

CapCut offers four useful hair-editing routes, and the right one depends on whether you're editing a photo or a video. For a photo, open AI design on CapCut Web or Desktop, upload a front-facing picture, type the cut and color you want, click Send and download the result. For video, use the Hair Color Change body effect in the phone app or an AI hair template. I'd start with AI design for a photo because it takes a written description of the cut, length and color through to an image download. Check the generation and download prompts for your account before committing to repeated variations.
Below I match each route to a goal, give the steps, show how to write a hair prompt that holds up, and explain what to do when the hair tool you saw in a tutorial isn't in your app.
Which CapCut hair tool fits your goal
| Your goal | Route | Where | Works on | My take |
|---|---|---|---|---|
| Try a new cut and color before a salon visit | AI design | CapCut Web, Desktop | Photos | Start here |
| Recolor hair in a few clicks | Retouch > Hair | Desktop | Photos on the timeline | Fast, but not offered in every region |
| Change only the hair area and compare versions | AI Replace | Desktop | Stills on the timeline | Best control over what changes |
| Hair color change inside a video | Body effect: Hair Color Change | Phone app | Video | Easiest for clips |
| TikTok-style before and after reveal | AI hair templates | Phone app, Template tab | Photos turned into video | Fastest for trends |
The table covers the tools that change hair inside CapCut itself. CapCut's own AI image generator sits behind the same AI design entry, so if you already make images there, the hair workflow will look familiar.
Route 1: AI design on a photo
This is the route behind CapCut's AI hairstyle changer page, and it's the one I'd use whenever the question is "how would this cut look on me?" The page lists three steps and calls the tool free, with high-quality downloads and no watermark.
- Sign in to CapCut Web and open AI design from the left-hand panel.
- Click Upload image and choose your photo from your device or from your CapCut Web space.
- Type the hairstyle you want, for example "short bob with bangs" or "medium straight style", and click Send.
- Compare the result with your original. Rewrite the prompt if the cut is right but the color is off, or the reverse.
- Click Download to save the image.
CapCut's AI hairstyle try-on guide gives the same route, uses the prompt "long pink hair with soft waves" as its example, and adds two details I find useful. AI design accepts a reference image alongside the prompt, and the result can be cleaned up afterwards with inpaint, remove, expand and upscale. If the new hair is cut off by the frame, AI expand gives it room, and the image upscaler sharpens a soft download.
The same guide lists one downside: AI design needs an active internet connection. On a PC or Mac, CapCut also documents AI design in the desktop app, as our photo editor guide explains, so you don't have to work in a browser if you already have CapCut for PC or CapCut for Mac installed.
Route 2: Retouch > Hair for quick color
CapCut's hair color guide puts the fastest recolor in Desktop's Retouch panel. Import the photo, select it on the timeline, then open Video > Basic > Retouch > Hair. You get eight preset colors that apply automatically, plus a Customize option where you type the shade you want.
There's a regional catch. CapCut's face retouching page says the Retouch feature is "not available now in the United States". If you are in the US and Retouch is missing from your Basic tab, that notice is relevant, and our Retouch guide covers what you can still do without it. In that case I'd skip straight to Route 1 or Route 3 rather than hunt through menus.
When the color is right, export the picture as an image instead of a one-frame video: CapCut's guide uses the three-line menu and Export still frames, with PNG or JPEG. Our guide to exporting a frame as an image covers still-image export in more detail.
Route 3: AI Replace when only the hair should change
AI Replace is the route I'd pick when AI design keeps changing more than you asked for. You mark the hair area yourself to guide the replacement. That selection is a target, not a guarantee that the face, clothes and background stay unchanged; compare the whole result with the original before applying it. CapCut's AI hairstyle walkthrough gives these steps for Desktop:
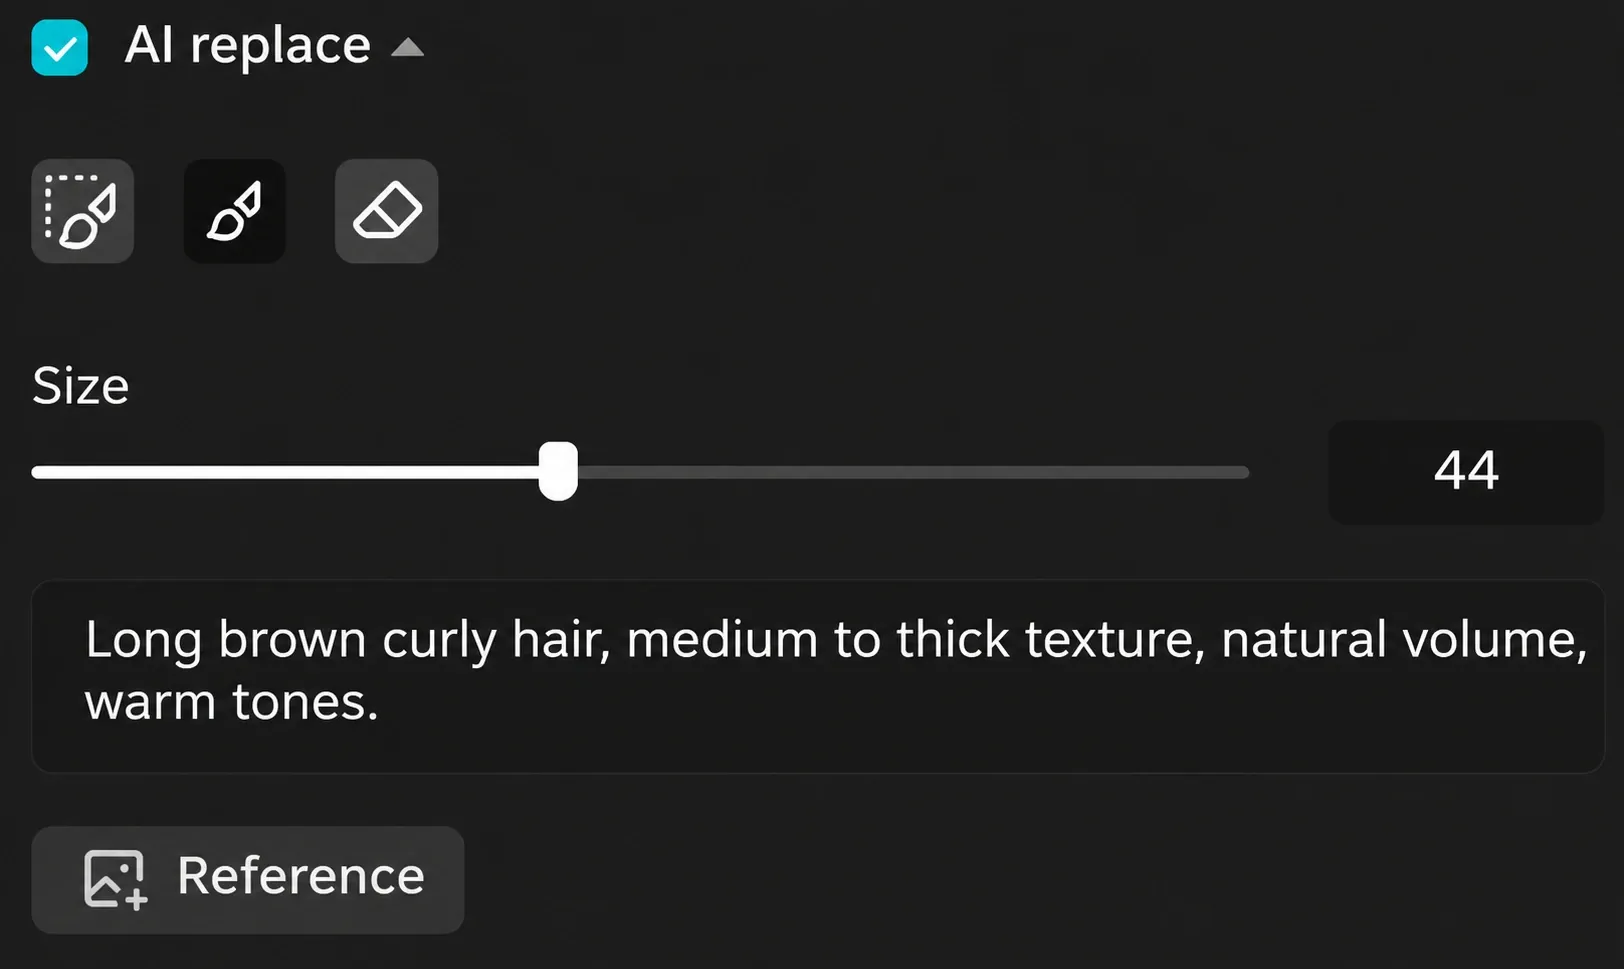
- Create a project, import the photo and drag it to the timeline.
- Select the photo, then open Video > Basic > AI replace.
- Brush over the hair you want to replace, including its ends, while keeping the selection off the face and clothes. Check the hairline closely in each result.
- Describe the new hair in the prompt box, or upload a photo of the hairstyle you want as a reference.
- Compare the four results with the original: check the face shape, eyes and expression, skin, clothes and background as well as the hair. Reject unwanted changes, then click Apply on the result you want.
- Use Export still frame to save a separate PNG or JPEG, and keep the original photo unchanged.
CapCut's guide to changing your hairstyle online uses the same four-result flow with the prompt "brown long hair". CapCut's AI hairstyle walkthrough also lists a limit the tool page doesn't: AI replace "has limited free uses". Our page on CapCut AI credits explains how CapCut meters its AI tools, so watch for a credit cost before you run it.
The change-hairstyle guide calls its Desktop route an "offline solution", while the try-on guide says AI design needs a connection. CapCut's connection help also covers trouble accessing AI features. I'd keep a connection available for either route and save the original photo locally.
Route 4: Hair color in a video
For a moving clip, I'd leave AI design and AI Replace aside: CapCut's own walkthroughs show both on still photos. Alphr's CapCut hair color tutorial gives the phone route: play your video, tap Effect, then Body Effect, choose Hair Color Change, move the time bar to where the change should start, and use Adjust to set the color and texture. Our guide to CapCut effects explains why body effects work best when the person is clearly visible.
If you want two colors, or the preset color looks flat, Doozy Town's free phone tutorial goes further on a photo: apply the hair tool, change the color, then use a mask and an overlay to give the hair two shades and feather the edge. For video, keep the two layers aligned and check the mask through the full clip, adjusting it if the head moves. Our masking tutorial and overlay guide cover those two steps in detail.
AI hair templates for TikTok
For the AI hair trend on TikTok, start with a template. CapCut's AI Hairstyle Change gallery shows the current set. Choose a template, tap Use template and pick the photos it asks for. Preview the video before exporting.
Alphr describes a second, more controlled version of the trend: edit the hair color of a photo first, then use the "Hair Color Change Filter" template with the original and the edited picture, and CapCut stitches them into a before and after. You can make that edited picture with Route 1, which keeps the whole trend inside CapCut. If you'd rather follow along on video, the indri irna template tutorial includes a CapCut template link in its description.
Templates come and go quickly. If one won't open or the button is gray, our templates troubleshooting guide covers the usual reasons, and the trending templates page explains how to find current ones. For posting the result, see CapCut for TikTok.
Free options and paid limits
The free claims come from three sources: CapCut's tool page (free, no watermark), Photo AI Studio's roundup of hairstyle apps, which calls the tool free and notes that advanced video editing may need Pro, and Doozy Town's phone method. The limits come from CapCut itself: AI replace has limited free uses and Retouch isn't offered in the US. Video Nerd's prompt tutorial files prompt-based hair customization under CapCut Pro, so if a hair tool asks you to upgrade, the Pro features guide and free vs Pro comparison show what you'd be paying for.
My verdict: start with AI design for a photo, use AI Replace when marking the target hair area helps, and choose effects or templates for video. Compare the whole result with the original before keeping it.
The photo that gets the best result
CapCut's tool page is specific about the input: a clear, front-facing photo with good lighting, and no blurry or angled shots or strong backlighting. CapCut's hairstyle tool FAQ adds a visible hairline, an uncovered face and minimal background clutter. In practice that means:
- Pull hair back from the forehead, or at least keep the hairline visible.
- Take off a hat or headband and push glasses up, since the AI has to guess what's under them.
- Stand facing a window, not with your back to it.
- Use a plain wall behind you so the new hair has a clean edge to sit against.
How to write a hair prompt that works
CapCut's examples are short: "short bob with bangs", "long wavy red hair". Short prompts work, but they leave the AI to fill in the rest, and that's where results drift. I'd write the prompt in a fixed order, adding one detail at a time:
| Part | Examples |
|---|---|
| Length | chin length, shoulder length, mid-back |
| Cut | bob, lob, pixie, layered, wolf cut, fade, buzz cut |
| Texture | straight, soft waves, loose curls, tight coils |
| Color | copper, ash blonde, dark brown, pastel pink ends |
| Bangs or part | curtain bangs, blunt bangs, side part, middle part |
A full prompt then reads "shoulder-length bob, soft waves, copper, curtain bangs". If the result is close, change one part per run so you can see what each word does. CapCut's tool FAQ suggests the same use: comparing bang length, layer shape, part direction and color before you settle on a reference for your stylist.
Before you save, zoom in to 100 percent and check four places: the hairline, the ears, any glasses, and the edge against the background. I check those first because that's where the new hair has to meet something the AI was told to keep.
Privacy and other people's photos
CapCut's tool page says uploaded images are processed and stored in encrypted cloud space. That's reassuring for your own selfie, but I'd still only upload photos of other people with their permission, since the image leaves your device. Our guide to whether CapCut is safe covers AI and cloud features in more depth, and the account login guide helps you confirm you're signed in to the right account before you upload.
When the hair tool isn't there
- No Retouch in the Basic tab: check the US notice above, then use AI design or AI Replace.
- No AI replace: select the photo on the timeline first, then open Video > Basic.
- AI design asks you to sign in: it's an online tool, so you need an account and a connection.
- The button moved after an update: our after-update guide helps you tell a moved control from a missing or gated feature.
- Colors look wrong across a whole video: fix the footage first with color correction, then apply the hair effect.
CapCut AI hair: questions
Is CapCut's AI hairstyle changer free?
CapCut's tool page calls the AI design route free, with downloads and no watermark. AI Replace is different: CapCut's own walkthrough says it has limited free uses, so watch for a credit cost before you run it.
Why can't I find Retouch > Hair in CapCut?
CapCut says its Retouch feature isn't available in the United States. If you're elsewhere, select the clip on the timeline first, then look under Video > Basic. Without Retouch, use AI design or AI Replace instead.
Can CapCut change hair color in a video?
Yes. In the phone app, use Effect > Body Effect > Hair Color Change and set the color with Adjust. CapCut's AI design and AI Replace walkthroughs work on still photos, so use them for pictures, thumbnails and template inputs.
How do I do the AI hair trend on TikTok?
Open CapCut's AI Hairstyle Change gallery and choose a template, or recolor a photo with AI design first and use the Hair Color Change Filter template with the before and after pictures.
Can I use a photo of a haircut I like as a reference?
Yes. CapCut says AI Replace accepts a hairstyle reference image as well as a text prompt, and AI design also takes a reference image. I'd pick a reference shot from the same angle as your own photo, so the AI isn't left to guess how the cut looks from the front.
Does CapCut keep the photos I upload?
CapCut's tool page says uploads are processed and stored in encrypted cloud space. Upload only your own photos or ones you have permission to use, and keep your original saved locally.