

To add an overlay in CapCut Mobile, tap Overlay, choose Add overlay, and select the photo or video. On Desktop, import the second visual and place it on a timeline track above the base clip. On Web, upload the second visual and use Add overlay or place it on a higher layer. Select the new layer before resizing, cropping, positioning or trimming it.
An overlay is a separate visual layer with its own timing. Picture-in-picture is one overlay layout: a smaller image or video remains visible over the main shot. A background is the lower visual behind the subject. A full-frame upper clip can cover the base entirely, while a texture may combine with the base through opacity or a blend mode.
Reviewed against current public CapCut documentation on September 16, 2026. This is a documentation-based walkthrough, not a hands-on test of every app build or account. Control names and placement can vary by platform, version and region.
Choose the Overlay for the Job
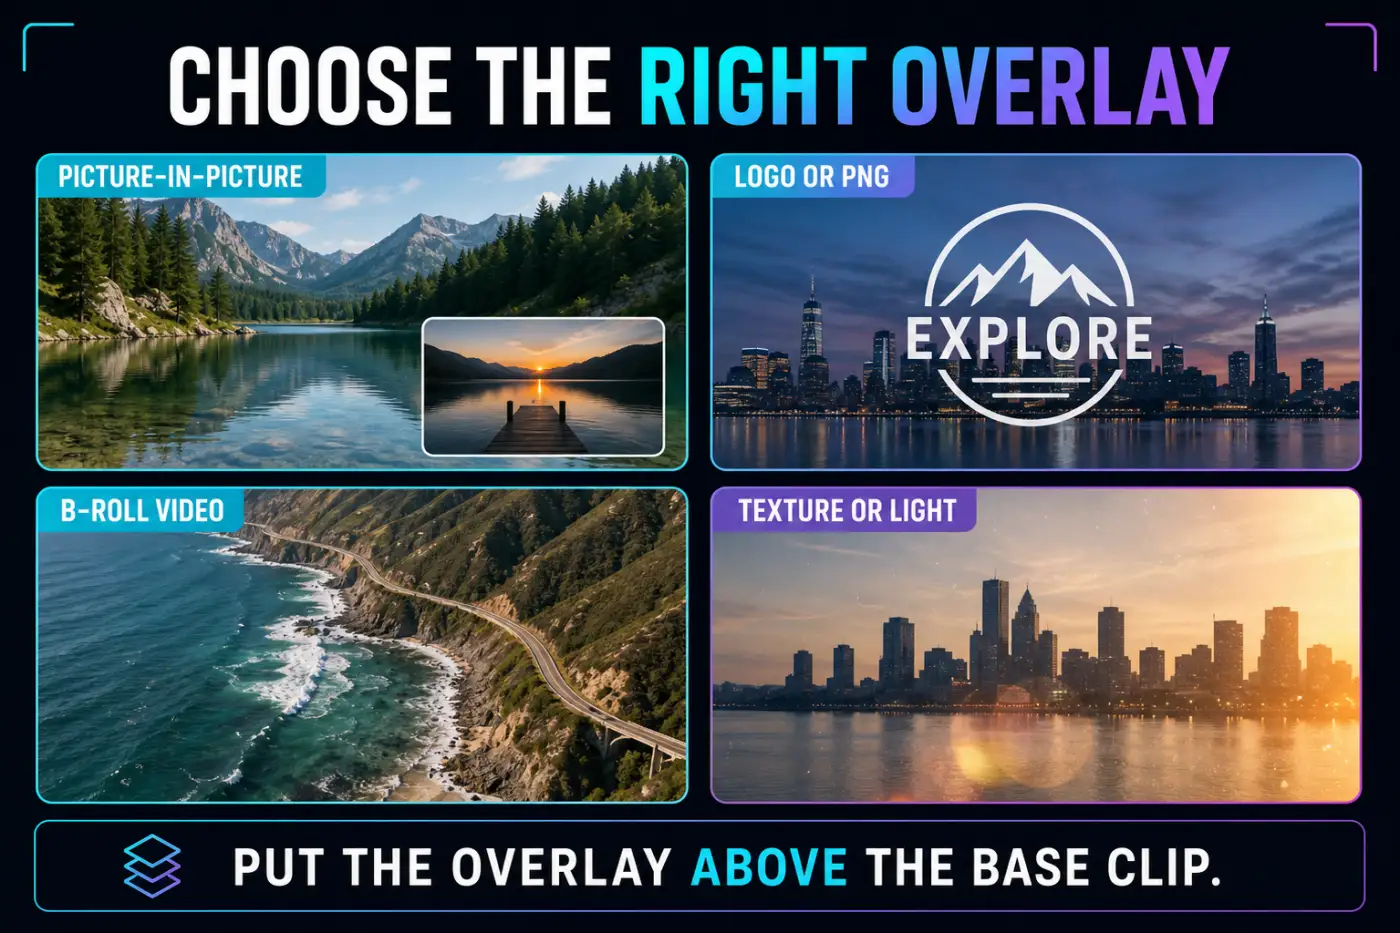
- Picture-in-picture: keep the base visible while a smaller second video or image appears over it.
- Logo or graphic: use a file with real transparency when you need clean edges without a box.
- B-roll: let an upper clip cover the base picture for part of the edit while the intended base audio can continue.
- Texture or light: fill the frame with an upper asset, then use a suitable blend mode or opacity only if the source requires it.
- Green-screen element: place the keyed clip above the replacement background, then remove the selected color.
Set the target section before importing. Put the playhead near the frame where the overlay should begin, and identify the base clip it should cover. Adding the media to the wrong part of the timeline is a timing error, not an opacity problem.
How to Add an Overlay in CapCut Mobile
- Open the intended project and move the playhead near the first frame where the overlay should appear.
- Tap Overlay in the project toolbar, then choose Add overlay.
- Select the photo or video in the media picker and add it to the project.
- Select the new overlay clip. Pinch or drag its canvas handles to resize it, then move it into position.
- Drag the overlay clip along the timeline to align its start with the target section. Drag either edge to set its duration.
- If it is a video, decide whether its audio belongs in the mix. Adjust that clip's volume separately from its visual layer.
- Play the complete overlay interval, including its entrance and exit, before adding masks, keyframes or effects.
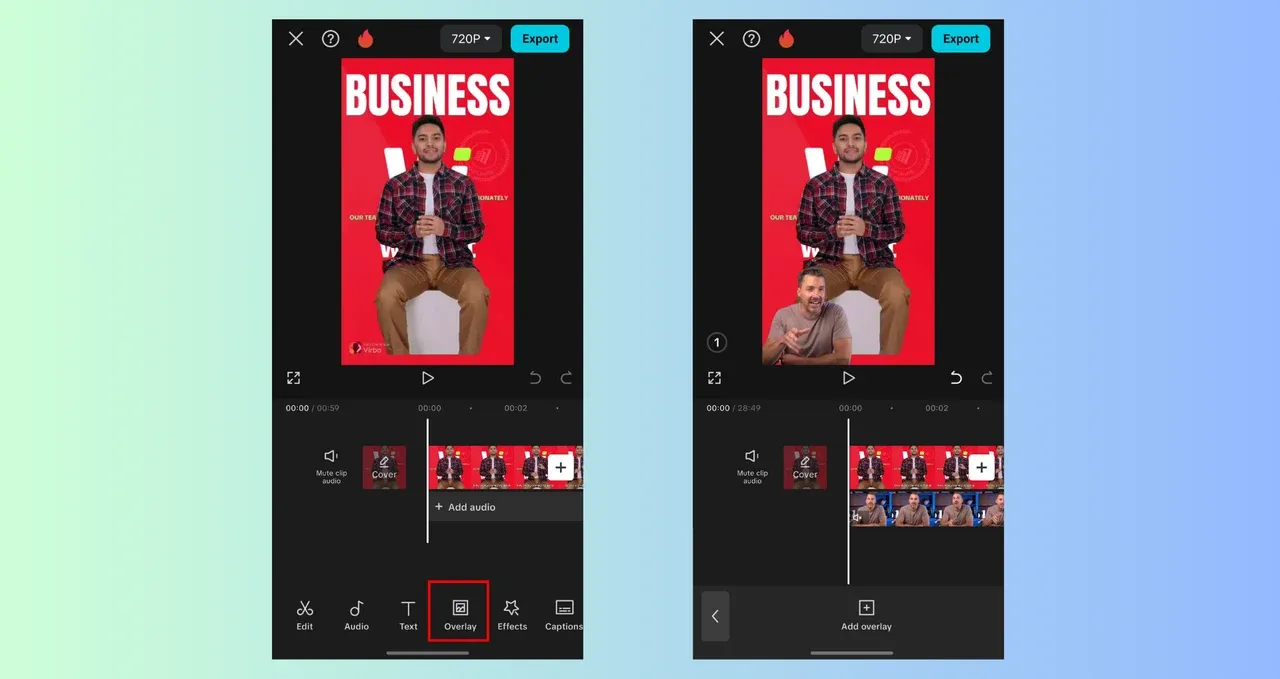
CapCut's current overlay guide documents this Mobile route and the pinch-to-resize and drag-to-position actions. If Overlay is absent, tap an empty area to leave a selected base clip's controls, then inspect the project toolbar again. Do not assume the same toolbar order on every phone.
How to Add an Overlay in CapCut Desktop
- Import the base video and the second photo or video.
- Put the base on the main timeline track.
- Drag the second visual to a separate track above the base clip.
- Select the upper clip and resize or position it in the preview or the available transform controls.
- Move the clip to the target time and trim its edges to the intended interval.
- Crop, mask, change opacity or choose a blend mode only when that treatment solves a visible composition problem.
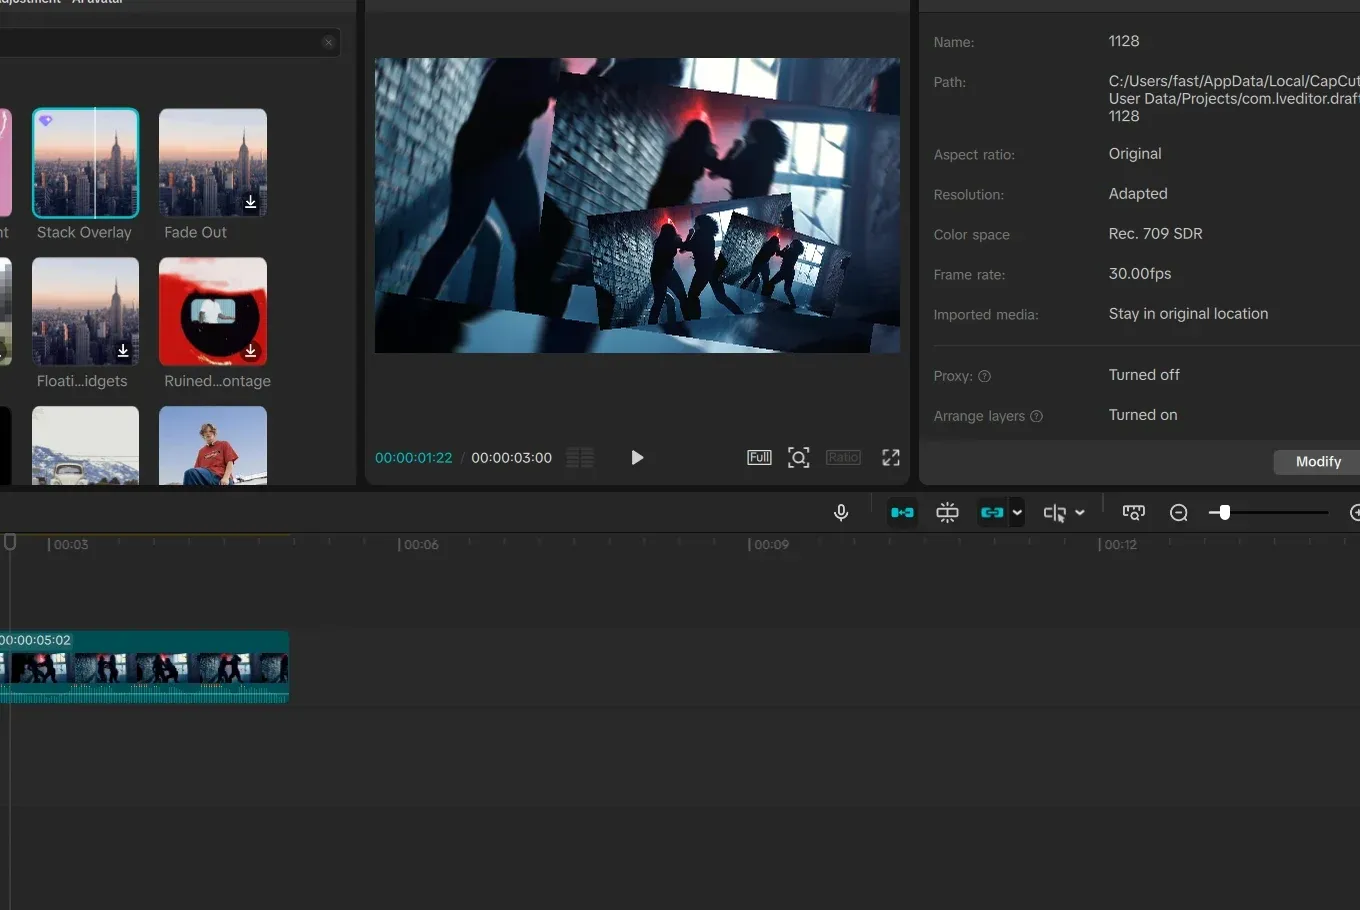
Desktop uses track order for ordinary media overlays. CapCut's current multi-platform overlay resource instructs users to put the second video or image on an upper track. This is different from searching the Effects library for an effect whose name contains “overlay.”
How to Add an Overlay in CapCut Web
- Open the intended Web project and upload the base and overlay files.
- Put the base video on the timeline and wait for required uploads to finish.
- Use Add overlay above the canvas where it appears, or use the current context-menu/layer route to place the second visual above the base.
- Select the added visual on the canvas, then resize and position it.
- Move and trim its timeline clip to match the target section.
- Confirm the project has saved before refreshing or closing the tab.
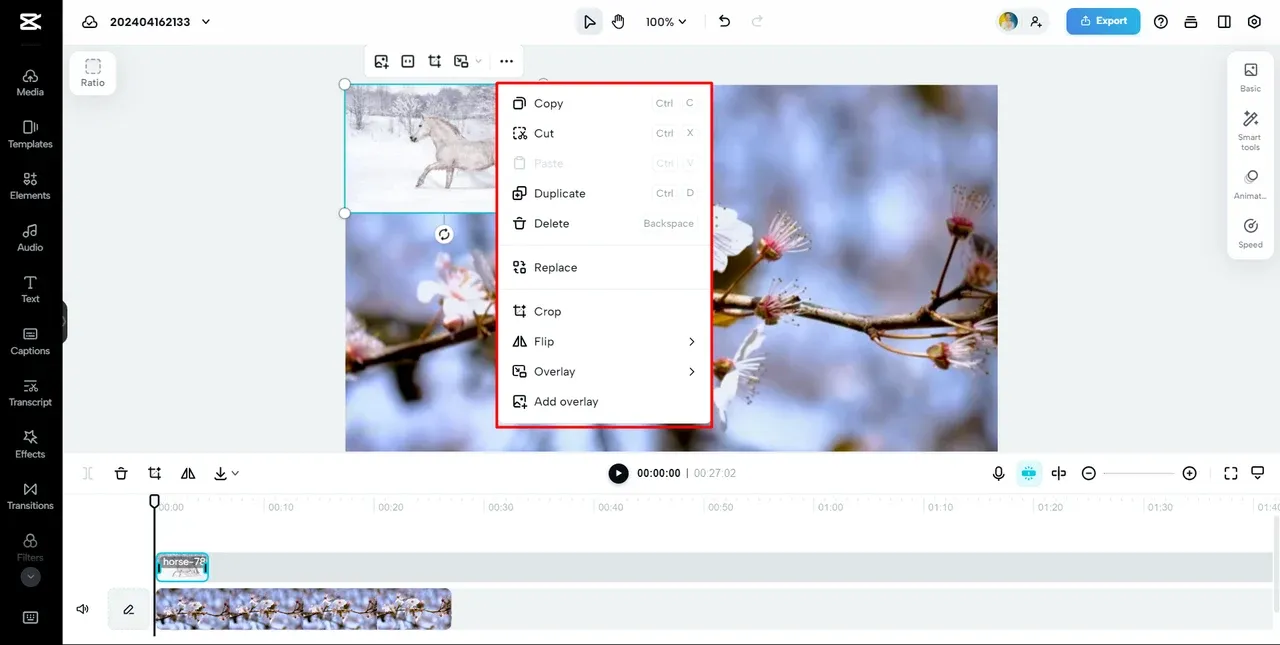
CapCut's picture-on-video guide also documents the Web Add overlay route, canvas handles and timeline duration. Web depends on uploaded media and account state. Keep the original files outside CapCut, and review the Web editor guide before clearing browser data or rebuilding the project.
Make a Picture-in-Picture Layout
Put the smaller clip above the base, crop away unused outer areas, and then scale it. Cropping first keeps the subject larger inside the inset. Move the box away from faces, captions, diagrams and the destination platform's controls. There is no universal best corner.
Picture-in-picture is not a separate kind of source media. It is an overlay resized so viewers can see both layers. A background sits below the subject. If an upper clip fills the canvas at full opacity, it becomes a cover or cutaway even though it is still technically layered above the base.
If the overlay video has sound, select that clip and decide whether to mute it, lower it or mix it with the base audio. Moving a visual off-canvas does not mute its audio. Check the final file with sound on.
Add a Logo or Transparent Graphic
Place the image above the base and extend its timeline edge only across the section that needs it. A transparent PNG is the safest common fallback for a logo when an imported file shows an unwanted rectangle. PNG can store an alpha channel; JPEG cannot. WebP can store alpha, but that does not guarantee that every CapCut build will import every WebP correctly.
If a black or white box remains, inspect the source asset first. Those pixels may be part of the file rather than an editor error. Use a properly licensed transparent original before applying automatic background removal to fine text or thin marks.
Use Opacity, Blend Modes and Masks
Opacity changes the strength of the entire upper layer. Blend mode changes how its tones combine with the layer below. Mask limits which part of the upper layer remains visible. Crop removes outer source areas. These controls are related, but they are not substitutes.
For a light effect supplied on a black background, Screen can be a sensible starting point because it preserves lighter pixels while suppressing dark ones. That is an example, not a rule for every asset. Return to Normal if a mode makes the image confusing, then compare modes on the actual shot and adjust opacity afterward.
The masking tutorial covers shaped and feathered reveals. For green footage, use the current Chroma Key controls and adjust the sampled color and edge settings gradually. Do not stack crop, background removal, chroma key and a mask unless each tool has a distinct job.
Move an Overlay With Keyframes
Select the overlay, put the playhead at the first state, and add a keyframe for a supported property such as position, scale or opacity. Move later in time and change that property to create another state. CapCut interpolates between those points.
CapCut's Desktop keyframe help confirms that the relevant clip must be selected and that some template or grouped elements may not expose the same controls. Use the keyframe walkthrough for the full sequence. Watch the motion through the whole interval so the overlay does not expose a cropped edge or cross a caption.
Check Rights Before Using Overlay Assets
Use footage, logos, graphics and texture files that you created or are licensed to use. Access inside CapCut is not a blanket commercial license. Under CapCut's current Materials License Agreement, commercial permission varies by asset, and eligible materials carry a commercial-use mark. Mixing a non-commercial platform material into an export restricts that content to personal and non-commercial use under that agreement.
For an outside stock asset, keep the source URL, license version and download record. For a client logo, obtain the approved file rather than copying a low-resolution image from a web page.
Why a CapCut Overlay Is Not Showing
Make a project copy before destructive diagnosis. Then change one condition at a time and undo that change if it does not identify the cause.
- Timing: put the playhead inside the overlay clip and confirm that the clip overlaps the intended base section.
- Layer order: on Desktop or Web, confirm that the overlay is on a visible higher layer. On Mobile, select the intended overlay and inspect the available arrangement controls.
- Visibility and opacity: check the selected clip's visible state and make sure opacity is above zero.
- Canvas position: inspect scale and position. If you test a reset, record or copy the intended values first.
- Crop, mask and blend: disable one treatment at a time on the project copy. Do not reset all composition work at once.
- Media and render: save the project, then re-import only the problem asset or restart the editor before considering broader changes.
CapCut's visibility guidance separates layer order, playhead timing, visibility, opacity, media compatibility and temporary rendering problems. If preview and output disagree, use CapCut's preview-mismatch guidance and export a short diagnostic section. Do not clear app data, offload, reinstall or rebuild the project until you have a verified restorable copy.
Check the Export and the Preview
First export a short section containing the overlay entrance, its busiest frame and its exit. This diagnostic can reveal a preview-only problem. It does not prove the rest of the video is clean.
After the full export finishes, watch and listen to the complete file outside CapCut. Look for one-frame flashes, missing layers, exposed crop edges, overlays that leave the canvas, unreadable picture-in-picture details and unintended upper-clip audio. Keep the editable project and source assets because the flattened file cannot restore masks, timing or keyframes. The selected-section export guide covers the diagnostic range, and the export settings guide covers the final render.
CapCut Overlay FAQ
How do I add an overlay in CapCut Mobile?
Open the project, tap Overlay, choose Add overlay, select a photo or video and add it. Select the new overlay to resize and position it, then move and trim its timeline clip to match the target section.
How do I add an overlay in CapCut on PC?
Import the second photo or video and drag it to a timeline track above the base clip. Select the upper clip to set its size, position, crop and timing. Use opacity, a mask or a blend mode only when the composition needs it.
How do I add an overlay in CapCut Web?
Upload the base and second visual, put the base on the timeline, then use Add overlay or the current layer route to place the second visual above it. Select the overlay on the canvas and trim its timeline interval.
Is picture-in-picture the same as an overlay?
Picture-in-picture is one overlay layout. The upper video is scaled into a smaller window so the base remains visible. Other overlays can be full-frame B-roll, logos, textures or green-screen elements.
How do I crop an overlay without changing the canvas?
Select the overlay clip and crop that source layer, then resize and position it. Crop changes the visible area of the selected media; the project canvas or aspect ratio remains a separate setting.
How do I mute an overlay video?
Select the overlay video and reduce that clip's volume to zero or use its available mute control. Moving the picture off-canvas or hiding the visual does not reliably remove its audio from the mix.
How do I make an overlay transparent?
Reduce the selected overlay's opacity when the whole layer should become lighter. For a logo with no rectangular background, start with a transparent PNG or another verified alpha-capable file rather than expecting opacity to remove the box.
Why is my CapCut overlay not showing?
On a project copy, check the playhead and overlay duration, layer order, visibility, opacity, scale and position. Then disable crop, mask or blend settings one at a time. Preserve the intended composition values instead of resetting everything together.
Can I use any CapCut overlay asset commercially?
No. Commercial permission depends on the asset and its license. CapCut's Materials License Agreement identifies eligible platform materials with a commercial-use mark. For outside assets, verify and retain the source license.
Once the full exported file passes the visual and audio checks, return to the CapCut Tutorials hub or continue with the masking lesson when the upper layer needs a shaped edge.