


To mask a video in CapCut, stack two visuals, select the upper clip, open Mask and choose a shape. Adjust the mask's size, position, rotation, feather and Invert setting until the lower layer shows through in the right area.
The mask belongs to the selected layer; it doesn't cut the whole project. If you animate it, use a mask keyframe or tracking control only when that control appears in your current workspace. Basic Position or Scale keyframes move the clip instead.
Fact-checked August 27, 2026 against current CapCut masking, Mobile blur, Desktop keyframe and Web tool guidance. Shape names, tracking, keyframe controls and plan access can differ by platform, account and build.
What a CapCut Mask Does
A mask divides one selected layer into visible and hidden areas. Where the upper layer is hidden, the layer below becomes visible. That is why most mask composites start with at least two aligned layers.
- Linear or split masks reveal one side of a layer and work for comparisons, wipes and split screens.
- Circle or rectangle masks create picture-in-picture, spotlights and shaped reveals.
- Mirror or filmstrip-style masks can create repeated or banded compositions when available.
- Invert swaps which side of the mask is visible.
- Feather softens the boundary between visible and hidden areas.
Mask inventories and names can change by platform. CapCut's mask-video material confirms the core controls: shape, feather, size, position, rotation and inversion. Those concepts matter more than memorizing one toolbar order.
Prepare the Two Layers Before Masking
- Put the background or base shot on the lower track.
- Place the shot you want to mask on a track above it.
- Align the two clips in time and trim them to the needed range.
- Scale and position the upper clip before fine mask work if its subject is far from the final framing.
- Save a project copy before building a complex moving mask.
Our guide to adding overlays in CapCut explains track order and picture-in-picture. Masking starts after that upper layer exists. Use the guide to cutting, trimming and splitting clips if the two layers don't cover the same time range.
How to Mask Video in CapCut Mobile
- Open the project and add the second photo or video through Overlay → Add overlay.
- Tap the upper overlay clip on its timeline row.
- Scroll the clip tools and open Mask.
- Choose a shape that matches the boundary you need.
- Move, resize and rotate the mask in the preview.
- Adjust Feather only enough to remove a distracting hard edge.
- Use Invert when the correct area is hidden instead of shown.
- Play the full masked section before adding keyframes.
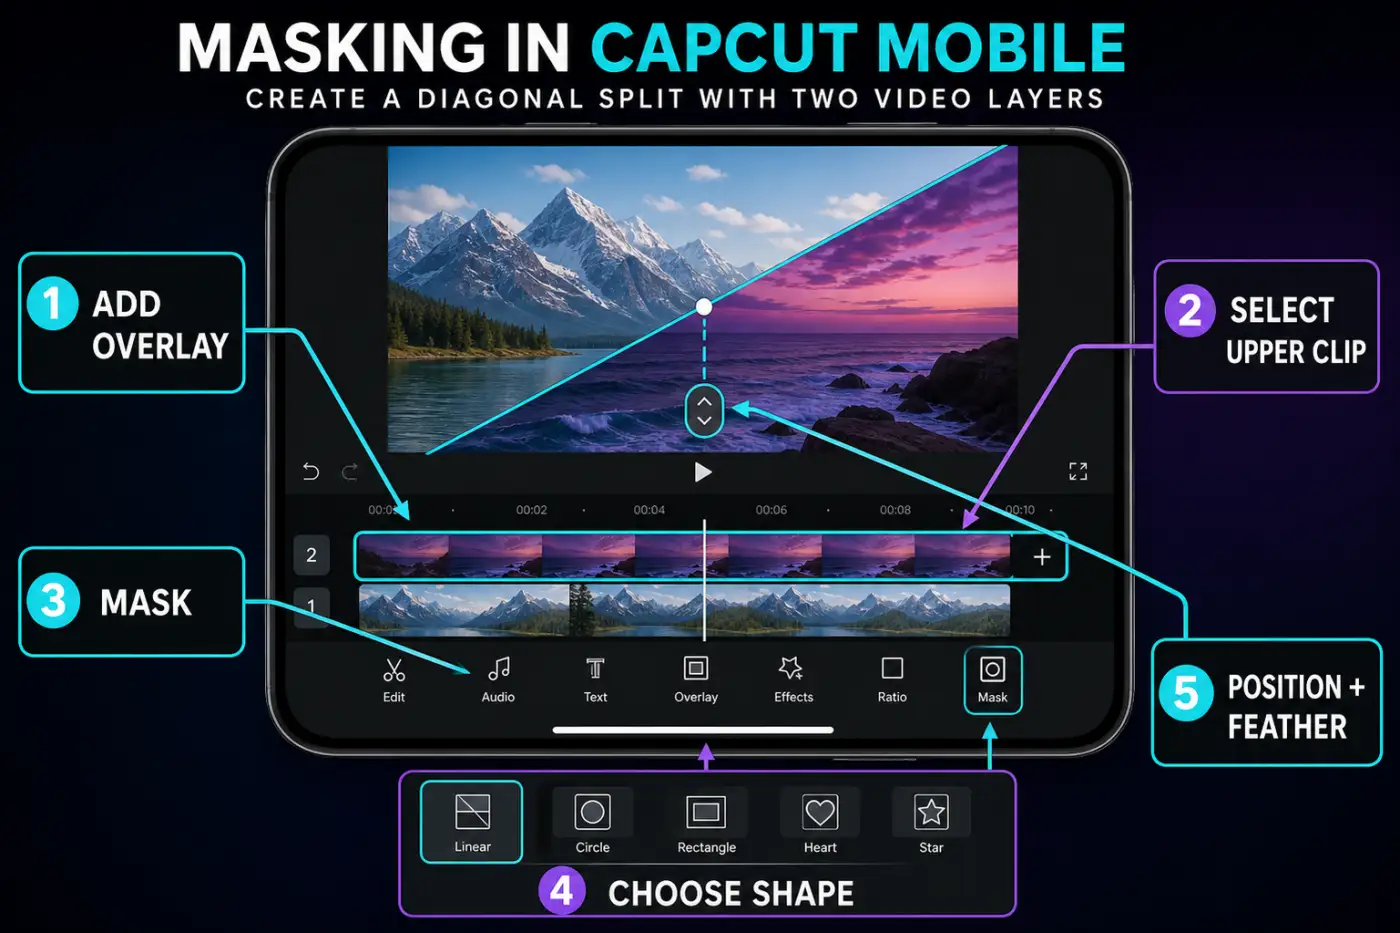
CapCut's current Mobile blur workflow selects the second video before swiping through the clip toolbar to Mask. A current masking-panel discussion shows how easily platform and selection state get mixed up. Use it as a warning signal, not permanent menu documentation: select the clip that should own the mask first.
How to Mask Video in CapCut Desktop
- Import both visuals and place the clip to be masked on a timeline track above the base.
- Select the upper timeline clip. Don't select its media-bin thumbnail or the base track.
- Open the clip's Video controls and choose Mask.
- Select Circle, Linear, Rectangle or another available shape.
- Adjust the mask in the preview or with position, size, rotation and feather fields.
- Toggle Invert if you need the outside instead of the inside.
- Scrub the full range to confirm both clips remain aligned.
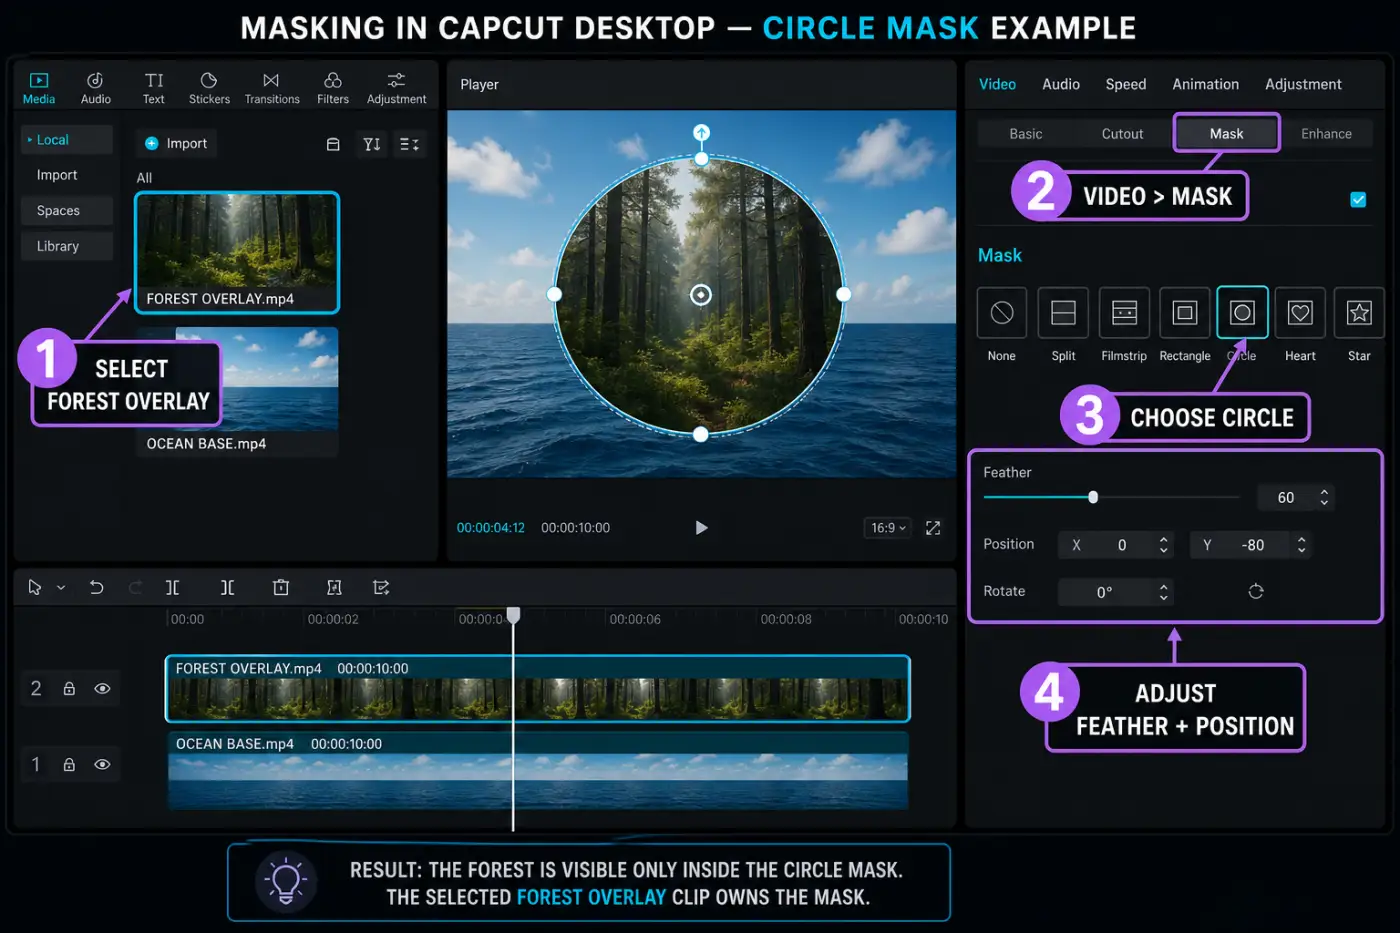
CapCut's overlay-video guide describes selecting a timeline clip and opening Mask. If the panel is absent, reselect the visual track and check the Video controls. CapCut's keyframe help for PC makes the same broader point: property controls don't appear when nothing relevant is selected.
Mask Video in CapCut Web
Upload both visuals, place the masked clip above the base and select the upper layer. In CapCut's current online instructions, open Basic → Mask, choose a shape, then adjust it in the canvas. The official online-mask page lists feather, size, position, rotation and inversion controls.
CapCut's Web masking page advertises the tool as free, while a current account report shows a paid Mask state. That conflict doesn't prove one universal plan rule. Trust the badge and export gate in the signed-in account that will finish the project. Save before refreshing, wait for cloud media to finish, and use the CapCut Web Editor guide when uploads or preview rendering fail.
Size, Position, Rotation, Feather and Invert
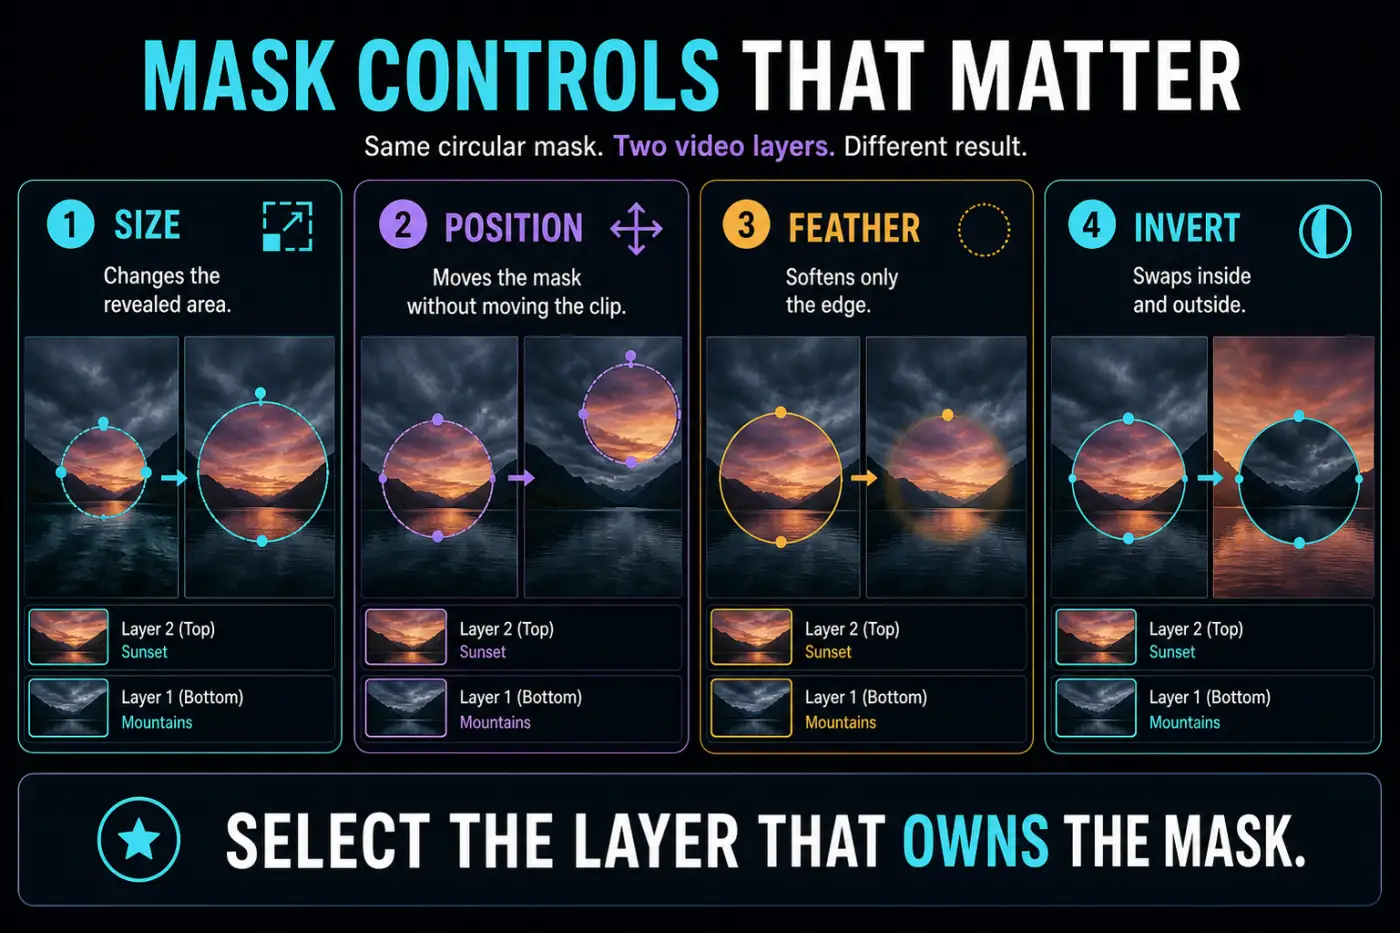
Size changes the revealed area
Make the mask large enough to include the intended subject, then inspect the opposite side for unwanted background. A larger mask is not a softer mask.
Position moves the mask, not the source clip
Drag the mask's center or use its position controls. If the entire image moves, you're editing the clip transform instead. Undo, reopen Mask and reselect the mask control.
Rotation changes the boundary direction
A Linear mask can become a vertical, horizontal or diagonal split. Match the rotation to a real line in the shot, such as a wall edge, horizon, doorway or object boundary. The seam will attract less attention there.
Feather softens only the edge
Use a hard or nearly hard edge for a deliberate split screen. Use moderate feather for light, blur or exposure blends. Excessive feather creates a foggy band and can expose details you meant to hide.
Invert swaps inside and outside
Invert is not a new mask shape. It reverses the visible side. CapCut's current face-blur workflow uses a circular mask and Invert as part of isolating the intended region.
Build a Split Screen With a Linear Mask
- Stack the two shots and align the action in time.
- Select the upper shot and apply a Linear or Split mask.
- Rotate and position the boundary to divide the frame.
- Reposition the upper clip inside its half without moving the mask by mistake.
- Adjust the lower clip so both subjects have room.
- Choose a hard boundary or a small feather based on the design.
CapCut's side-by-side guide covers multi-frame layouts. For a comparison, keep scale, eye line and color reasonably balanced. A diagonal split adds energy, but it should not cut through a face, product label or caption.
Create a Circle Reveal or Spotlight
Place the detail shot above the wide shot and add a Circle mask to the upper layer. Resize it around the detail, feather the edge lightly and position it where it doesn't cover essential content. A border graphic can separate the inset, but it should be another deliberate overlay rather than a random effect.
For a spotlight, duplicate the same shot on two tracks, adjust the upper copy, and mask the changed version to the important area. That can brighten, sharpen or color a region while the rest remains stable. If the goal is privacy, use the tested workflows in the CapCut face-blur guide or partial-blur guide; a soft spotlight is not a reliable privacy mask.
Clone Yourself or Build a Mask Reveal
Clone-yourself shot
Lock the camera before recording. Keep focus, exposure and lighting stable, then perform one action on one side of the frame and a second action on the other without crossing the planned boundary. Record enough empty time before and after both takes.
Place one take on the base track and align the second take above it. Apply a Linear mask to the upper clip and position the boundary in an area that stays visually quiet. A wall, doorway or open floor is easier to hide than moving leaves, reflections or shifting shadows. Use little or no feather when the two recordings match cleanly; increase it only enough to hide a seam.
Play the full overlap and watch hands, clothing, shadows and props near the boundary. If either performance crosses it, keyframe the mask around that moment or choose a different take. Mute one duplicate audio track unless both recordings are intentionally part of the sound design.
Animated mask reveal
For a wipe-style reveal, put the incoming shot above the outgoing shot and give the upper clip a Linear mask. At the first frame, position the visible area outside the canvas or at the starting edge and add a mask keyframe. Move later, drag the mask across the frame and create the end keyframe.
Match the reveal direction to movement in the shot. A passing object, camera pan or person crossing frame can hide the boundary. Feather enough to prevent a brittle digital edge, but not so much that both scenes become muddy. A mask reveal is built inside one upper clip; a standard transition joins adjacent clips. The CapCut transitions guide explains when the simpler adjacent-clip method is the better choice.
Animate a CapCut Mask With Keyframes
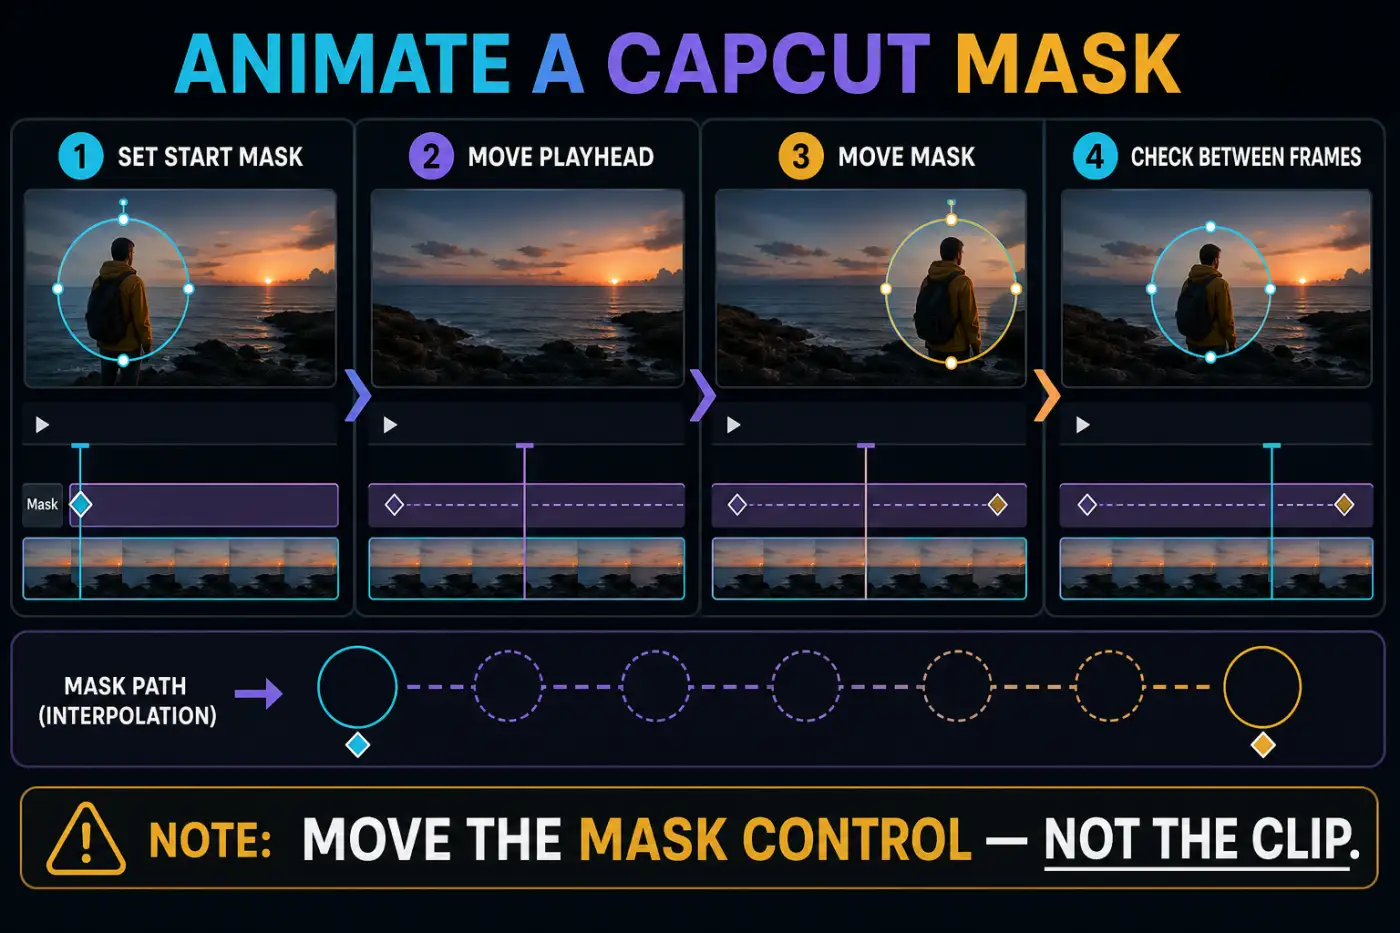
- Select the clip that owns the mask and reopen its Mask controls.
- Place the playhead at the first frame. If the Mask panel exposes a keyframe diamond, add the starting mask keyframe.
- Move the playhead forward.
- Move, resize or rotate the mask itself. Add or confirm the next mask keyframe only in that same Mask control.
- Play the frames between the points and add corrections when the subject changes direction.
The general CapCut keyframe guide explains interpolation and playhead order. A moving subject rarely follows one straight path, so inspect the frames between points and add only the corrections the shot needs.
CapCut's masking guidance separates two cases: use tracking when the editor provides it; otherwise update the mask with keyframes as the subject moves. Don't assume a tracking button shown in another platform exists in yours. A current snap-back report is a reason to verify each point and keep a project copy, not proof that every moving mask is broken.
Mask vs Crop, Chroma Key and Background Removal
- Mask: hides or shows an area using a controllable shape.
- Crop: removes outer frame area and usually keeps a simple rectangular boundary.
- Chroma key: removes pixels around a selected color, such as a green background.
- Background removal: attempts to separate a subject from its background.
- Opacity: changes transparency across the whole selected layer.
Use the green-screen tutorial for a clean chroma background and the background-removal guide when the subject needs an irregular outline. A preset circle mask can't follow hair or fingers just because its feather is high.
Why a CapCut Mask Is Not Working
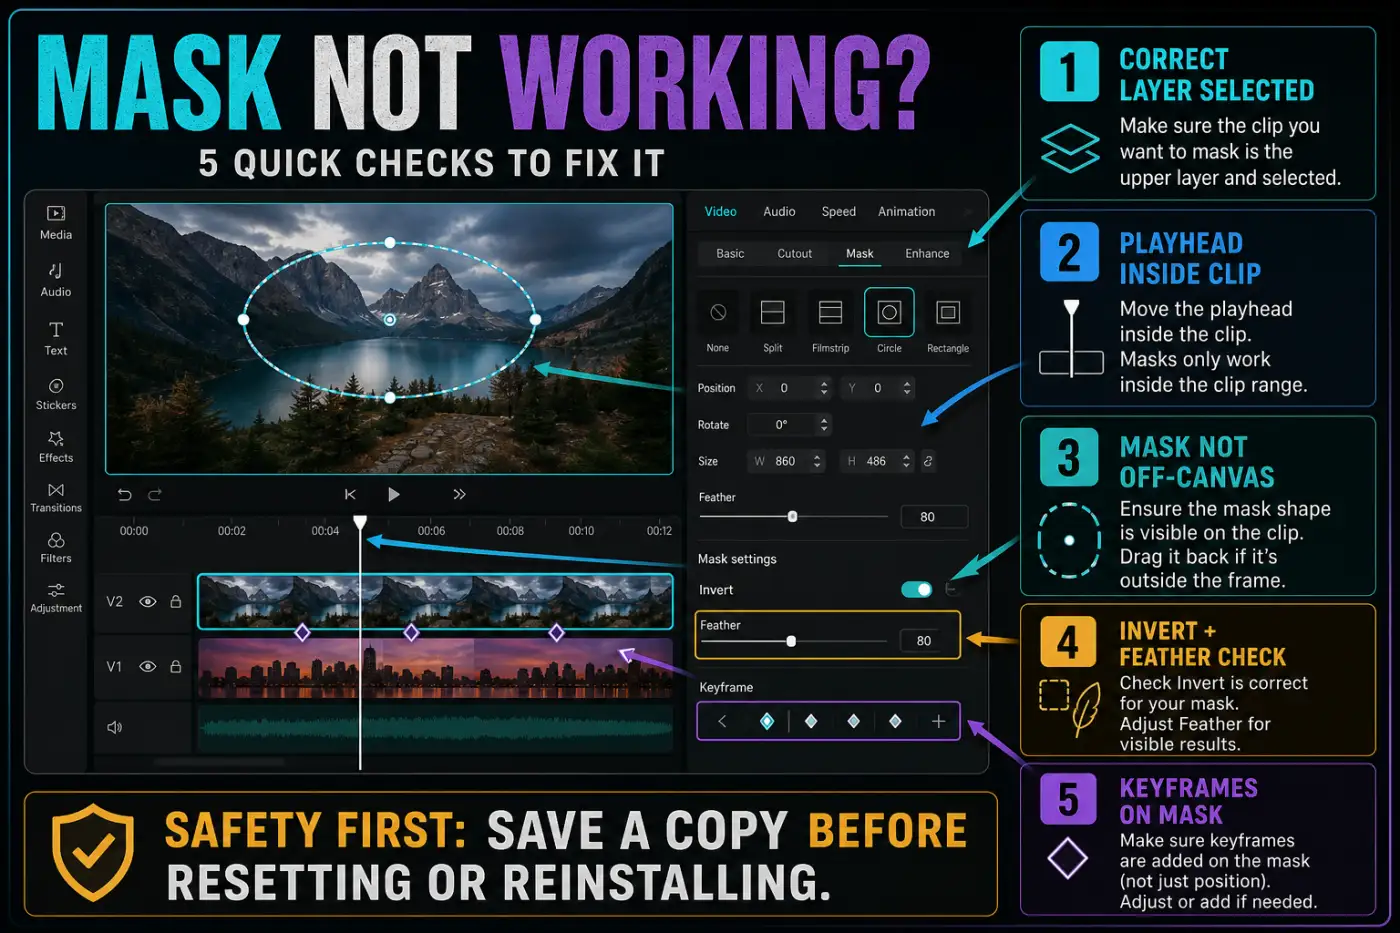
- Selection: select the layer that should be hidden or revealed.
- Timing: put the playhead inside that clip and inside the section where it overlaps the base.
- Position: reset or recenter a mask dragged beyond the canvas.
- Visibility: check layer order, opacity and track visibility.
- Invert and feather: return to a hard, non-inverted mask to diagnose the boundary.
- Keyframes: confirm the diamonds belong to Mask rather than Basic position, scale or opacity.
- State: save a copy, restart or refresh, and export a short test before reinstalling.
A January 2026 masking thread describes the familiar failure: the mask moves when the editor meant to move the clip. The fix starts with identifying which control is active. Undo first; random additional keyframes make the timeline harder to recover.
Inspect Every Masked Edge Before Export
View the composite at full frame and at phone size. Scrub slowly through entrances, direction changes and the end. Look for exposed corners, a subject leaving the mask, a feathered halo, one-frame flashes and captions crossing the boundary.
Export a short masked section and play it outside CapCut. If it matches, render the full project with the CapCut export settings for the destination. Keep the editable project because a flattened export can't restore the two layers or their mask keyframes.
CapCut Masking FAQ
How do I use a mask in CapCut Mobile?
Add the second visual as an overlay, select that upper clip, open Mask, choose a shape, and adjust its position, size, rotation and feather. The mask affects the selected layer, not every layer in the project.
Where is Mask in CapCut on PC?
Select the visual clip you want to mask, then open its Video controls and find Mask. If no clip is selected, clip-specific mask and keyframe controls may not appear.
What does Invert do on a CapCut mask?
Invert swaps the visible and hidden sides of the mask. A circle that normally shows the inside will show the outside after inversion, revealing the layer beneath through the center.
How do I feather a mask in CapCut?
Select the masked clip and increase Feather until the edge blends naturally. Feather softens the boundary; it doesn't move the mask or repair a badly aligned subject.
Can I animate a mask in CapCut?
Yes, when your current Mask controls expose keyframes. Add a starting mask keyframe, move the playhead, move or resize the mask, then add or confirm the next point in the same Mask control. If tracking is available, test it on a short section before choosing it over manual corrections.
Why does my mask move the video instead?
The transform box for the clip and the mask control can overlap. Re-select the clip, reopen Mask, and drag the mask's own center or edge handles. Confirm the active keyframe belongs to Mask rather than Basic position or scale.
Is a CapCut mask the same as background removal?
No. A mask hides or reveals an area defined by a shape. Background removal tries to isolate a subject, while chroma key removes a selected color. Use the tool that matches the edge you need.
Once the masked edge survives a short export, return to the CapCut tutorial path. Use the transitions lesson next when the edit needs a cut between adjacent clips rather than a reveal inside one upper layer.