

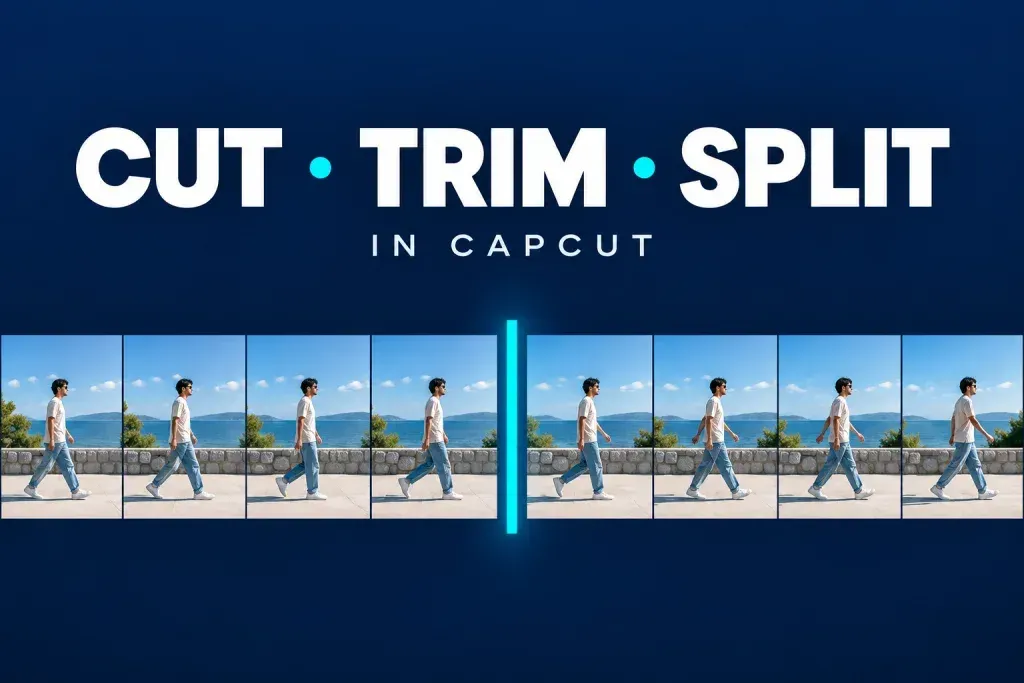
To cut a CapCut clip, select it on the timeline, place the playhead where you want the cut and choose Split. To remove a mistake from the middle, make two cuts around it, select the isolated section and delete it. You should be left with the two parts you want to keep.
Use trim when the unwanted footage is already at the beginning or end: drag that clip edge inward. Use Split for a cut inside the clip. Crop changes the framing; it doesn't shorten the clip.
Reviewed against public CapCut documentation on September 15, 2026. This is an editorial walkthrough, not a new hands-on test of every app version. Menus, shortcuts and linked-track behavior can differ.
The inline references come from CapCut’s published documentation, not a new test on our own project. Check your actual selection before deleting anything.
Before importing confidential, client or personal footage, check CapCut's current privacy policy and any device or employer rules. Avoiding cloud or AI buttons does not prove that imported content remains local. Practise with nonsensitive footage you have permission to use. For a major recut, duplicate the project and work on the copy. Keep the original media available. A duplicate inside CapCut is not an independent backup; the project safety guide covers preserving both the edit and its source files.
Trim vs Split vs Crop in CapCut
- Trim: drag the left or right edge inward to hide footage before the new start or after the new end. In normal timeline editing, you can usually extend the edge again until it reaches the source boundary.
- Split: divide the selected timeline clip at the playhead. CapCut creates two timeline sections that still refer to the same source media.
- Delete: remove the selected timeline section. Whether other clips close the gap depends on the track, magnet/ripple behavior and your current layout.
- Crop: change which part of the picture is visible. Cropping doesn't shorten the clip.
“Cut” is the general editing goal. CapCut's basic-tools guide describes Split as dividing a clip at a chosen point. The exact words (trim, split, delete and crop) tell you what will happen to the timeline.
How to Cut, Trim and Split Video in CapCut Mobile
Trim the beginning or end
- Open the project and select the video clip you intend to shorten, on the main track or an editable video layer. Look for its selected border and editing controls.
- Pinch outward on the timeline if the clip is difficult to control.
- Drag the left edge handle inward to set a later start, or the right edge handle inward to set an earlier end. Handle appearance can differ by version.
- Play across the new edge. If a word or movement feels clipped, extend the handle slightly, as far as the available source footage allows.
Split at the playhead
- Select the intended clip or layer on the timeline. Check which other items are selected or linked before you cut.
- Move the playhead to the intended boundary inside that clip.
- Find Split in the selected clip's editing controls, scrolling the toolbar if needed. One manual split divides that clip into two pieces.
- Select either piece to move, trim, change speed or delete it separately. Text and caption blocks can have additional restrictions, covered below.
Remove a mistake from the middle
For example, to remove a two-second mistake from a twelve-second clip, isolate that interval and check that the remaining sequence is about ten seconds long. Those numbers describe a practice edit, not an app limit or a measured test.
- Select the intended clip and inspect any linked video, audio or text items.
- Place the playhead at the beginning of the unwanted section and choose Split.
- Select the remaining piece, move to the point where the wanted action resumes and split again.
- Select only the unwanted middle section and delete it. If an unintended gap remains, move the right retained segment left until its beginning meets the previous segment's end. Move every later video segment and the captions, overlays, effects and audio that must stay synchronized by the same amount. Inspect items that cross the removed interval separately: they may need their own split or trim rather than a simple move. Leave deliberately continuous music in place, but replay it against the shorter picture. If you cannot keep the intended items together, undo and work out the selection on the duplicate before trying again.
- Zoom in and replay the join with sound. Check the last wanted frame before it, the first wanted frame after it, captions and overlays. Undo if the wrong material moved or disappeared.
After deletion, inspect later video, overlays, captions, effects and detached audio separately. Linking and grouping controls vary. Include only items intended to travel together, try one change on the duplicate and undo it if the result is wrong.
Remove the Beginning or End: Trim or Split?
For dead air at the start or a camera reach at the end, drag the clip edge inward. If you trimmed too much, extend that edge toward the original source boundary. This does not restore a deleted source file or recreate edits made in another version of the project.
Split and delete is useful when the playhead makes the boundary easier to judge. CapCut's basic editing guide also describes Delete left and Delete right. Use those only when the current control clearly identifies what it will remove. With a manual Split, both pieces remain until you deliberately delete one; a delete-left/right action is different.
If you're still learning the workspace, keep the CapCut editor feature map open beside the project. The Media panel, preview, inspector and timeline do different jobs; a cut is made on the timeline even when the frame itself is visible in the preview.
How to Trim and Split in CapCut Desktop
- Import the source and drag it to the timeline.
- Click the intended clip so its border is active. Inspect selected and linked items before cutting.
- To trim, point at the start or end until the edge control appears, then drag inward.
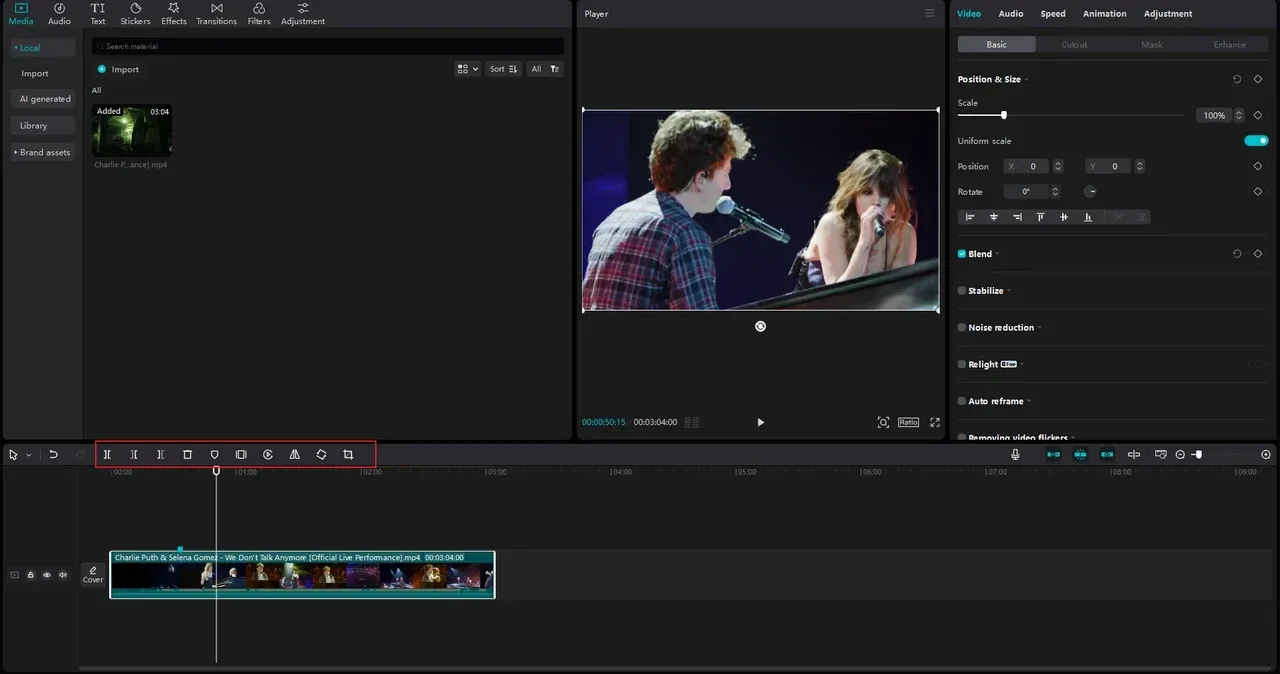
- To split, place the playhead inside the selected clip and click the Split control.
- CapCut's Desktop shortcut guide lists Ctrl+B on Windows and Cmd+B on macOS. Shortcuts can be customized: if those keys do nothing, return focus to the timeline, inspect the current shortcut mapping or use the visible Split button.
CapCut names Track Magnet and Auto Snapping in the same Desktop guide, but alignment and linked-track movement are different jobs. Snapping helps position an edge; it is not proof that captions, music and overlays will move together. Inspect the labels and behavior in your build. Zoom in, play across the join and listen for an audio click.
Keep Cuts From Messing Up the Timeline
Before deleting, look vertically as well as horizontally. A video segment may have captions above it, a sound effect below it and music that should continue through the cut. Decide which items should move with the picture and which should stay at their current time.
To change shot order, select the intended segment and use your version's move control or drag gesture to place it at the new position. Replay both new joins and check any related audio or text. Moving a picture does not by itself prove that its other layers moved with it.
- Lock only tracks that should stay fixed. A lock can prevent an accidental move, but locking narration that needs to shift with the picture can leave the edit out of sync.
- Inspect linking or grouping where offered. Include only the items that should travel together, then try one cut on the duplicate.
- Use snapping for placement. Zoom in to confirm the exact join instead of trusting the magnet alone.
- Check gaps across all layers. If no visible layer covers a gap, you may see the canvas or a black frame. A gap sounds silent only if no other audible track is playing there.
- Preserve a working version. Keep the original project and its source media while you check a structural recut.
How to Cut a Video in CapCut Web
CapCut's Web trimming instructions describe edge trimming and two splits followed by deletion. Use footage you own or have permission to edit; this workflow does not require a YouTube downloader.
- Open the intended Web project and put the video on the timeline. Wait for the upload and preview to finish.
- Select that video clip. To shorten an edge, drag its left or right boundary inward.
- For a middle section, place the playhead on the first frame you do not want and choose the visible Split control.
- Select the remaining right piece, move to the first frame you want to keep afterward and split again.
- Select the isolated middle segment and choose Delete. Inspect the retained clips, gap and related layers using the checks above, then replay with sound.
Do not assume Desktop keyboard shortcuts work in the browser. The online trimmer overview describes the Web tools, but does not establish identical controls or paid-feature access for every account.
The Web Editor guide covers browser, upload and performance limits. For a crowded timeline, the larger workspace in CapCut Desktop can make tracks easier to inspect; that is not a promise it will run faster on every computer.
Trim and Split Audio Without Breaking Sync
Select the audio clip, then move an edge or split at the playhead, as described in CapCut's audio-cutting instructions. Use the waveform when it helps locate a pause, but listen as well: a small shape is not necessarily silence. After changing the picture, check whether the narration, music and sound effects still occur at the intended moments.
- Keep a voiceover tied to the picture it explains.
- If you remove video from the main track, decide whether music should continue or close with the picture.
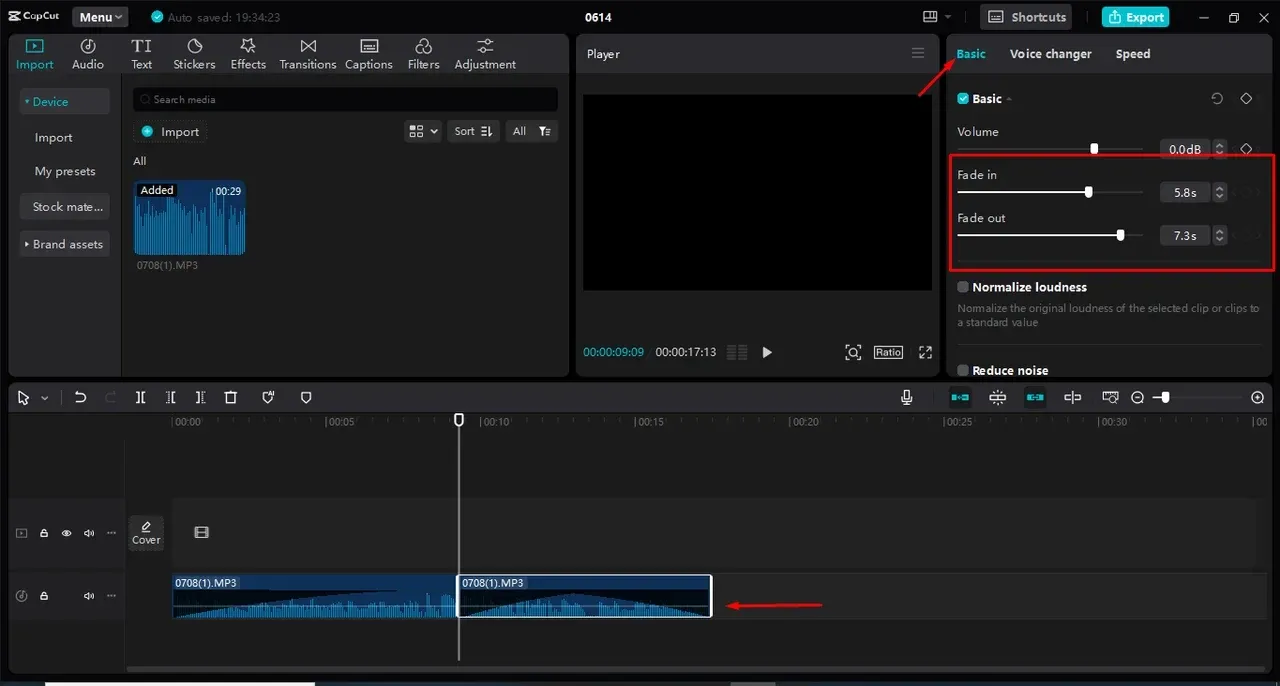
- If an audio cut clicks or changes ambience abruptly, try a short fade and listen again. On Desktop, select the audio clip and look for Fade in and Fade out in the right-side Basic audio controls, as described in CapCut's audio-fade instructions. Keep fades out of wanted syllables; a fade cannot restore words cut away. The music editing guide covers timing and volume across platforms.
- Zoom into the waveform for speech breaths and beat cuts instead of guessing from the preview image.
For narration generated from text, edit the wording and timing using the CapCut text-to-speech workflow. For captions, cut at natural speech pauses and then confirm the visible line still matches the audio with the auto-captions guide.
How to Make a Precise Cut
- Zoom into the timeline. Use the wide view for shot order and a closer view for frames and waveforms. On Desktop, CapCut documents arrow-key frame navigation; give the timeline focus first.
- Choose a natural boundary. Try a speech pause, a beat or a change in action. Do not cut through a syllable just to hit a visual marker.
- Check both sides. Play from a few seconds before the cut through a few seconds after it, with sound.
- Use Undo early. Reverse a mistaken split or delete while the action is still available. Reopening the app is not a reliable way to recover undo history.
- Test, then check the complete output. A short export can reveal a local problem. Before sharing, export the intended full video and watch that entire file outside CapCut, including all cuts, text, sound and the ending.
After the cut works, a CapCut transition can bridge two shots when the story calls for it. Don't use a transition to hide a bad cut by default; a direct cut is often cleaner.
Why Split Is Not Working in CapCut
Start with the checks below. CapCut's subtitle-splitting help describes extra restrictions for text and caption blocks; those do not automatically apply to every video clip.
- Selection: select the intended clip, not the preview image or an unrelated layer.
- Position: put the playhead inside that clip, away from its existing outer edges.
- Shortcut: if only the keys fail, return to the timeline and try the visible Split control. Check whether the shortcut has been changed.
- Lock or nesting: inspect the selected item. Unlock only what you intend to edit; if you need a clip inside a group or compound clip, open it or ungroup it where that control is offered. Keep a duplicate before changing the structure.
- Scale: zoom in if the resulting piece is too small to select comfortably.
- Text and loading state: wait for the selected caption to finish generating or the selected media to finish loading. Captions can have a minimum segment duration; zooming in does not remove that restriction, and there is no universal video-clip limit established by that subtitle guidance.
If the entire app is unresponsive rather than only Split, use the CapCut not working checklist instead of repeatedly tapping the tool.
Can You Undo or Join a Split?
Use Undo promptly if the split was accidental and the action is still available. After later edits, repeatedly undoing can also remove work you want to keep. Two neighboring pieces can play continuously without a gap, but that does not make them one original timeline item.
If you need the untouched source again, add it to a duplicate project or a separate track for comparison. Importing the original does not restore the later effects, captions or timing you built around the cut. Exporting and re-importing is different again: CapCut says the result is a video file without separately editable original layers. The merging guide explains adjacency and Compound Clip options without treating either as lost-edit recovery.
Export Only One Part of a Desktop Timeline
You do not need to delete the rest of the timeline to export one section. CapCut's partial-export instructions describe I and O markers, plus Shift+X range selection. Set the intended range, inspect its start and end in your current build, then check the saved duration and first and last frames. If the result includes an unwanted frame or misses the ending, adjust the boundary and test again. For the full workflow, use exporting a selected clip or range.
Before a later full-project export, clear or reset the range so the export summary covers the whole intended video. Splitting and trimming change the timeline rather than compressing the original file. The rendered result still depends on the resolution, frame rate, codec and bitrate you choose; a clean cut is not a guarantee of a lossless export.
Manual Split, Split Scenes and Auto Cut
Manual Split cuts at your playhead. Split Scenes searches for scene boundaries inside a source clip; CapCut's manual and automatic splitting guide describes a separate scene-detection command. Use it only when that control is offered, and review its proposed cuts. It does not replace choosing the exact frames to remove. AutoCut assembles a rough sequence rather than making only one manual cut.
Use automation for a rough cut, then review every boundary. CapCut's Auto Cut documentation lists Mobile and Desktop support, no Web support, and possible regional or account rollouts. It also says the generated sequence can be reordered and refined.
If you need CapCut to discover several candidate moments inside one interview, podcast or webinar, start with Long Video to Shorts, then return to Manual Split to repair the exact opening and closing frames.
CapCut Cut, Trim and Split FAQ
What is the difference between trim and split in CapCut?
Trim shortens the beginning or end of a timeline clip by moving an edge. Split divides a selected clip at the playhead so the new sections can be deleted, moved or edited separately.
How do I cut a section out of the middle of a video?
Put the playhead on the first frame you do not want and split. Move it to the first frame you want to keep afterward and split again. Delete the isolated middle segment. If a gap remains, move the retained sequence and its intended dependent layers together, then check the join with sound. Inspect items crossing the removed interval separately; undo if the wrong material moves or disappears.
What is the CapCut split shortcut on Desktop?
CapCut documents Ctrl+B on Windows and Cmd+B on macOS. Those shortcuts can be customized. Select the intended clip, give the timeline focus, and check the current mapping if the keys do nothing. You can also use the visible Split control.
Does splitting a video reduce quality?
No new compression is applied just because a timeline clip is split or trimmed. Quality changes when CapCut renders the export, so review the export resolution, frame rate, codec and bitrate for the destination.
Why is Split not working in CapCut?
Check the selected clip, playhead position, shortcut mapping, lock or group state, and timeline zoom. Wait if that media or caption is still loading. Subtitle blocks may have a minimum duration; that is not a universal limit for video clips. These are checks to try, not a measured ranking of causes.
Can I join two clips after splitting them?
Use Undo if the split is still in history and reversing it will not discard later work. Adjacent pieces can play continuously but remain separate clips. Adding the original source gives you an untouched item, not the later effects, captions or timing; compare it on a duplicate rather than overwriting your edit.
How do I export only one part of a CapCut Desktop timeline?
CapCut documents I and O markers and Shift+X range selection. Inspect the marked start and end, then check the exported duration and first and last frames. Reset the range before a later full-project export. You do not need to delete the rest of the edit.
Return to the CapCut beginner learning path when the cuts play correctly. Add text or music next, then check that those new layers still match the edited picture.