

To merge clips in CapCut, put the clips in playback order on the main timeline, close any empty space between them, check each picture and audio boundary, then export the complete timeline once. You do not need a transition or a Compound Clip to create one finished video.
Keep the source files and editable project. A short test export can confirm one difficult join, but only a full export and complete watch-through can verify the duration, final frame, audio and every cut.
Checked against the public CapCut help pages on September 16, 2026. Labels and control positions can vary by platform, version, account and region, so match each step to the build in front of you.
Choose the Result You Actually Need
| Goal | Method | Result |
|---|---|---|
| Clips play one after another | Place them adjacent on the main timeline, then export | Separate editable clips in the project and one finished file |
| Several Desktop elements act as one timeline object | Create a Compound Clip | A nested editable object, not a finished file |
| Several elements move together but remain on the same timeline | Group them where that control is available | Linked elements without nesting them into a Compound Clip |
| Repair an accidental split immediately | Undo | The state before the split |
| Show two videos at the same time | Use separate overlay tracks | A split-screen or picture-in-picture composition |
| Use one project inside another | Export and import the rendered file | A flattened clip; the original layers remain only in the source project |
For an ordinary joined video, use the first method. CapCut's online Video Merger instructions describe uploading the files, placing them next to each other on the timeline and exporting. “Side by side” in that workflow means adjacent in time, not two pictures sharing the frame.
How to Merge Clips in CapCut Mobile
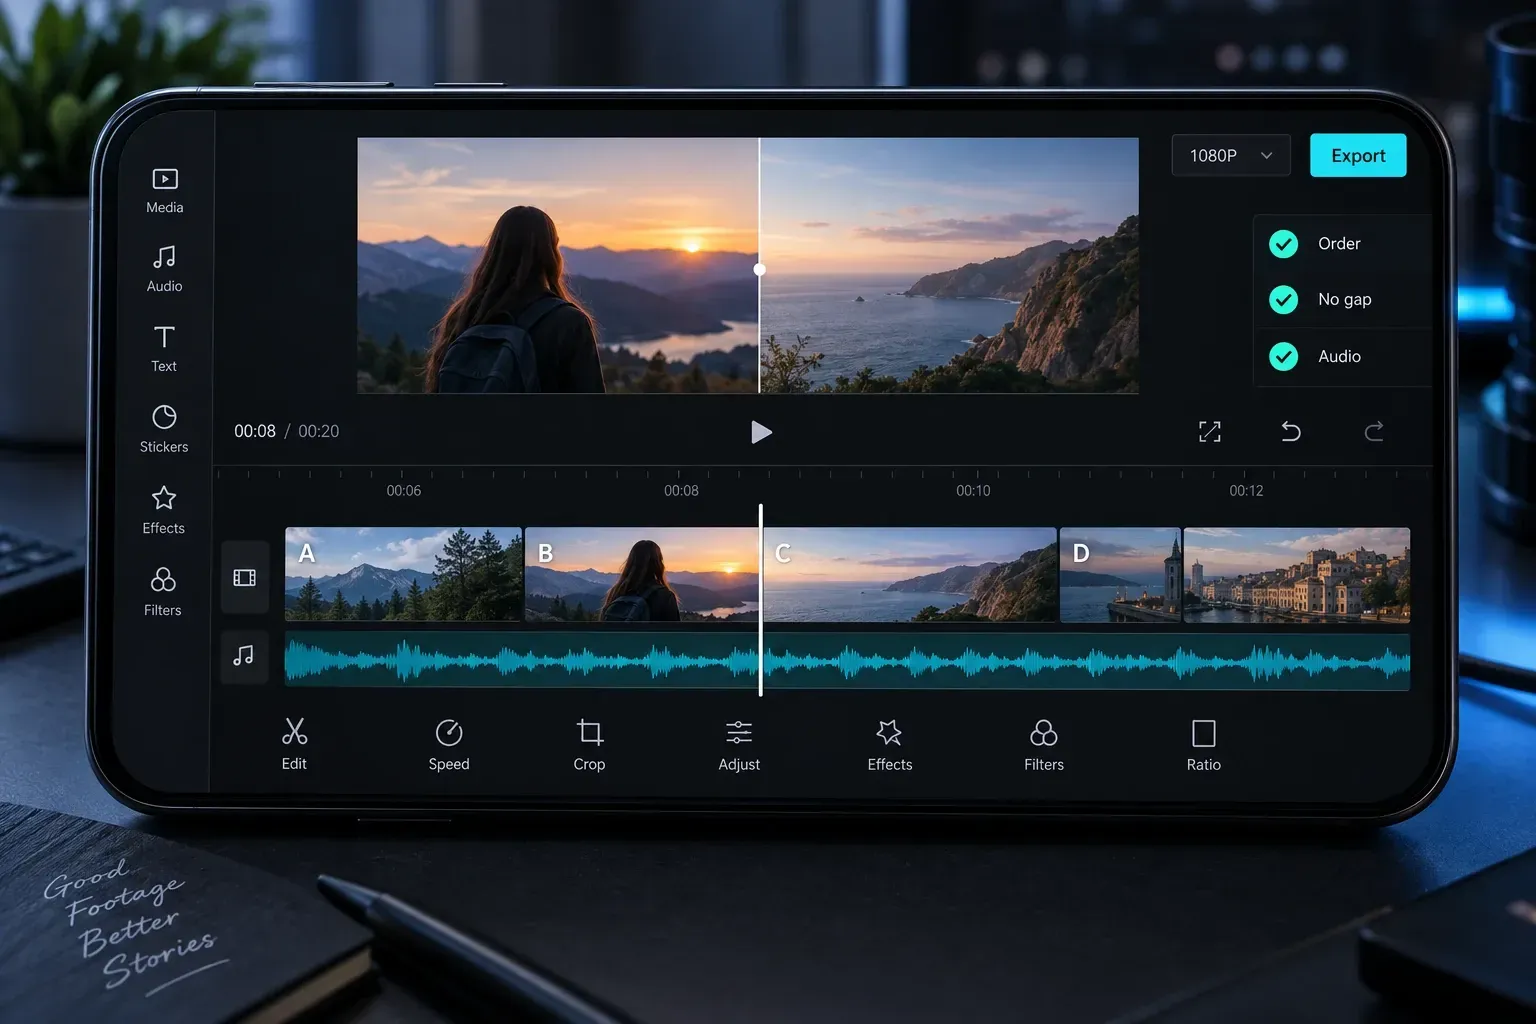
- Open CapCut, tap New project and select the videos you want to use.
- Tap Add and inspect the timeline. Do not rely on selection order alone; confirm the actual playback order.
- Press and hold a clip, then drag it to the correct place if the sequence is wrong.
- Trim unwanted starts and endings. For cuts inside a clip, follow the CapCut cut, trim and split guide.
- Zoom into each boundary and confirm that the end of one clip touches the start of the next with no empty timeline section.
- Play across every join with sound on. Correct framing and audio changes before adding optional transitions.
- Export the full timeline, then watch the complete saved file outside CapCut.
CapCut's current multi-platform merge guide documents New project, selecting multiple videos, dragging to reorder them and exporting. Its transition step is optional. A direct cut is valid when it fits the edit.
How to Merge Clips in CapCut Desktop
- Choose Create project and import the source files.
- Drag the first clip to the main track, then put each following clip directly after it.
- Reorder clips by dragging them along the main track. Check that a clip did not land on an upper overlay track.
- Zoom into each cut. Remove empty space, accidental overlaps and unwanted trimmed frames.
- Play through every boundary and listen for clipped words, duplicate ambience, silence or a sudden level jump.
- Choose the delivery frame, resolution and frame rate deliberately, then export the complete sequence.
- Open the exported file in a player and check its start, total duration, every join and the final frame.
If you need to inspect one difficult section first, Desktop supports In and Out markers. CapCut's selected-range export help documents I and O, plus Shift+X. Clear or move the range before the final export so you do not accidentally deliver only the test section.
How to Combine Videos in CapCut Web
- Open the Web editor or Video Merger and upload the clips.
- Place them on the main timeline in the intended order.
- Trim the ends and close any visible gap between adjacent clips.
- Review each join, including framing and audio.
- Use Export, then Download where that route appears.
- Watch the complete downloaded file before removing local sources or closing the only editable session.
Browser editing adds upload, account and connection dependencies. Start with two short non-sensitive clips if you are learning the workflow, and keep the original media outside CapCut. The CapCut Web guide covers save-state and browser safeguards.
Close the Gap Without Hiding the Cut
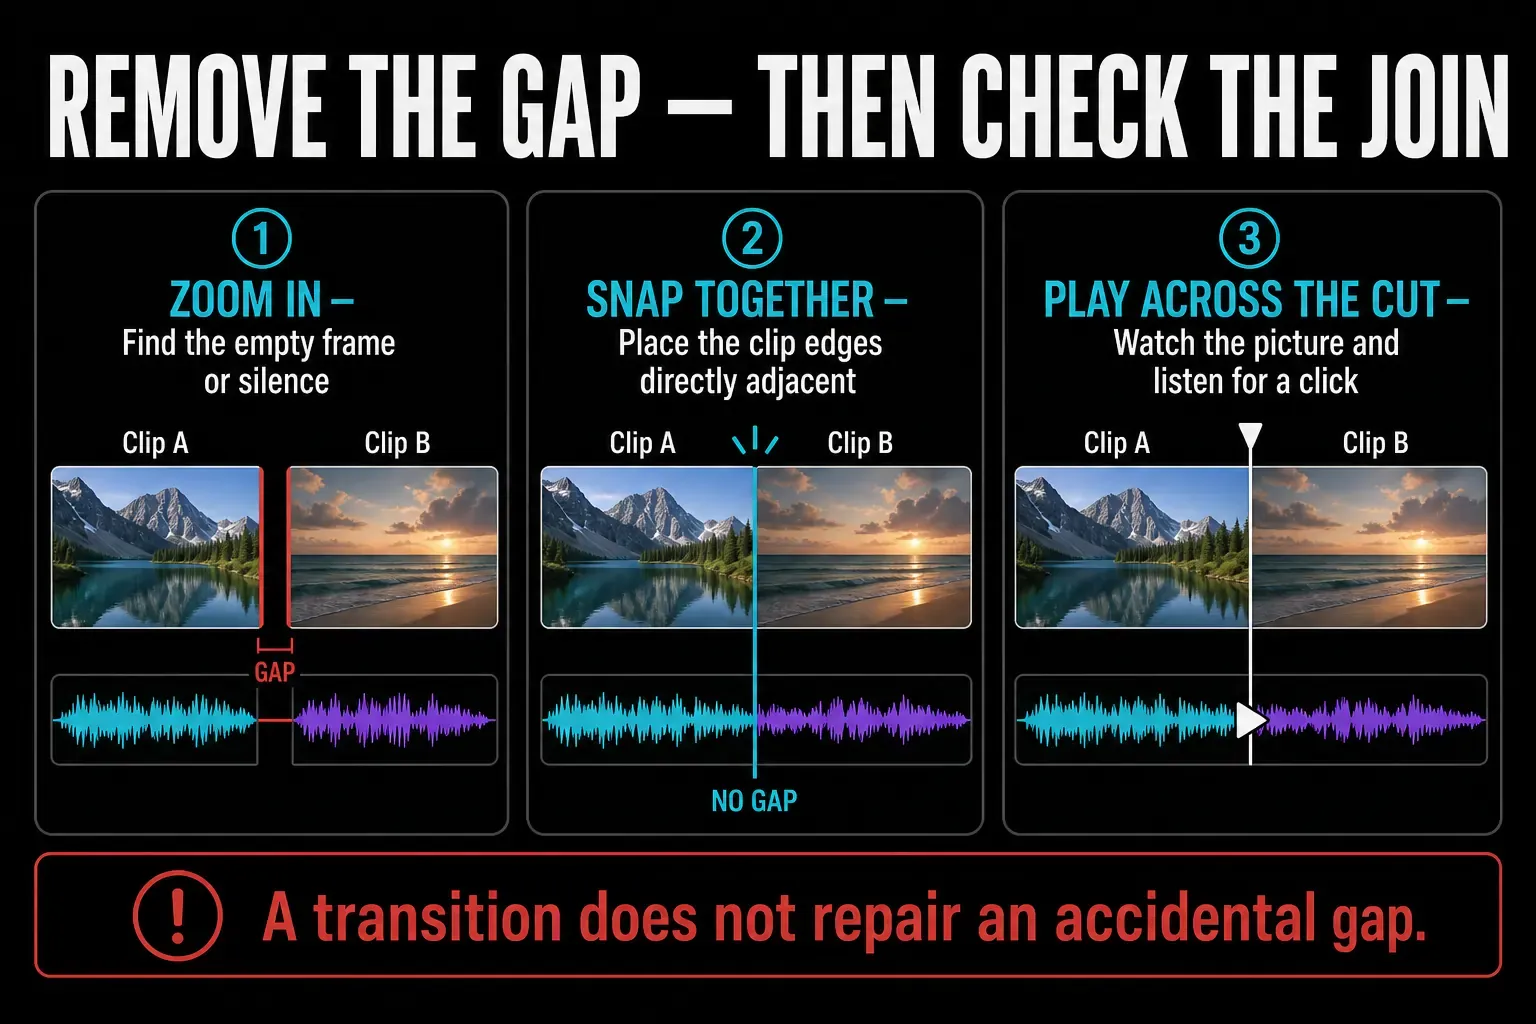
Move the playhead just before the cut and play beyond it. If there is a black or background-colored flash, first confirm whether an actual gap exists. If the edges already touch, inspect the last source frame, the first source frame, disabled or hidden layers, masks, effects and the exported test. Do not assume every flash is empty timeline space.
Use the same approach for silence. A gap matters only if no music, ambience, voiceover or linked audio covers it. When the clips touch but sound still changes abruptly, compare clip volume, fades, source ambience and any detached audio track. A transition is a style choice, not a repair for missing media.
Match Framing, Motion and Audio
Clips with different aspect ratios can still play in one sequence, but each clip needs an intentional fit inside one project frame. A boxed or cropped result can also come from Scale, Crop or Position settings, even when the source clips have the same shape. Choose the delivery ratio first, then check every clip with the aspect-ratio guide.
Mixed frame rates do not require a universal 60 fps export. CapCut's current frame-rate guide recommends choosing the timeline rate for the delivery and reviewing conversion, motion, captions, transitions and voiceover timing. If a client gives an exact specification, use it. Otherwise, compare motion in the full exported file rather than choosing the highest source rate automatically.
Color and exposure can change sharply between cameras or locations. Correct each source only when the mismatch distracts from the intended cut. For audio, adjust individual clip levels or use a continuous music or ambience bed when it belongs in the edit. The CapCut music guide covers fades and level decisions.
Use a Transition Only When It Helps
CapCut offers transitions at clip boundaries, but joining videos does not require one. Use a hard cut for continuous action, dialogue or a deliberate change of angle. Use a short dissolve or another transition when the change in time, place or mood needs a visible cue.
Place and check the clips first. Then add the transition and watch whether it hides a needed frame, overlaps speech or changes the pace. The CapCut transitions guide covers duration and placement.
Compound Clip vs Group vs Export
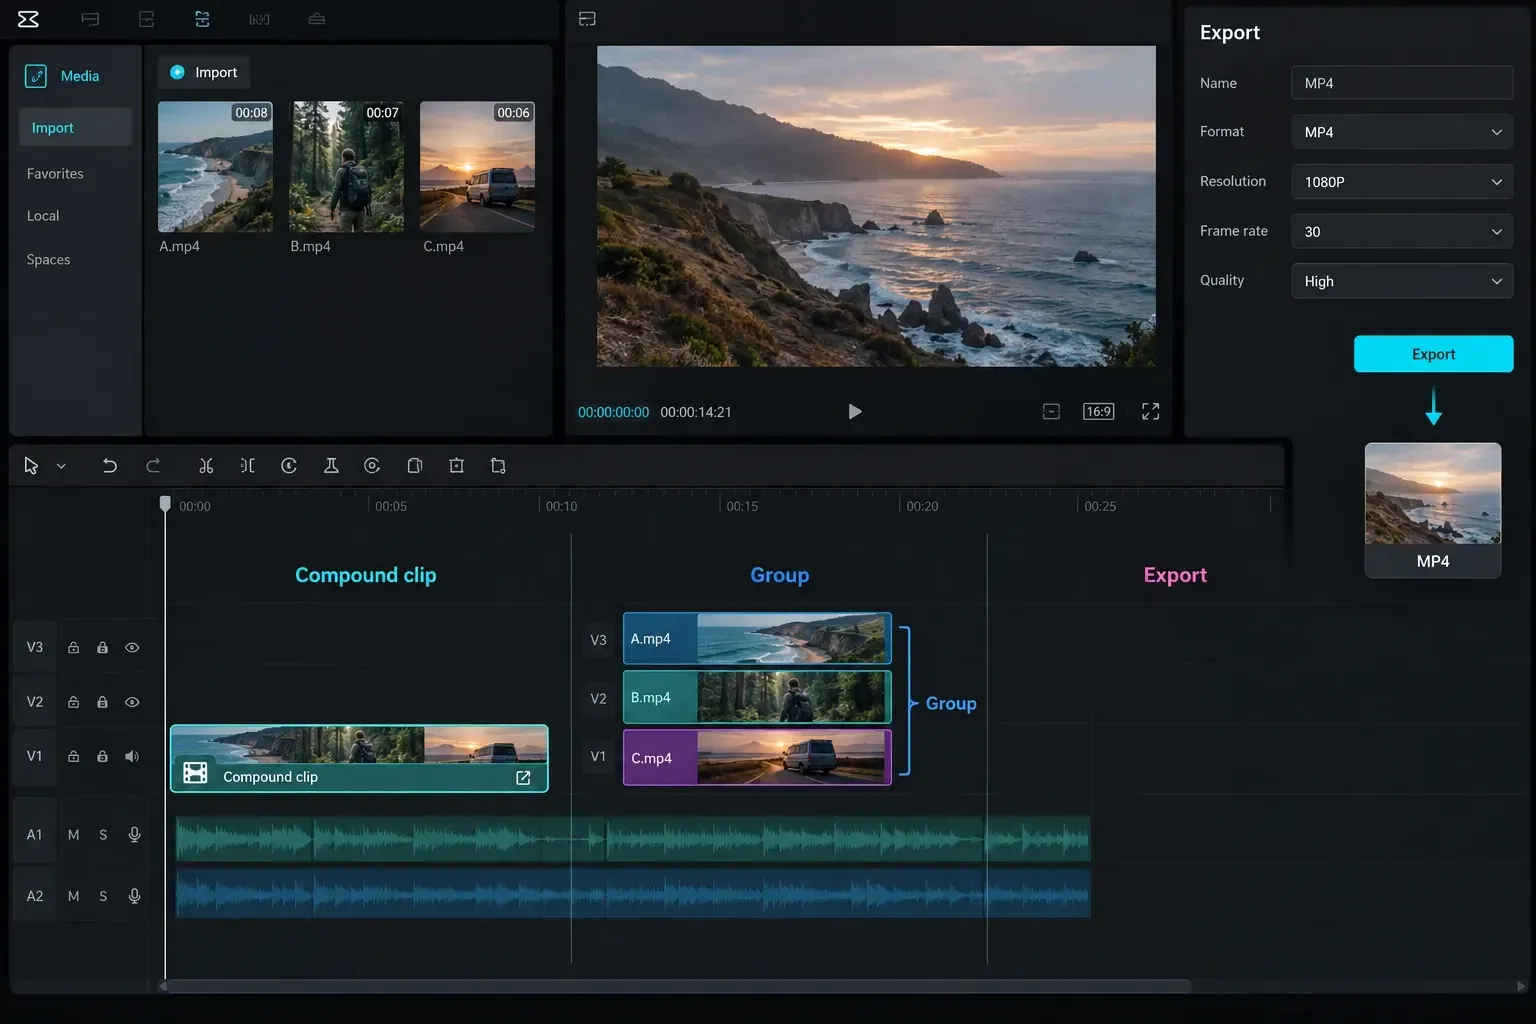
On Desktop, a Compound Clip nests selected timeline elements into one object. To create one, select the intended clips or layers, right-click the selection and choose Create compound clip. CapCut documents that exact route in its Desktop layering workflow and its stitching guide.
A group links items for organization and movement without turning them into the same nested timeline object. Do not treat Ungroup as the command for reversing a Compound Clip. Where the current Desktop build offers it, the relevant command is Undo Compound Clip. Create and reverse a test Compound Clip in a project copy before using the operation on the only edited sequence, because later trims and higher-level changes may not map back as you expect.
Export does something else: it renders picture and sound into a media file. Re-importing that file does not restore separate cuts, captions, masks, keyframes, effects or audio layers. Keep the editable project and source media even after the final file is approved.
Can You Unsplit or Rejoin a Split Clip?
Use Undo immediately after an accidental Split. If you continue editing or reopen the project, placing the sections together restores continuous playback but does not turn them back into one timeline object.
Re-importing the original source can provide one untouched clip, but replacing edited sections may discard speed changes, keyframes, effects, captions and timing work applied after the split. Make a project copy, compare the replacement with the edited sequence, and keep the original version until the rebuilt cut passes a full review.
Combine Two CapCut Projects Safely
CapCut's current project-import help says the supported cross-platform route is to export the first project, then import that finished video into the second. The imported result is flattened, so its individual layers and effects are not separately editable.
Export the first project in full, watch it completely, then import it into a copy of the destination project. Preserve both original projects and their source files. The imported file has been encoded once already and will be encoded again when the combined project is exported, so compare the final result with the approved first export.
Fix a Joined Video That Looks or Sounds Wrong
- Wrong order: replay from the beginning and drag clips into the intended sequence.
- Black or background flash: inspect for a gap. If none exists, check source edge frames, lower layers, effects and preview-versus-export behavior.
- Silence: check whether any audio spans the interval, then inspect clip volume, fades and detached tracks.
- Cropped or boxed clip: check project ratio plus that clip's Scale, Crop and Position values.
- Jerky motion: compare source and delivery frame rates, speed changes and the exported file. Do not switch everything to 60 fps by default.
- Compound export error 22113: first make a restorable project copy. CapCut's error-specific help says to remove and re-create the draft's Compound Clips, then export again. That instruction is specific to 22113.
- Soft output: adjacency does not compress clips by itself. Review scaling and our full breakdown of CapCut export settings.
Verify the Full Export
For a Desktop diagnostic, set In and Out markers around one difficult join and export that range. Watch it outside CapCut, then remove or reset the range before the real export. On Mobile or Web, do not delete the rest of the only project merely to make a short test; use a project copy if isolation requires structural changes.
After the final export, confirm the file opens, starts correctly and has the expected duration. Watch and listen through the complete video, including the last frame and final audio. Check every join, transition, caption, speed change and mixed-frame-rate section. A successful short test does not prove that the full file is complete.
CapCut Merge Clips FAQ
Is there a Merge button in CapCut?
You do not need a special Merge button for a normal sequence. Put the clips next to each other on the main timeline, close the gaps, check the joins and export the complete project once.
How do I combine two videos in CapCut Mobile?
Start a New project, select both videos and tap Add. Confirm their timeline order, trim the edges, close any gap, review picture and audio at the join, then export and watch the complete saved file.
How do I remove a gap between clips?
Zoom into the boundary and move the second clip until its start touches the first clip's end. If a flash or silence remains with no visible gap, inspect source edge frames, layers, effects and audio instead of hiding the problem with a transition.
Is a Compound Clip the same as merging videos?
No. A Compound Clip nests selected Desktop timeline elements into one editable object. Exporting adjacent clips creates the finished video file. An ordinary joined sequence does not require a Compound Clip.
How do I undo a split in CapCut?
Use Undo immediately after the accidental Split. Later, adjacent sections can play continuously but remain separate timeline clips. Re-importing the source can discard later speed, effect, keyframe and timing work, so compare it in a project copy.
Can I merge two CapCut projects?
CapCut's documented route is to export one project and import the rendered video into the other. The imported clip is flattened and cannot restore its original separate layers, effects or captions. Keep both editable projects and source files.
Does merging clips reduce quality?
Putting clips next to each other does not itself compress them. Export encodes the sequence, and importing that export into another project adds another encode. Scaling, source quality and export choices also affect the result.
Should I add a transition between every clip?
No. A transition is optional. Use a direct cut when it preserves action, speech or pace; add a transition only when the change in time, place or mood needs one.
Once the complete exported file passes picture and audio review, return to the CapCut Tutorials hub for the next editing task.