The small white square icon between two clips on the CapCut timeline is easy to miss. I ignored it for the first three weeks I used the app, just cutting straight between clips like a complete amateur. On my own Reels, the difference showed up quickly — especially on b-roll-heavy edits — but transition timing mattered more than the transition category itself. Here's exactly how transitions work in CapCut, on both mobile and desktop.
CapCut Transitions Quick Answer
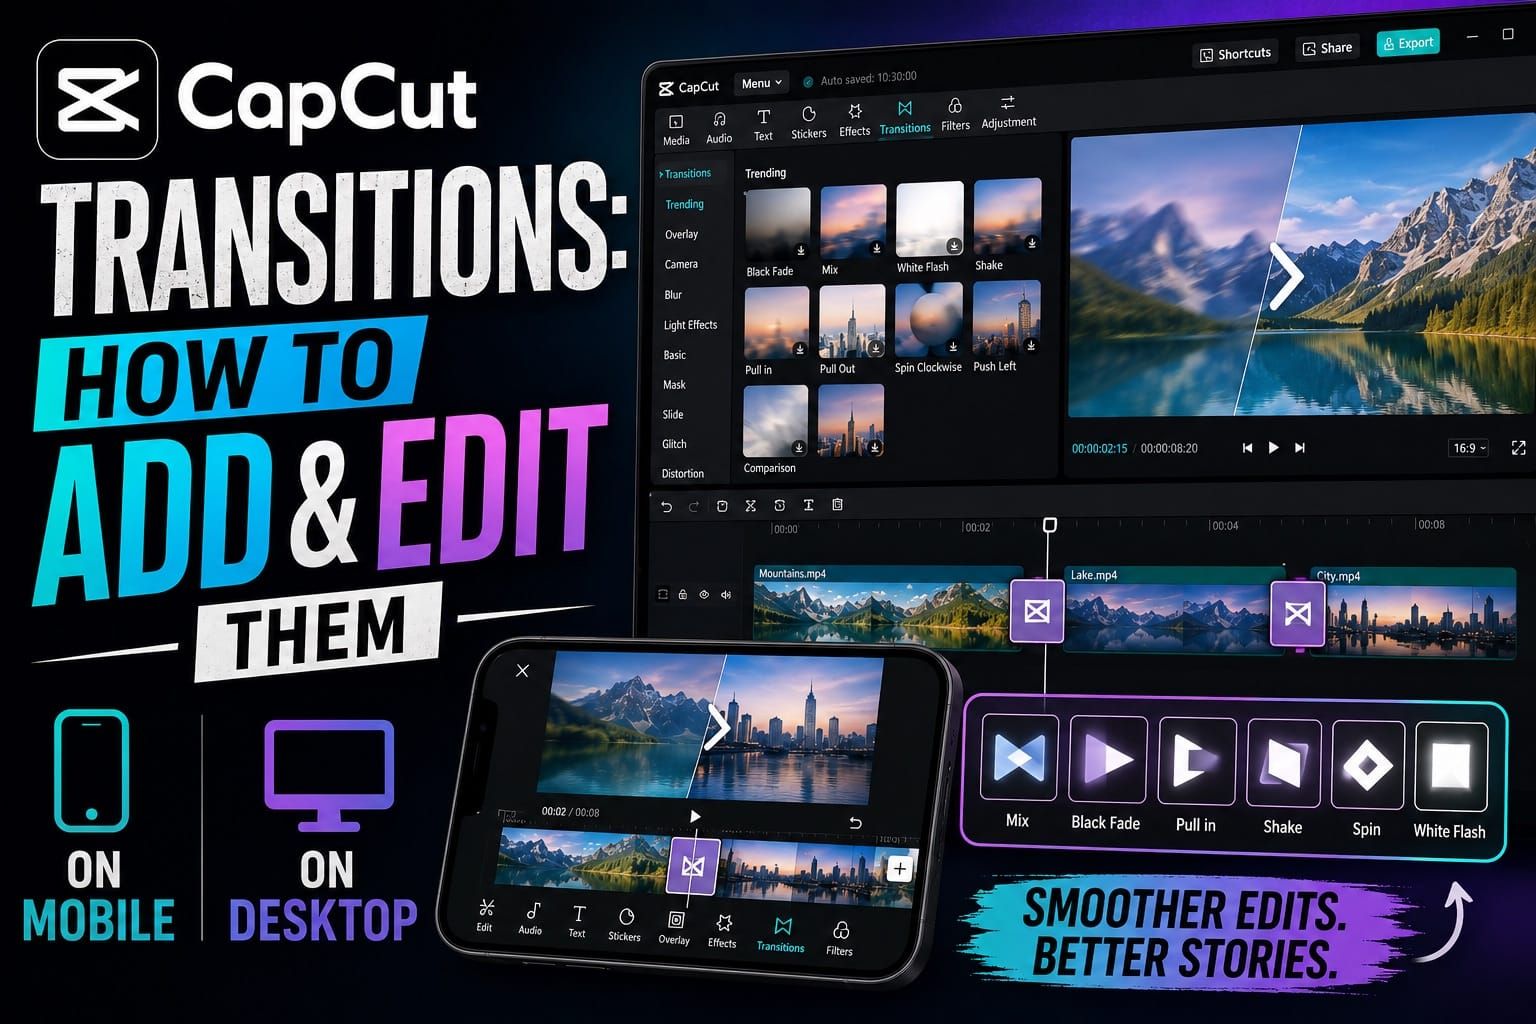
On mobile, tap the white square icon between any two clips on the timeline to open the transitions panel. Pick a style, adjust the duration slider, and tap the checkmark to confirm. On desktop, go to the Transitions tab on the left panel, then click or drag a transition between two clips. Use "Apply to all" if you want one style across the entire edit.
CapCut Transitions Categories: What's Available
The transitions library is bigger than most people realise. CapCut organises its transitions into categories including Trending, Basic, Camera, Overlay, Light Effect, Split, Distortion, Glitch, Blur, Social Media, Slide, MG, and Mask. On desktop, category labels can vary by build, but you may see tabs such as Pro, Hit, Overlay, and Light.
Here's what each main category actually does in practice:
- Basic — Clean cuts, dissolves, fades. These work for almost anything without drawing attention to themselves.
- Glitch — Digital interference effects. Good for tech content, gaming, or anything where you want a jarring cut to land harder.
- Blur — Soft wipes using motion blur. Pairs well with b-roll transitions on travel or lifestyle content.
- Camera — Simulated camera movements like whip pans and zoom cuts. Heavy use makes edits look dated fast, so pick your spots.
- Overlay — Motion-matched blends where one clip flows into the next. Better for slower-paced edits than action content.
- Split — Divides the frame before revealing the next clip. Works best when the two clips share similar framing.
- Light Effect — Flash and lens flare transitions. Overused in 2023. Use once or twice maximum per video, not on every cut.
Some transitions are marked with a crown icon. Those are paid assets. If you use them on a free account, CapCut may prompt you to upgrade, add a watermark, or limit export depending on your app version, region, and account status. Unmarked transitions are the safest choice for free exports.
CapCut Transitions on Mobile: Step-by-Step
I do about 70% of my edits on mobile, so this is the workflow I actually use daily.
- Open your project and make sure you have at least two clips on the timeline. Transitions only appear between clips, not on a single clip.
- Scroll the timeline until you can see the join point between two clips. There will be a small white square icon sitting exactly on that join.
- Tap the white square. The transitions panel slides up from the bottom of the screen.
- Browse by category, or use search if your app version shows it — searching "smooth" or "glitch" works well when available.
- Tap any transition to preview it. CapCut plays the transition in the preview window automatically so you don't have to confirm before seeing it.
- Use the slider at the bottom of the panel to adjust duration. Shorter is usually better — around 0.3s to 0.5s for action-paced content, up to 0.7s for slower lifestyle edits.
- If you want the same transition across all your clips, tap "Apply to all" before confirming.
- Tap the checkmark (bottom right) to apply.
One thing most tutorials skip: you can't add a transition if your clip is trimmed all the way to its very start or end point. CapCut needs a few frames of unused footage on either side of the cut to render the transition. If the white square is greyed out, trim a few frames from each clip to free up some overlap room.
CapCut Transitions on Desktop: Step-by-Step
The desktop editor handles transitions differently. There's no white square to tap — instead the panel lives in the sidebar. For a quick visual reference, CapCut's official transition help page also covers the desktop workflow with screenshots.
- Import your clips and arrange them on the timeline.
- Click the Transitions tab in the left panel sidebar. It sits below Effects in the navigation.
- Browse categories (Pro, Hit, Overlay, Light) or use the search bar. You can also filter by free vs. paid using the crown toggle.
- To add a transition: either click the "+" icon on the transition thumbnail to apply it to the currently selected cut point, or drag and drop the transition thumbnail directly between two clips on the timeline.
- Once applied, click the transition block on the timeline to select it. A duration slider appears in the top-right panel — drag it to adjust timing.
- You can also resize the transition by dragging its left or right edge directly on the timeline.
- To apply the same transition to every cut point, use the "Apply to All" option that appears in the panel after adding a transition.
On desktop, splitting a clip is faster because you can use Ctrl+B (Cmd+B on Mac) to cut the clip at the playhead position, then drop a transition between the two new segments. On mobile, you can do the same thing with the Split tool, just with more taps.
One thing worth knowing: some transition effects built into mobile templates are not available natively in the desktop editor. The desktop Transitions panel has its own library of timeline-based transitions, but if you saw a specific template transition on mobile and can't find it on desktop, that's why. CapCut's help page on template download issues explains why this happens on PC specifically.
CapCut Transitions Editing: Change, Delete, Replace
Most guides cover adding transitions and stop there. The part that actually matters for editing a real project is what happens after you've added them.
Change a transition duration
On mobile: tap the white square on the cut where a transition already exists. The panel reopens and the duration slider is there. Drag it. On desktop: click the transition block on the timeline, then drag either edge or use the duration slider in the top panel.
Delete a transition
On mobile: tap the transition icon on the timeline to open the panel, then scroll left in the category list until you find "None." Tap it and confirm. That removes the transition and reverts the cut to a straight cut. On desktop: right-click the transition block on the timeline and select Delete, or click the block to select it and press the Delete key.
Replace a transition with a different one
On mobile: tap the existing transition icon, then just tap a different transition style in the panel. It replaces the old one immediately. On desktop: drag a new transition from the panel onto the existing transition block — it swaps it out.
Apply to All applies the selected transition style and duration across available cut points. In many builds, it can overwrite existing transition choices, so use it before doing detailed manual transition work. I've used it to quickly swap a basic dissolve for a glitch style after realising the pacing needed something harder — saves the work of touching 23 individual cuts.
CapCut Transitions Timing: How Long Should They Be?
This is where most beginner edits fall apart. The default duration CapCut assigns to transitions is often too long for short-form content.
For TikTok and Reels, aim for 0.2s to 0.4s on high-energy content. Anything over 0.5s starts to feel slow unless you're working with ambient music or a slow-burn narrative. Travel content and photo slideshows can go up to 0.7s on dissolves without feeling sluggish.
Beat-synced edits are a different case. If you're cutting to music, place your cuts on the beat first, then set the transition duration in seconds rather than frames — around 0.2s to 0.4s for high-energy edits. If you prefer thinking in frames: at 30fps that's roughly 8 to 14 frames; at 60fps, think closer to 12 to 24 frames for the same visual feel. Going too wide bleeds into the next beat and kills the sync.
A transition that's technically correct but poorly timed will always look worse than a sharp straight cut. When you're unsure, try it with and without. Sometimes the plain cut is stronger.
CapCut Transitions: Free vs. Pro
The free plan includes a solid range of transition categories — Basic, Glitch, Blur, Slide, and others. CapCut pricing varies by region, platform, and current plan structure. Some transitions, effects, templates, and AI tools are marked with a crown icon and require a paid plan. If you are comparing Standard and Pro, check the subscription screen inside your CapCut account before exporting, because included assets and pricing can change.
For the vast majority of TikTok and Reels edits, the free transition library is more than enough. The crown-marked ones are mostly stylistic add-ons rather than capability unlocks.
CapCut Transitions Tips That Most Guides Don't Cover
Transitions don't replace good cuts. Every guide focuses on which transitions look cool. The real skill is knowing when a straight cut works better than any transition at all. On dialogue-heavy content or talking-head videos, a clean cut almost always beats a dissolve.
Search by name rather than browsing. The categories contain hundreds of options and browsing wastes time. If you know you want something like "zoom" or "whip," type it in the search bar. You'll find what you want in under 4 seconds instead of scrolling for two minutes.
Match direction of motion. A slide-right transition works best when the action in the outgoing clip is moving right. If the motion in your clip goes left and your transition goes right, it creates a visual conflict that viewers feel even if they can't identify it.
Layer effects, don't stack transitions. You can add a video effect (from the Effects panel) on top of a transition point to compound the impact. A light flash layered over a cut point, timed to a beat drop, hits harder than any single flashy transition on its own. The CapCut epic transitions tutorial covers this combination technique in detail.
Check auto-captions after adding transitions. If you're using CapCut's auto-caption feature, transitions can shift the visual timing of subtitle blocks. Always review captions after adding transitions — the audio track doesn't move, but the visual pacing changes enough to make captions feel out of step.
CapCut Transitions FAQ
Why can't I add a transition in CapCut?
Two reasons come up most. First, you may only have one clip on the timeline. Transitions require at least two clips. Second, your clips may be trimmed to their absolute edge — CapCut needs a few frames of available footage on either side of a cut to render the transition effect. Trim a second or two from the ends of each clip to free up overlap footage.
Does CapCut have free transitions?
Yes. CapCut includes free transitions, and unmarked transitions are the safest choice for free exports. Paid transitions are usually marked with a crown icon. If you use a crown-marked transition on a free account, check the export screen carefully — CapCut may add a watermark, prompt for an upgrade, or restrict that asset depending on your app version and region.
How do I delete a transition in CapCut?
On mobile, tap the transition icon on the timeline, then select "None" from the beginning of the categories list. On desktop, click the transition block on the timeline to select it, then press Delete.
What does "Apply to All" do in CapCut transitions?
Apply to All applies the selected transition style and duration across available cut points in your project. In many builds, it can overwrite existing transition choices, so use it before doing detailed manual transition work.
Can I add a transition inside a single clip in CapCut?
Not directly, but you can split the clip first. On desktop, use Ctrl+B (Cmd+B on Mac) to cut the clip at your playhead position, creating two segments. Then add a transition between those two segments. On mobile, use the Split tool to divide the clip, then tap the join point to add your transition.
Are CapCut transitions different on mobile and desktop?
The basic idea is the same, but the interface and available assets can differ. Mobile uses the white-square transition icon between clips on the timeline. Desktop uses a Transitions panel where you drag effects onto the timeline. Some mobile and web template-based transition effects may not appear natively in the desktop editor, so do not assume every mobile transition exists on desktop too.