I spent about 23 minutes on a Reels edit last week doing nothing but chasing the wrong effect category. I wanted a glitch overlay on my footage but kept applying body effects to a clip with no person in it — and nothing was happening. No error message, no feedback. The effect just sat there doing nothing. Once I understood that CapCut splits effects into genuinely separate systems, everything clicked.
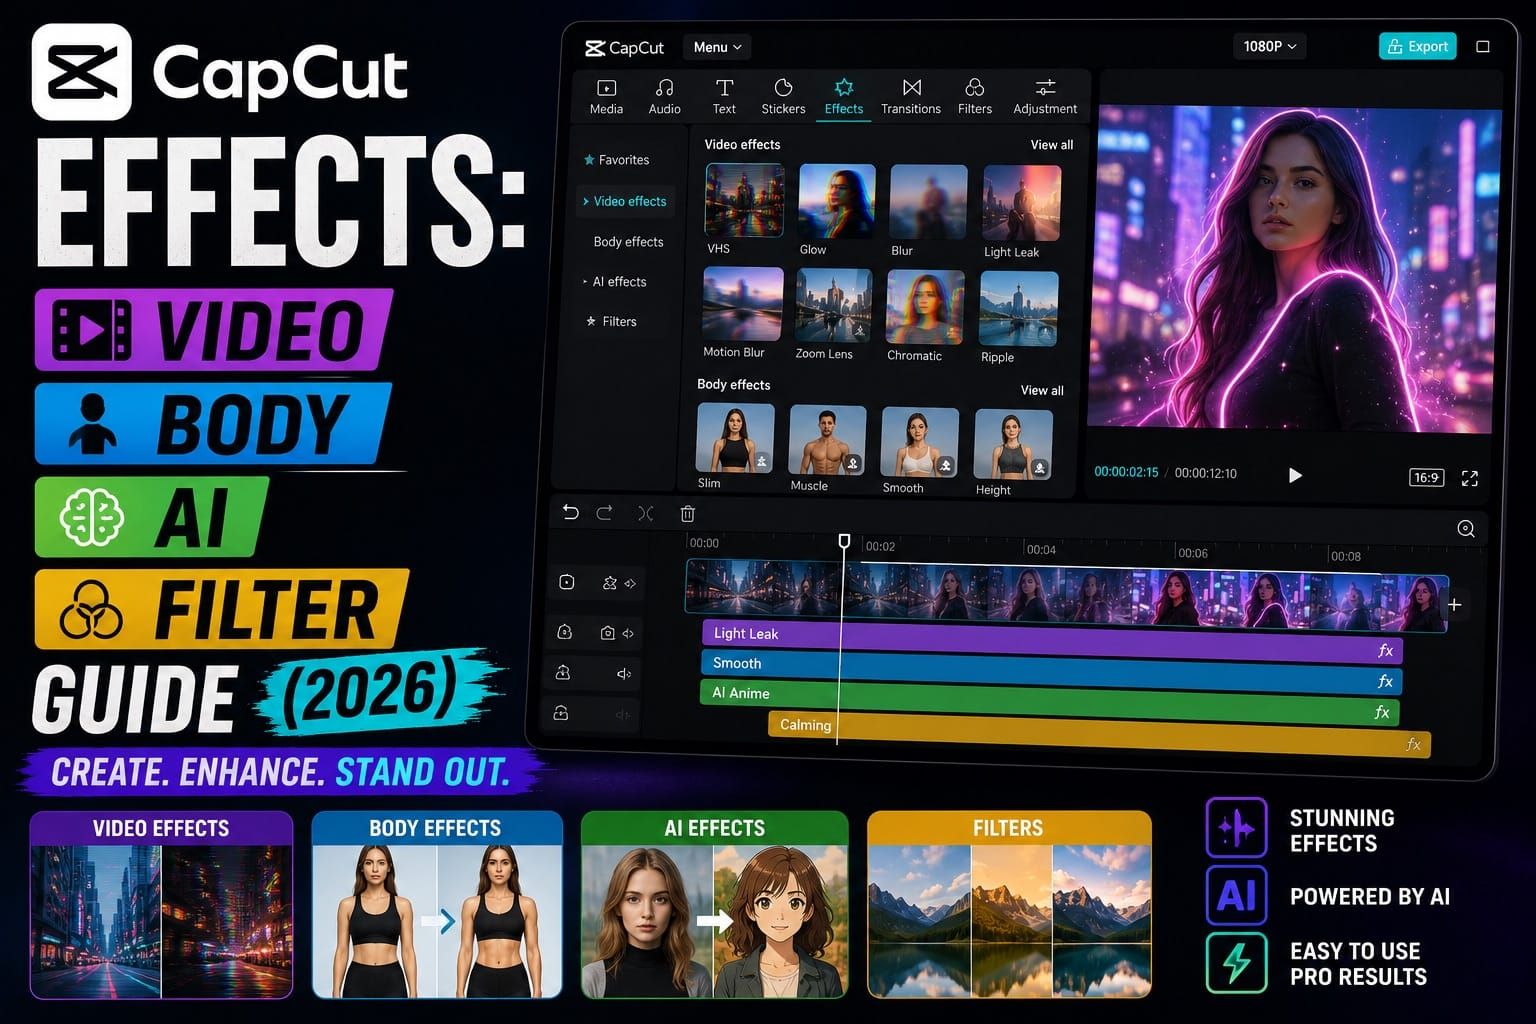
This guide covers the main effect systems in CapCut, how each one works, where to find it, and what's free versus paid in 2026. CapCut changes effect names and categories often, so the focus here is on the systems rather than individual effects in the library.
CapCut Effects Quick Answer
CapCut effects are split into separate systems. Use Video Effects for full-frame looks like glitch, blur, VHS, light leaks, and distortion. Use Body Effects for person-tracking effects. Use Filters for color changes. Use Text Effects only on text layers. Use Transitions between clips. AI effects can appear in different menus depending on platform and version — check the selected clip panel if you don't see them in the Effects tab.
CapCut Effects Categories: What Each One Does
CapCut doesn't have one effects panel. It has several, and they work differently. Confusing them is the single most common reason effects seem to "not work."
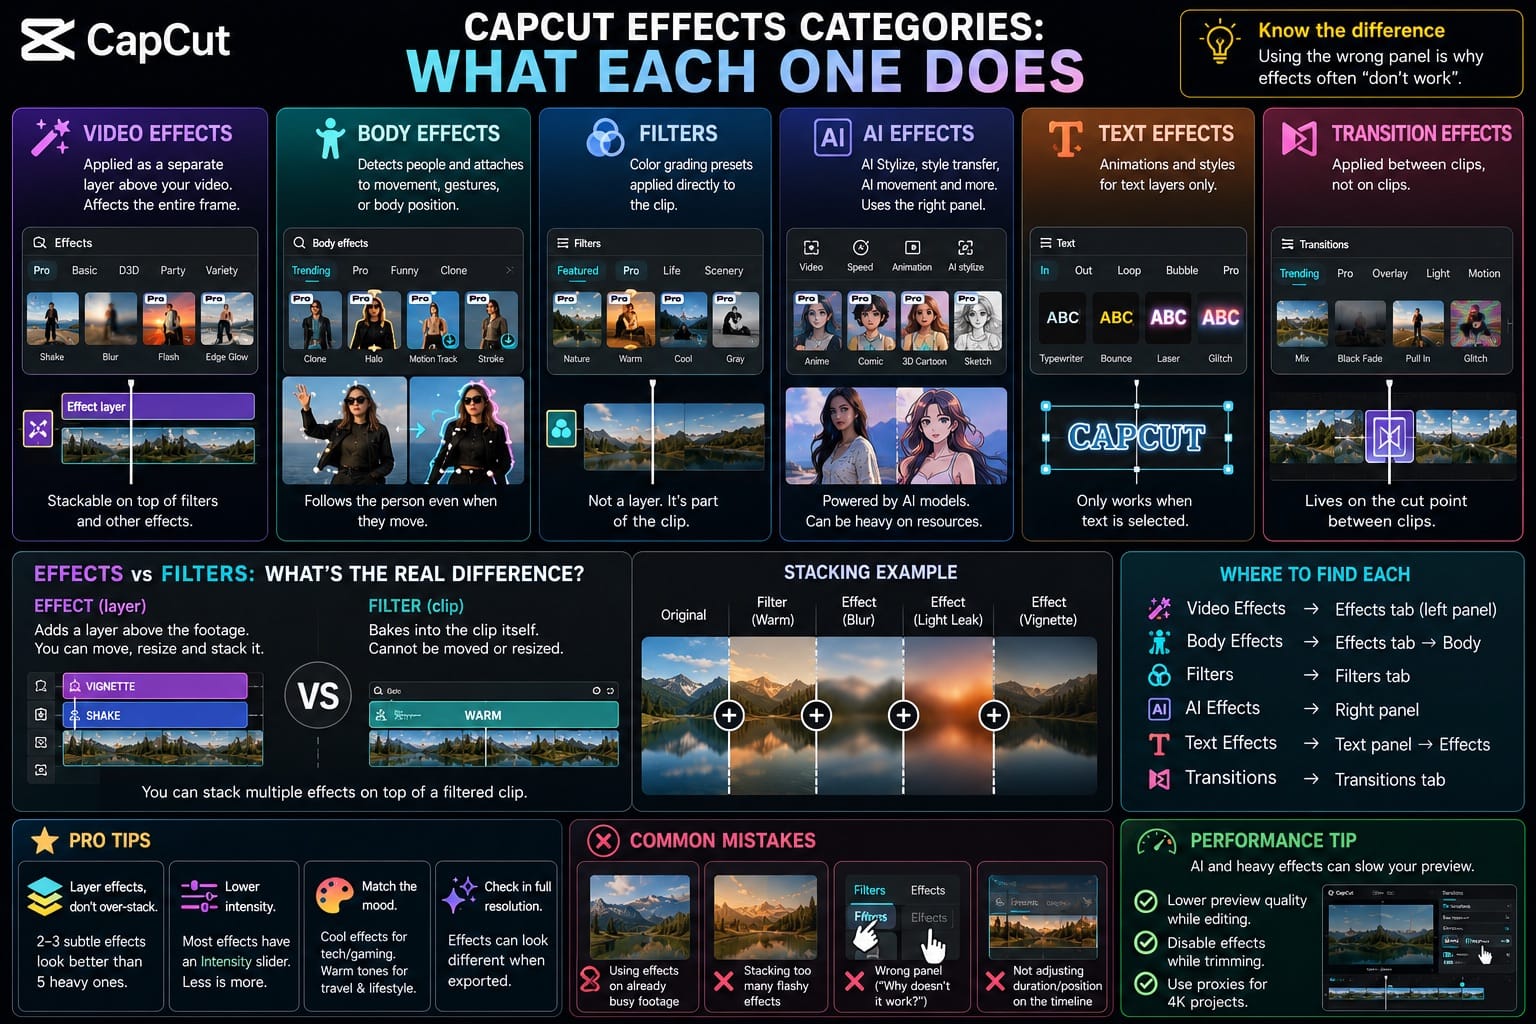
Here's what you're dealing with:
- Video Effects — applied as a separate layer on the timeline, above your footage. These affect the entire frame.
- Body Effects — detect people in the frame and attach to movement, gestures, or body position.
- Filters — color grading presets applied directly to a clip. Separate from effects entirely.
- AI Effects — include AI Stylize, AI style transfer, and AI movement. These use the right panel, not the Effects tab.
- Text Effects — animations and styling for text layers. Only available when a text element is selected.
- Transition Effects — applied between clips, not on them. Found under the Transitions panel. For the full workflow, see the CapCut transitions guide.
The key difference between video effects and filters: effects get their own timeline track, filters attach to the clip itself. That's why you can stack an effect on top of a filtered clip without one cancelling the other.
CapCut Video Effects: How to Add and Adjust Them
Video effects are what most people mean when they say "CapCut effects." This is where you'll find glitch, blur, VHS, distortion, chromatic aberration, light leaks, and hundreds of trending looks.

On Desktop
- Open your project and place your clip on the timeline.
- Click Effects in the top toolbar.
- Browse by category: Trending, Lens, Light, Retro, Distortion, Nature, Love, and more.
- Click an effect to preview it. Drag it onto the timeline — it lands as its own layer above your footage.
- Drag the edges of the effect layer to trim its duration. Move it left or right to reposition it on the timeline.
One thing that catches people: if you drag an effect onto the clip directly rather than the timeline, it may not apply. CapCut wants it dropped into the track area. Once it's on the timeline as its own layer, you can trim, extend, or move it independently of your footage.
On Mobile
- Tap Effects in the bottom toolbar (scroll right if you don't see it).
- Tap Video Effects.
- Browse or search by category. Tap any effect to preview it.
- Tap the checkmark to apply. The effect appears on its own track above the timeline.
- Tap the effect layer to trim, move, or adjust it.
A common mobile mistake: people tap an effect expecting it to apply to the selected clip. It doesn't — CapCut drops it at the playhead position as a new layer. Move your playhead to where you want the effect to start before applying.
On Web
The web editor at capcut.com has a pared-down version of the effects library. Find Effects in the left sidebar. The workflow is the same: click to preview, drag to the timeline. The category selection is smaller than desktop but covers the most popular looks.
CapCut Body Effects: What They Are and When to Use Them
Body effects use CapCut's AI to detect people in the frame and apply visual changes tied to their presence or movement. These include things like motion trails, body outlines, particle effects, dynamic shadows, and stroke-style overlays.
They do not work on empty scenes, landscapes, or footage with no people visible. This seems obvious but it's the most common reason body effects appear to do nothing. If your clip has no detectable person, the effect has nothing to attach to. The same failure can happen if the person is too small in frame, partially off-screen, blocked by objects, or poorly lit — the AI may detect nothing even though a person is technically present.

To access body effects on desktop: Click Effects in the top toolbar, then select Body Effects from the tabs. Apply and trim the same way as video effects.
On mobile: Tap Effects, then tap Body Effects in the category row.
Body effects are particularly useful for dance videos, reaction clips, fitness content, or any short-form video where motion is a focal point. On TikTok or Reels edits, they're often more effective than standard video effects because they stay locked to the subject rather than covering the whole frame.
CapCut AI Effects: Stylize, Auto Velocity, and AI Style Transfer
AI effects are the least consistent part of CapCut's interface because they move between mobile, desktop, and web builds. On desktop, most AI tools appear after selecting a clip and checking the right-side editing panel. On mobile, they're usually inside the Edit toolbar or AI-related menus.
Depending on your build, you may see tools labelled AI Stylize, AI style transfer, Auto Velocity, AI Movement, background removal, or other AI-assisted effects. If a tutorial shows an AI tool you can't find, check the same project on mobile and desktop before assuming it was removed — the menu location often differs by platform and app version.
Auto Velocity automatically creates speed ramps synced to audio beats in your clip. Select your clip, open AI Stylize in the right panel (on desktop), and apply Auto Velocity. CapCut analyzes the audio and applies speed curve adjustments automatically.
AI Style Transfer converts your footage into a visual style — cartoon, anime, oil painting, sketch, and others. These tools can take noticeably longer than standard effects because they require analysis or generation. Processing time depends on clip length, account access, connection speed, and hardware. The results vary a lot by footage type. Clean, well-lit footage with a clear subject works best. Busy or dark scenes tend to produce muddier output.
AI Movement adds simulated camera motion — zoom, shake, soft drift, dynamic pan — without needing to touch keyframe animation. Find it in the right panel under the Video section on desktop. Useful for adding energy to static footage without manual keyframing.
CapCut Filters vs. Effects: The Difference That Matters
A lot of people use these terms interchangeably. In CapCut they're distinct tools.
Filters are color grading presets. They change the brightness, saturation, hue, and tone of your clip. Categories include Mono, Retro, Style, Food, Night Scene, Portrait, and others. Tap a clip, go to Filters, and the preset applies directly to that clip's color data.
Effects are visual layers added on top of footage. They add elements — grain, distortion, light flares, glitch patterns — rather than changing the underlying color.
You can use both at the same time. I often run a Retro filter on a clip and then drop a VHS Glitch effect on top. The filter sets the color mood, the effect adds the texture. Stacking them doesn't cancel either one out, though stacking too many effect layers can create visual noise that makes neither element readable.
CapCut Effects That Are Free vs. Paid
CapCut includes a large number of free video effects, body effects, and filters, but the exact free/paid split can change by platform, region, account status, and app version. The safest signal is the crown icon: effects, templates, or AI tools marked with a crown are paid assets.
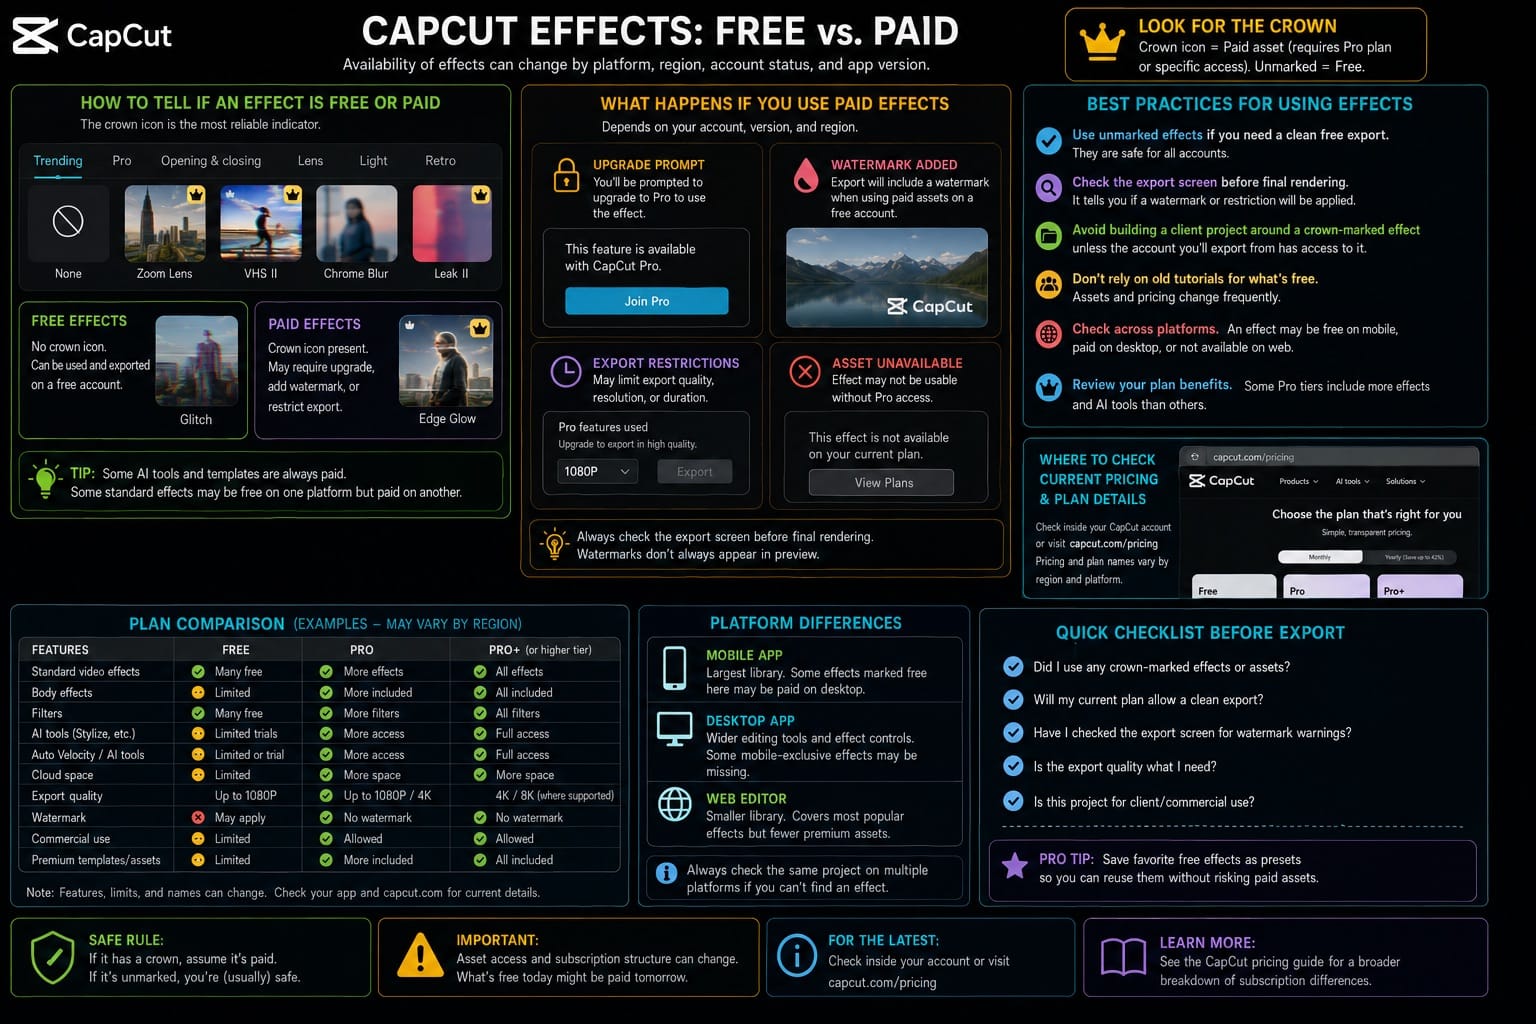
If you use a crown-marked effect on a free account, CapCut may prompt you to upgrade, add a watermark, restrict export, or make that asset unavailable — depending on your version and region. Do not assume the same effect behaves identically on mobile, desktop, and web. After CapCut's pricing and plan changes, some assets that older tutorials show as free may now require a paid plan.
Practically, this means:
- Use unmarked effects if you need a clean free export.
- Check the export screen before final rendering — watermarks don't always appear in preview.
- Avoid building a client project around a crown-marked effect unless the account you'll export from has access to it.
- Don't rely on old tutorials for which effects are free; CapCut's asset access and subscription structure can change.
For current pricing and plan inclusions, check inside your CapCut account or the official pricing change page at capcut.com directly. Pricing and plan names vary by region and platform. For a broader breakdown of subscription differences, see the CapCut pricing guide.
CapCut Effects Not Working: 7 Actual Causes
This comes up constantly in forums. Here are the real reasons effects don't apply or don't show up, not the generic "restart the app" advice:
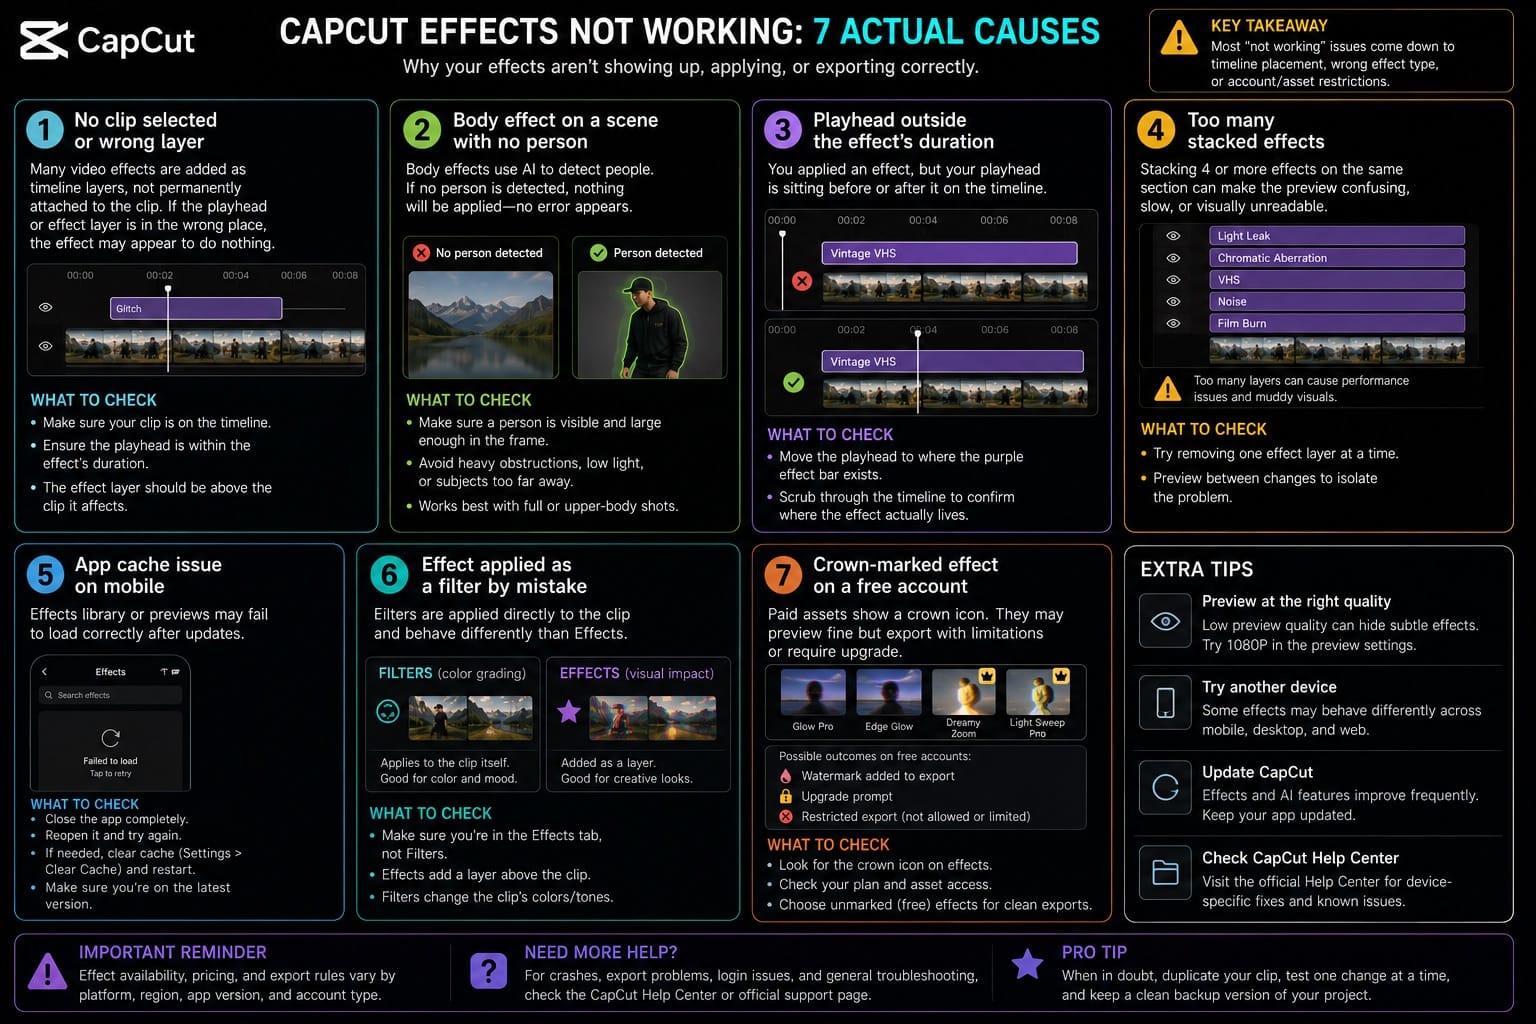
- No clip selected or wrong layer. Many video effects are added as timeline layers rather than being permanently attached to the selected clip. If the playhead or effect layer is in the wrong place, the effect may appear to do nothing. Make sure your clip is on the timeline and the playhead is within the effect's duration before assuming it hasn't applied.
- Body effect on a scene with no person. The AI detects no subject and applies nothing visually. No error appears.
- Playhead outside the effect's duration. You applied an effect, but your playhead is sitting before or after its timeline position. Scrub through the timeline to confirm where the effect actually lives.
- Too many stacked effects. Stacking 4 or more effects on the same section can make the preview confusing, slow, or visually unreadable. Try removing one layer at a time to isolate the problem.
- App cache issue on mobile. Effects library fails to load on some devices after updates. Closing and reopening the app clears this in most cases.
- Effect applied as a filter by mistake. If you went to Filters instead of Effects, the item behaves differently and may look like it's not doing anything on a clip that already has strong color grading.
- Crown-marked effect on a free account. The effect may look fine in preview but export with a watermark, an upgrade prompt, or a restricted export depending on your app version, region, and account status. This isn't a bug — it's expected behavior for paid assets on a free account.
CapCut's own help page on this covers a few of these, but it misses the body effect issue entirely. That one accounts for a surprising number of forum questions about effects "not working." For broader crash, export, and login fixes beyond effects, see the CapCut not working guide.
How to Stack CapCut Effects for Better Results
Single effects rarely look as good as combining two that serve different purposes. The rule I use: one effect for texture, one for motion or light.
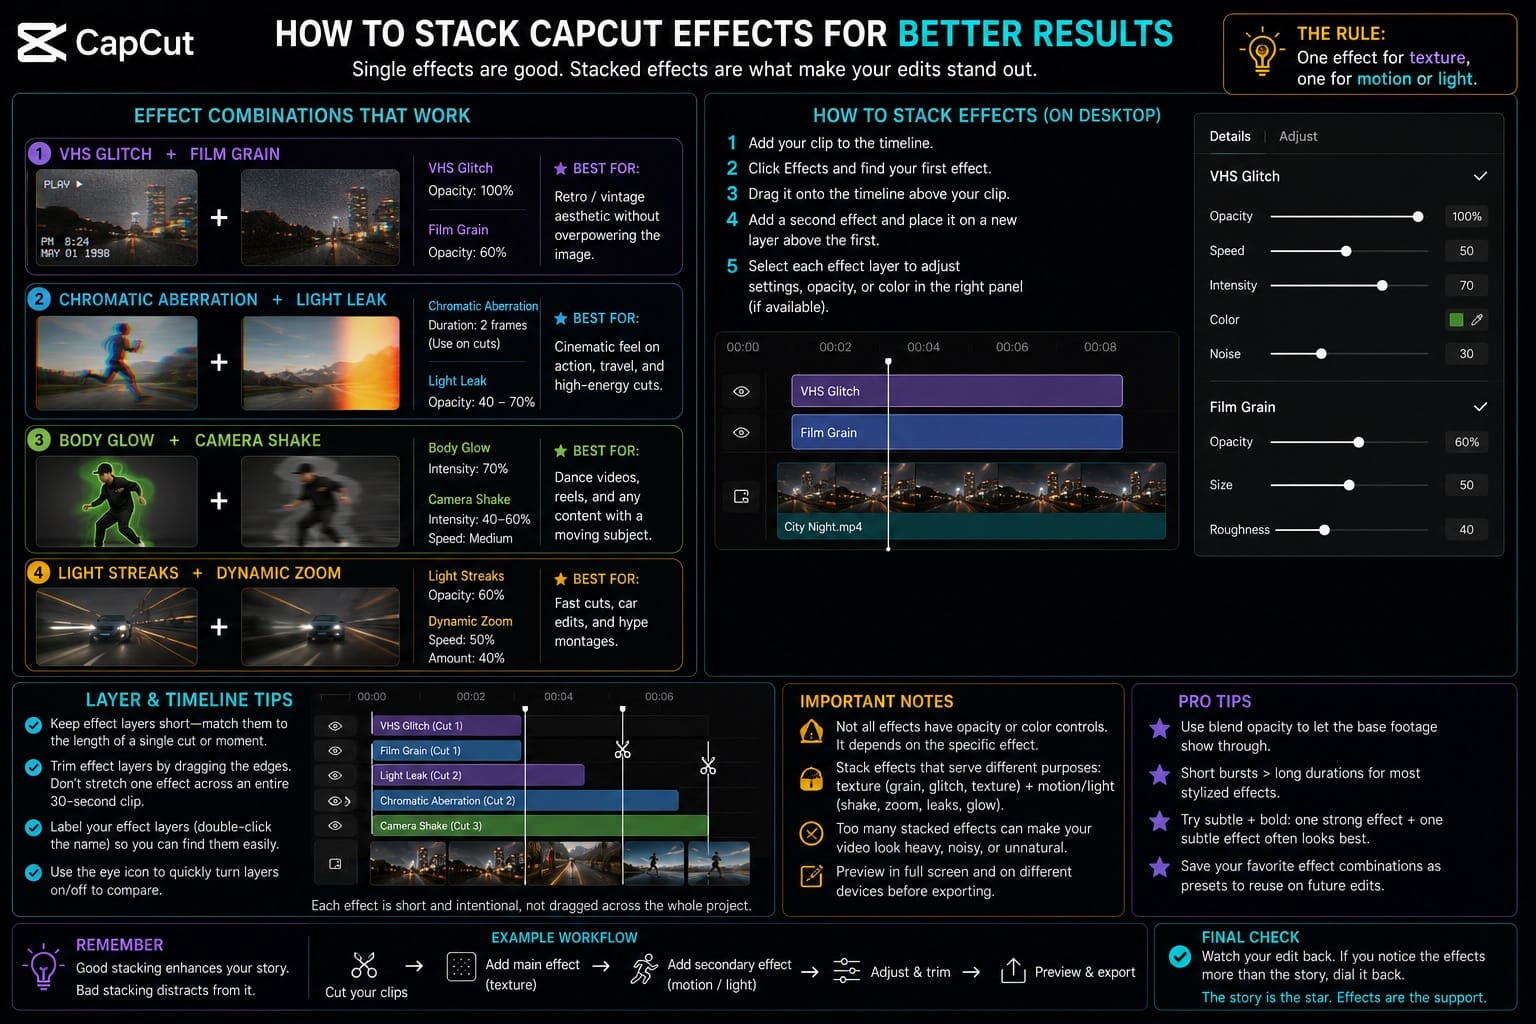
Some combinations that work well in practice:
- VHS Glitch + Film Grain — retro aesthetic without either element overpowering the other. Set VHS at full opacity, Film Grain at around 60%.
- Chromatic Aberration + Light Leak — cinematic feel on action or travel footage. Keep Chromatic Aberration to 2-frame bursts on cuts rather than the whole clip.
- Body Glow + Camera Shake — effective for dance videos where you want motion and the subject to both feel dynamic.
On desktop, you can adjust the opacity and color of some effects by selecting the effect layer and checking the right panel. Not all effects expose these controls — it depends on the specific effect. If you don't see opacity controls, the effect doesn't support them.
Keep your effect layers visible and labeled in the timeline. On longer projects, it's easy to lose track of which effect is causing a specific look. I keep effects intentionally short — usually matching the length of a single cut — rather than running one effect across an entire 30-second clip.
CapCut Effects for Specific Content Types
Different content types respond to effects differently. Here's what's worked reliably for short-form video on TikTok, Reels, and YouTube Shorts:
Dance and Transition Videos
Body effects sync well here because they attach to movement. Use Stroke, Motion Trail, or Axis Rotation body effects timed to beat drops. Pair with a 2-frame Chromatic Aberration on sharp cut transitions to add punch without overwhelming the subject.
Travel and Lifestyle Footage
Filters do most of the work here — Retro or Cinematic categories. Add a Light Leak video effect at clip transitions rather than over the whole clip. 3-5 second burst of a light effect at a cut point feels intentional. A 30-second light effect on a 30-second clip just looks heavy-handed.
Tutorial and Talking Head Content
Minimal effects work better than heavy ones. A subtle Film Grain filter on the base clip, maybe a zoom-in keyframe at a key point. AI Movement with the Zoom setting can add visual rhythm to a static talking head without looking artificial if you keep the scale below 15%.
Text-Heavy Short-Form
Text effects are underused here. If your video is primarily text on screen, the text animation is the effect — you don't need video effects competing with it. Pick one text animation style and stay consistent across cuts.
CapCut Effects on Mobile vs. Desktop: The Real Differences
The effects library is not identical across platforms. This matters if you start a project on mobile and finish it on desktop (or vice versa).
The available library can differ by platform. Mobile often exposes more trend-driven effects and template-style looks, while desktop gives you better timeline control over effect duration, layering, and placement. The web editor usually has the smallest or most simplified selection — useful for quick edits but limited for effects-heavy projects.
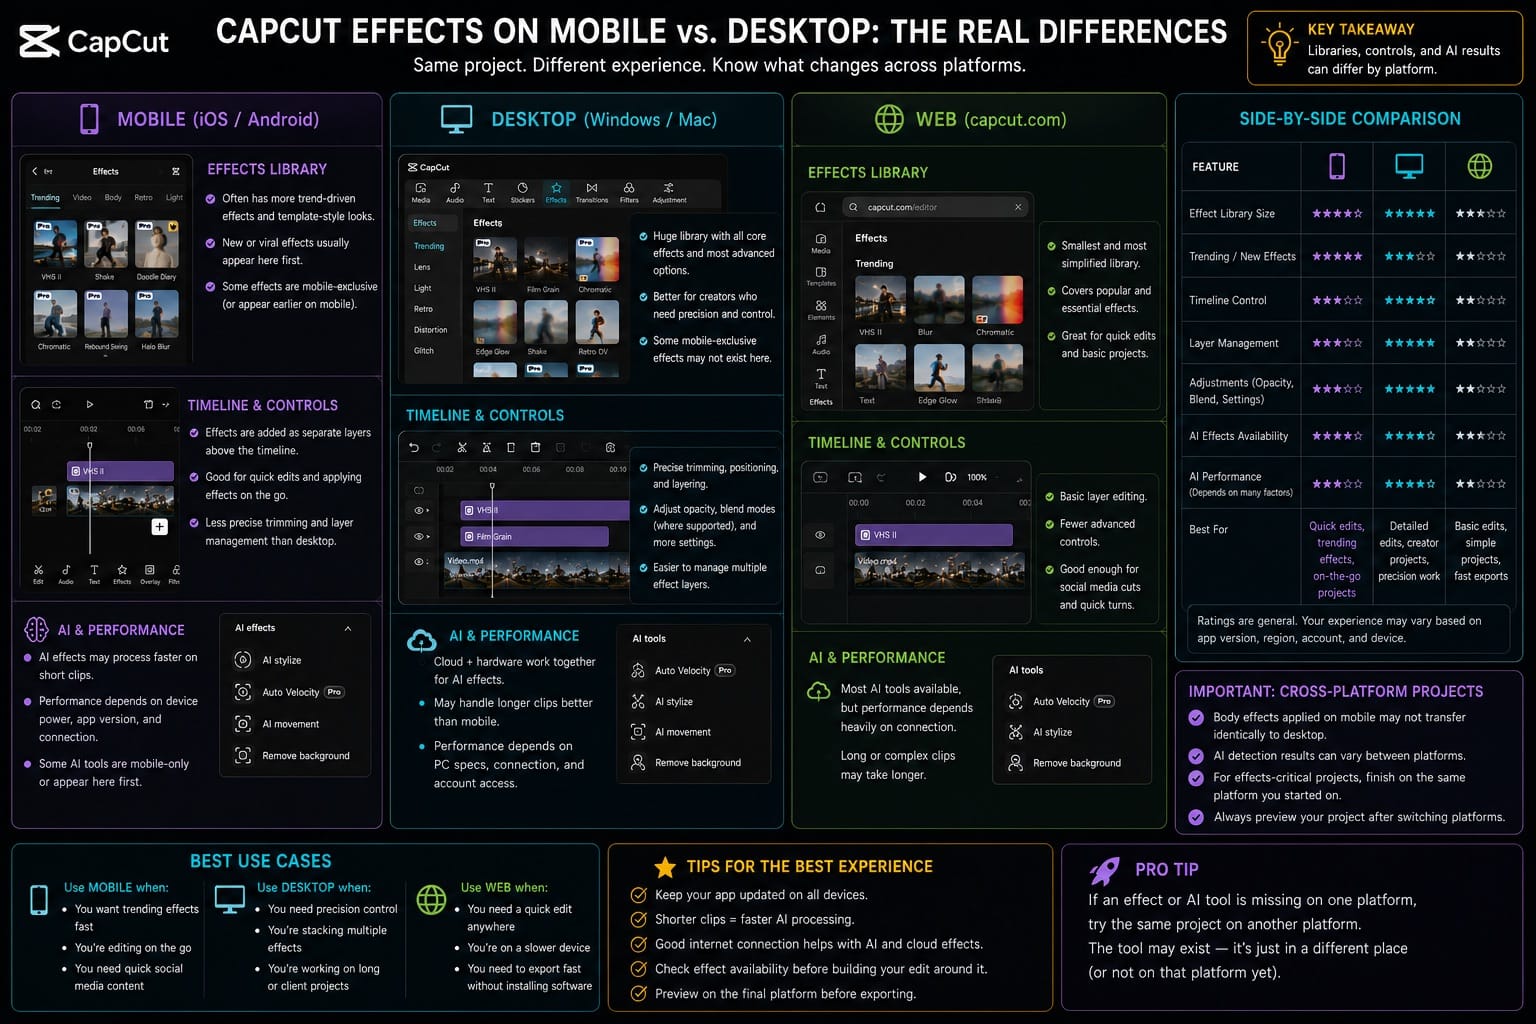
AI effects can feel different across platforms because some processing depends on cloud analysis, account access, connection speed, and local hardware. If an AI effect feels sluggish, try a shorter clip, check your connection, update the app, or test the same project on another platform before assuming the feature is broken.
One difference that trips people up: body effects applied on mobile don't always transfer identically to desktop when you open the same project. The AI detection result can vary slightly between platforms. For effects-critical projects, finish on whichever platform you started on.
Frequently Asked Questions About CapCut Effects
Are CapCut effects free?
Many are free, but the exact free/paid split can change by platform, region, and account status. Effects with a crown icon are paid assets. On a free account, CapCut may add a watermark, prompt you to upgrade, restrict export, or make the effect unavailable depending on your current app version and region. Always check for the crown icon before building a project around a specific effect.
How do I find trending effects in CapCut?
Open Effects from the toolbar and check the Trending category. This updates regularly and reflects what's currently popular on TikTok and Reels. On mobile, you can also find trending effects via the Discover tab or by searching specific effect names you've seen on other videos.
Can I use CapCut effects offline?
Some recently used assets may remain available after loading, but CapCut's effects library is tied to online asset delivery. For best results, connect to the internet before starting an effects-heavy edit, especially if you need effects you haven't used before. Effects can also be removed from CapCut's central catalog at any time — CapCut confirms that membership does not guarantee indefinite access to every past asset.
Why does my CapCut effect export with a watermark?
The effect is likely a paid or crown-marked asset. Depending on your app version, region, and account, CapCut may watermark the exported section, ask you to upgrade, or restrict the export entirely. The watermark doesn't appear during preview — only in the exported file. Check for the crown icon before applying if clean export matters. For current plan details, check the subscription screen inside your CapCut account.
Can I use CapCut effects on photos?
Yes. CapCut's effects and filters work on photo clips as well as video. Import a photo, set its duration on the timeline, then apply effects the same way you would to video. Body effects require a detectable person in the photo to function.
How many effects can I stack in one CapCut project?
There's no hard cap on the number of effect layers you can add. In practice, heavy effect stacking on long projects can cause preview lag or export slowdowns, especially on mobile. Keeping it to 2-3 effect layers per clip section gives you flexibility without hurting performance.