
I shot a talking head clip last week in my home office and didn't notice the shelf of half-unpacked boxes behind me until I was already in the timeline. No time to reshoot. I duplicated the layer, applied a Gaussian blur to the bottom track, used Remove BG on the top track, and had a clean blurred background in about 4 minutes. In most current versions, this workflow runs on free tools as long as your project doesn't rely on Pro-marked effects or AI assets.
That's the method most tutorials skip over or explain badly. Below are all 3 ways to blur a background in CapCut, ranked from fastest to most precise, with the real caveats each one carries. CapCut's official blur background guide confirms there's no single one-click option for this, which explains why so many people get stuck.
CapCut Blur Background: Which Method to Use
For most talking-head and portrait videos, the best method is to duplicate the clip, blur the bottom layer, and use Remove BG or Auto Cutout on the top layer. This keeps the subject sharp while the background goes soft. For objects, pets, screens, or license plates, use the mask tool instead.
CapCut Blur Background Method 1: Duplicate Layer + Remove BG (Best for Portraits)
This is the cleanest approach if your clip has a person as the main subject. It stacks two copies of your video: a blurred version on the bottom layer, and a cutout of yourself on the top layer. The Auto Cutout AI handles the subject isolation automatically.
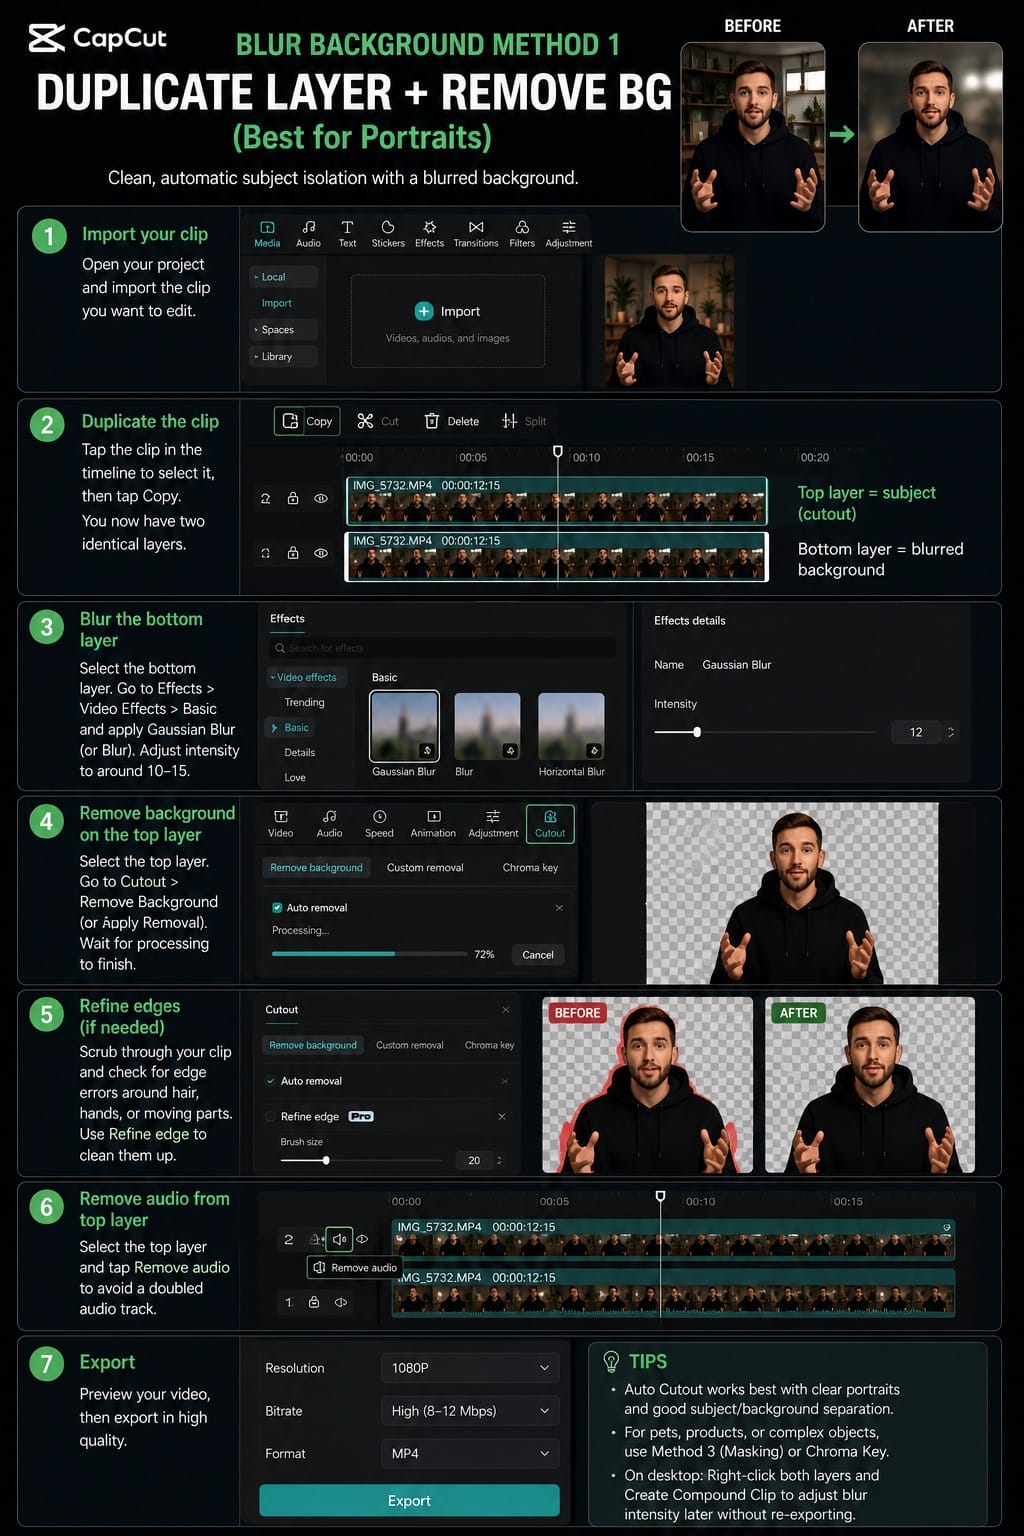
- Open your project and import the clip.
- Tap the clip in the timeline to select it, then tap Copy. You now have two identical layers.
- Select the bottom layer. Go to Effects > Video Effects > Basic and apply a blur effect. Gaussian Blur works well. Pull the intensity slider to around 10–15. Higher than that starts to look artificial.
- Select the top layer. Go to Cutout > Remove Background (or Auto Removal depending on your version). Wait for processing to finish. Time varies based on clip length, resolution, device, and internet connection.
- Once done, scrub through to check for edge errors around hair or moving arms. Tap Refine Edge if available to clean up problem areas.
- Remove the audio from the top layer to avoid a doubled audio track.
- Export.
One thing most guides don't mention: Auto Cutout is most reliable on clear portrait footage with a person in frame. It can work on other subjects depending on contrast and how cleanly the background separates, but products, pets, and complex objects are less predictable. For those cases, use Method 3 with masking, or chroma key if your background is a single solid color.
On desktop, the same logic applies. Duplicate your clip, stack the layers, apply blur to the bottom, then select the top layer and go to Video > Remove BG > Auto Removal. Right-click both layers and create a Compound Clip so you can adjust the blur intensity later without re-exporting.
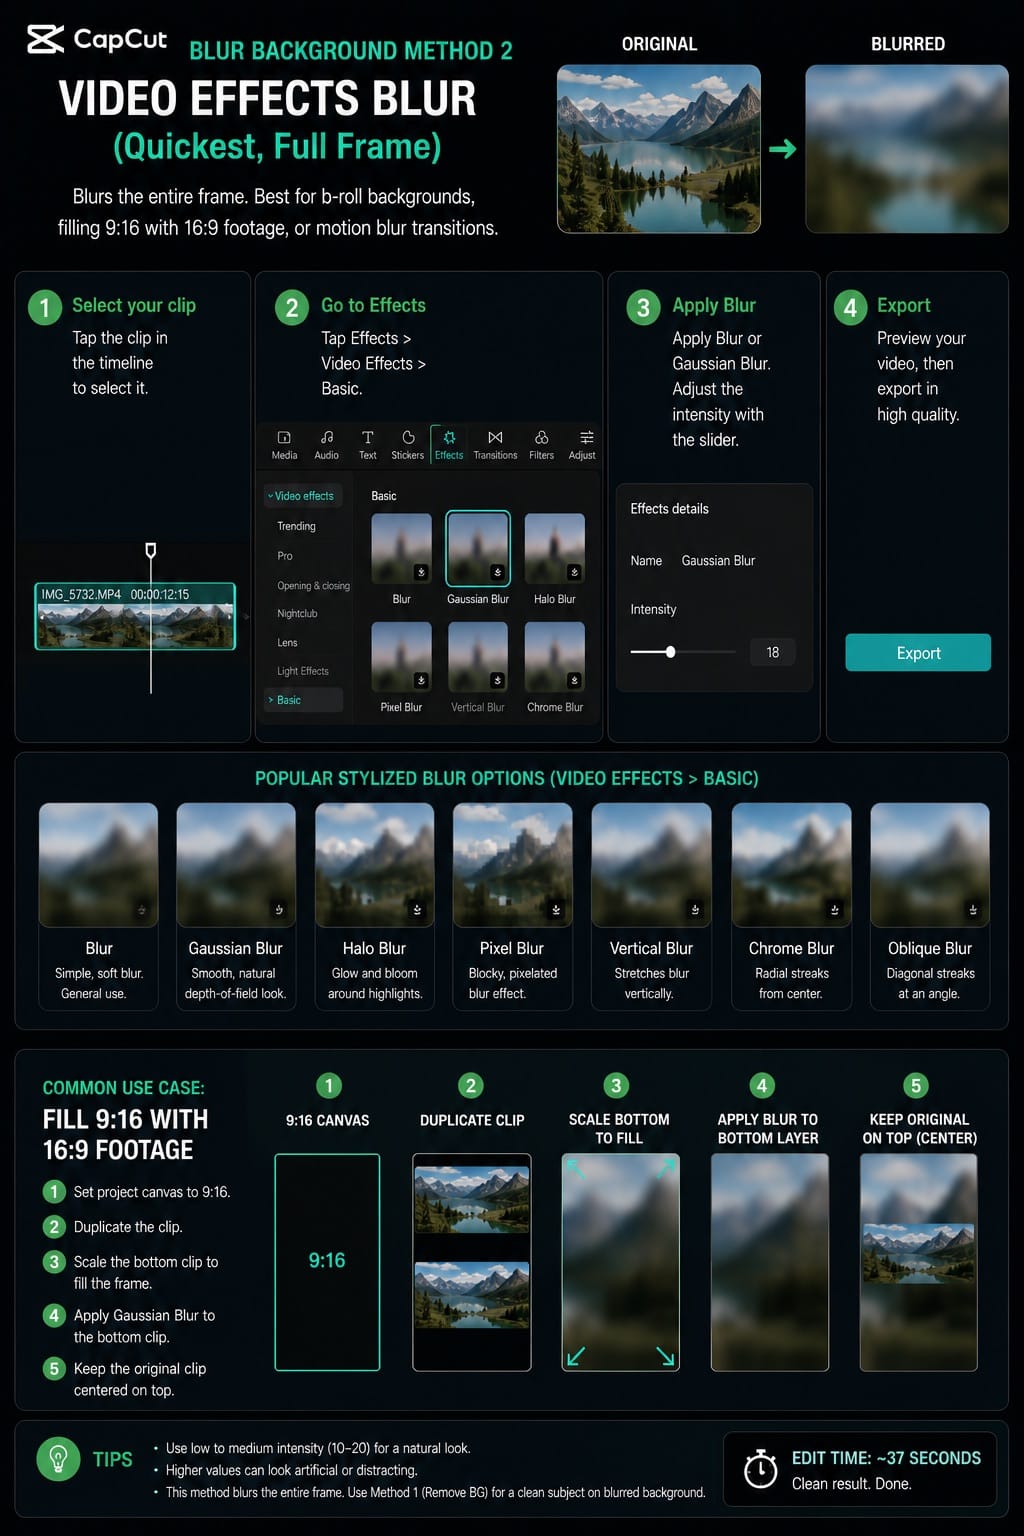
CapCut Blur Background Method 2: Video Effects Blur (Quickest, Full Frame)
Most tutorials lead with this method. I'd actually put it second, because it blurs the entire frame, not just the background. You have to pair it with a mask or a second layer if you want a clean subject. On its own, it's only useful for specific situations: blurring a clip used as a b-roll background, filling a 9:16 canvas with a blurred version of a 16:9 video, or adding a motion blur transition effect.
If that's what you need, here's the shortest path:
- Select your clip in the timeline.
- Tap Effects > Video Effects > Basic.
- Apply Blur or Gaussian Blur. Adjust the intensity with the slider.
- Export.
CapCut also lists stylized blur options in the same menu: Halo Blur, Pixel Blur, Vertical Blur, Chrome Blur, and Oblique Blur. These are more creative than functional. If you're going for a clean depth-of-field look, stick to Gaussian Blur and keep the intensity conservative.
The common use case I actually reach for this method: I have horizontal footage (16:9) that needs to go into a 9:16 TikTok frame. I set the canvas to 9:16, duplicate the clip, scale the bottom version to fill the frame, hit it with a blur effect, and let the unblurred original sit centered on top. 37 seconds of editing, clean result.
CapCut Blur Background Method 3: Mask Tool (Most Control)
If your subject isn't a person, or if Remove BG is creating messy edges, the mask approach gives you precise control over exactly which pixels get blurred.
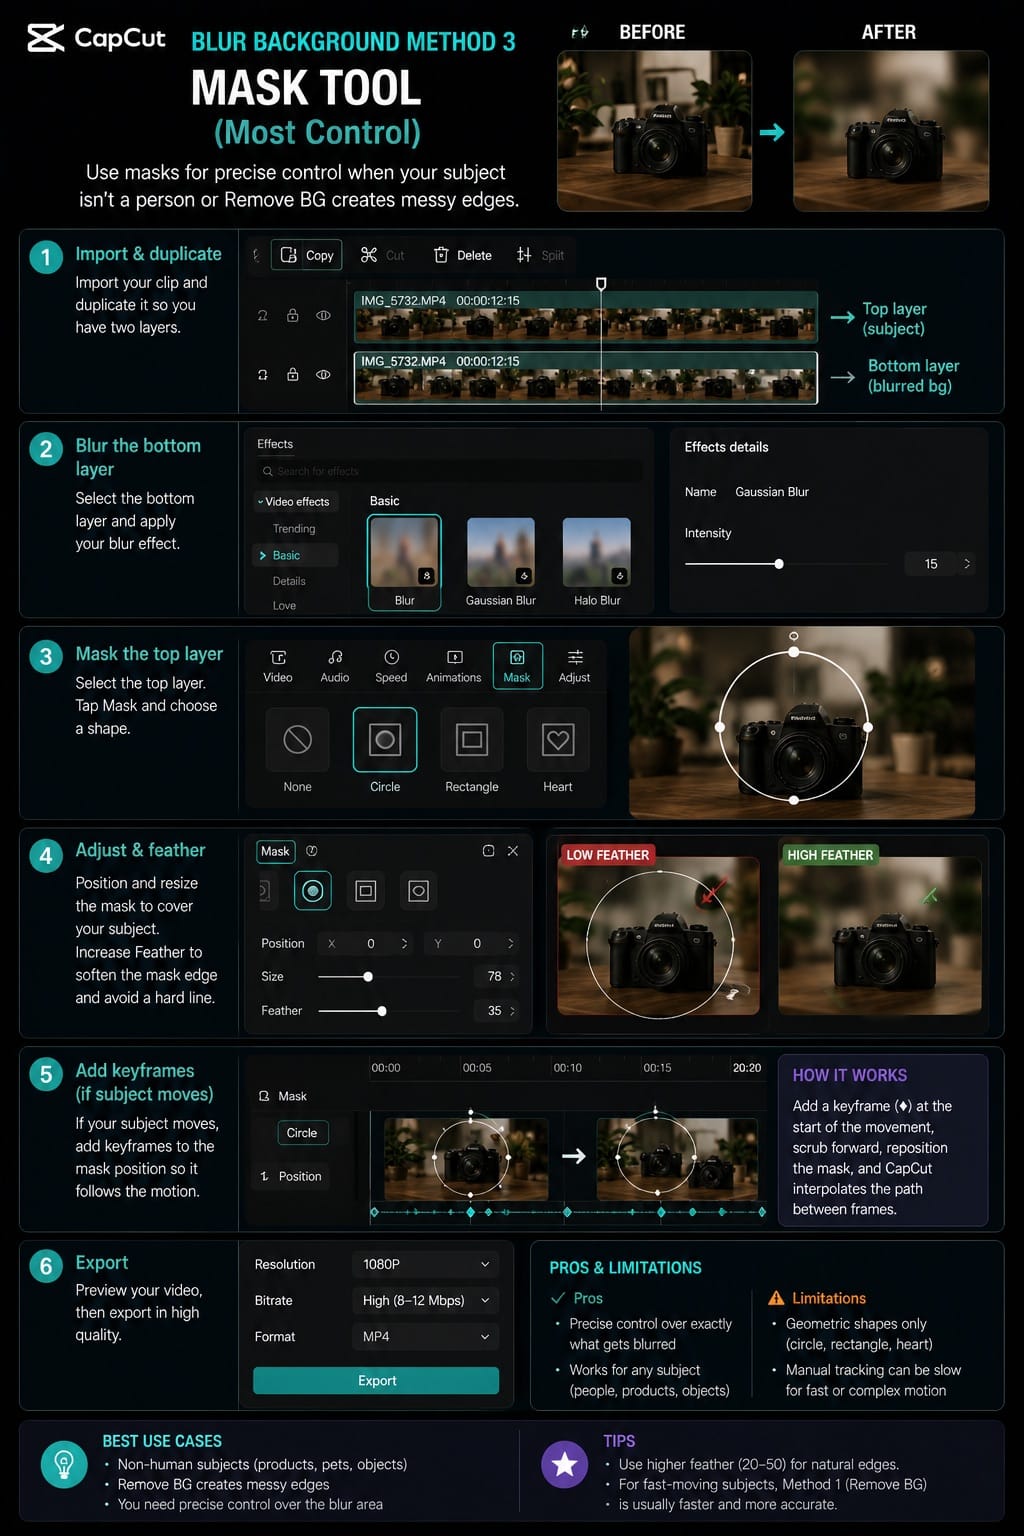
- Import your clip and duplicate it so you have two layers.
- Select the bottom layer and apply your blur effect (Video Effects > Basic > Blur).
- Select the top layer. Instead of Remove BG, tap Mask.
- Choose a mask shape: circle, rectangle, or heart. Position and resize it to cover your subject.
- Increase the Feather value to soften the mask edge. This prevents a hard cutout line around your subject.
- If your subject is moving, add keyframes to the mask position so it follows the motion. Tap the keyframe icon at the start of your subject's movement, scrub forward, reposition the mask, and CapCut interpolates the path between frames.
- Export.
For a mostly static talking-head clip, you may only need a few keyframes per minute. If the subject moves around often or walks across the frame, manual mask tracking becomes slow and error-prone fast. At that point, go back to Method 1 and clean up the AI cutout edges manually instead.
One thing worth knowing about the mask shapes: they're geometric. If your subject has an irregular outline (which almost everything does), you'll always have some blur bleeding in around the edges or some background left exposed. Feathering helps, but it doesn't solve the fundamental shape mismatch. This is a real limitation of CapCut's masking compared to apps with free-draw masks or AI tracking.
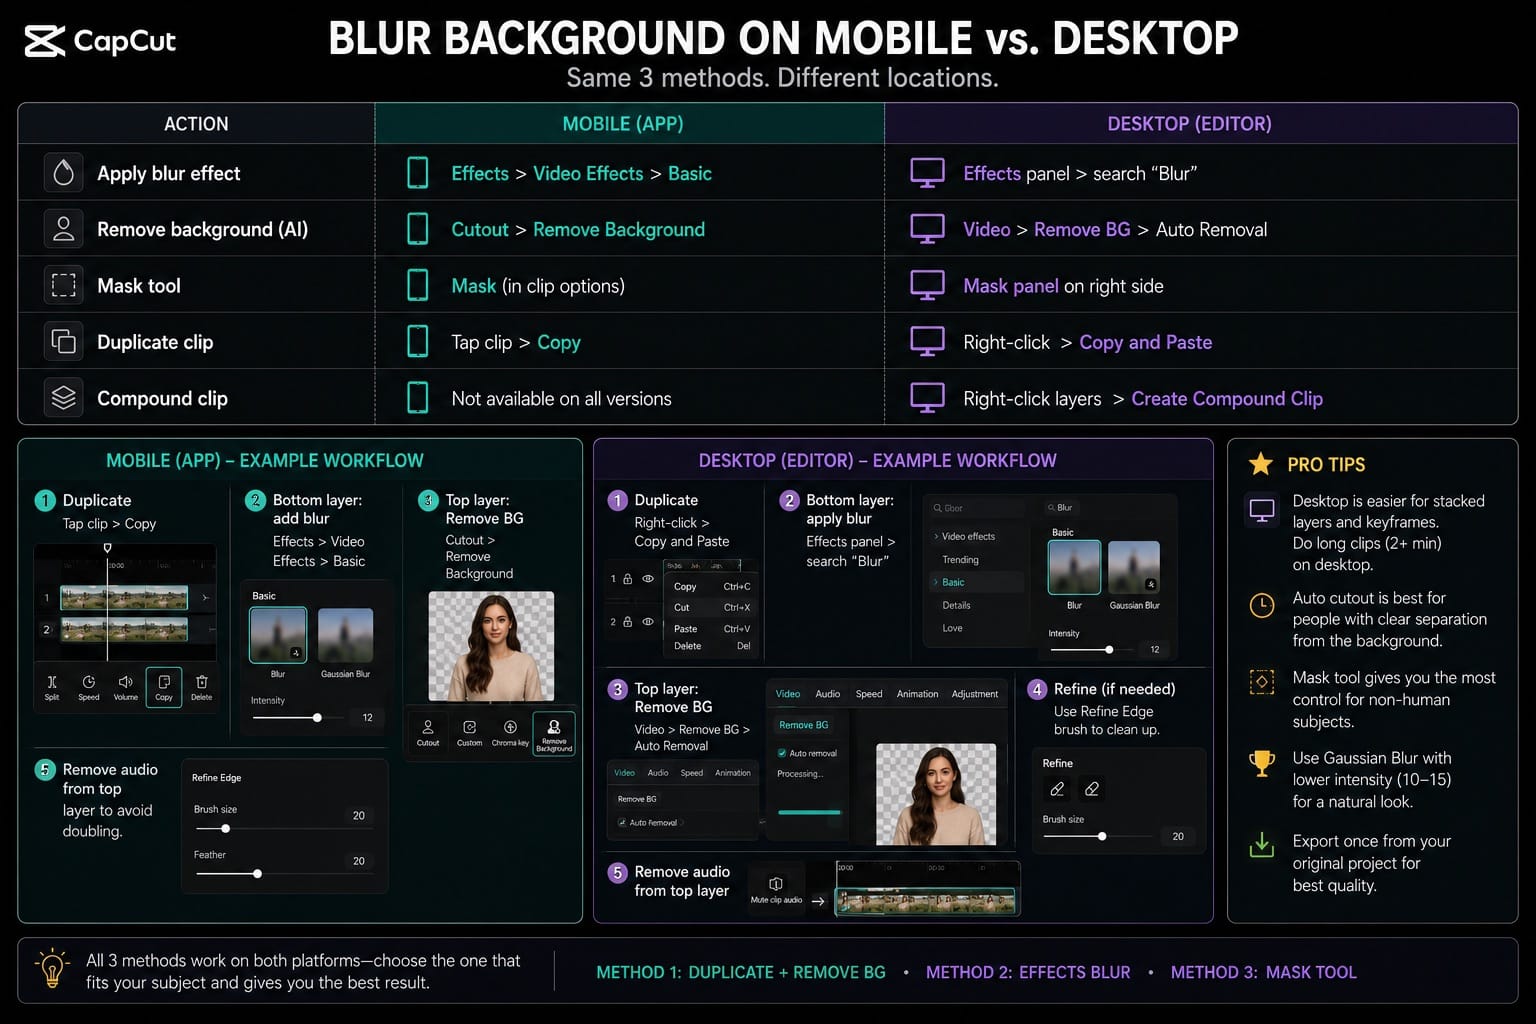
CapCut Blur Background on Mobile vs. Desktop
The 3 methods above work on both platforms, but with differences in where things are located.
| Action | Mobile | Desktop |
|---|---|---|
| Apply blur effect | Effects > Video Effects > Basic | Effects panel > search "Blur" |
| Remove background (AI) | Cutout > Remove Background | Video > Remove BG > Auto Removal |
| Mask tool | Mask (in clip options) | Mask panel on right side |
| Duplicate clip | Tap clip > Copy | Right-click > Copy and Paste |
| Compound clip | Not available on all versions | Right-click layers > Create Compound Clip |
Desktop is easier for the duplicate-layer method because managing stacked clips on a phone timeline gets fiddly, especially if you're adding keyframes. If you're editing a long clip (over 2 minutes), do this on desktop.
CapCut Blur Background Quality Issues and Fixes
The biggest complaint I see in r/capcut threads: the cutout looks clean in the preview but shows halos or fringing after export. This happens because H.264 compression at aggressive phone export settings exaggerates the edge artifacts that were barely visible at full resolution in the editor.
Two fixes that actually work (CapCut's desktop blur guide suggests high-resolution export for better edge clarity when source footage supports it, but for most vertical social uploads, 1080p is usually enough):
- Export at a higher resolution. If you were exporting at 720p, try 1080p. The encoder has more data to work with and the edge artifacts become less visible relative to frame size.
- Reduce blur intensity. Start around 10–15 and adjust based on your footage. Talking-head clips usually need less blur than a busy room background. Pushing it above 25–30 tends to make the composite look obviously edited.

Edge quality around hair is the other common issue. CapCut's Auto Cutout tends to eat fine hair strands and replaces them with the blurred background bleeding through. The
auto cutout refine edge brush helps, but for close-ups with flyaway hair, you'll often get cleaner results shooting against a plain wall and using CapCut's green screen tool instead of AI background removal.
The blur-from-duplicate method also doesn't give you depth-aware bokeh. Real depth-of-field blur from a camera lens blurs closer background elements less and farther ones more. CapCut's uniform blur applies the same intensity across the entire background layer. Most viewers won't notice on a phone screen, but it's visible on larger displays.
CapCut Blur Background FAQ
Is CapCut blur background free?
Basic blur effects and masking are generally available without a paid plan. The duplicate-layer workflow in this guide does not rely on Pro-locked templates or premium blur presets, but Remove BG and Auto Cutout availability can vary by platform, region, and app version. Check whether the feature is marked free or Pro in your current CapCut app.
Does CapCut have an automatic one-click blur background?
In the mobile and desktop editor, CapCut does not usually give you a single-tap background blur that perfectly isolates the subject and blurs only the background. The online CapCut web tool may simplify the process, but the app workflow still relies on layers, Remove BG, or masking to get the separation right.
Why does my blurred background look bad after export?
Most likely a combination of high blur intensity and export compression. Lower the blur slider to 10–15, and export at 1080p or higher. Also check that you don't have double audio from the duplicate layer.
Can I blur a specific area without blurring the whole video?
Yes, using the mask tool. Apply a blur effect to the clip, then tap Mask and draw a shape over the area you want blurred. If the object is moving, add keyframes to track it. This is the standard approach for blurring faces, license plates, or screens in CapCut.
Does blurring reduce video quality?
The blur effect itself doesn't reduce resolution. Your export resolution stays the same. What can degrade quality is the encoding step. If you export at a low bitrate or resolution, the combined effect of blur plus compression can make the video look worse than expected. Export at 1080p minimum for any clip with blur effects.
Does CapCut blur background work for non-portrait videos?
Auto Cutout works best on portrait footage with a clear person in frame. Results on pets, products, or objects are less consistent and depend on how well the subject contrasts with the background. For anything that isn't a person, the mask tool gives you more predictable results.
If you need sharper subject separation for complex clips, the Remove Background guide covers the refinement tools in more detail.