I ran into this problem on a talking-head Reel I filmed in my bedroom last month. Plain white wall, decent light, nothing fancy. The shot was fine but the background was boring, and I didn't have a green screen anywhere near me. Took me under 3 minutes to replace it using CapCut's Auto Removal. No green screen, no masking, no drama.
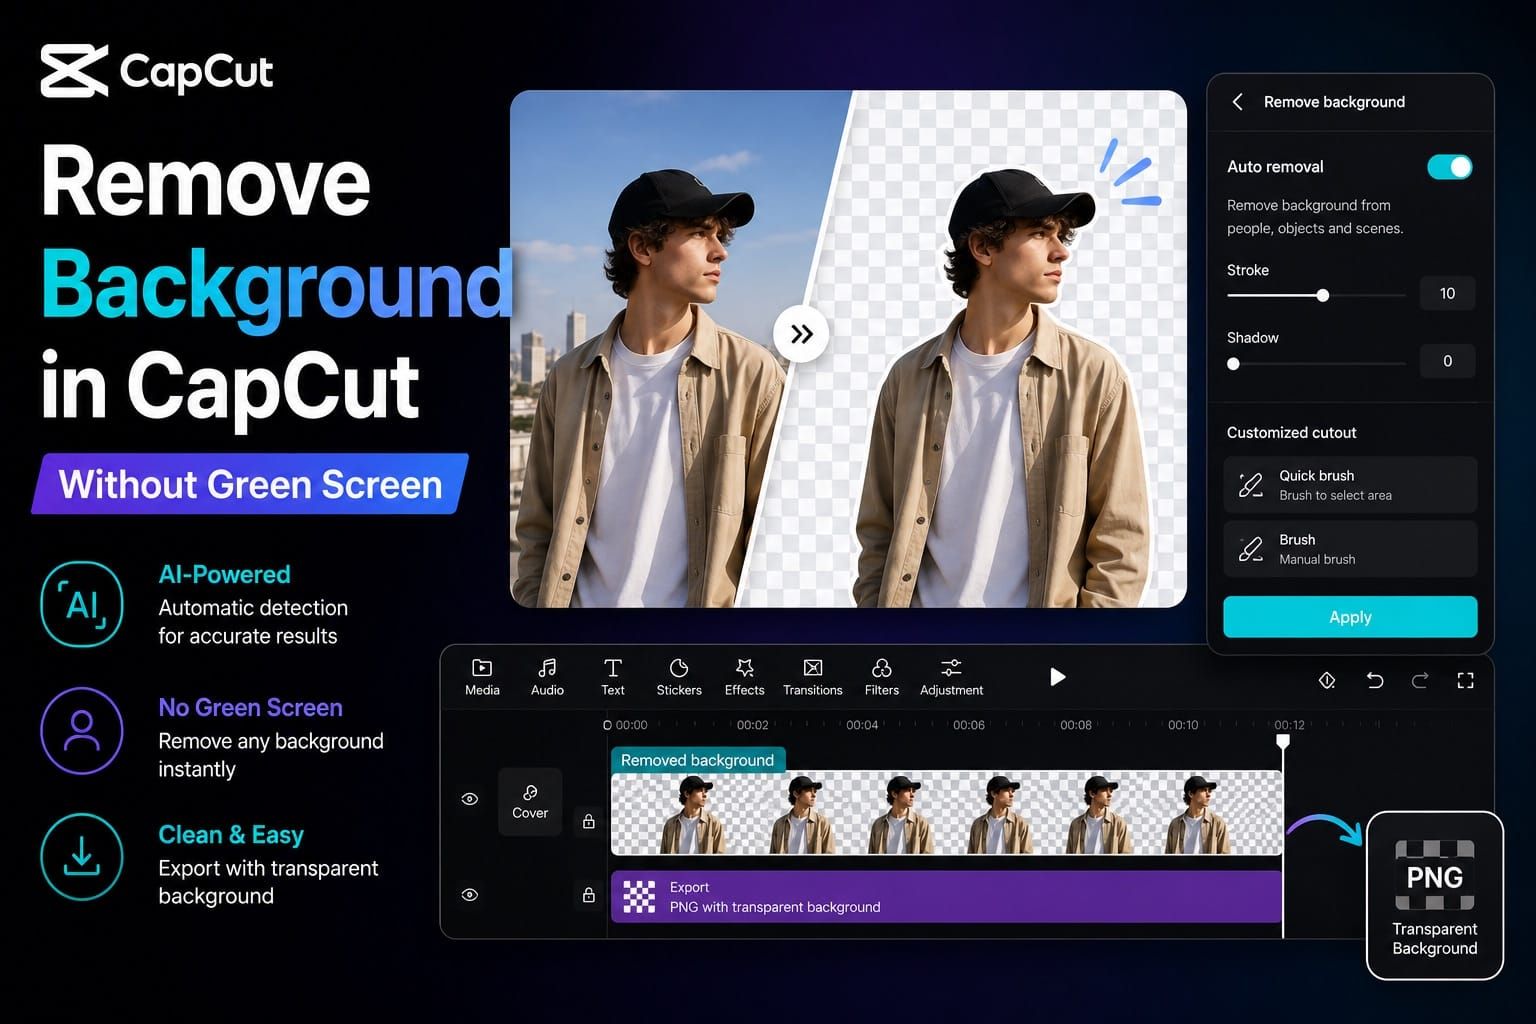
You can remove the background in CapCut without a green screen using the Auto Removal feature under Cutout (mobile) or Remove BG (desktop). CapCut's AI detects your subject automatically and cuts the background in seconds. For trickier footage or lower-contrast shots, Custom Removal gives you brush tools to clean up the edges manually. See CapCut's official background removal guide if you want to cross-check steps against the current version.
Below is the full breakdown: mobile steps, desktop steps, what the free plan actually covers, and the situations where Auto Removal tends to fall apart.
CapCut Auto Removal: How to Remove Background on Mobile
The mobile path is slightly different from desktop, and most tutorials mix them up. On mobile the feature lives under Cutout, not Remove BG.
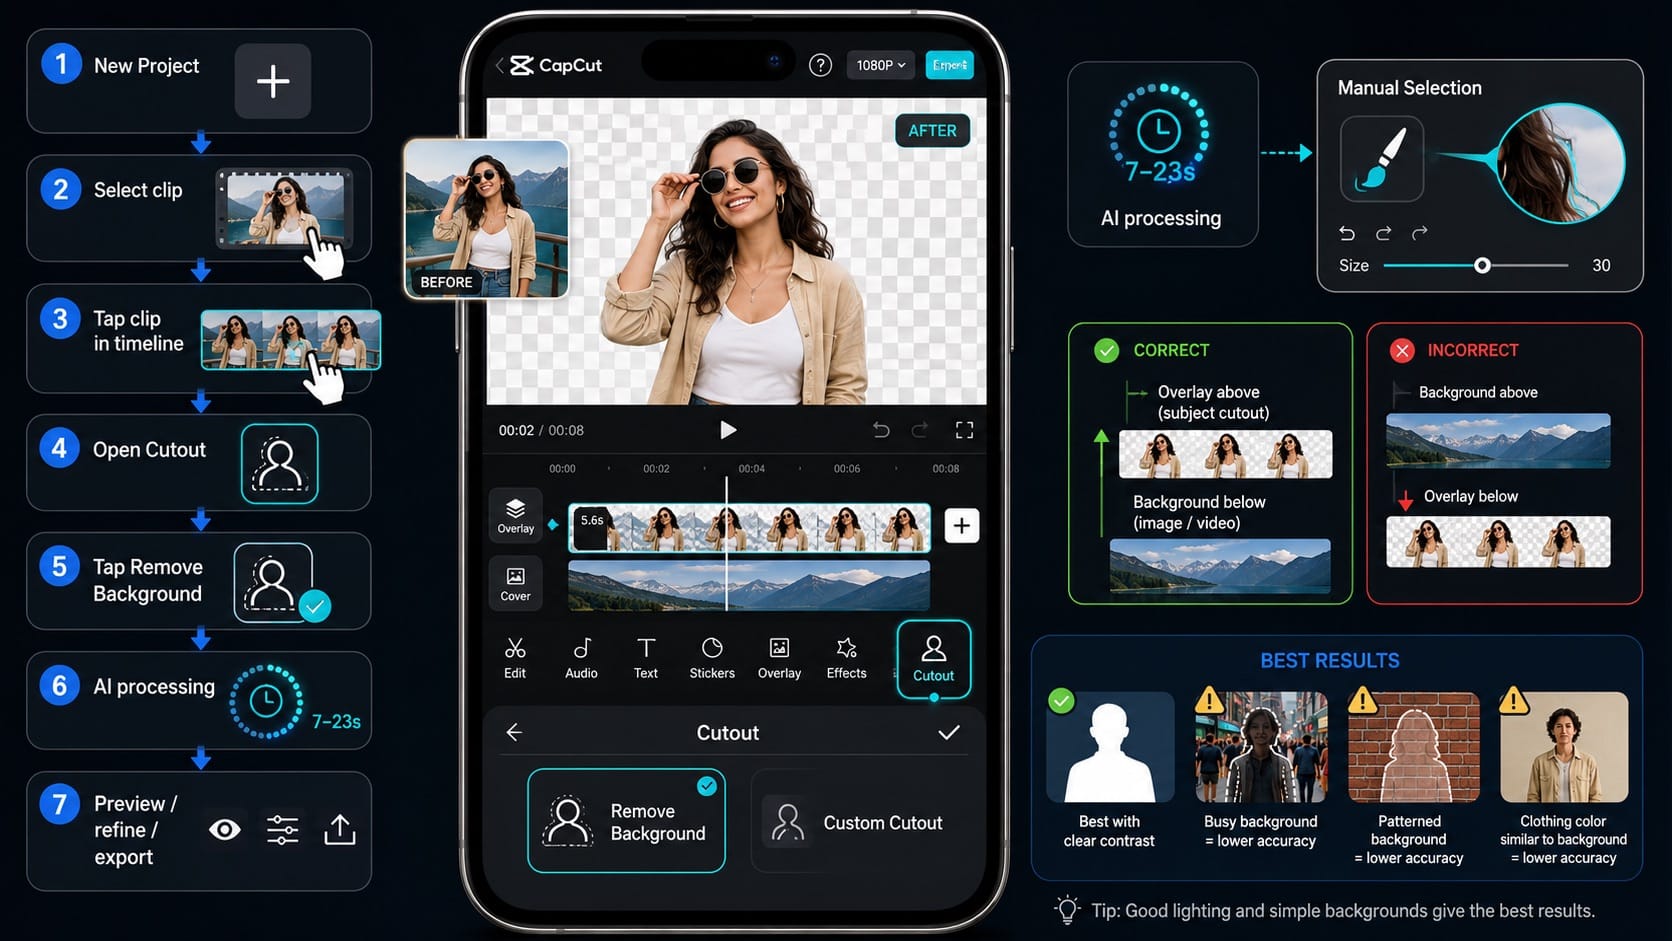
- Open CapCut and tap New Project.
- Select your video clip from the gallery and tap Add.
- Tap the clip in the timeline to select it.
- Scroll the bottom menu until you find Cutout, then tap it.
- Tap Remove Background.
- Wait for the AI to process. On an average phone this takes about 7 to 23 seconds for a 30-second clip, depending on resolution.
- Preview the result. If edges look rough, tap Manual Selection to use the brush tools.
- Tap the checkmark to apply, then export.
One thing most guides skip: you need to add your new background on a layer below the subject clip, not above it. Import the background video or image, place it on the main track, then put your cut-out clip on the overlay track on top. This is the step people miss and then wonder why the background won't show.
Auto Removal on mobile works best when there's clear contrast between you and the background. Busy walls, patterned fabric behind you, or similar colors to your clothing all reduce accuracy noticeably.
CapCut Remove Background on Desktop: Step-by-Step
Desktop calls the same feature Remove BG and it lives in a different spot than you'd expect if you're coming from mobile.
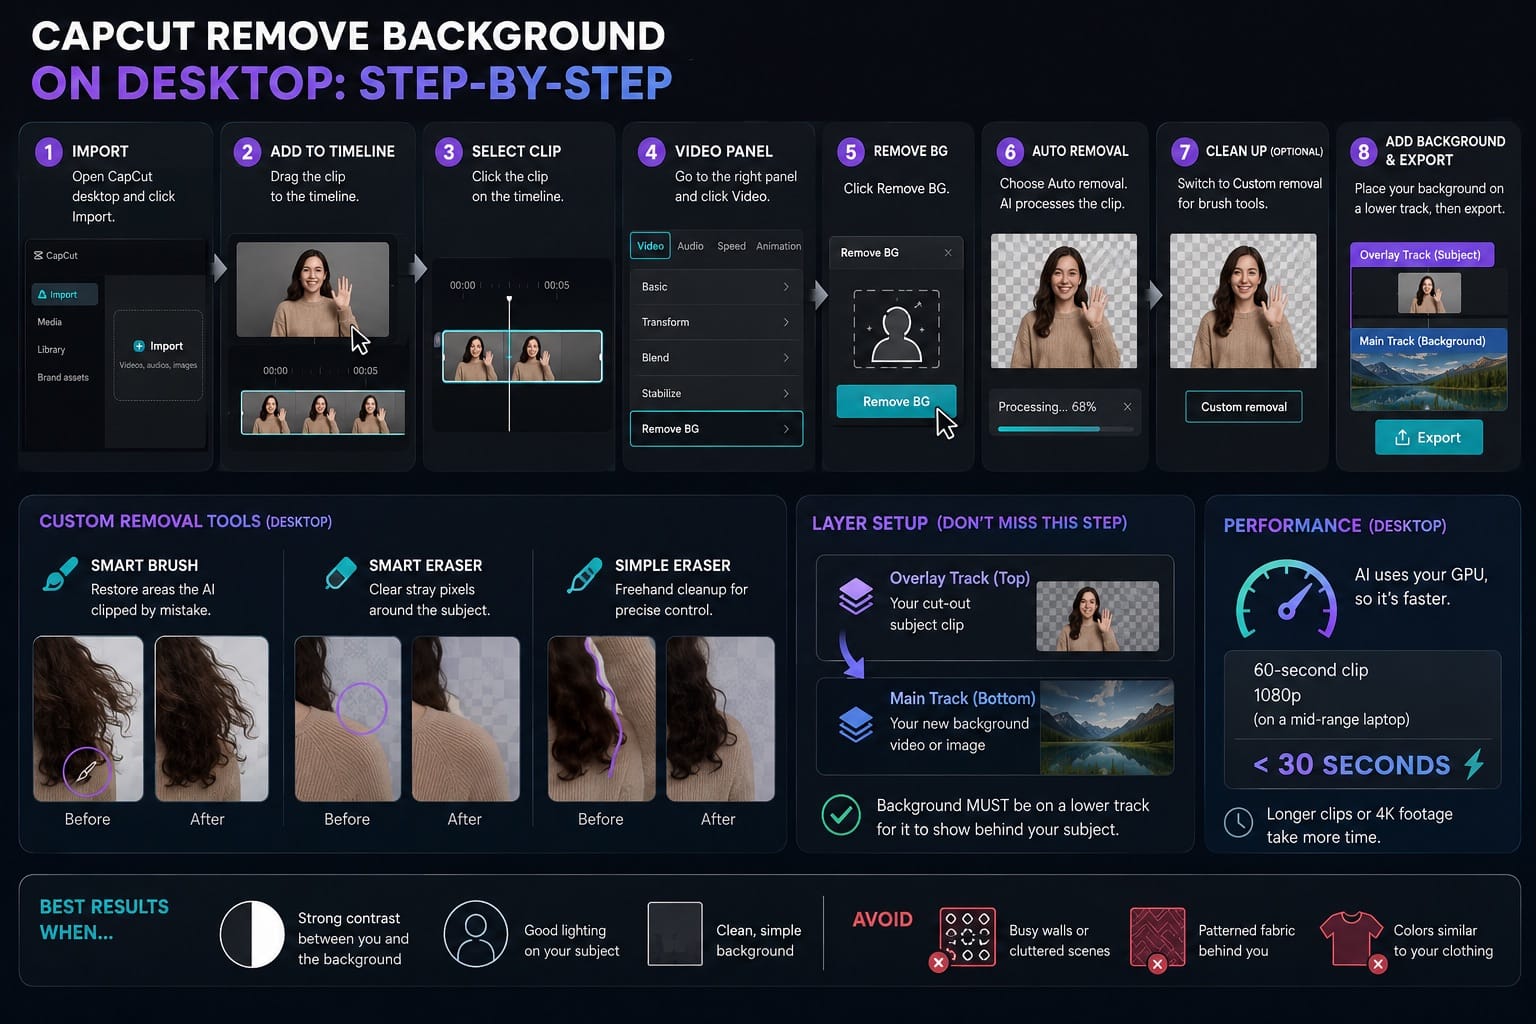
- Open CapCut desktop and click Import to bring in your footage.
- Drag the clip to the timeline.
- With the clip selected, go to the right panel and click Video.
- Click Remove BG.
- Choose Auto removal. CapCut processes the clip and removes the background.
- If you need to clean up edges, switch to Custom removal for brush tools.
- Place your new background on a lower track, then export.
On desktop, the AI often finishes faster than on mobile because it can use your machine's GPU. A 60-second clip at 1080p on a mid-range laptop typically finishes in under 30 seconds. Longer clips or 4K footage take more time.
The Custom removal tools on desktop are worth using. You get a Smart Brush to restore areas the AI clipped by mistake, a Smart Eraser to clear stray pixels around the subject, and a Simple Eraser for freehand cleanup. For hair and loose fabric edges, these save a lot of frustration.
CapCut Remove Background Online: Browser Workflow
CapCut also offers an online video background remover that works directly in the browser. This is useful when you don't want to install the desktop app or only need to process one short clip quickly.
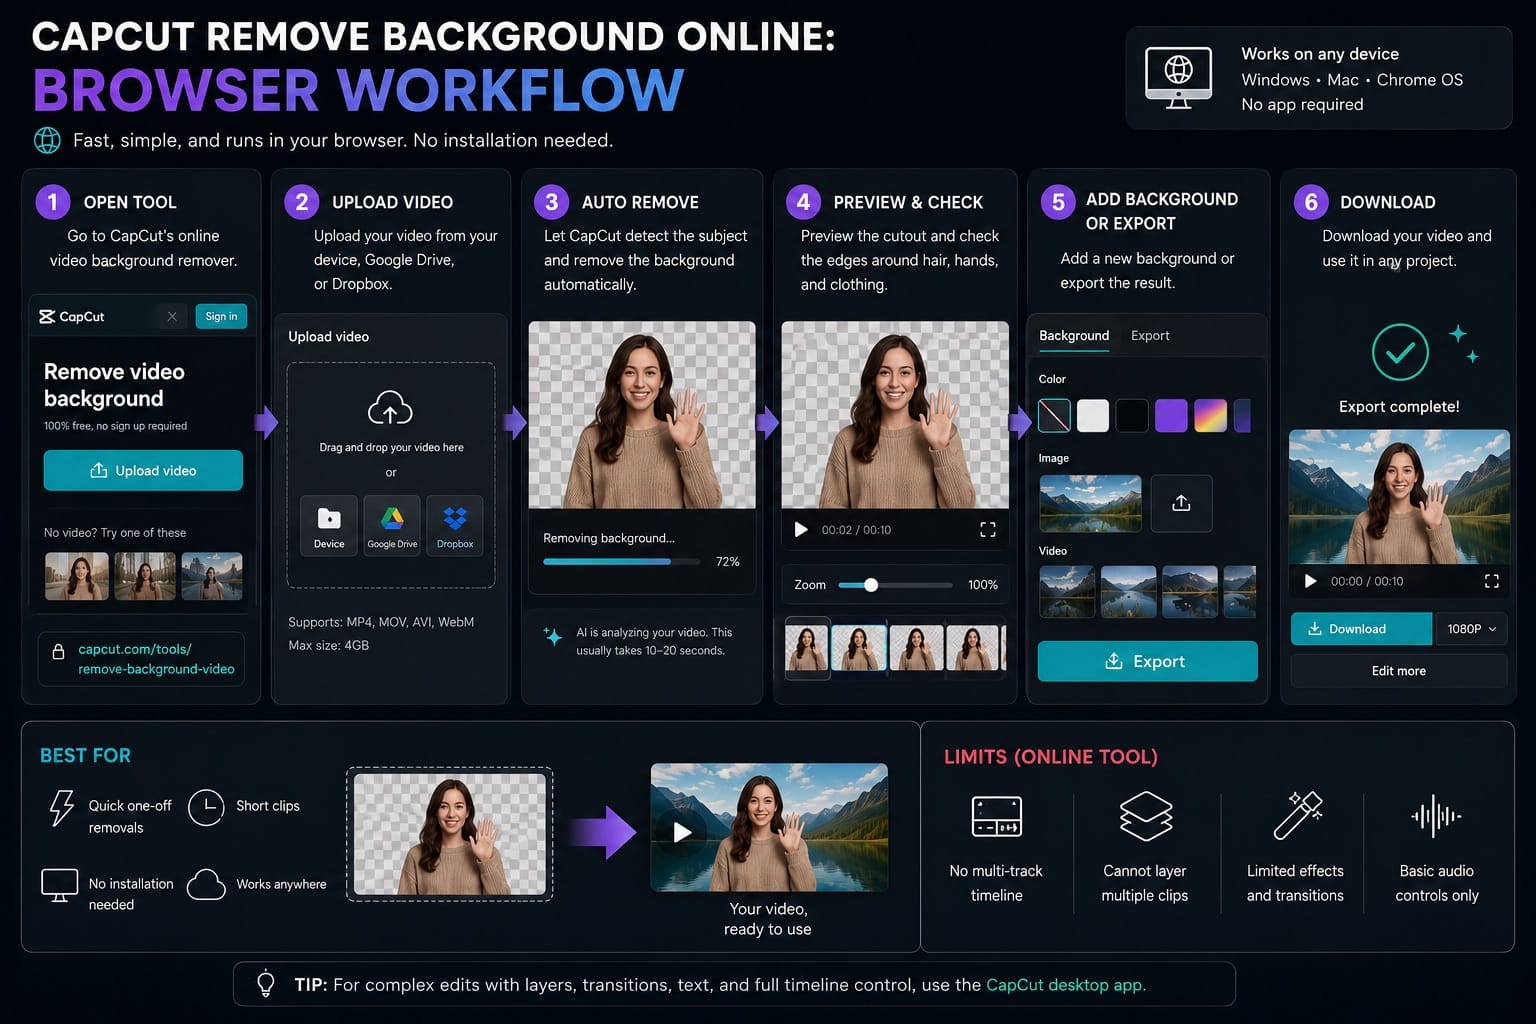
- Go to CapCut's online video background remover.
- Upload your video file from your device, Google Drive, or Dropbox.
- Let CapCut detect the subject and remove the background automatically.
- Preview the cutout and check the edges around hair, hands, and clothing.
- Add a new background or export the result if the output options match your project.
For longer edits, the desktop app is still easier to control. The online tool handles quick one-off removals well, but you can't layer a new background, add effects, and manage a full timeline the way you can on desktop. Treat the online tool as a fast lane, not a full replacement.
CapCut Remove Background: Free vs Pro in 2026
CapCut background removal access varies by platform, region, app version, and account tier. Many users can test basic AI background removal for free, but longer video jobs, repeated removal, higher export options, batch workflows, or certain AI tools may trigger a Pro prompt or usage limit.
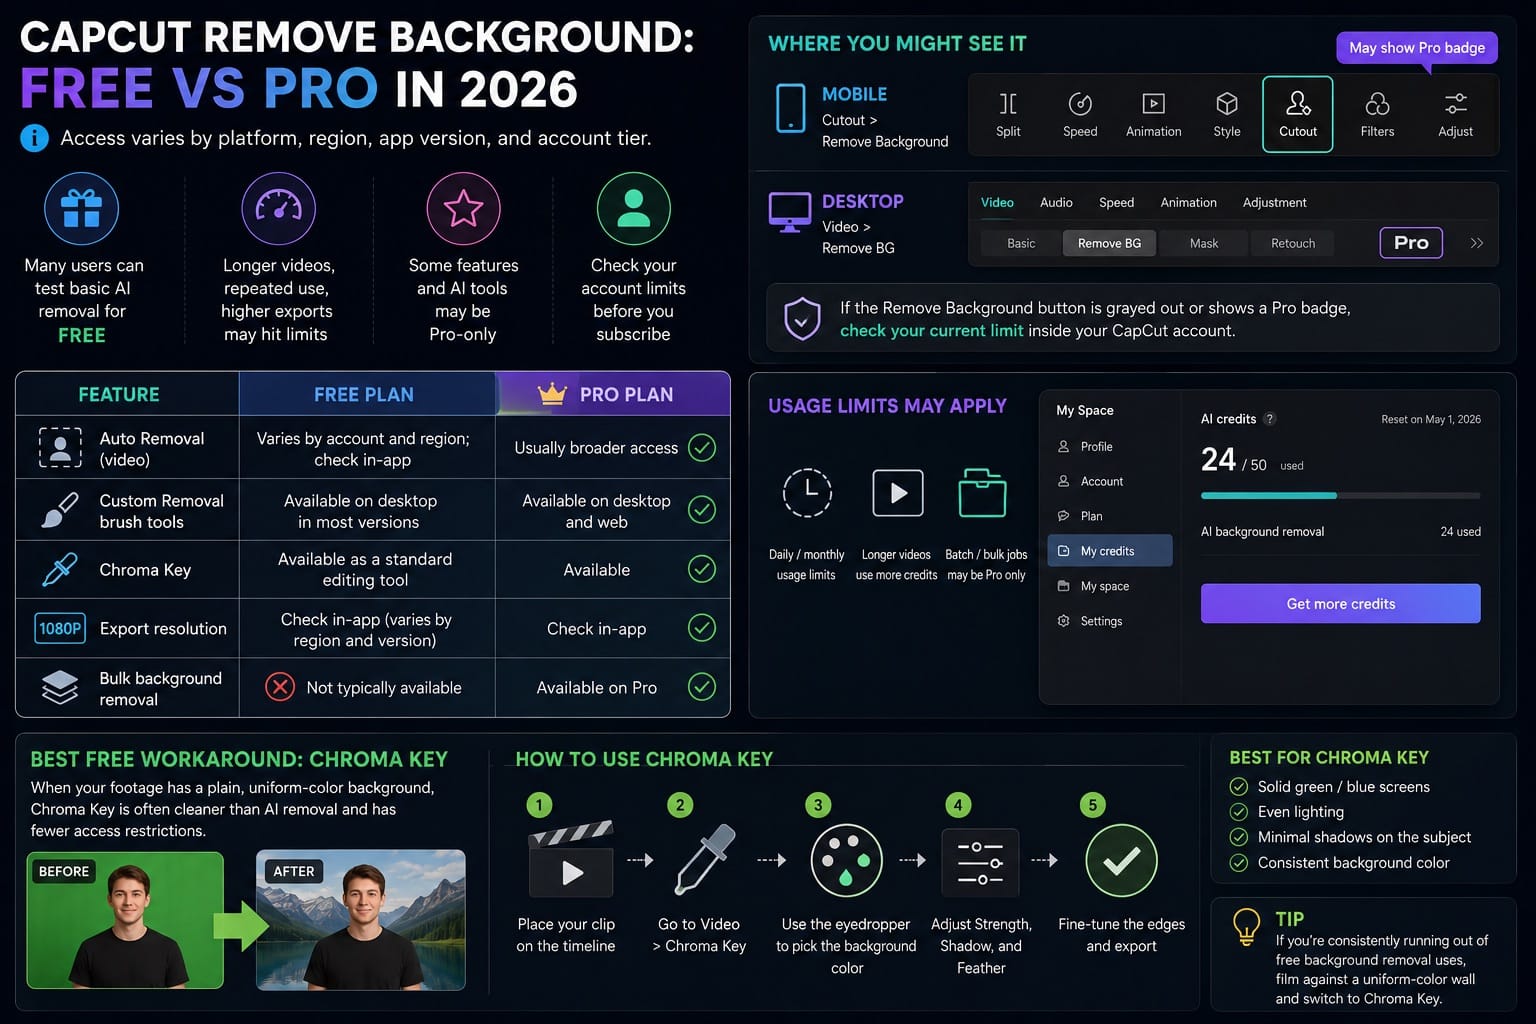
If the Remove Background button is grayed out or shows a Pro badge, check the current limit inside your CapCut account before subscribing. Chroma Key is generally the better free workaround when your footage has a plain, uniform-color background, since it does not rely on AI subject detection and is available as a standard editing tool.
| Feature | Free Plan | Pro Plan |
|---|---|---|
| Auto Removal (video) | Varies by account and region; check in-app | Usually broader access |
| Custom Removal brush tools | Available on desktop in most versions | Available on desktop and web |
| Chroma Key | Available as a standard editing tool | Available |
| Export resolution | Check in-app (varies by region and version) | Check in-app |
| Bulk background removal | Not typically available | Available on Pro |
If you're consistently running out of free background removal uses, film against a uniform-color wall and switch to Chroma Key. It's often cleaner than AI removal on plain backgrounds, and the access restrictions are usually less aggressive.
CapCut Custom Removal: Manual Cutout for Tricky Footage
Auto Removal works on 11 out of every 14 clips I throw at it. The three that fail are usually: footage with similar colors between subject and background, shots with fine hair detail against a light background, and anything filmed with strong backlight. That's when Custom Removal earns its place.
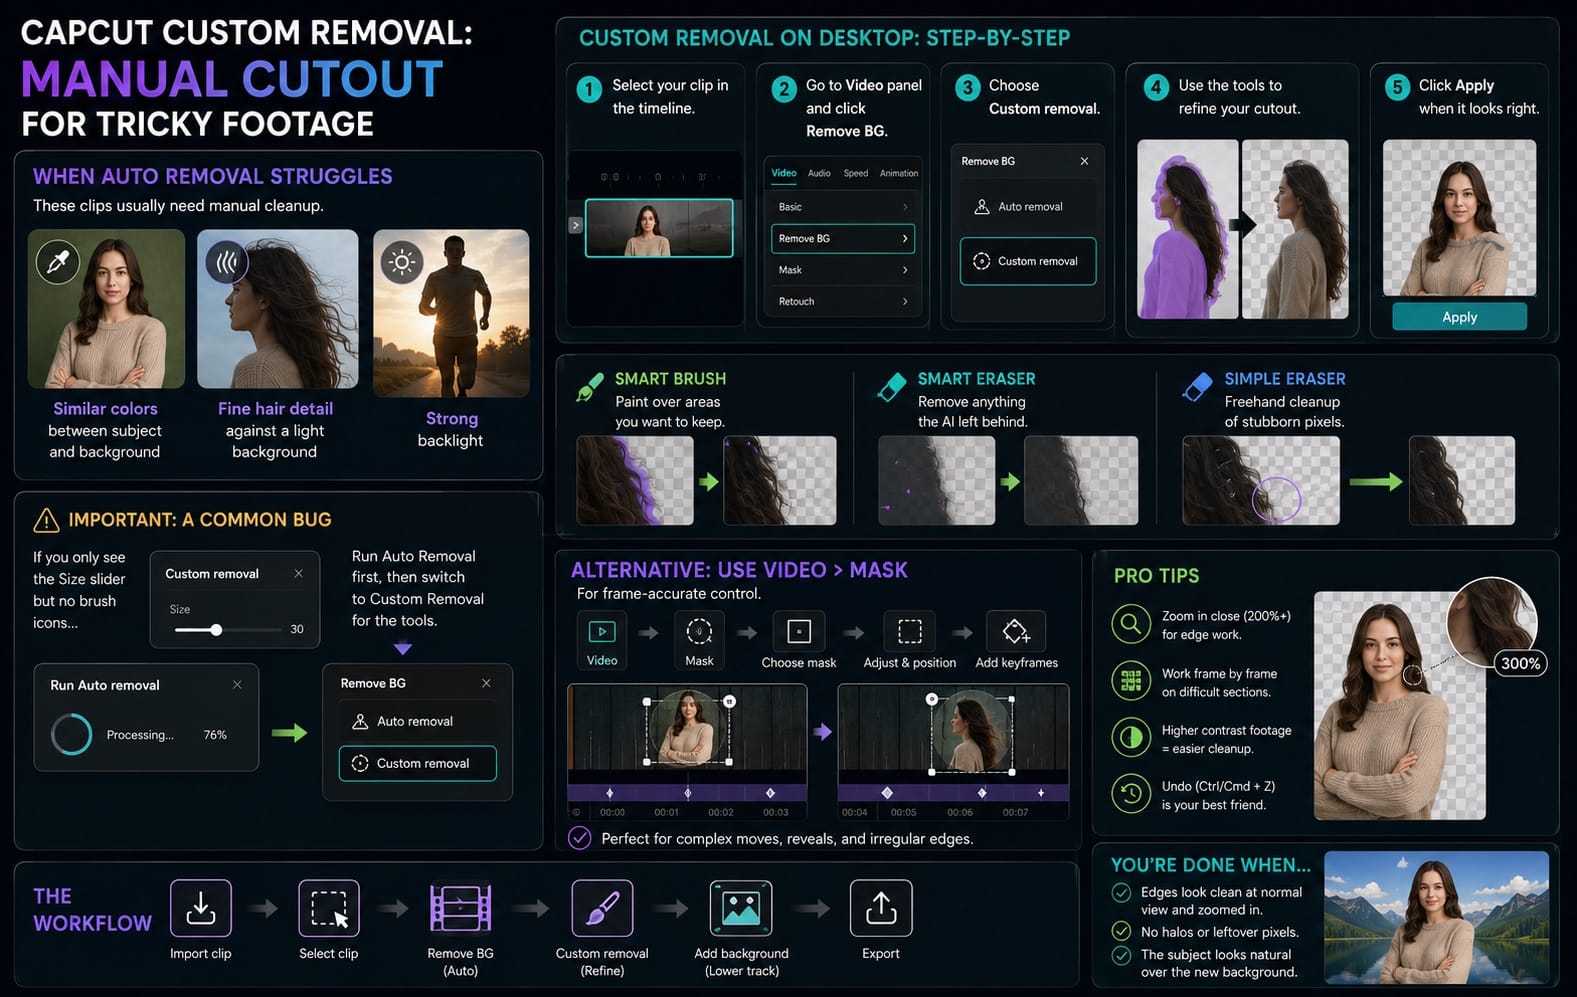
To use Custom Removal on desktop:
- After clicking Remove BG in the Video panel, choose Custom removal instead of Auto removal.
- Use the Smart Brush to paint over the areas you want to keep.
- Use the Smart Eraser to remove anything the AI left behind.
- Use the Simple Eraser for freehand cleanup of stubborn pixels.
- Click Apply when the cutout looks right.
One common bug: the Custom Removal tools don't appear unless Auto Removal has already processed the clip first. If you only see the Size slider but no brush icons, run Auto Removal first, then switch to Custom Removal for touch-ups. This trips up a lot of people who expect to jump straight into manual editing.
You can also use the Video > Mask path as a workaround. Brush or shape masks animated with keyframes in CapCut give you frame-accurate control without touching the Cutout menu at all.
CapCut Remove Background Not Working: Common Fixes
A few issues come up repeatedly. None of them require reinstalling unless everything else fails.
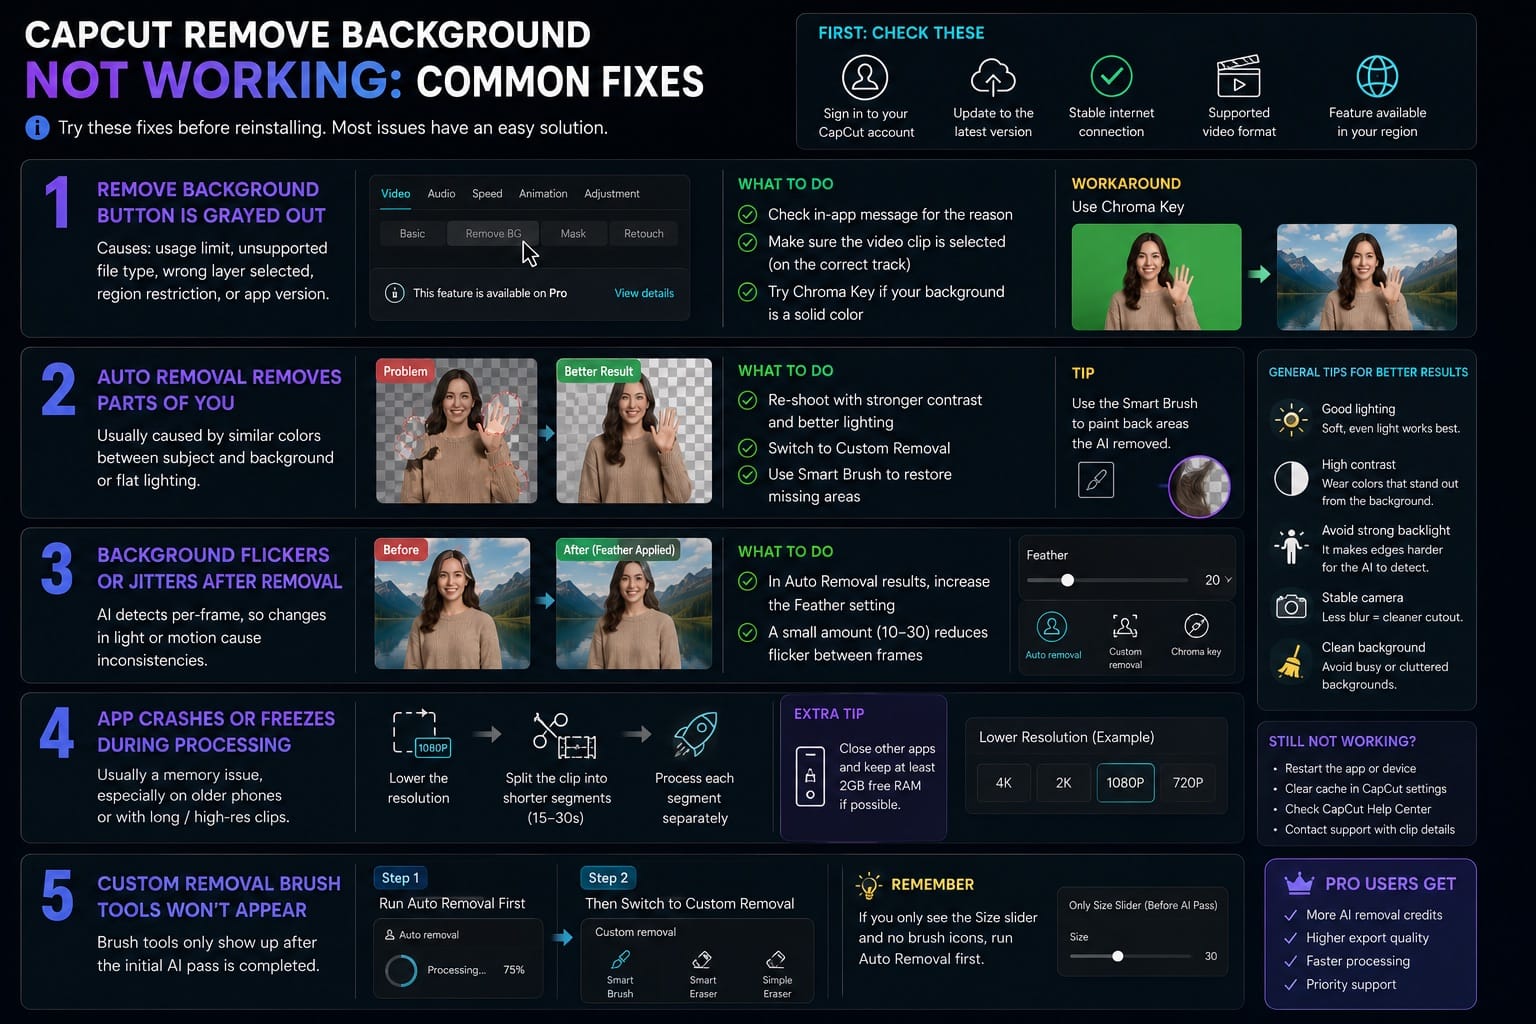
The Remove Background button is grayed out. This can happen for several reasons: you've hit a free-plan usage limit, the file type isn't supported, you have the wrong timeline layer selected, or there's a feature restriction for your region or app version. Check the in-app message first; it usually tells you which one. If your footage has a plain background, Chroma Key is the fastest workaround while you sort it out.
Auto Removal removes parts of you, not just the background. This happens when your clothing matches the background too closely, or when the lighting is too flat. Try re-shooting with a stronger contrast between yourself and what's behind you, or switch to Custom Removal and paint back the missing areas manually.
The background flickers or jitters after removal. This is a known AI limitation on video. The model detects per-frame, and slight changes in light or motion cause inconsistencies between frames. Adding a slight Feather setting (available under Auto Removal results) softens transitions between frames and reduces flickering.
The app crashes or freezes during processing. Usually a memory issue on older phones. Try lowering the clip resolution before processing, or split the clip into shorter segments and process them separately.
Custom Removal brush tools won't appear. Run Auto Removal first. The brush tools only activate after the initial AI pass completes successfully.
CapCut Background Removal Tips for Cleaner Results
After running AI background removal on probably 37 separate clips across different projects, the biggest factor is not the software. It's the source footage.
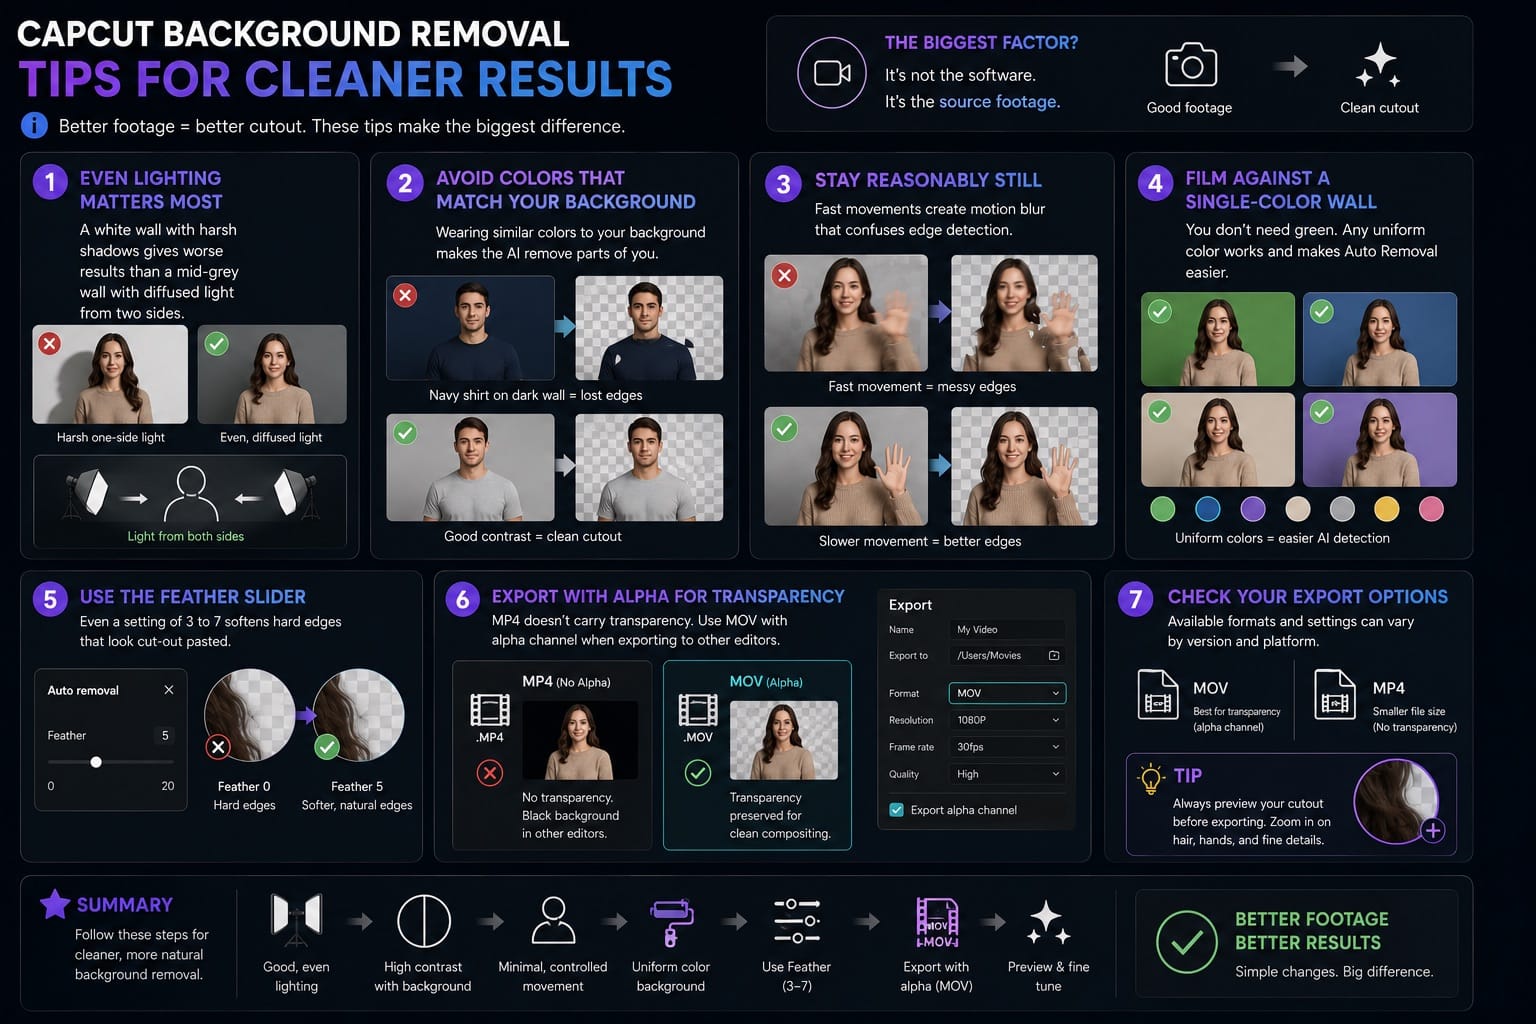
- Even lighting matters more than background color. A white wall with harsh shadows from one side gives worse results than a mid-grey wall with diffused light from two sides.
- Avoid wearing colors that match your background. Navy blue shirt against a dark wall is the fastest way to lose a shoulder in the cutout.
- Stay reasonably still. Fast hand movements create motion blur that confuses edge detection. Slow down gestures or plan on touching up those frames.
- Film against a single-color wall if possible. You don't need green specifically. Any uniform color works. Even a plain cream wall gives Auto Removal a much easier job.
- Use the Feather slider after Auto Removal. Even a setting of 3 to 7 softens hard edges that look cut-out pasted. This one change improves almost every result.
If you're exporting for use in another editor and need transparency, look for MOV export with alpha channel support in CapCut Desktop. MP4 doesn't carry transparency, so the cutout won't composite cleanly in other tools if you use that format. Check your export panel for available format options, as they can vary by version.
CapCut AI Background Removal vs Chroma Key: When to Use Each
Every tutorial treats these as equivalent options. They're not. Chroma key almost always wins on clean, uniform-color backgrounds.
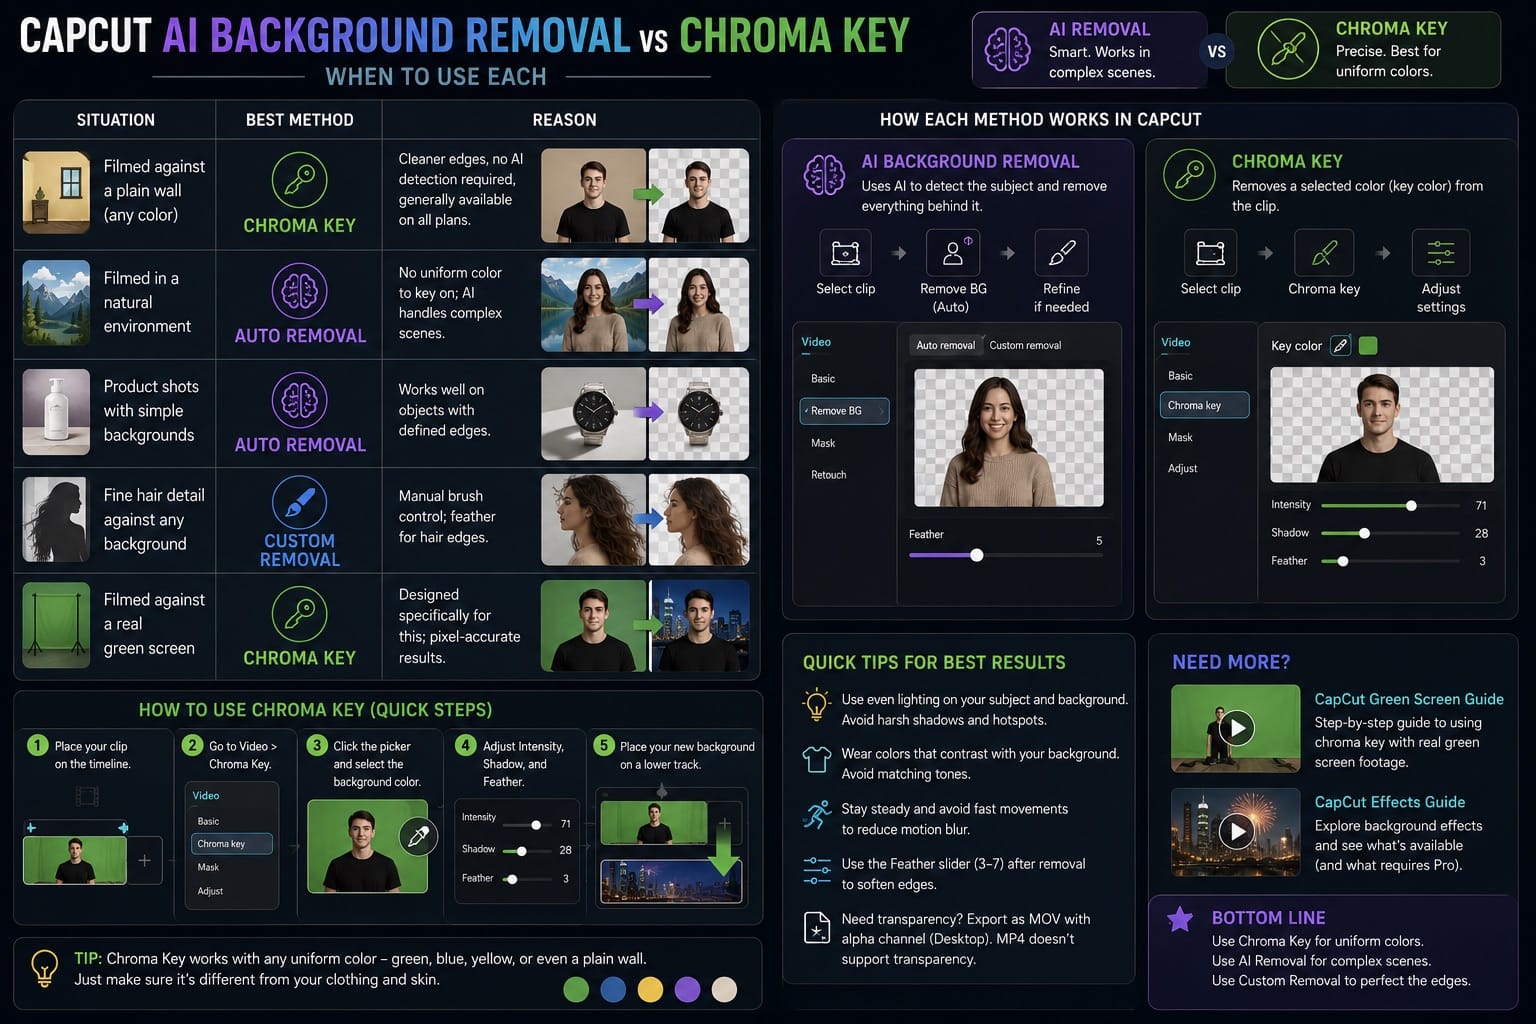
| Situation | Best Method | Reason |
|---|---|---|
| Filmed against a plain wall (any color) | Chroma Key | Cleaner edges, no AI detection required, generally available on all plans |
| Filmed in a natural environment | Auto Removal | No uniform color to key on; AI handles complex scenes |
| Product shots with simple backgrounds | Auto Removal | Works well on objects with defined edges |
| Fine hair detail against any background | Custom Removal | Manual brush control; feather for hair edges |
| Filmed against a real green screen | Chroma Key | Designed specifically for this; pixel-accurate results |
Chroma Key is generally available as a standard editing tool in CapCut and does not rely on AI subject detection, so it tends to be the better workaround when AI background removal is limited on your account. Pick any uniform-color backdrop, select that color with the picker tool, and adjust the Intensity and Shadow sliders. You can use a blue wall, a yellow curtain, whatever you have. The color just needs to be distinct from your clothing and skin.
For more on using CapCut's chroma key tool with real green screen footage, see the guide on CapCut green screen. If you're running background effects on top of the removed background, check the CapCut effects guide for what's available and what requires Pro.
CapCut Remove Background FAQ
Is CapCut background removal free?
Basic AI background removal is available on the free plan, but access varies by region, platform, and account tier. If the feature is grayed out or gated behind a Pro badge, check your current usage limit in the app. Chroma Key is generally available as a standard editing tool regardless of plan, making it a reliable workaround for footage shot against a uniform-color background.
Can I remove the background in CapCut without a green screen?
Yes. Auto Removal in the Cutout menu (mobile) or Remove BG menu (desktop) uses AI to detect and remove the background without any green screen required. It works best on footage with clear contrast between the subject and background.
How do I remove a background in CapCut on iPhone or Android?
Select your clip in the timeline, tap Cutout from the bottom menu, then tap Remove Background. The AI processes the clip and removes the background automatically. Tap Manual Selection if you need to refine the edges.
Why is CapCut background removal not working?
The most common reasons: you've hit the free monthly limit (check in-app), your CapCut version is outdated, or Auto Removal hasn't finished processing before you try to use Custom Removal. Run Auto Removal first, wait for it to complete, then apply Custom Removal brush tools if needed.
Can I export a transparent background video from CapCut?
Sometimes, depending on platform, version, and export options. For video transparency, look for MOV export with alpha support in CapCut Desktop or supported online workflows. MP4 is not suitable for transparent video because it does not preserve an alpha channel. For images, export as PNG to keep transparency. CapCut's support center has export format details if you run into compatibility issues.
Does CapCut background removal work on images?
Yes. The image background remover works through the online editor or the desktop app. Select your image, go to Remove BG, and choose Auto Removal. Export as PNG to keep the transparent background. For images, the free plan on the online tool tends to be less restricted than video removal.
CapCut pricing has changed significantly in 2025 and 2026. If you're hitting the background removal limit regularly and considering Pro, the pricing guide covers what the upgrade actually includes and which AI features count against a separate credit pool.