I spent about three hours on a single 23-second clip last month trying to get a velocity edit to actually feel cinematic rather than just... random speed changes with flash effects slapped on top. Once I understood the difference between the three approaches CapCut offers, everything clicked. This guide covers all of them: manual Speed Curve, Auto Velocity, and Beat Sync.
CapCut Velocity Edit Quick Answer
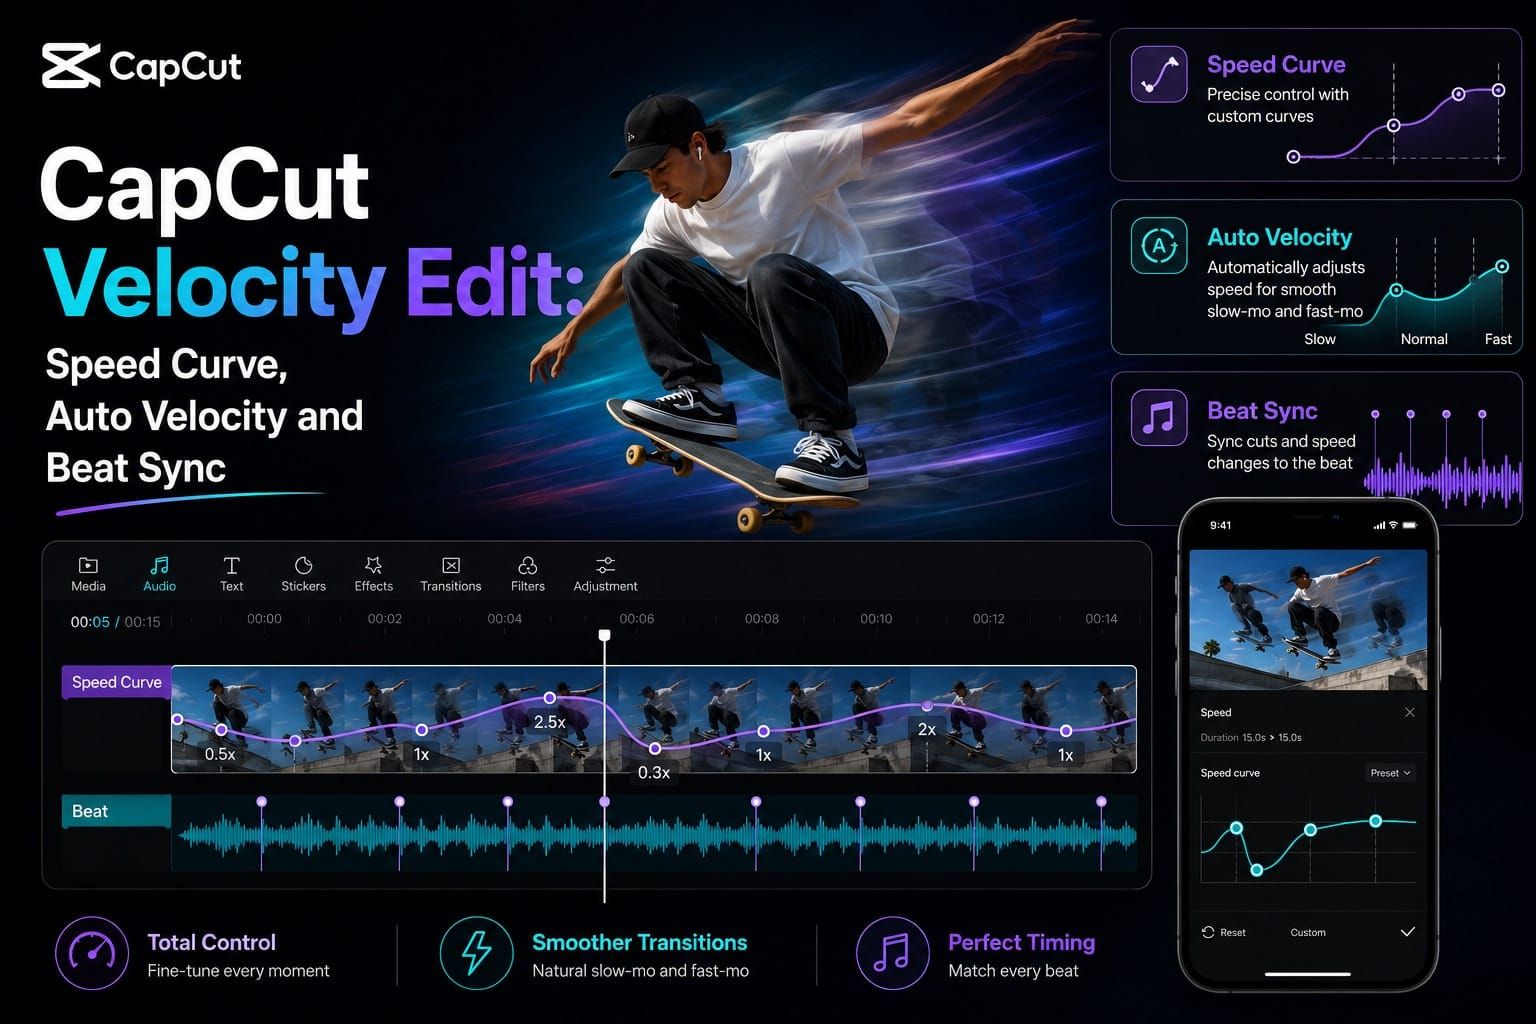
A CapCut velocity edit controls how your clip's speed changes over time. You get three tools to do it: Speed Curve (manual control via a graph with beats), Auto Velocity (AI-driven speed sync under Style), and Beat Sync (cuts and transitions timed to audio beats). Speed Curve gives you the most control. Auto Velocity is the fastest. Beat Sync is best for photo slideshows or multi-clip timelines. Use them independently or combine all three.
CapCut Speed Curve: Manual Velocity Editing on Mobile
The Speed Curve is where the real velocity editing happens. Most people using Auto Velocity think that is the definitive method. It is not, and the results usually look generic. The curve gives you precise control over exactly which moment slows down and by how much.
On mobile:
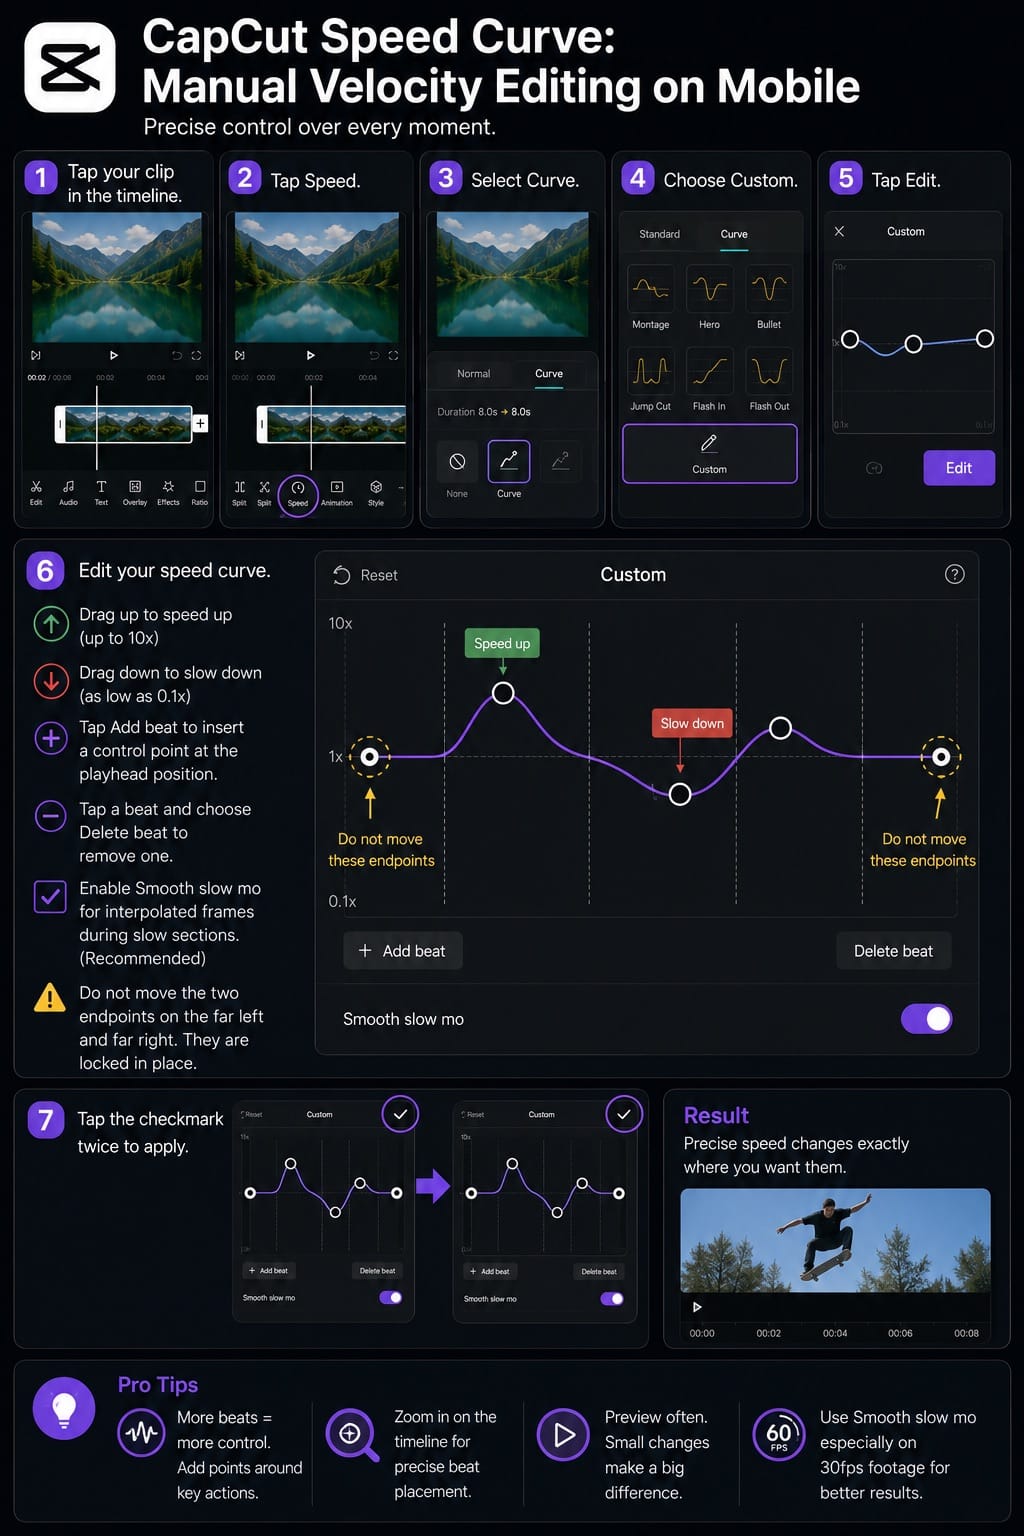
- Tap your clip in the timeline to open the edit menu at the bottom.
- Tap Speed, then select Curve.
- You will see six preset options: Montage, Hero, Bullet, Jump Cut, Flash In, and Flash Out. Below those is Custom.
- Tap Custom, then tap Edit.
- A graph appears with five beat points on a horizontal line. Drag any point up to speed up that section (up to 10x), or down to slow it (as low as 0.1x).
- Tap Add beat to insert more control points at the playhead position. Tap a beat and choose Delete beat to remove one.
- Enable Smooth slow mo at the bottom if you want interpolated frames during the slow sections. Worth ticking on unless your footage is already 60fps.
- Tap the checkmark twice to apply.
The one thing nobody tells you: do not move the two endpoints on the far left and far right of the graph. CapCut locks those in place, so all your adjustments need to happen with the inner points.
CapCut Speed Curve Presets: Which One to Actually Use
The six built-in presets save time, but they are a starting point, not a finished product. I have used all of them across probably 37 or 38 clips and here is what each actually does:
| Preset | Speed pattern | Best for |
|---|---|---|
| Montage | Alternates fast and slow sections rhythmically | Multi-action clips, travel, sports reels |
| Hero | Slows at the midpoint, then ramps back up | Single dramatic moment: jump, impact, reveal |
| Bullet | Extreme slowdown in the middle, fast at edges | Action close-ups, gaming highlights |
| Jump Cut | Rapid speed spikes across the clip | High-energy cuts, comedy timing |
| Flash In | Starts very fast, slows toward the end | Openings, intro shots |
| Flash Out | Starts slow, accelerates toward the end | Exits, transitions out of a scene |
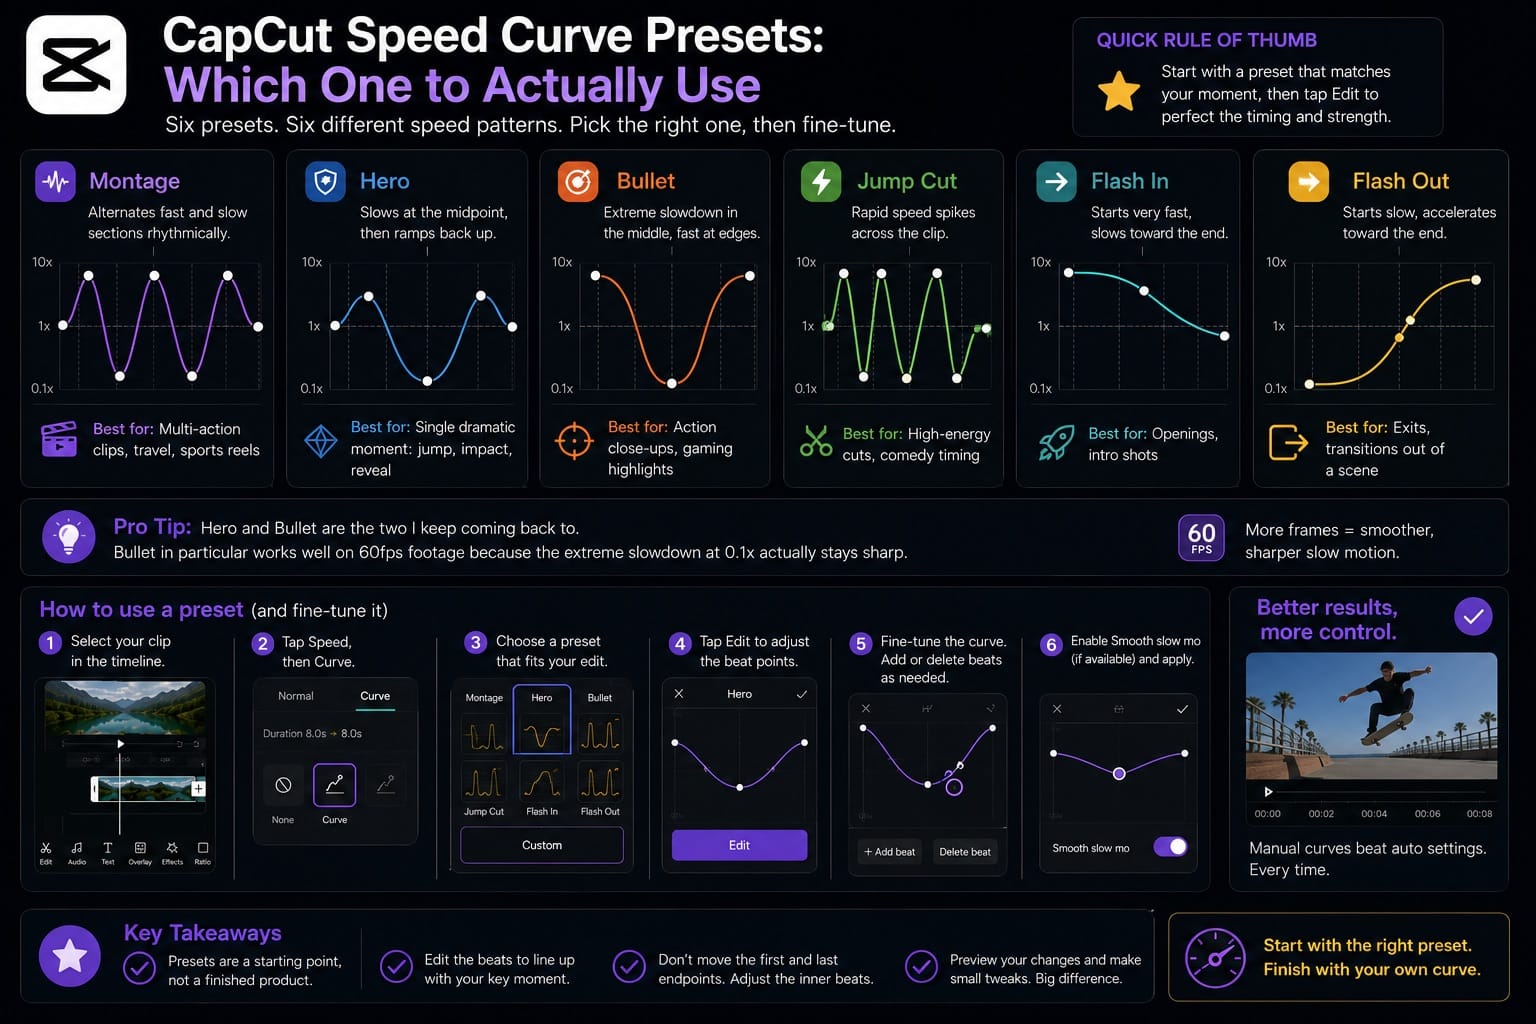
Hero and Bullet are the two I keep coming back to. Bullet in particular works well on 60fps footage because the extreme slowdown at 0.1x actually stays sharp.
If you apply a preset and it does not quite line up with your key moment, tap Edit on the preset to adjust the individual beat points rather than starting from scratch in Custom. Saves time.
CapCut Speed Curve on Desktop: More Precision, Same Logic
On CapCut desktop (Windows or Mac), the curve editor works the same way but gives you finer control because you can zoom the timeline and see exactly where your beats land.
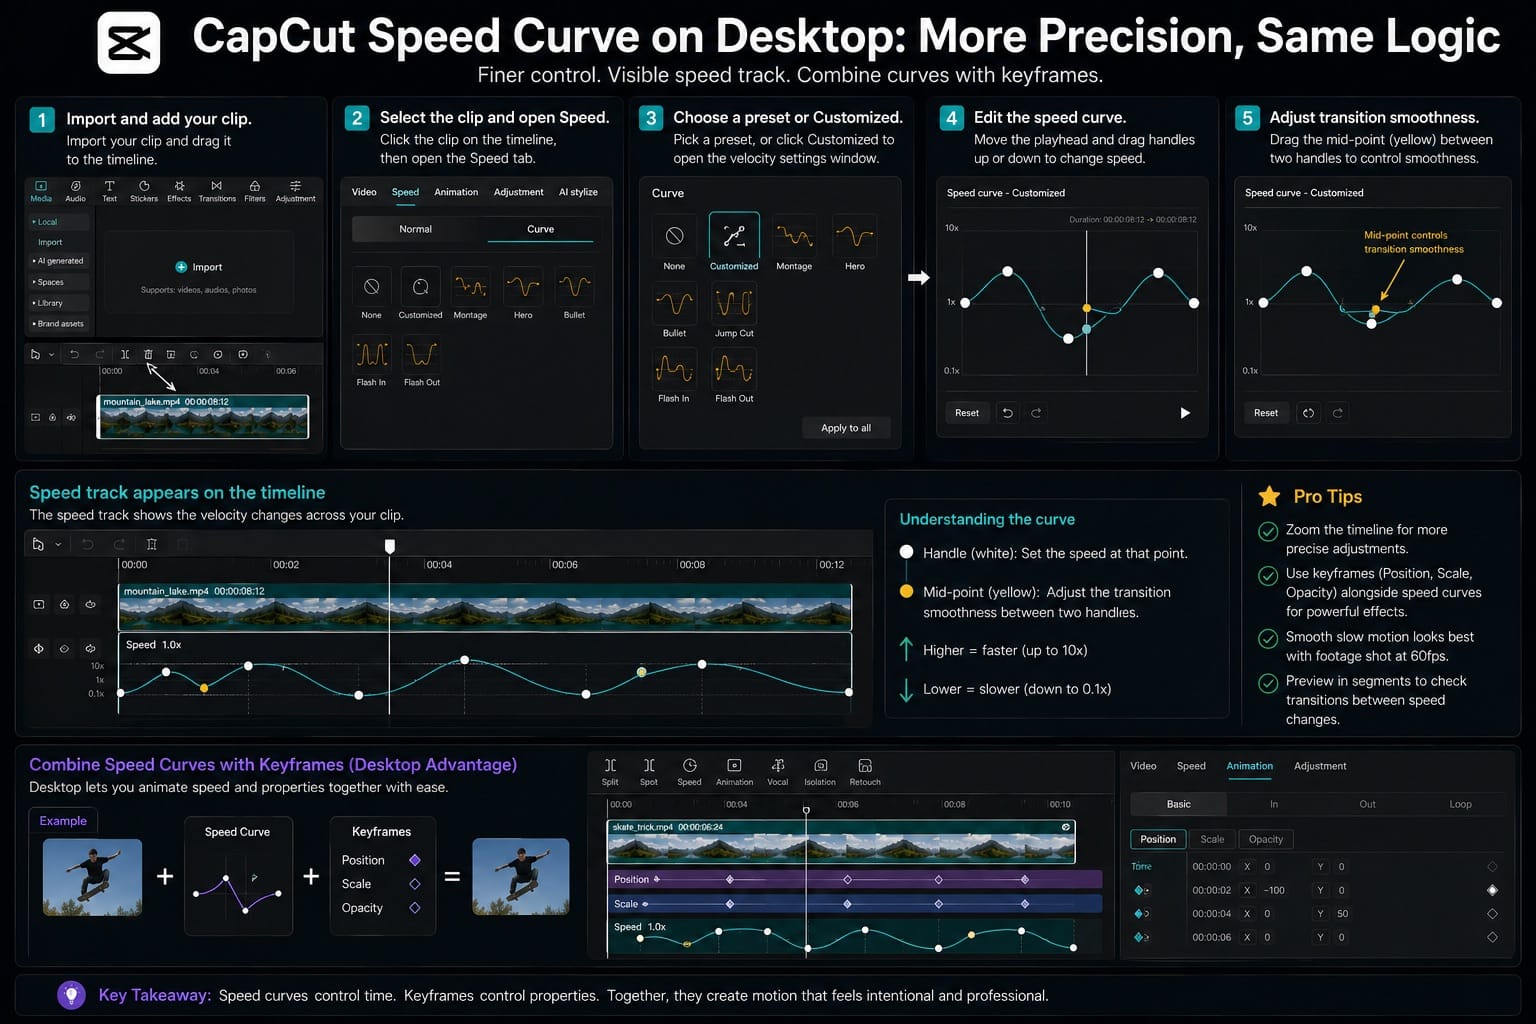
- Import your clip and drag it to the timeline.
- Click the clip to select it, then open the Speed tab in the right panel.
- Select Curve.
- Choose a preset or click Customized to open the velocity settings window. A speed track appears beneath your clip on the timeline so you can monitor the curve visually.
- Move the playhead to where you want a speed change, then drag the corresponding handle up or down.
- The mid-points between two handles control transition smoothness. Drag a mid-point closer to one handle to make the speed change more abrupt at that end.
- Click OK to confirm.
Desktop is also where you get access to CapCut keyframe animation tools alongside the velocity editor, so you can combine speed ramps with zoom or position keyframes in the same session. On mobile that workflow takes more steps.
How to Make a CapCut Velocity Edit Online
CapCut's online editor supports velocity editing through the Speed Curve tool as well. The workflow is closer to desktop than mobile: upload your clip, select it on the timeline, open the Speed tab in the right panel, choose Curve, then use Custom to adjust the speed graph.
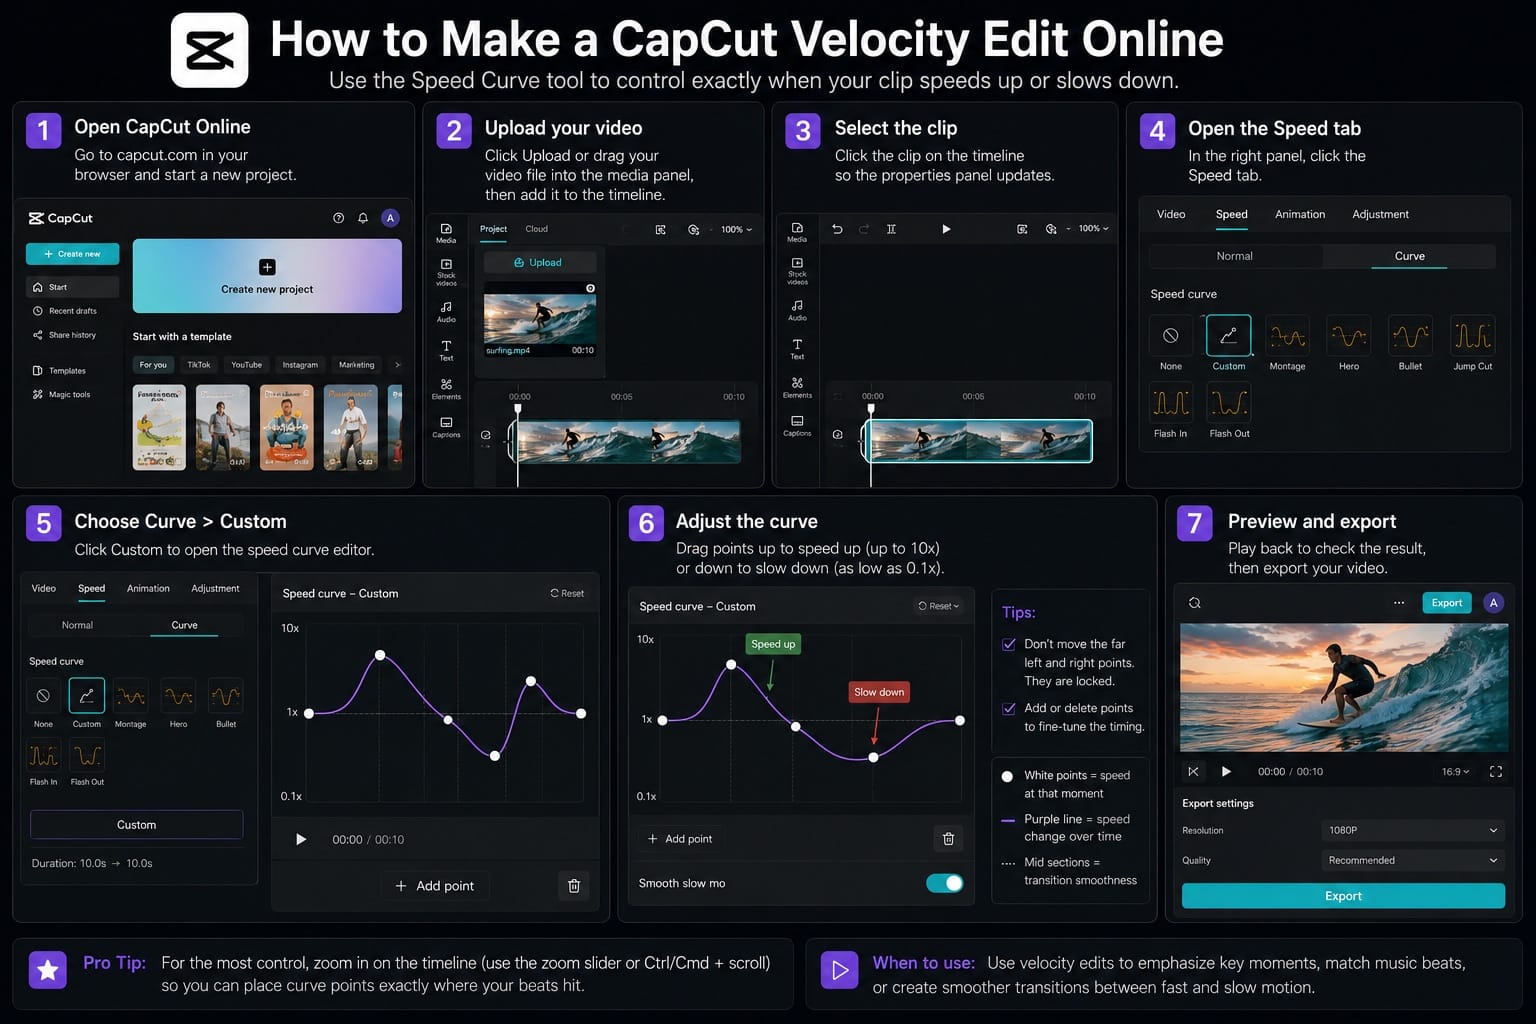
- Open CapCut in your browser and start a new project.
- Upload your video and place it on the timeline.
- Select the clip.
- Open the Speed tab in the right panel.
- Click Curve, then choose Custom.
- Adjust the curve points to speed up or slow down specific moments.
- Preview the result and export.
The online editor is useful for quick speed ramps without installing the desktop app. For longer clips or frame-precise beat matching, desktop tends to be easier to control because of the larger timeline view and zoom options.
CapCut Auto Velocity: Fast but Limited
Auto Velocity is the one that went viral on TikTok under #CapCutVelocity. It is fast. It is also not what most tutorial creators think it is.
Auto Velocity is not inside the Speed menu. It lives under Style. That trips people up constantly.
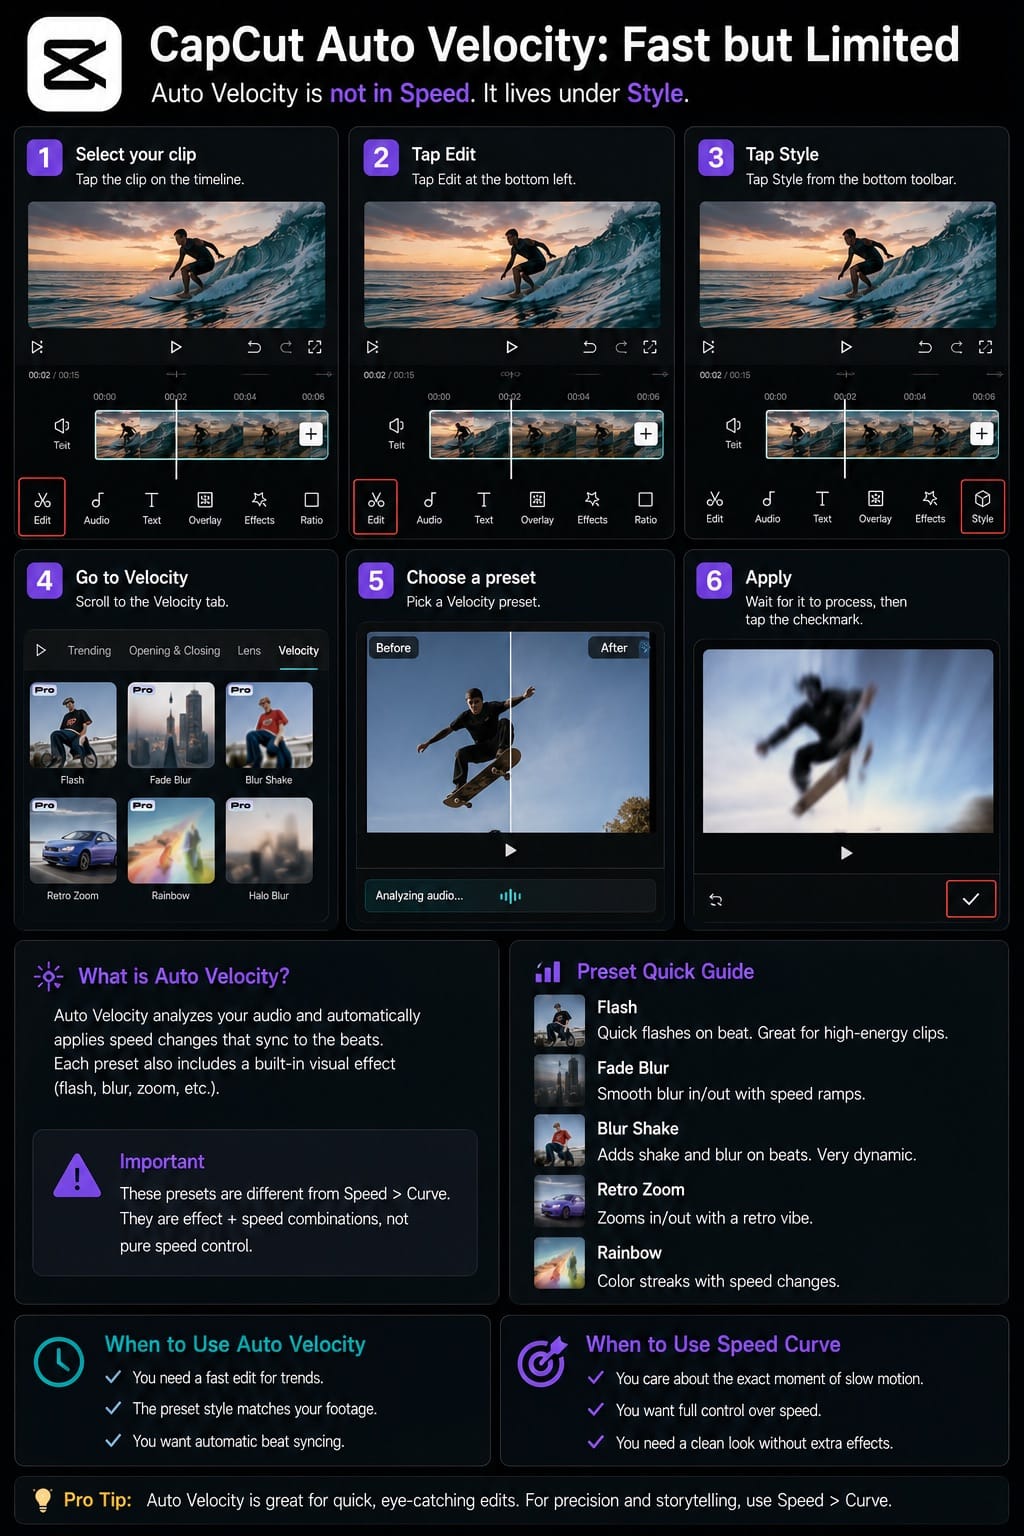
On mobile:
- Select your clip in the timeline, then tap Edit at the bottom left.
- Tap Style from the bottom toolbar.
- Scroll to the Velocity tab.
- Choose from presets like Flash, Fade Blur, Blur Shake, Retro Zoom, or Rainbow.
- CapCut analyzes your audio and applies an automatic speed sync. Wait a moment for it to process.
- Tap the checkmark to confirm.
The Style > Velocity presets are different from Speed > Curve presets. They combine a speed pattern with a visual effect (the blur, flash, or zoom you see in the name). That is why they can look flashy on one clip and completely wrong on another. The effect is baked in and harder to customize than a pure curve. CapCut's official velocity editing guide has a breakdown of which presets suit which content types.
Use Auto Velocity when you need something quick for a trend and the visual style matches your clip. Use Speed Curve when you actually care about which exact moment slows down.
CapCut Beat Sync: Aligning Cuts and Speed to Music
Beat Sync is separate from both methods above. It does not directly change a clip's internal speed the way Speed Curve does. Instead, it helps align cuts, transitions, templates, or visual moments to the rhythm of the audio. Depending on your CapCut version, this may appear as automatic beat syncing, beat markers, Auto Beat, or template-based beat edits. The official Beat Sync page has a collection of related templates worth browsing before you build something from scratch.
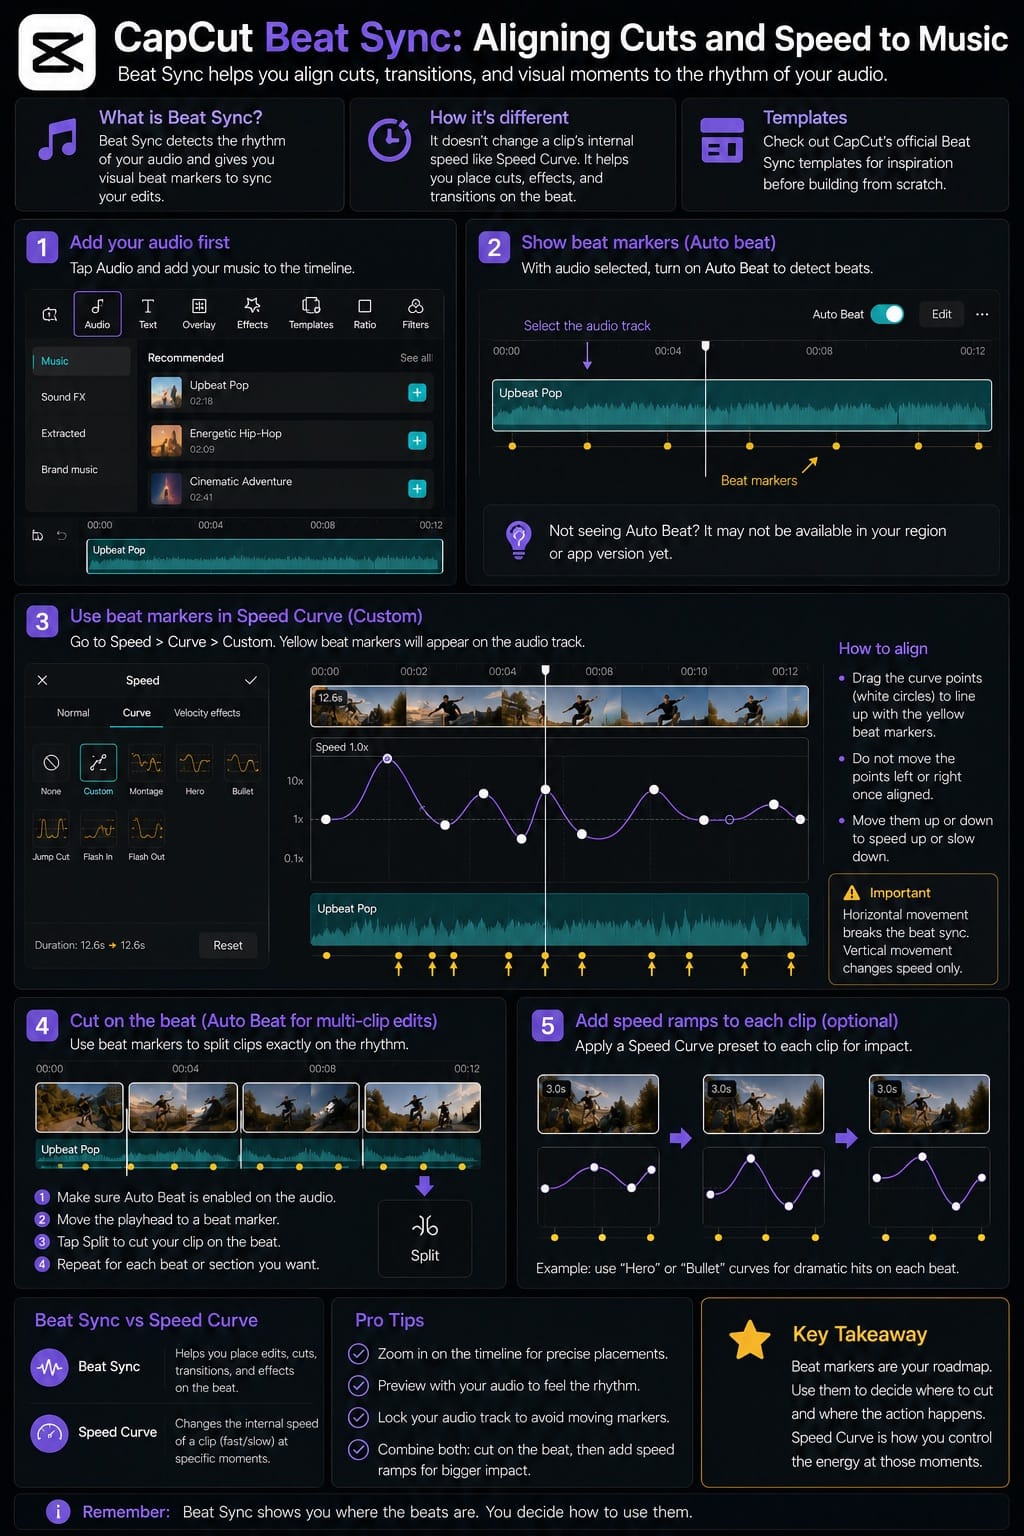
On mobile, the relevant tool is Auto beat, found when you have music on the timeline:
- Add your audio track first via the Audio tab.
- Go to Speed > Curve > Custom and you will see yellow beat markers appear on the audio track at the bottom of the screen.
- These markers show you exactly where the beats hit. Use them as anchor points: drag your velocity curve beat points to match the yellow markers.
- Do not move your beat points horizontally once you have matched them to the audio. Vertical movement (speed change) is fine. Horizontal movement breaks the sync.
For multi-clip timelines, the Auto Beat function (tap the audio track, look for Auto Beat or the beat detection toggle) places dots along the audio waveform. You can then split clips at each dot and trim to create cuts on the beat. This is a different workflow from velocity editing but they combine well: use beat markers to decide where to cut, then apply a Speed Curve preset to each clip for a ramp effect at each edit point.
The key thing Beat Sync does not do: it will not automatically move your video cuts for you in every version of CapCut. In some builds the automatic alignment works; in others you are placing cuts manually based on the markers. If the automatic option is missing, that tends to mean it has not rolled out to your region or app version yet.
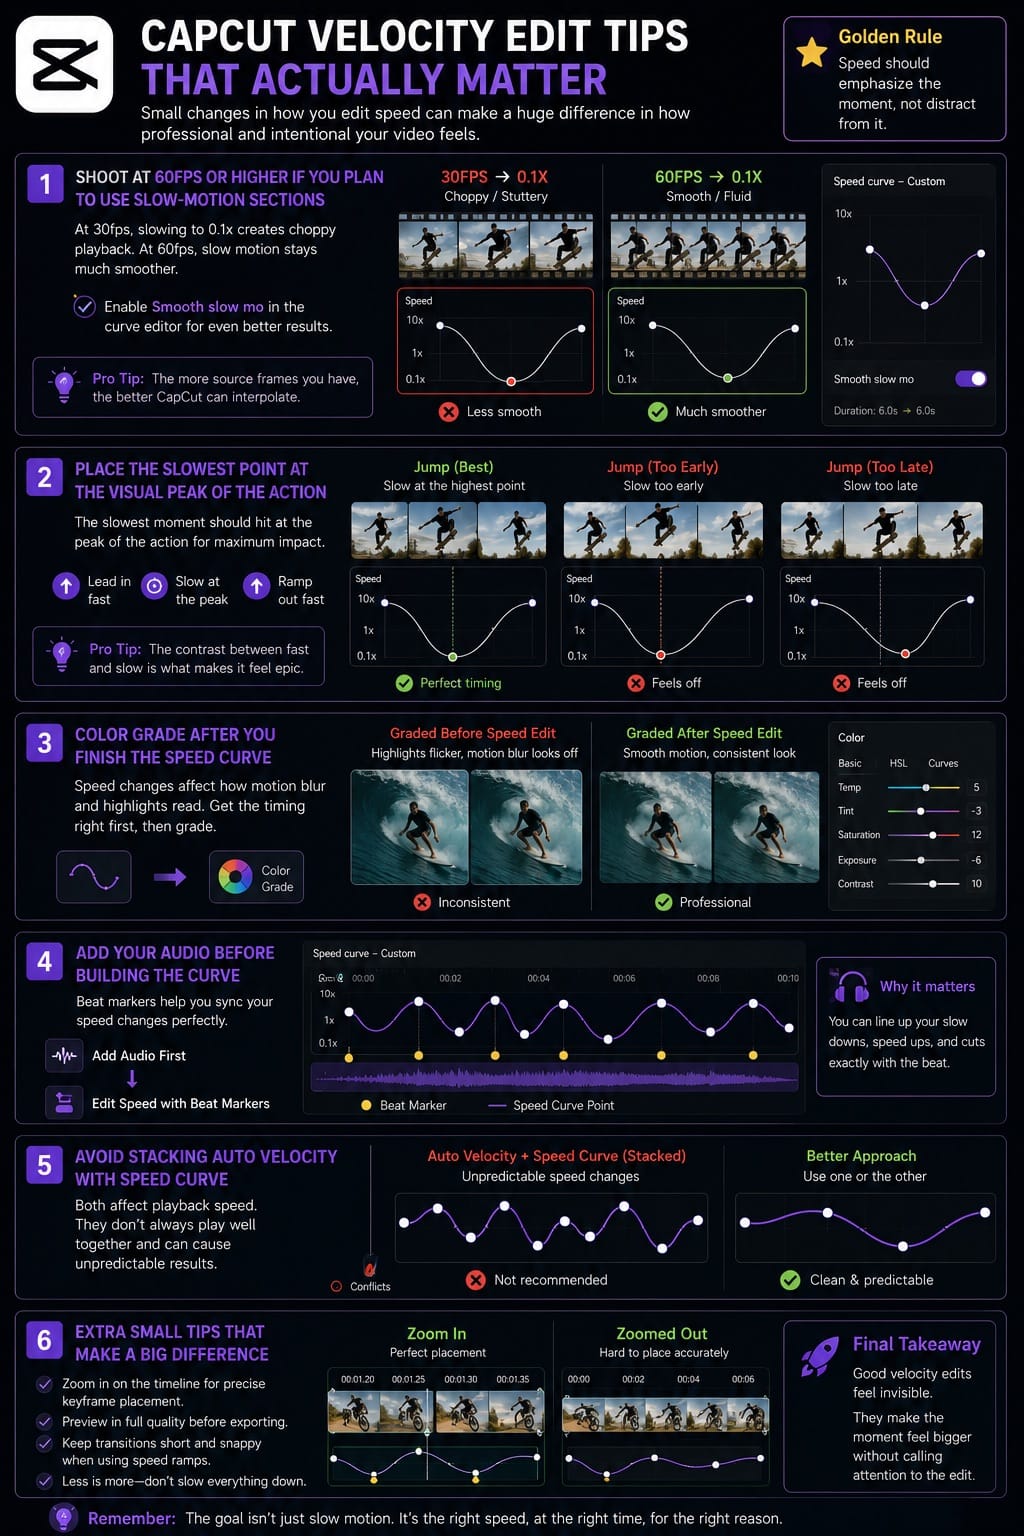
CapCut Velocity Edit Tips That Actually Matter
Shoot at 60fps or higher if you plan to use slow-motion sections. At 30fps, slowing a clip to 0.1x creates choppy playback. At 60fps, the slow-motion sections usually hold up much better. The Smooth slow mo option (frame interpolation) in the curve editor helps, but it works noticeably better when your source footage already has extra frames to work with. CapCut's speed ramp tool page has additional reference on supported frame rates.
For a deeper slow-motion workflow, see our CapCut slow motion guide.
Place the slowest point at the visual peak of the action. A jump should hit its lowest speed at the highest point. An impact should slow at the moment of contact. The contrast between the fast lead-in and the slow peak is what makes it read as intentional rather than accidental.
Color grade after you finish the speed curve, not before. Speed changes can affect how motion blur reads on your color-adjusted clips. Get the timing right first, then apply CapCut effects.
For music video edits, add your audio track before building the curve. That way the beat markers are visible inside the curve editor as you adjust. Editing speed blind and trying to align it afterward is slower and less accurate.
Avoid stacking Auto Velocity effects on top of manual Speed Curve edits on the same clip. Both change the playback speed and they do not always interact cleanly. Apply one or the other, not both.
CapCut Velocity Edit Templates
If you want to skip the manual work entirely, CapCut's template library has dedicated velocity edit templates. In the app, tap Templates from the bottom nav, search "velocity," and filter by Trending or New. The template replaces your footage into a pre-built curve and music combination.
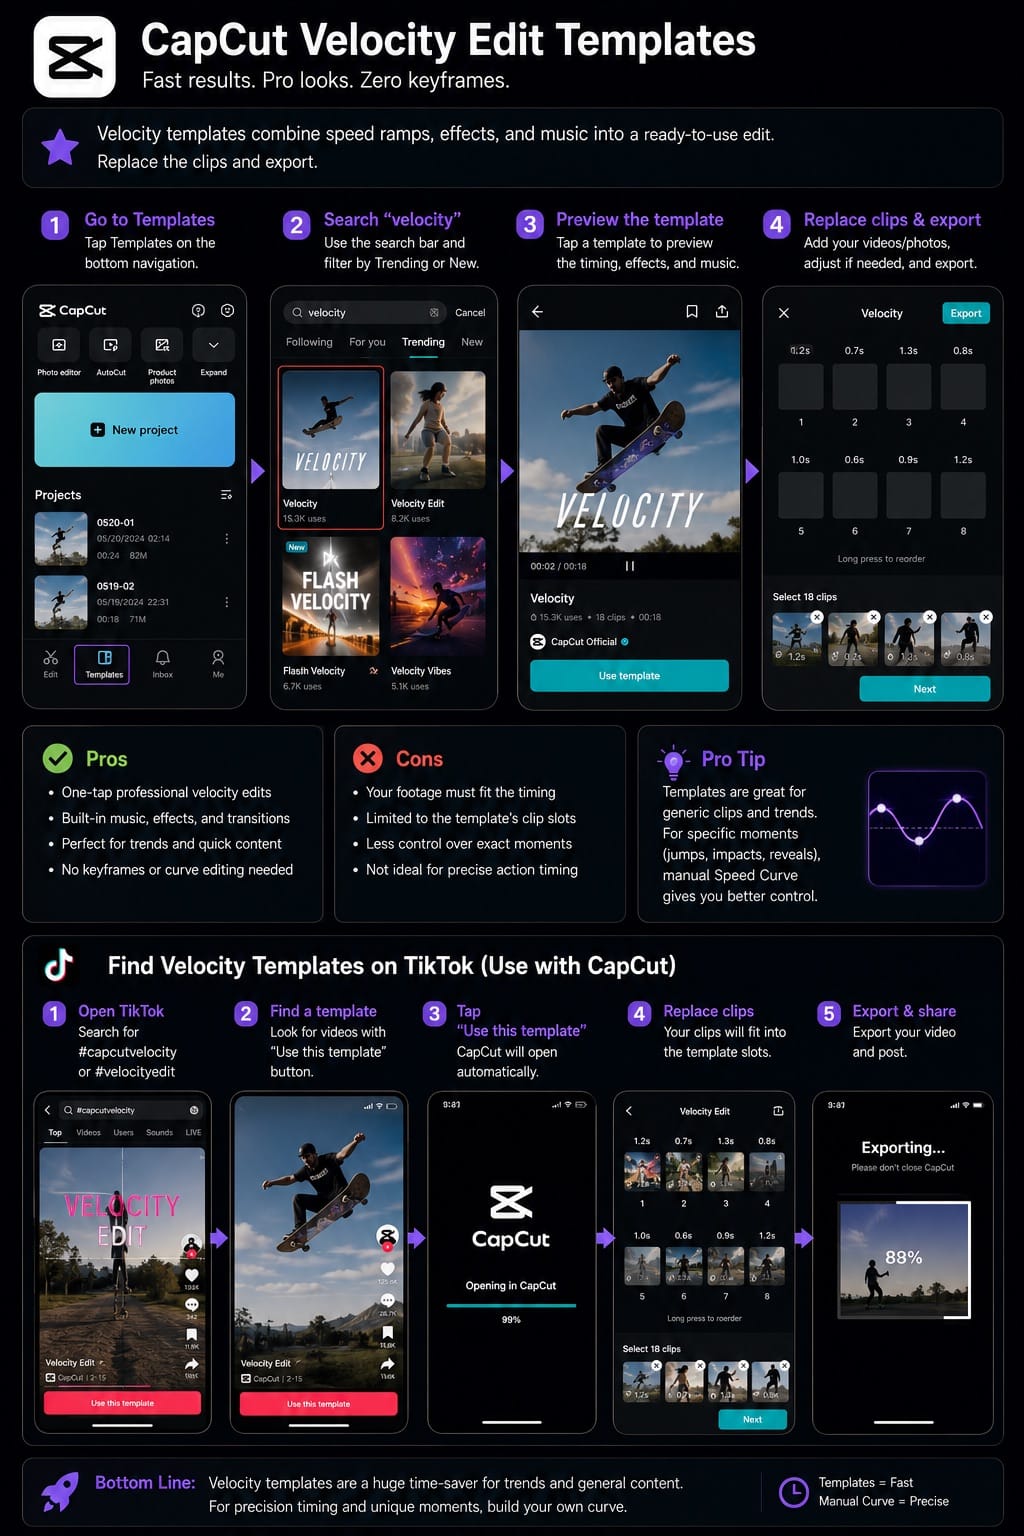
The downside is the same as any template: your clip has to fit the predetermined clip slots and timing. If your action does not happen at the moment the template expects it, the effect looks off. For generic clips it works. For footage with specific moments you want to time, the manual curve is worth the extra 11 minutes.
You can also find velocity templates inside the TikTok app directly, and use them through CapCut's built-in TikTok integration. Search #capcutvelocity or #velocityedit and tap Use this template on any clip that has the option enabled.
CapCut Velocity Edit FAQ
Where is Auto Velocity in CapCut?
Auto Velocity is under Style, not under Speed. Select your clip, tap Edit, then tap Style at the bottom, and look for the Velocity tab. The Speed menu is for manual or preset curve editing. Both affect speed, but they are different tools accessed from different places in the interface.
Why does my velocity edit look choppy in CapCut?
Choppy slow motion usually means your source footage is 30fps and you are slowing it below around 0.3x. Enable Smooth slow mo in the curve editor to turn on frame interpolation. If it still looks rough, re-shoot at 60fps or higher. No amount of software processing fully compensates for missing frames.
Can I sync velocity edits to music in CapCut?
Yes. Add your audio track first, then go to Speed > Curve > Custom. Yellow beat markers will appear on the audio waveform along the bottom of the timeline. Position your velocity beat points to match those markers. Do not shift the points horizontally after aligning them or the sync breaks.
What is the difference between CapCut velocity presets and Auto Velocity?
Speed Curve presets (Montage, Hero, Bullet, etc.) give you a predefined speed pattern that you can adjust manually after applying. Auto Velocity (under Style) combines a speed change with a visual effect like blur or flash and is automatically synced to detected audio. Speed Curve presets offer more control. Auto Velocity is faster to apply.
Does CapCut velocity editing work on desktop?
Yes, and it is more precise on desktop than on mobile. Select your clip, click the Speed tab in the right panel, choose Curve, then click Customized. You get the same beat point graph as mobile but with a larger timeline view and the ability to zoom in for frame-level accuracy. The Style > Auto Velocity option is also available in the desktop version.
Can I use velocity edits with CapCut transitions?
You can apply transitions at clip cut points and Speed Curve effects within clips simultaneously. A common approach: apply Flash In or Flash Out as the curve on a clip, then add a CapCut transitions at the cut point between clips. The flash at the end of one clip and the beginning of the next creates a layered effect. Just preview at full speed before exporting because the combination can look cluttered if both effects are heavy.