The first time I tried chroma key in CapCut, I spent about 23 minutes adjusting the wrong slider. The Strength was already fine. The problem was green spill on my subject's collar, and Shadow was the fix. Nobody told me that. Every tutorial I found just said "adjust the sliders until it looks right."
This guide covers the full CapCut green screen workflow on both mobile and desktop, what each control actually does, and the specific problems that show up when your footage isn't perfect.
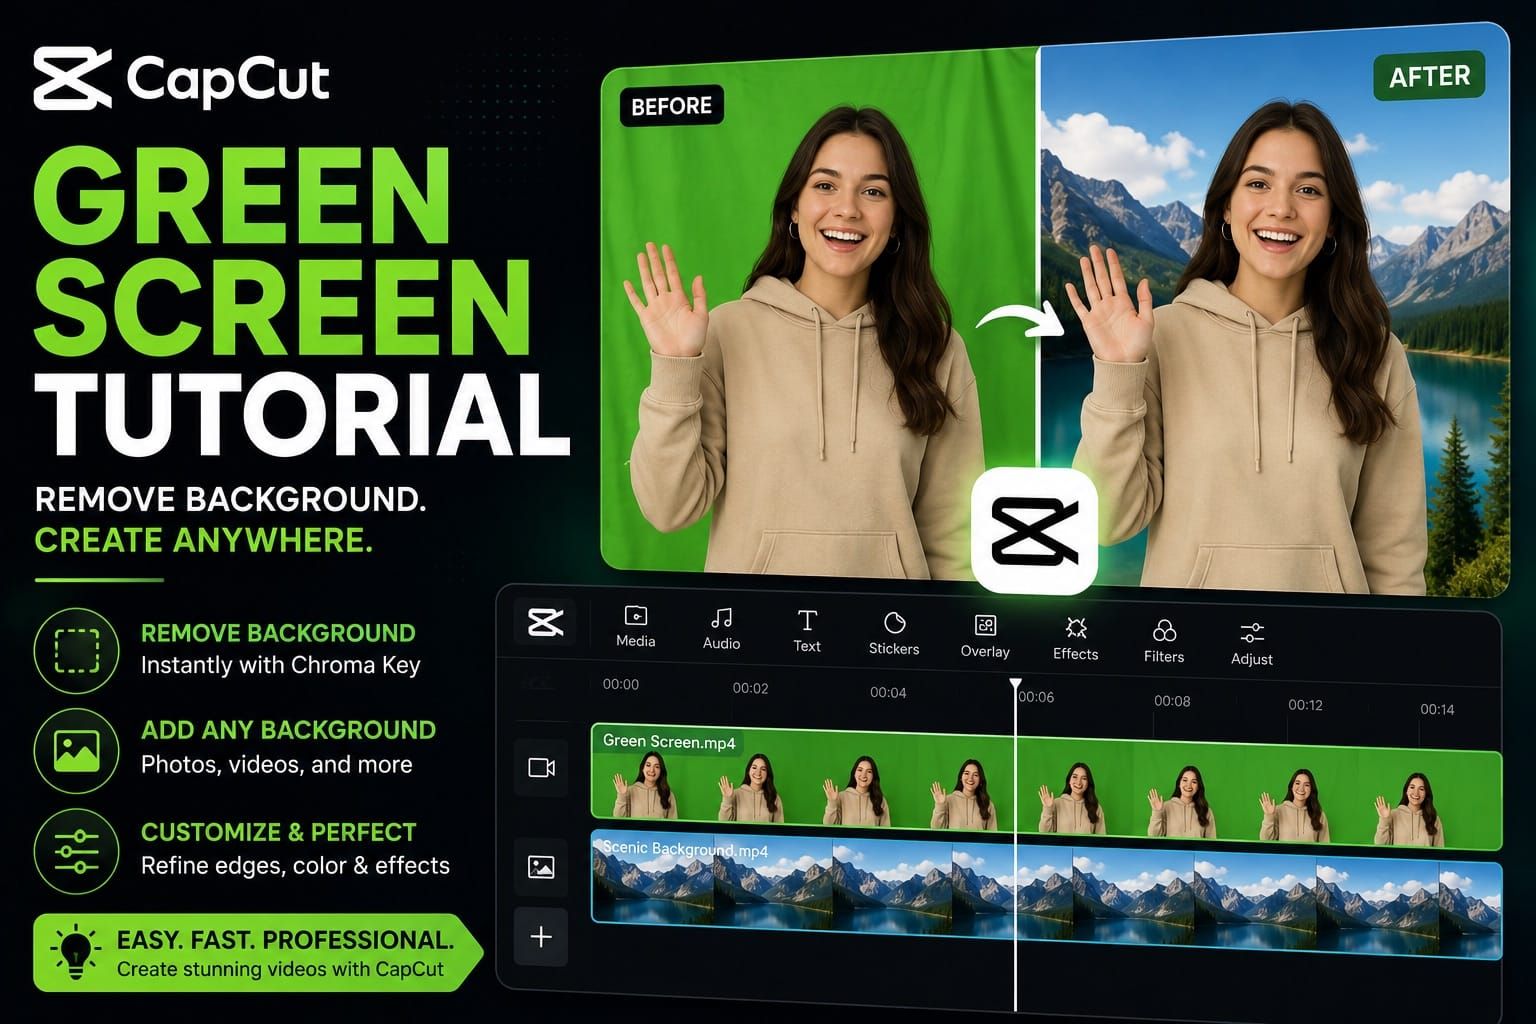
Quick answer: To use green screen in CapCut, place your background on the main timeline, add the green screen video as an overlay, select the overlay, open Cutout or Remove BG, choose Chroma Key, sample the green area with the color picker, then adjust Strength, Shadow, and Edge until the subject blends cleanly with the new background. If you're new to editing in CapCut, start with the CapCut features guide before working with overlay tracks.
CapCut Green Screen vs Auto Cutout: Which One to Use
CapCut gives you two ways to remove a background: Chroma Key and Auto Cutout. They are not interchangeable.
Chroma Key is for footage shot in front of a solid green or blue background. You pick the color, CapCut removes it, and you dial in the edges with sliders. It gives you precise control and handles hair, transparent objects, and fast motion better than AI removal, provided your lighting is decent.
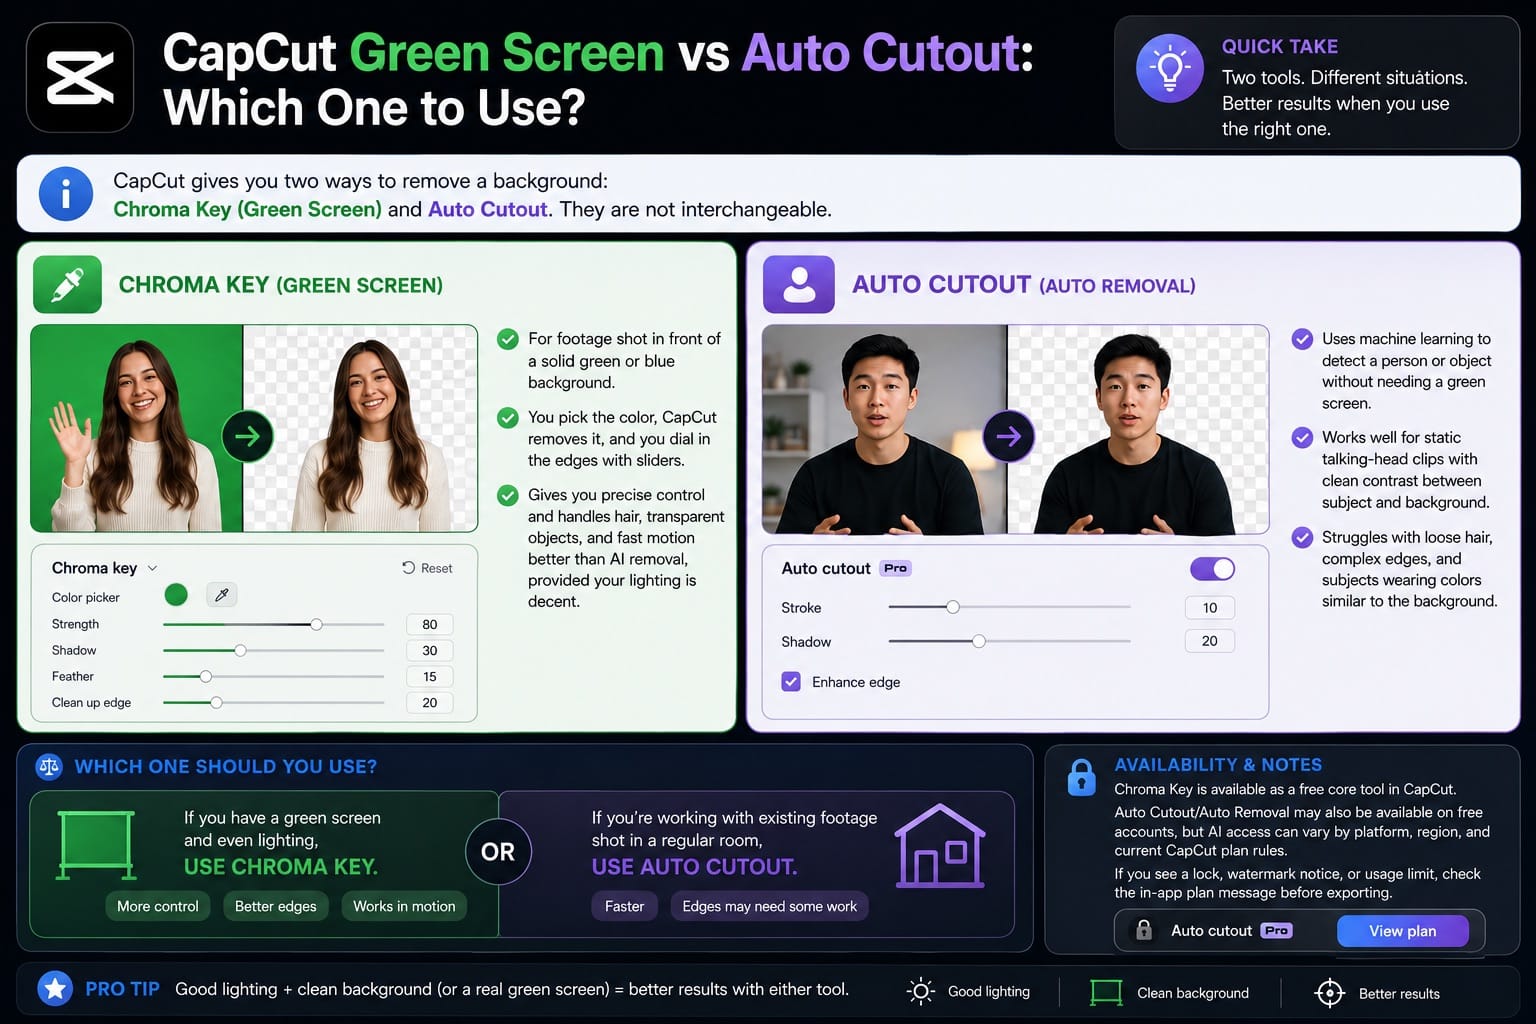
Auto Cutout uses machine learning to detect a person or object without needing a green screen. It works well for static talking-head clips with clean contrast between subject and background. It struggles with loose hair, complex edges, and subjects wearing colors similar to the background.
If you have a green screen and even lighting, use Chroma Key. If you're working with existing footage shot in a regular room, Auto Cutout is faster, though the edges will likely need some work.
Chroma Key is available as a free core tool in CapCut. Auto Cutout/Auto Removal may also be available on free accounts, but AI access can vary by platform, region, and current CapCut plan rules. If you see a lock, watermark notice, or usage limit, check the in-app plan message before exporting.
How to Use Green Screen in CapCut on Mobile
The mobile workflow puts the Chroma Key tool inside the Cutout or Remove BG menu. The label varies by app version, so if you don't see one, look for the other.
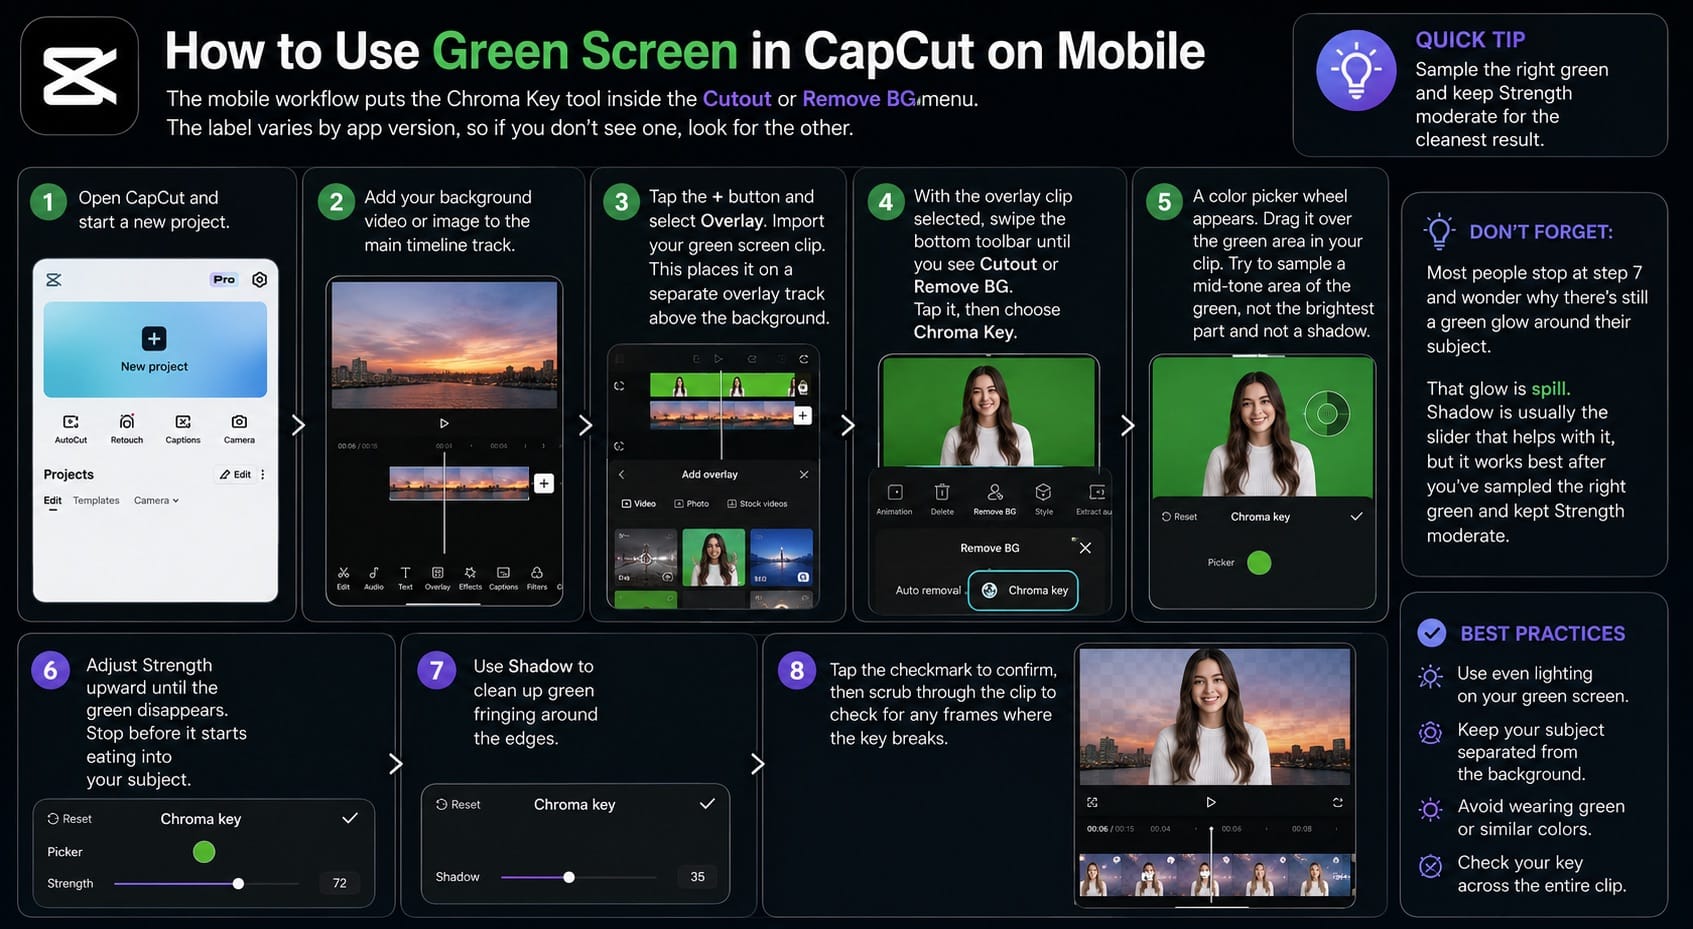
- Open CapCut and start a new project.
- Add your background video or image to the main timeline track.
- Tap the + button and select Overlay. Import your green screen clip. This places it on a separate overlay track above the background.
- With the overlay clip selected, swipe the bottom toolbar until you see Cutout or Remove BG. The label can vary by app version. Tap it, then choose Chroma Key.
- A color picker wheel appears. Drag it over the green area in your clip. Try to sample a mid-tone area of the green, not the brightest part and not a shadow.
- Adjust Strength upward until the green disappears. Stop before it starts eating into your subject.
- Use Shadow to clean up green fringing around the edges.
- Tap the checkmark to confirm, then scrub through the clip to check for any frames where the key breaks.
Most people stop at step 7 and wonder why there's still a green glow around their subject. That glow is spill. Shadow is usually the slider that helps with it, but it works best after you've sampled the right green and kept Strength moderate.
How to Use Green Screen in CapCut on Desktop
The desktop version puts Chroma Key in a different location than mobile, which is where a lot of confusion comes from.
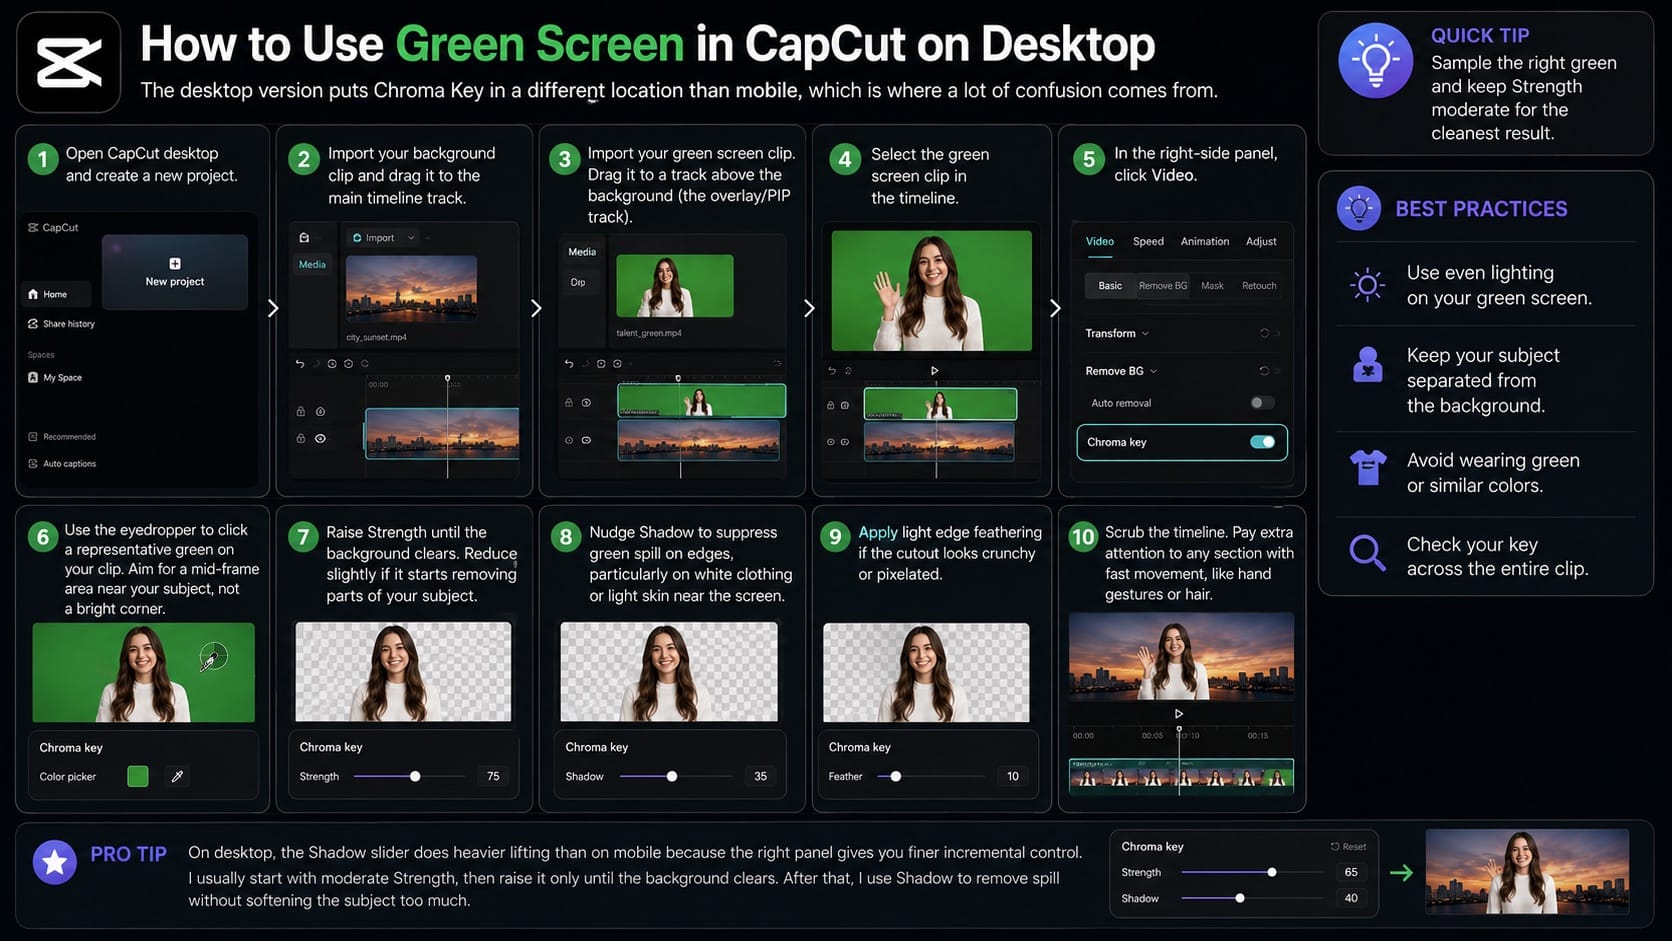
- Open CapCut desktop and create a new project.
- Import your background clip and drag it to the main timeline track.
- Import your green screen clip. Drag it to a track above the background (the overlay/PIP track).
- Select the green screen clip in the timeline.
- In the right-side panel, click Video.
- Scroll down to Remove BG and expand it.
- Toggle on Chroma Key.
- Use the eyedropper to click a representative green on your clip. Aim for a mid-frame area near your subject, not a bright corner.
- Raise Strength until the background clears. Reduce slightly if it starts removing parts of your subject.
- Nudge Shadow to suppress green spill on edges, particularly on white clothing or light skin near the screen.
- Apply light edge feathering if the cutout looks crunchy or pixelated.
- Scrub the timeline. Pay extra attention to any section with fast movement, like hand gestures or hair.
On desktop, the Shadow slider does heavier lifting than on mobile because the right panel gives you finer incremental control. I usually start with moderate Strength, then raise it only until the background clears. After that, I use Shadow to remove spill without softening the subject too much.
CapCut Chroma Key Controls Explained
Most tutorials skip the explanation and just say "adjust until it looks good." Here's what each control actually does.
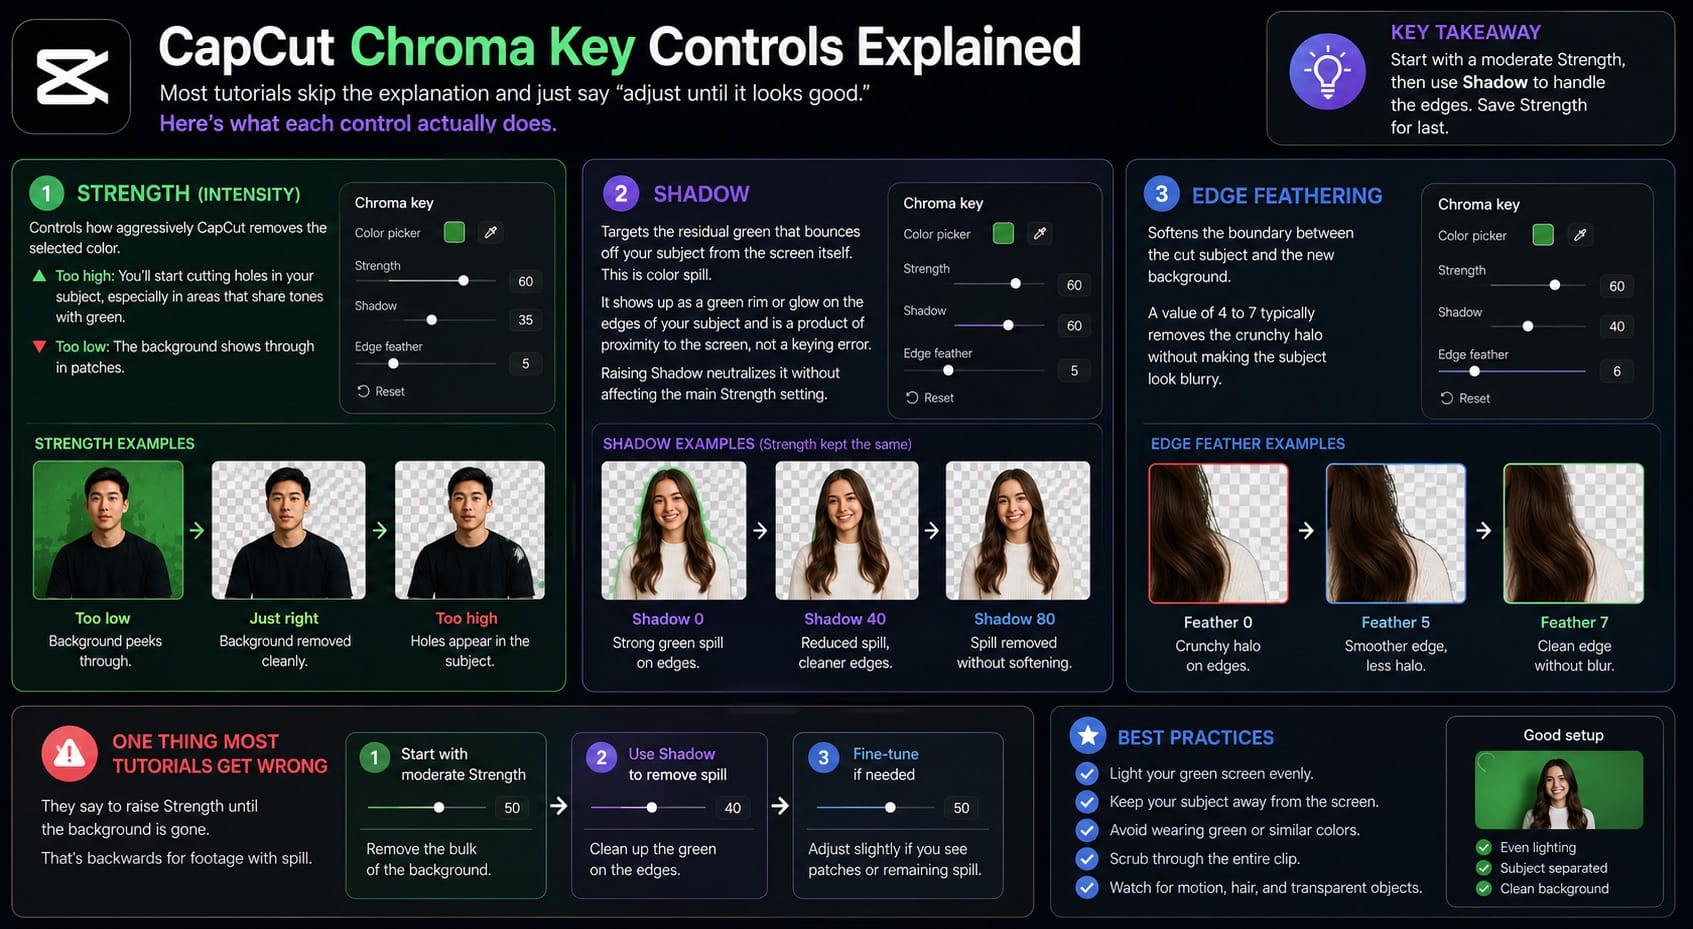
Strength (also called Intensity on some versions) controls how aggressively CapCut removes the selected color. Push it too high and you'll start cutting holes in your subject, especially in areas that share tones with green, like certain greens in clothing or some skin tones under green-tinted lighting. Push it too low and the background shows through in patches.
Shadow targets the residual green that bounces off your subject from the screen itself. This is color spill. It shows up as a green rim or glow on the edges of your subject and is a product of proximity to the screen, not a keying error. Raising Shadow neutralizes it without affecting the main Strength setting.
Edge Feathering (available on desktop, labeled differently or absent on some mobile versions) softens the boundary between the cut subject and the new background. A value of 4 to 7 typically removes the crunchy halo without making the subject look blurry.
One thing most tutorials get wrong: they say to raise Strength until the background is gone. That's backwards for footage with spill. Start with a moderate Strength, then use Shadow to handle the edges. If you max out Strength first, you've left yourself no room to fix spill without pulling the subject apart.
CapCut Green Screen Setup: Shooting Tips That Actually Matter
The quality of your key in post is mostly determined before you hit record. Chroma key in CapCut, or any editor, cannot fully recover from bad source footage.
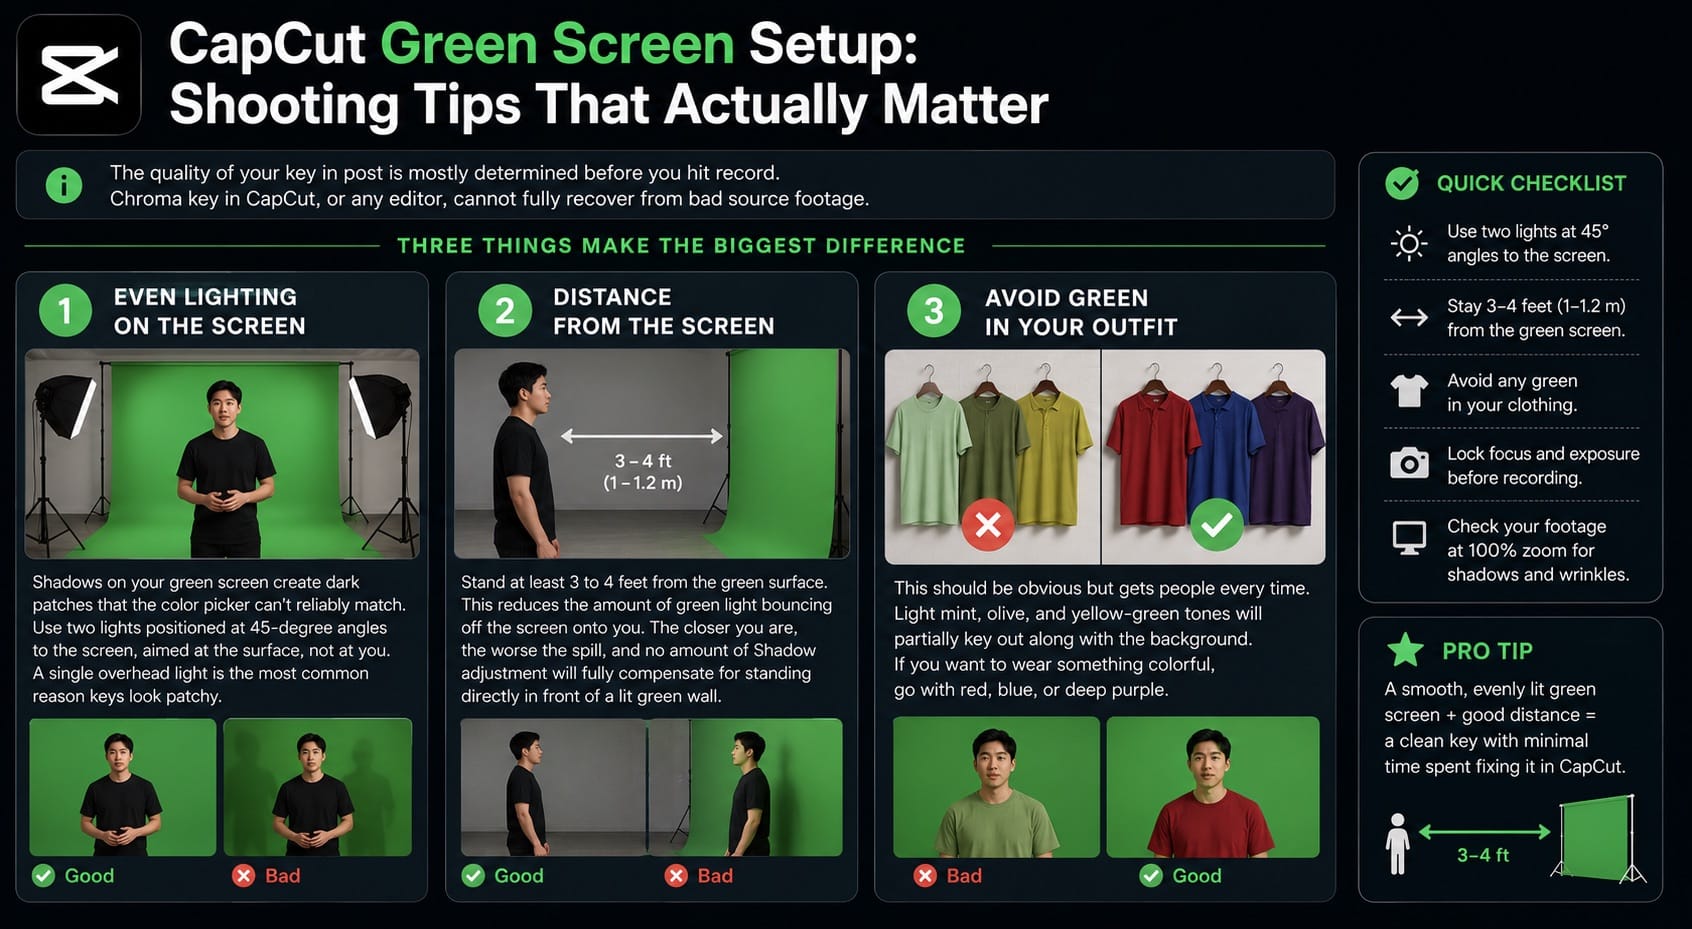
Three things make the biggest difference:
Even lighting on the screen. Shadows on your green screen create dark patches that the color picker can't reliably match. Use two lights positioned at 45-degree angles to the screen, aimed at the surface, not at you. A single overhead light is the most common reason keys look patchy.
Distance from the screen. Stand at least 3 to 4 feet from the green surface. This reduces the amount of green light bouncing off the screen onto you. The closer you are, the worse the spill, and no amount of Shadow adjustment will fully compensate for standing directly in front of a lit green wall.
Avoid green in your outfit. This should be obvious but gets people every time. Light mint, olive, and yellow-green tones will partially key out along with the background. If you want to wear something colorful, go with red, blue, or deep purple.
CapCut Green Screen Not Working: Common Fixes
If the background isn't clearing properly or the key looks wrong, here are the actual causes.
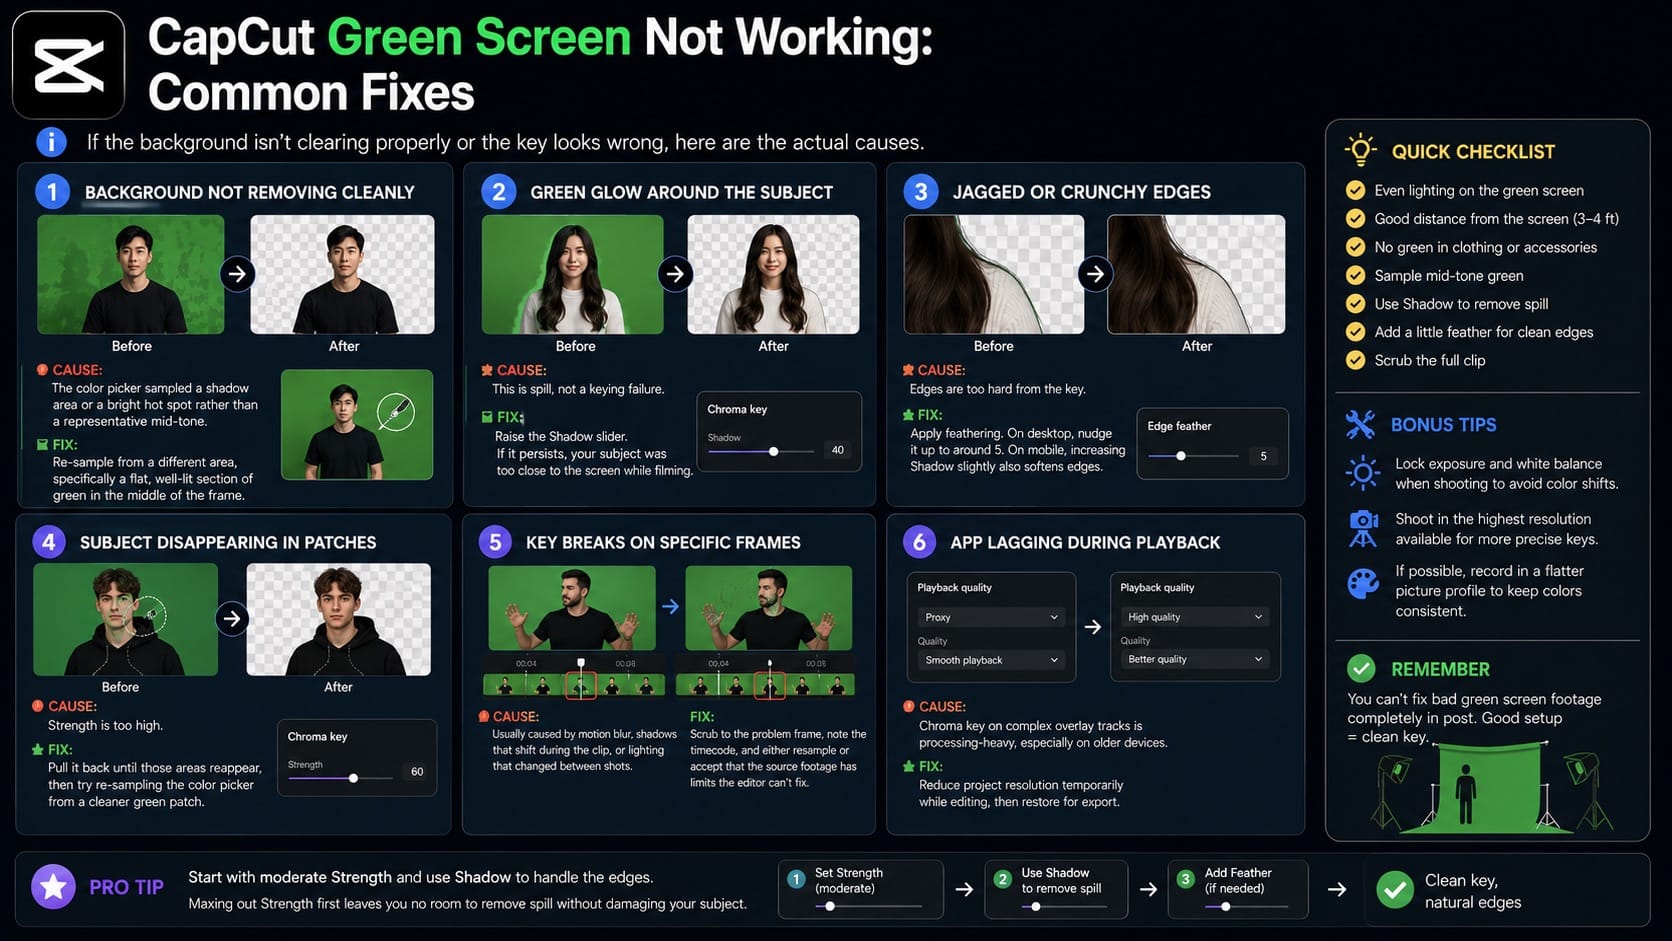
Background not removing cleanly: The color picker sampled a shadow area or a bright hot spot rather than a representative mid-tone. Re-sample from a different area, specifically a flat, well-lit section of green in the middle of the frame.
Green glow around the subject: This is spill, not a keying failure. Raise the Shadow slider. If it persists, your subject was too close to the screen while filming.
Jagged or crunchy edges: Apply feathering. On desktop, nudge it up to around 5. On mobile, increasing Shadow slightly also softens edges.
Subject disappearing in patches: Strength is too high. Pull it back until those areas reappear, then try re-sampling the color picker from a cleaner green patch.
Key breaks on specific frames: Usually caused by motion blur, shadows that shift during the clip, or lighting that changed between shots. Scrub to the problem frame, note the timecode, and either resample or accept that the source footage has limits the editor can't fix.
App lagging during playback: Chroma key on complex overlay tracks is processing-heavy, especially on older devices. Reduce project resolution temporarily while editing, then restore for export.
CapCut Auto Cutout as a Green Screen Alternative
If you don't have a green screen, Auto Cutout can remove backgrounds from existing footage. The workflow is nearly identical: place your background on the main track, add your subject clip as an overlay, select the overlay, go to Cutout, and choose Auto Removal instead of Chroma Key.
CapCut's AI detects the subject automatically. No color selection required. The results are clean on talking-head clips where there's clear contrast between the person and the background. They get complicated with fine hair, translucent materials, or motion.
Auto Cutout is more likely to be affected by AI usage limits or plan changes than Chroma Key. For a deeper look at how AI removal compares to manual cleanup, see the CapCut background removal guide. For high-volume editing, a physical green screen is still more predictable because Chroma Key relies on color selection rather than AI credits.
If your export adds a CapCut logo or ending clip, the CapCut watermark guide explains the difference between free watermarks, template marks, and Pro-gated assets.
CapCut Green Screen FAQ
Is CapCut green screen free?
Chroma Key is a free core tool in CapCut on mobile, desktop, and web. You do not need a Standard or Pro subscription to use it. Auto Cutout (AI background removal) may also be available on free accounts, but AI feature access can vary by platform, region, and current plan rules. If you see a lock or usage limit on Auto Cutout, check the in-app plan notice.
Can I use CapCut green screen on iPhone?
Yes. The Chroma Key tool is available in CapCut for iOS. The path is: add your clip as an overlay, select it, tap Cutout in the bottom toolbar, then tap Chroma Key. The controls are the same as Android.
How do I get rid of green spill in CapCut?
Use the Shadow slider. Green spill, the greenish glow on the edges of your subject, is not removed by the Strength setting. Raising Shadow specifically targets residual color bounce from the screen. If spill is severe, the main fix is physical: increase the distance between your subject and the green screen when filming.
Why is CapCut chroma key not working?
The most common causes are poor color sampling (try clicking a different area of the green), video format issues (CapCut works best with MP4), an outdated app version, or source footage with inconsistent lighting. Update the app, re-import the clip, and resample the color before adjusting sliders.
Does CapCut green screen work without a green screen?
The Chroma Key tool requires a solid-color background in your footage. If you don't have one, use Auto Cutout instead. It uses AI to remove backgrounds without any special filming setup, though results vary depending on the complexity of the original background.
Can I use blue screen instead of green in CapCut?
Yes. The color picker in Chroma Key lets you select any color, not just green. Blue screen is a valid alternative, particularly if your subject has green clothing or green-tinted hair. The workflow is identical.
Does CapCut green screen work on PC?
Yes. The desktop app on Windows and Mac includes Chroma Key under Video > Remove BG in the right inspector panel. The controls are more precise on desktop than mobile, with finer slider increments and more visible edge feathering options.