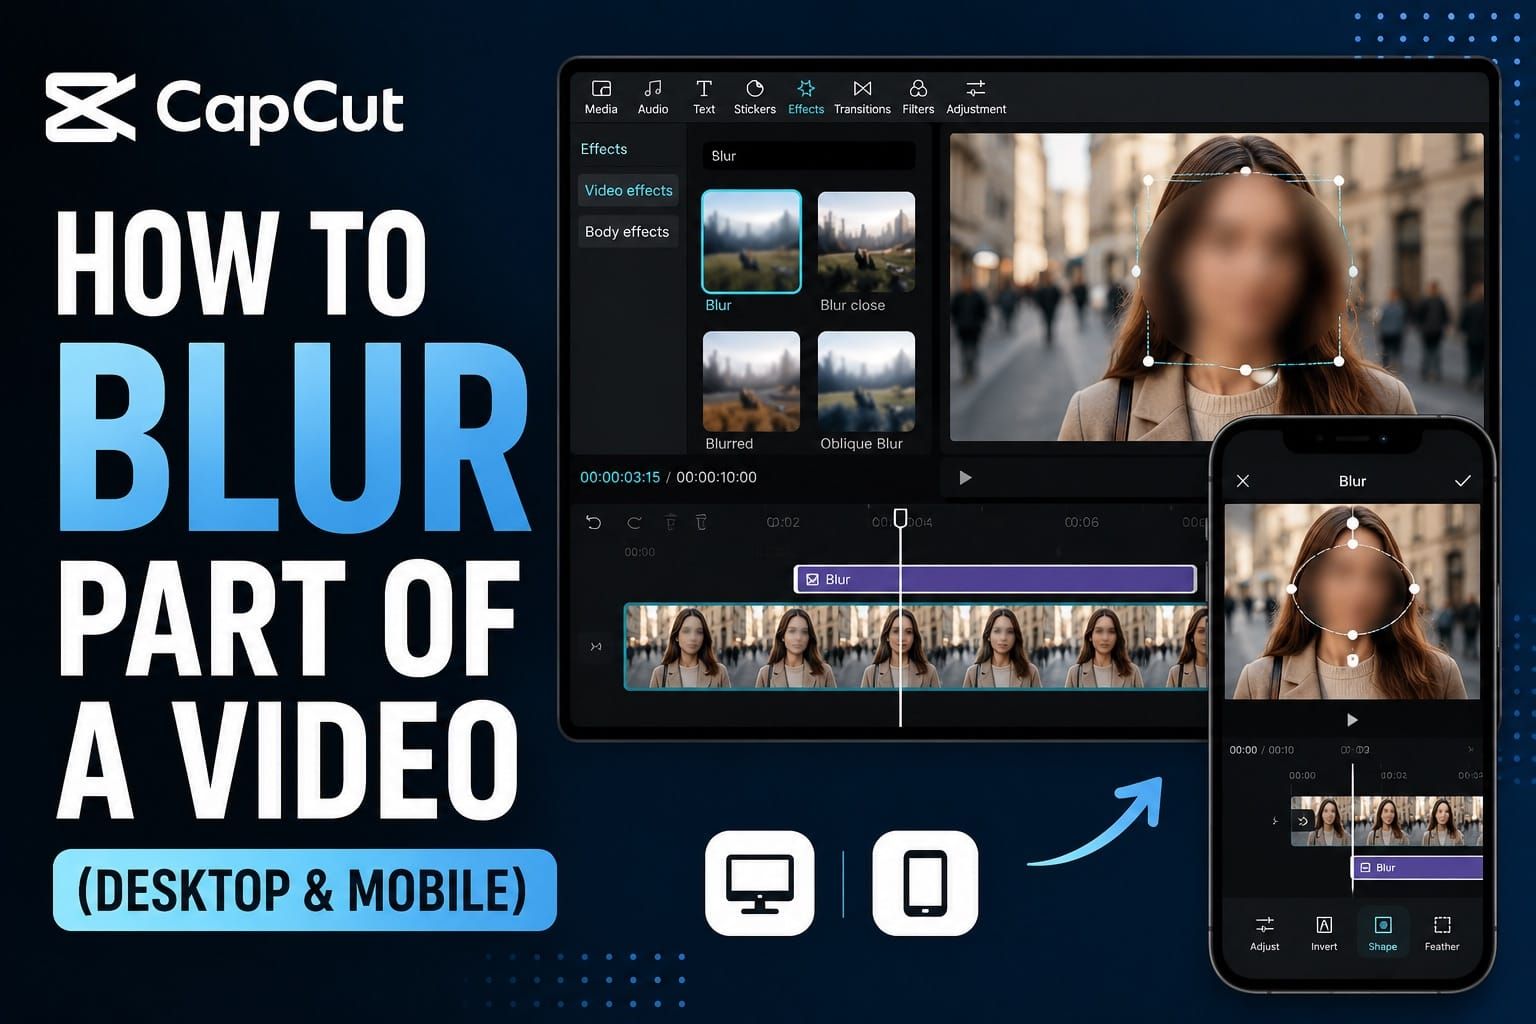
I was editing a street vlog where a stranger walked into frame for about 4 seconds. I needed to blur one specific area, a face in this case, without blurring the background or the whole clip. That's where most tutorials fall short. They show you how to apply a blur to the entire video. Blurring a specific area in CapCut is a different process, and that's what this article covers.
If you searched for how to blur part of video in CapCut, the answer is the mask-and-overlay method. You duplicate the clip, blur one layer, and use a mask to expose only the blurred area in the region you want hidden. On desktop this happens in the timeline. On mobile you need to export a blurred version first, then add it back as an overlay.
Quick answer:
Desktop: duplicate the clip, blur the bottom layer, mask the top layer, click Reverse, then export.
Mobile: export a fully blurred version, add it back as an overlay, then mask only the area you want blurred.
Moving subject: place the mask, run Track Mask, then manually correct any frames where it drifts.
How the Mask + Overlay Method Works
You cannot apply a blur to a single region of a clip without using two video layers. CapCut has no brush tool that lets you paint blur directly onto a frame. The method is to stack two copies of the same clip and use a mask to control where the blur shows through.
Your original clip sits on the bottom of the timeline. A blurred copy sits above it. The mask on the top layer cuts a hole in the shape you define, so the blur from the layer below shows through only in that region. Everything outside the mask stays sharp because the top layer covers it with the original footage.
Once you understand that structure, each step below will make sense.
The duplicate-clip method is also the safest free option. CapCut's Pro prompts vary by app version, account type, and region, especially when you apply masks to effect layers rather than to video clips. If you hit a paywall, this clip-level approach avoids it.
What You Can Blur with This Method
This workflow works on any region of your video, not just faces. Common use cases:
- Face or head area
- License plate
- Phone screen or laptop screen
- Address, email, or document text
- Logo or username
- Background object or bystander
- Moving person in frame
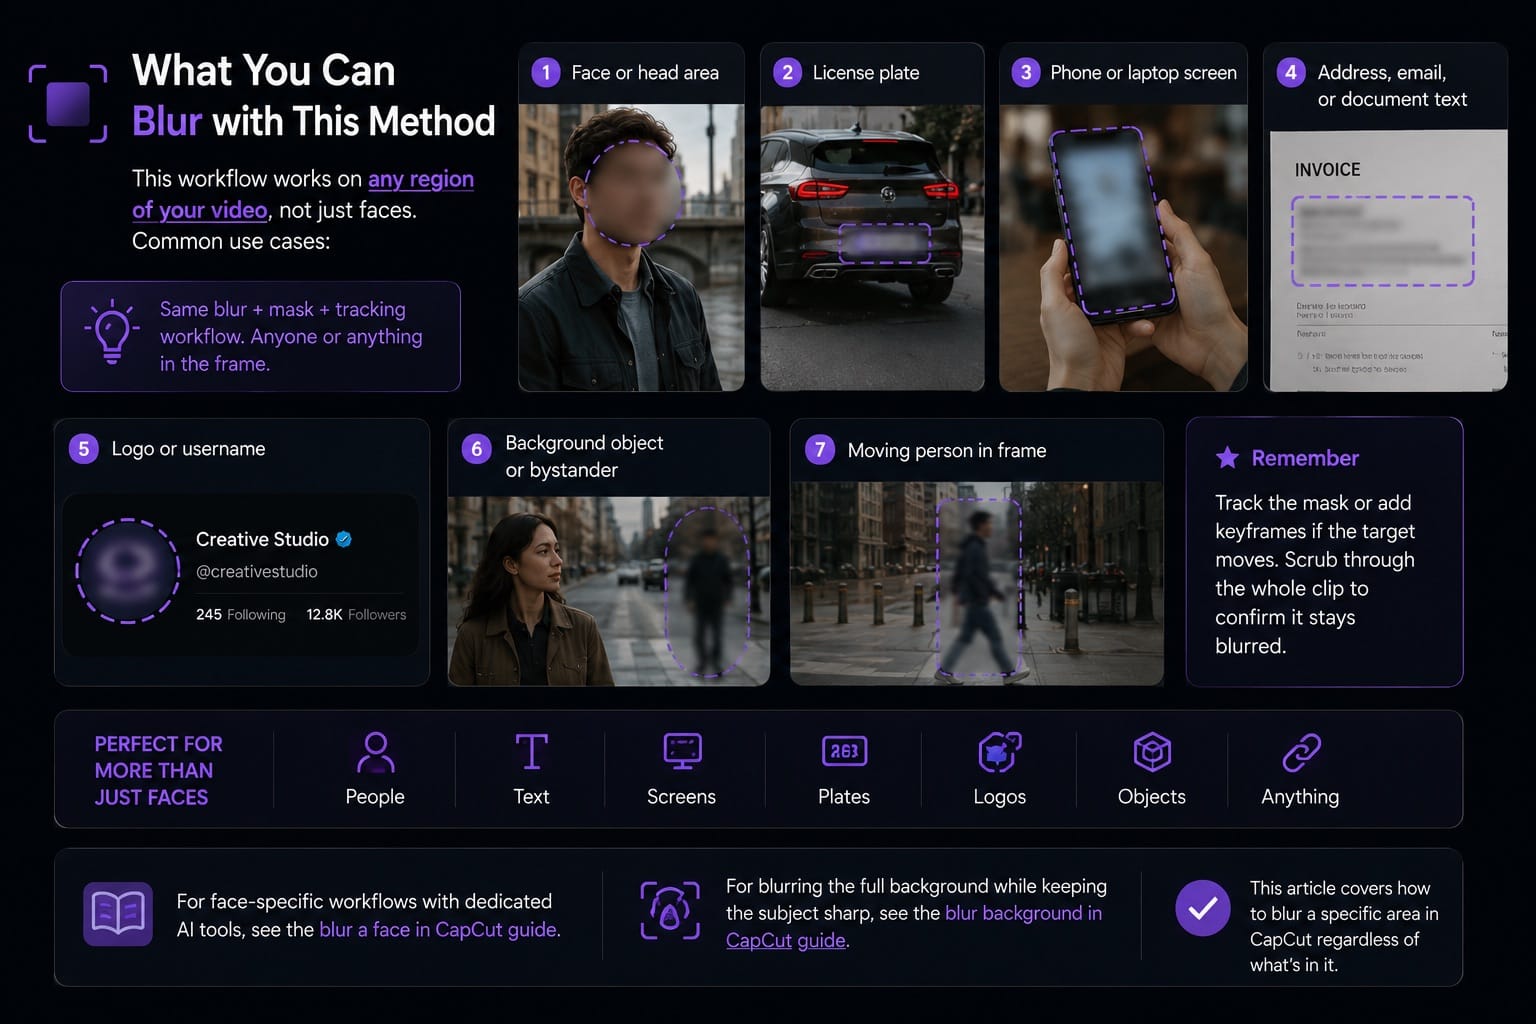
For face-specific workflows with dedicated AI tools, see the blur a face in CapCut guide. For blurring the full background while keeping the subject sharp, see the blur background in CapCut guide. This article covers how to blur a specific area in CapCut regardless of what's in it.
CapCut Desktop: Blur a Specific Area Step by Step
Tested on CapCut desktop. The UI labels reflect the current version as of 2026. If something looks slightly different in your build, the underlying tabs (Effects, Mask, Video) are in the same general locations.
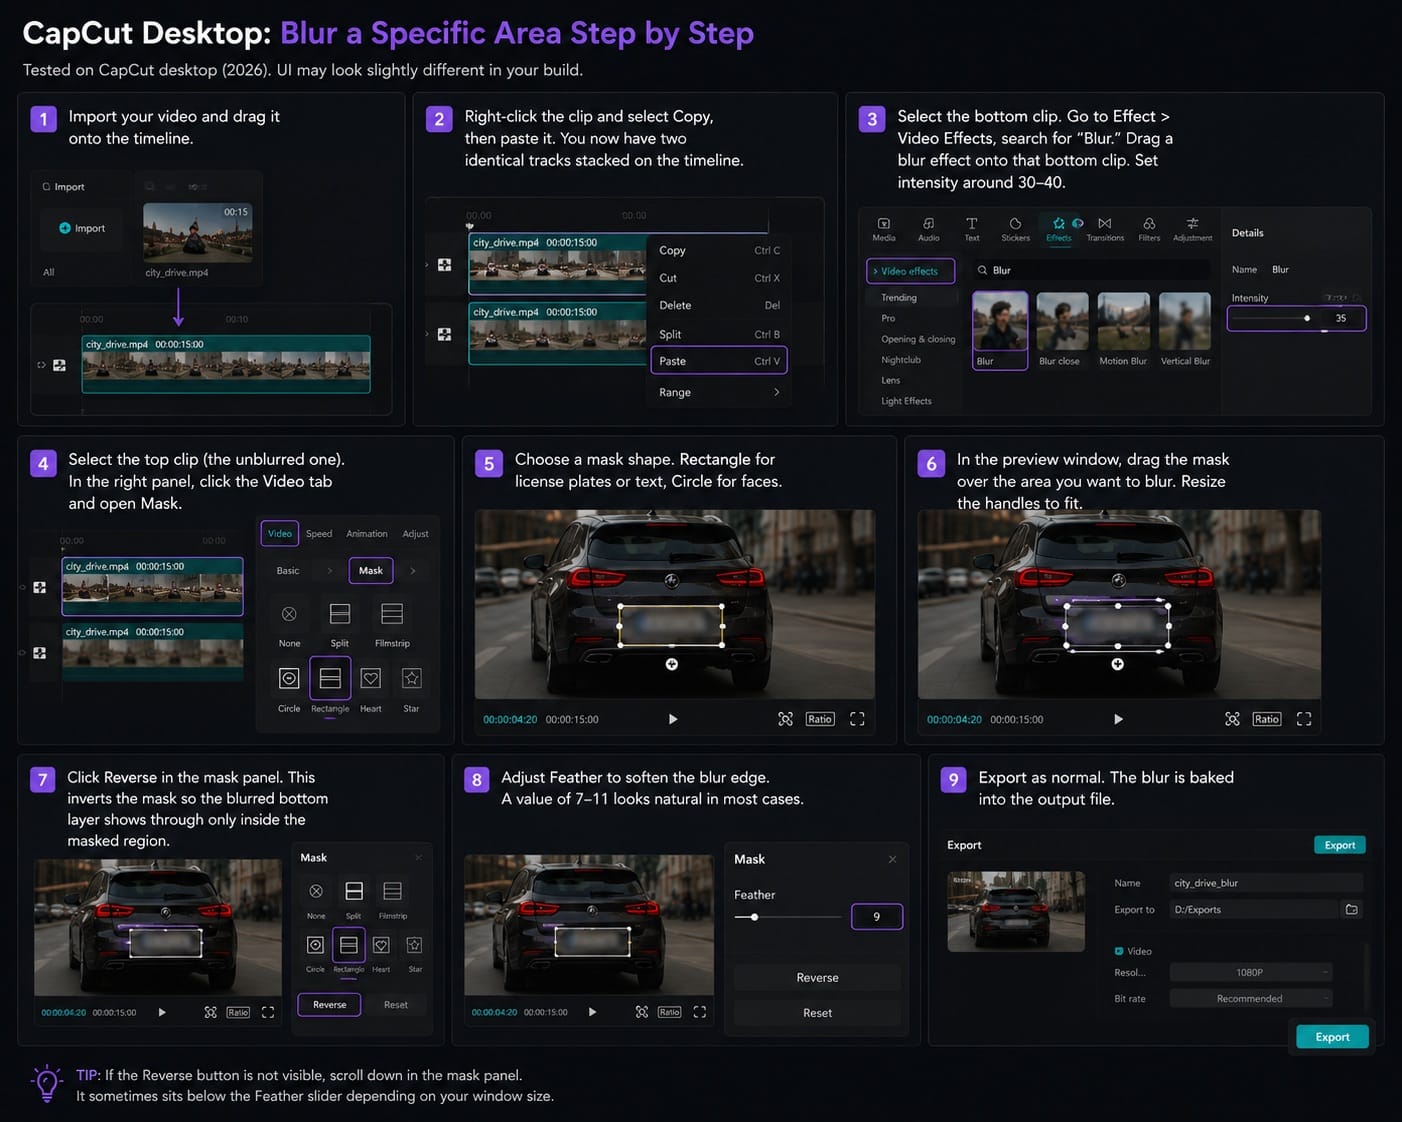
- Import your video and drag it onto the timeline.
- Right-click the clip and select Copy, then paste it. You now have two identical tracks stacked on the timeline.
- Select the bottom clip. Go to the Effect tab at the top left, open Video Effects, and search for "Blur." Drag a blur effect onto that bottom clip. Set intensity around 30-40 in the right panel. That range reads clearly without looking like a glitch.
- Select the top clip (the unblurred one). In the right panel, click the Video tab and open Mask.
- Choose a mask shape. Rectangle for license plates or text, Circle for faces.
- In the preview window, drag the mask over the area you want to blur. Resize the handles to fit.
- Click Reverse in the mask panel. This inverts the mask so the blurred bottom layer shows through only inside the masked region.
- Adjust Feather to soften the blur edge. A value of 7-11 looks natural in most cases.
Export as normal. The blur is baked into the output file.
If the Reverse button is not visible, scroll down in the mask panel. It sometimes sits below the Feather slider depending on your window size.
CapCut Mobile: Blur Part of a Video on iPhone or Android
The mobile workflow uses the Overlay menu rather than a second timeline track. The extra export step is a real inconvenience, but it's how CapCut mobile handles layered effects without a proper multi-track system.
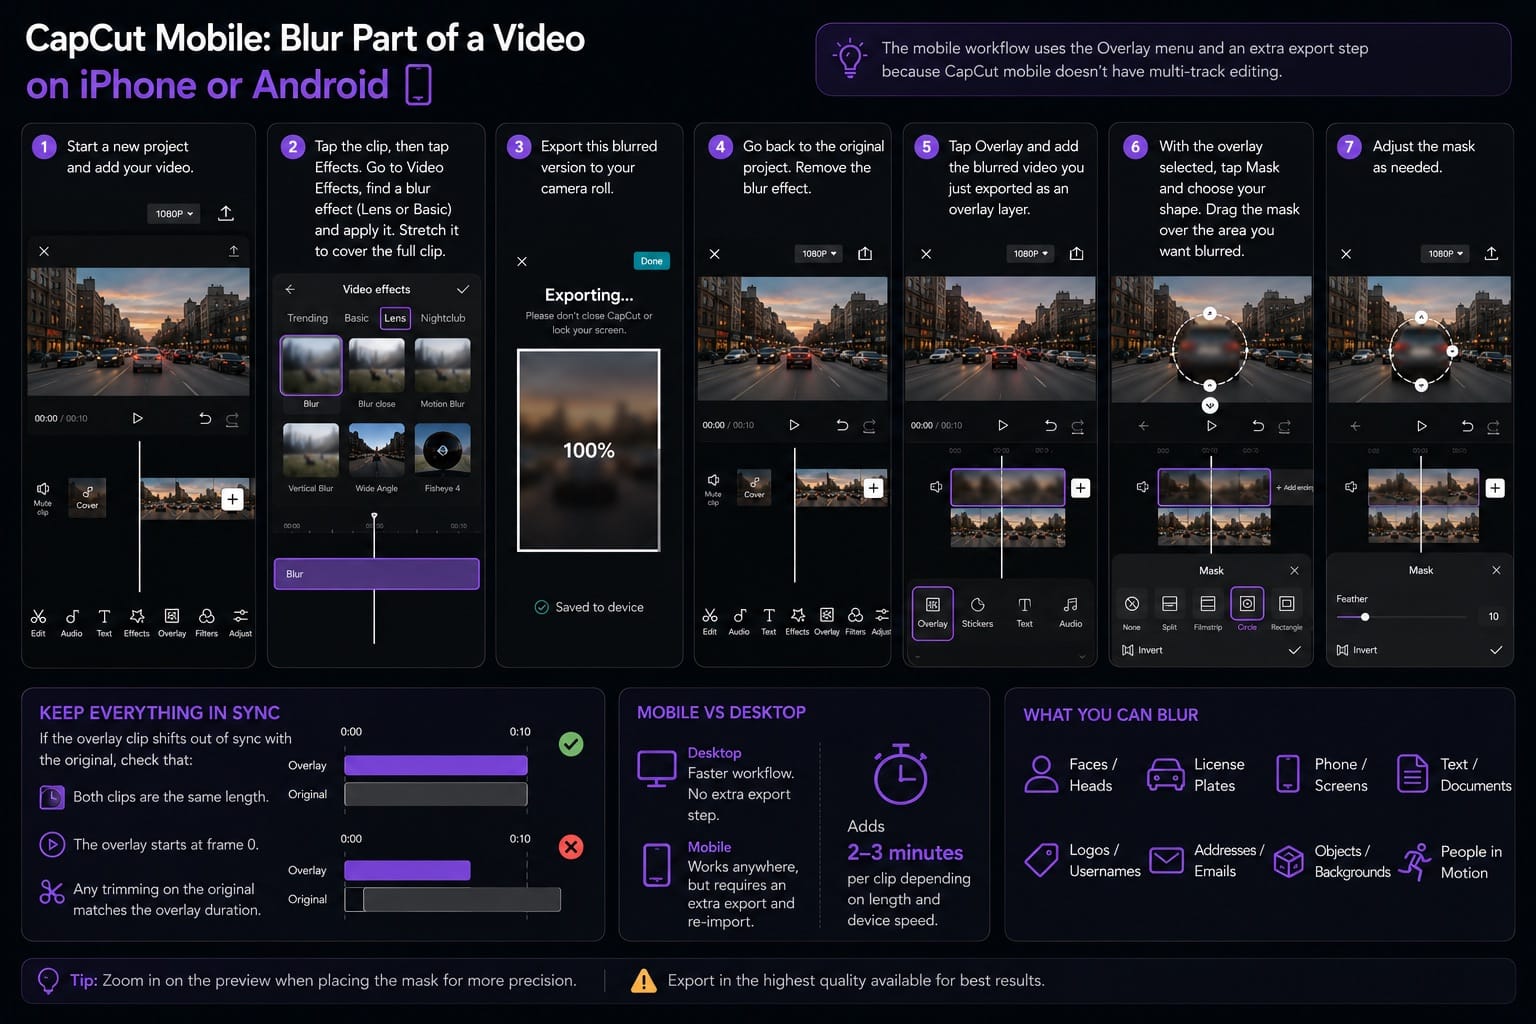
- Start a new project and add your video.
- Tap the video in the timeline, then tap Effects at the bottom. Go to Video Effects, find a blur effect under the Lens or Basic category, and apply it. Stretch it to cover the full clip length.
- Export this blurred version to your camera roll.
- Go back to the original project. Remove the blur effect. Tap Overlay and add the blurred video you just exported as an overlay layer.
- Position the overlay so it lines up exactly with the original clip.
- With the overlay selected, tap Mask and choose your shape (Circle, Rectangle, etc.).
- Drag the mask over the area you want blurred. The blurred overlay shows through only inside that mask shape.
If the overlay clip shifts out of sync with the original, check that both clips are the same length and that the overlay starts at frame 0. Any trimming you did to the original needs to match the overlay duration.
For regular privacy editing, desktop is faster. The mobile method works, but the export-reimport step adds 2-3 minutes per clip depending on length and device speed.
CapCut Track Mask: Blur a Moving Object or Person
A static mask works for anything that doesn't move: a parked car, a sign, text on a screen. For a moving face or a person walking through frame, you need the mask to follow the subject.
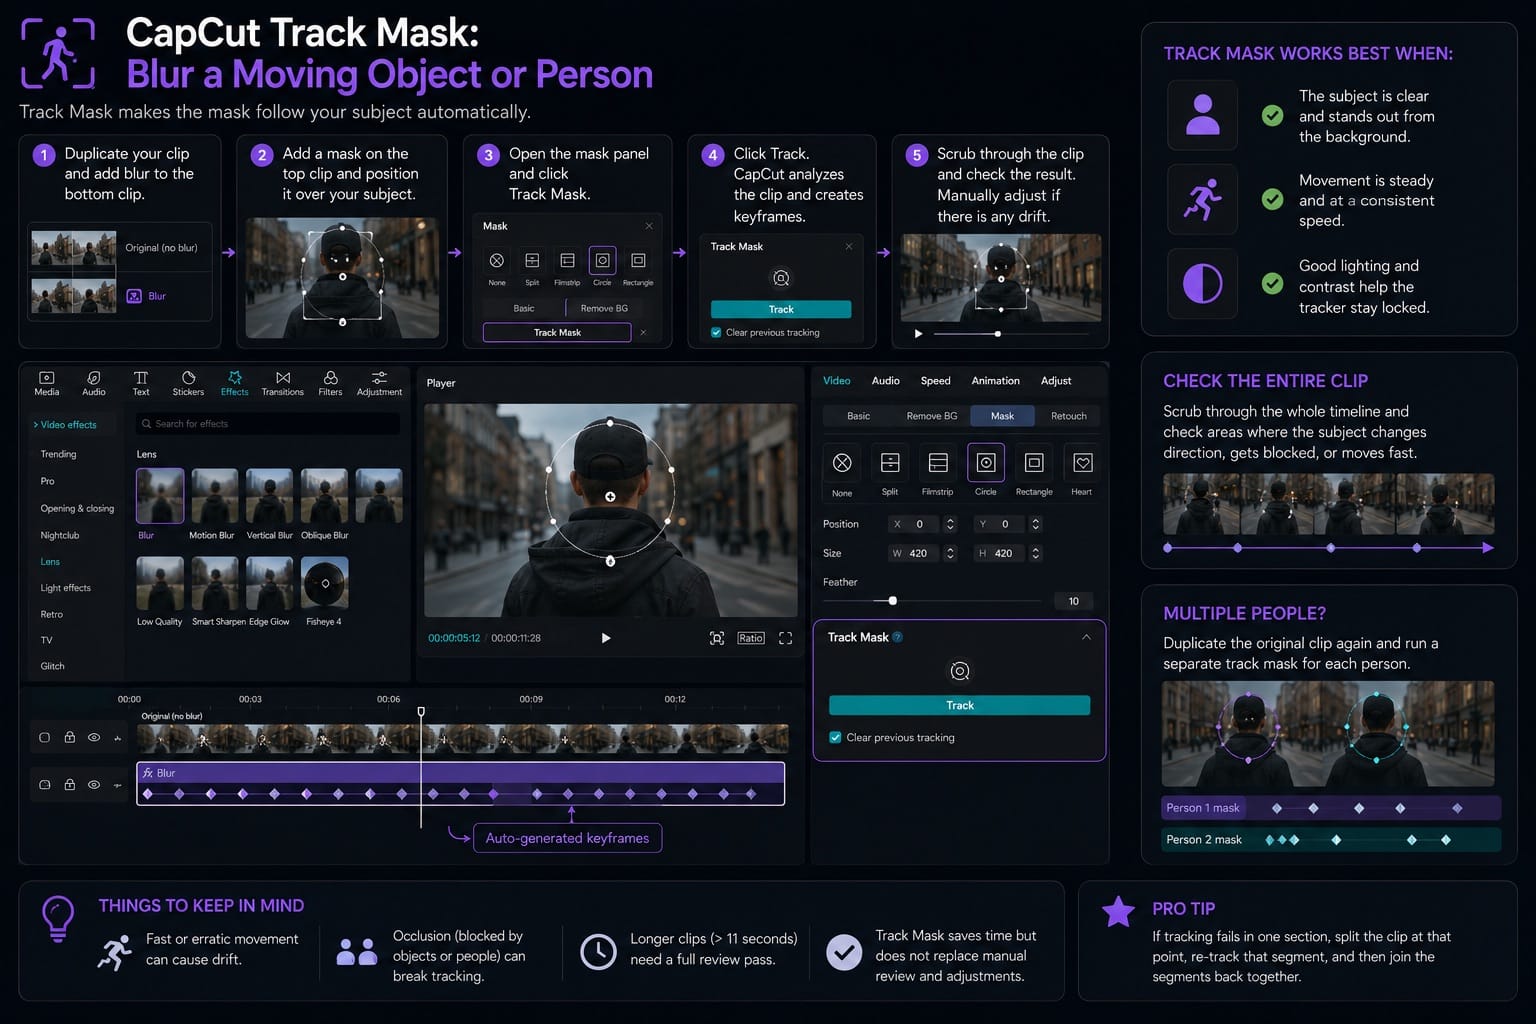
After placing your mask in step 5 of the desktop method, open the mask panel and click Track Mask, then Track. CapCut analyzes the clip and generates keyframes to keep the mask aligned with the moving subject.
Things to check before you rely on Track Mask:
- It works best when the subject has clear contrast against the background and moves at a consistent speed.
- Fast or erratic movement reduces tracking accuracy. A person running or turning quickly will likely cause drift.
- Scrub through the entire clip after tracking. Check every frame where the subject changes direction or speed.
- For two people in the same frame, run a separate overlay and mask pass for each one by duplicating the original clip again.
Track Mask reduces the amount of manual keyframe animation you need, but it does not replace a review pass. On clips longer than 11 seconds with a moving subject, budget at least a few minutes to check for drift.
CapCut's official blur guide documents the desktop tracking workflow in detail.
CapCut Blur Shapes and Feather Settings
CapCut offers Rectangle, Circle, Heart, Star, and custom shapes via the Brush or Pen tools on desktop. The shape you choose affects how convincing the blur looks.
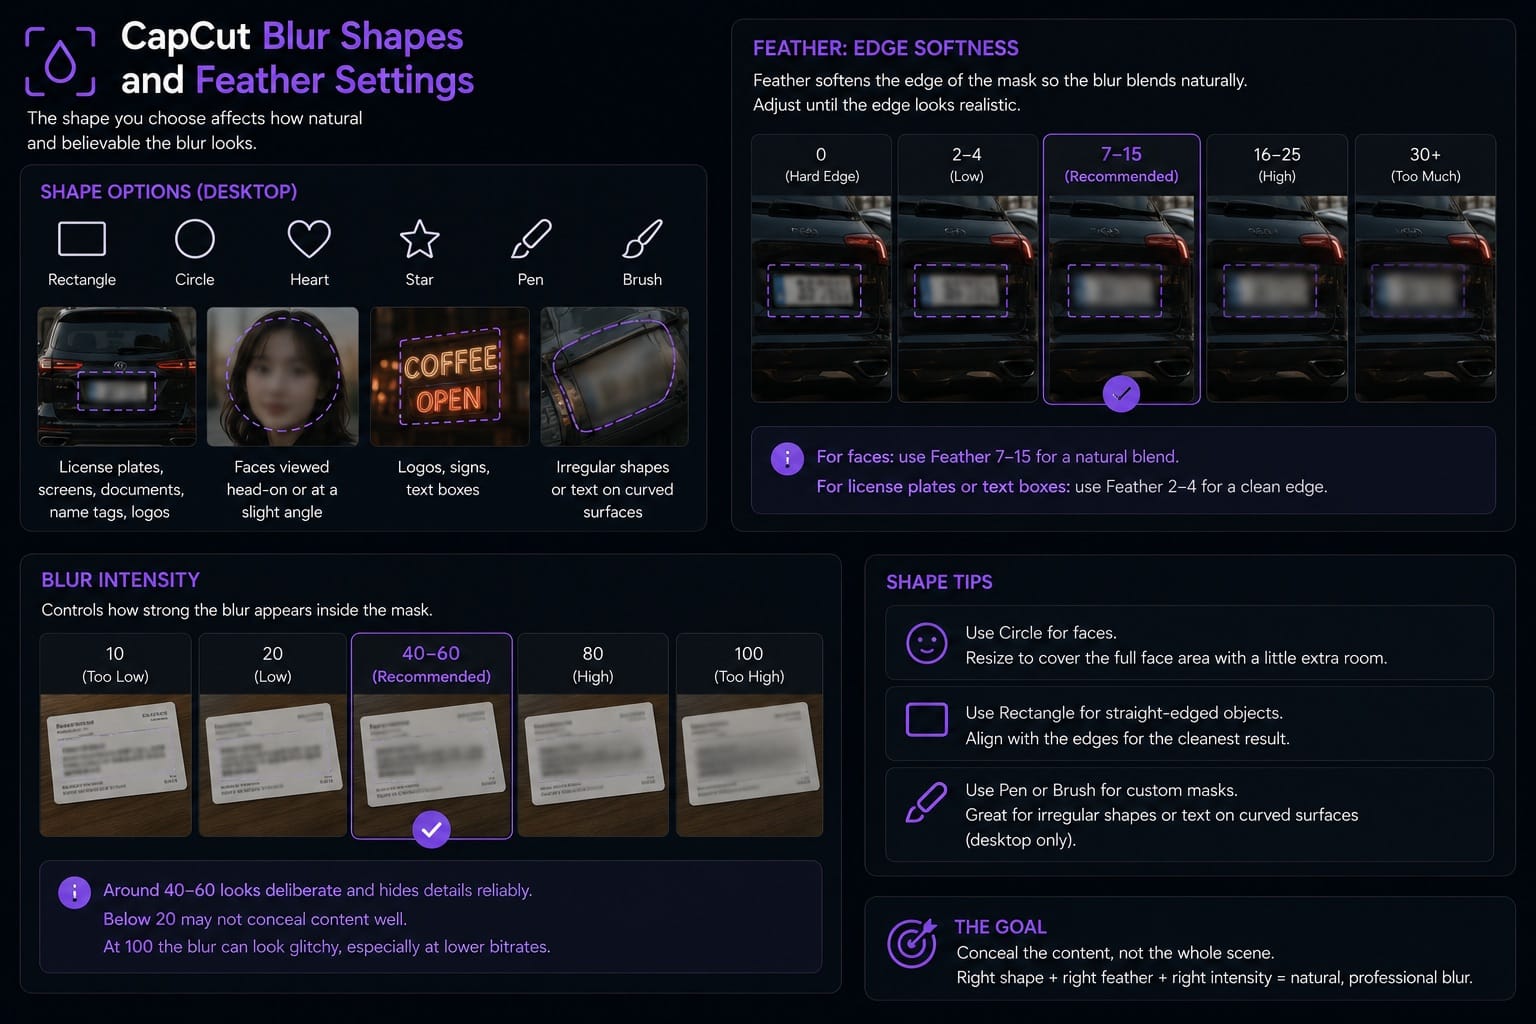
- Circle: faces viewed head-on or at a slight angle
- Rectangle: license plates, phone screens, documents, name tags, logos
- Pen or Brush (desktop only): irregular shapes like text on a curved surface or a face at a sharp angle
Feather controls edge softness. Zero feather gives a hard cutout that looks obviously edited. Too much feather and the blur bleeds into areas you want sharp. For faces, a Feather value between 7 and 15 blends naturally in most situations. For license plates or text boxes, keep it low (2-4) for a clean edge.
Blur intensity has a separate slider. Around 40-60 looks deliberate. Below 20 may not conceal the content reliably. At 100 it can look glitchy on export, especially at lower bitrates.
CapCut Blur Types for Partial Blurring
The most common blur effects under Video Effects:
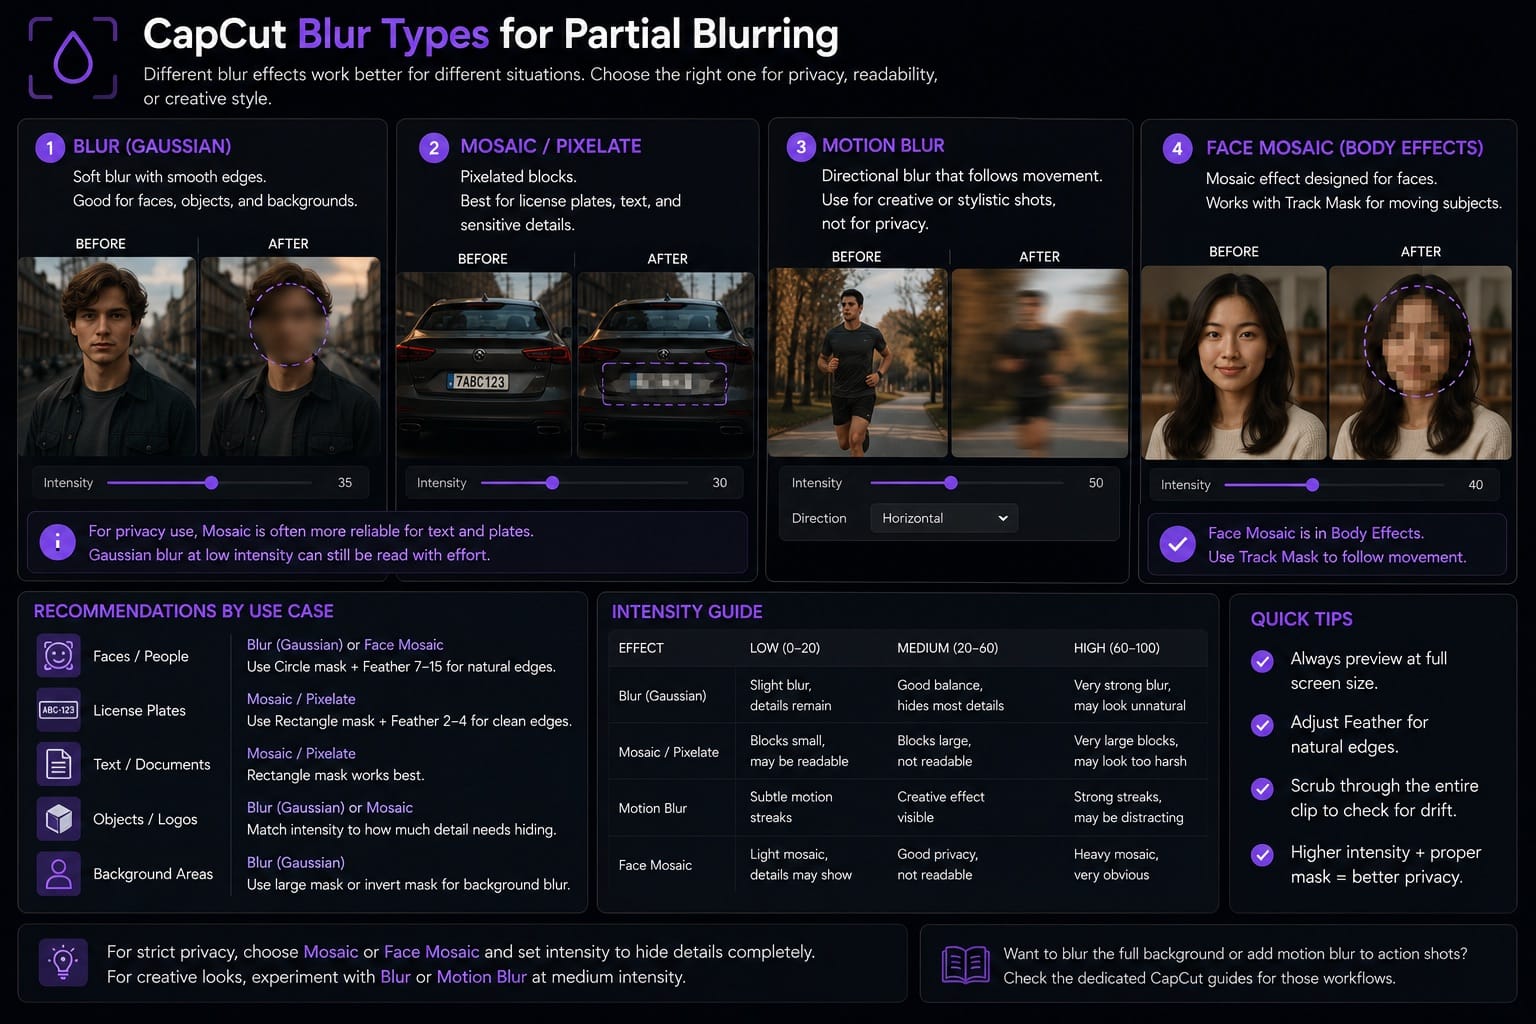
- Blur (basic Gaussian): works for faces, objects, and backgrounds
- Mosaic / Pixelate: pixelated blocks; good for license plates and text where Gaussian blur at low intensity still leaves content readable
- Motion Blur: directional blur for creative shots, not for privacy
- Face Mosaic (under Body Effects): mosaic pattern designed for faces; works with Track Mask
For privacy use, Mosaic is often the more reliable choice on text and plates. A Gaussian blur at intensity 30 can still allow a viewer to read a license plate number if they look closely. Mosaic makes the content unreadable at much lower intensity. CapCut's face blur documentation covers the Body Effects path in more detail.
For motion blur on action footage, that's a different workflow entirely. See the dedicated article.
Is Partial Blur Free in CapCut?
The duplicate-clip + clip-level mask method is the most reliable free option. As of the desktop builds I tested in 2026, it did not require a Pro account.
Where Pro prompts tend to appear:
- Applying a mask directly to an effect track (not a video clip) on some versions
- Certain blur effects in the library, depending on region and account type
- Some Body Effects including Face Mosaic (availability changes by region and app version)
If you see a Pro prompt, switch to the duplicated video layer method and keyframe the mask manually if Track Mask is unavailable. This breakdown documents that free alternative in detail. The CapCut Pro review covers what is consistently gated vs. what stays free.
Common Problems When Blurring One Area
The blur covers the wrong area or the entire frame is blurred. You skipped the Reverse step. The mask defaults to keeping the inside area sharp and blurring the outside. Clicking Reverse flips that so the blurred bottom layer shows through the masked region only.
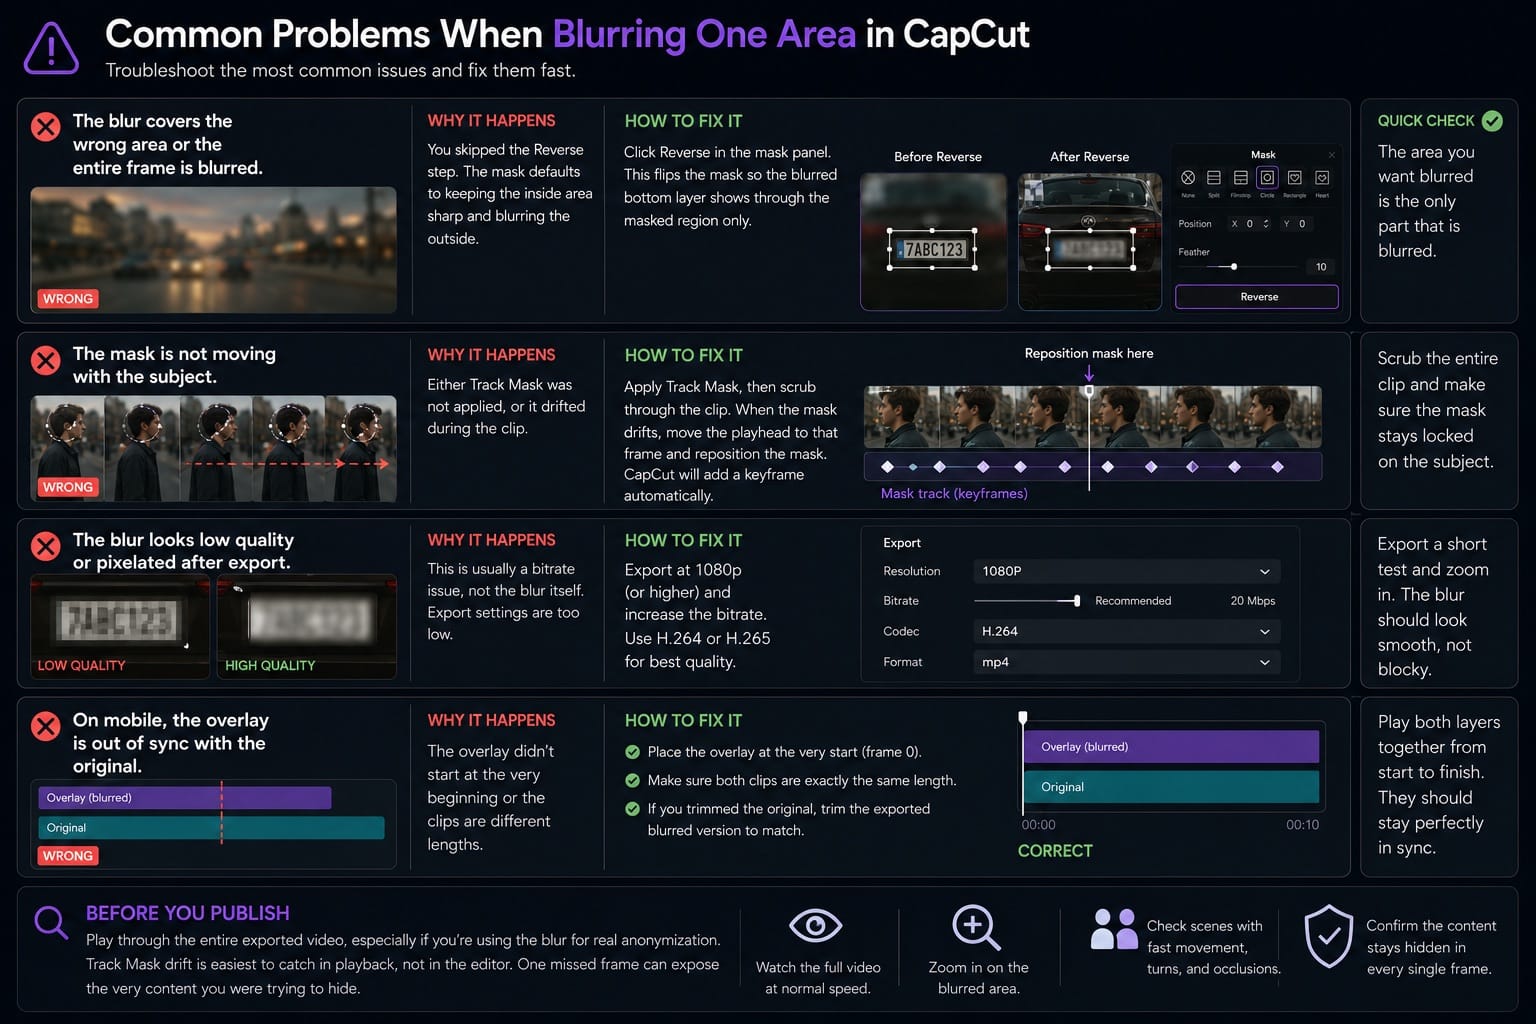
The mask is not moving with the subject. Either Track Mask was not applied, or it drifted. Scrub to the frame where it goes off, reposition the mask there manually, and CapCut will record a corrective keyframe automatically.
The blur looks low quality or pixelated after export. This is usually a bitrate issue, not the blur itself. Export at 1080p or higher and increase the bitrate in the export settings. CapCut's default settings compress aggressively.
On mobile, the overlay is out of sync with the original. Place the overlay at the very start of the timeline and confirm both clips are identical in length. If you trimmed the original, the exported blurred version will be a different length unless you trim it to match.
Before you publish: play through the entire clip one more time after export, especially if you're using the blur for real anonymization. Track Mask drift is easiest to catch in playback, not in the editor timeline. One missed frame can expose the very content you were trying to hide.
FAQ: Blurring Part of a Video in CapCut
Can you blur a specific area in CapCut for free?
In most cases, yes. The duplicate clip + overlay + mask method does not require Pro on the desktop builds tested in 2026. If you hit a paywall when masking an effect layer, switch to masking the video clip layer instead. CapCut's gating varies by version, region, and account type.
Does CapCut have an automatic face blur?
CapCut may show Face Mosaic or face-related body effects in some builds, but availability varies by app version, account type, and region. For reliable privacy work, the safest approach is still to place the mask yourself, run Track Mask, and review the full clip manually before export.
Can you blur a moving object in CapCut?
Yes. After placing your mask, click Track Mask and then Track. CapCut creates keyframes to follow the subject through the clip. Scrub through the output and manually correct any frames where the mask drifts off target.
How do I blur a license plate in CapCut?
Use a Rectangle mask with the Mosaic or Blur effect. For a stationary plate, a static mask is enough. For a moving vehicle, apply Track Mask. Mosaic conceals the plate number more reliably than Gaussian blur at the same intensity setting.
Why is the blur not following the face in CapCut?
Track Mask drifted. Find the frame where the mask goes off target, reposition it manually, and CapCut records a corrective keyframe. Repeat for each problem frame. Fast movement and low-contrast backgrounds are the most common causes of drift.