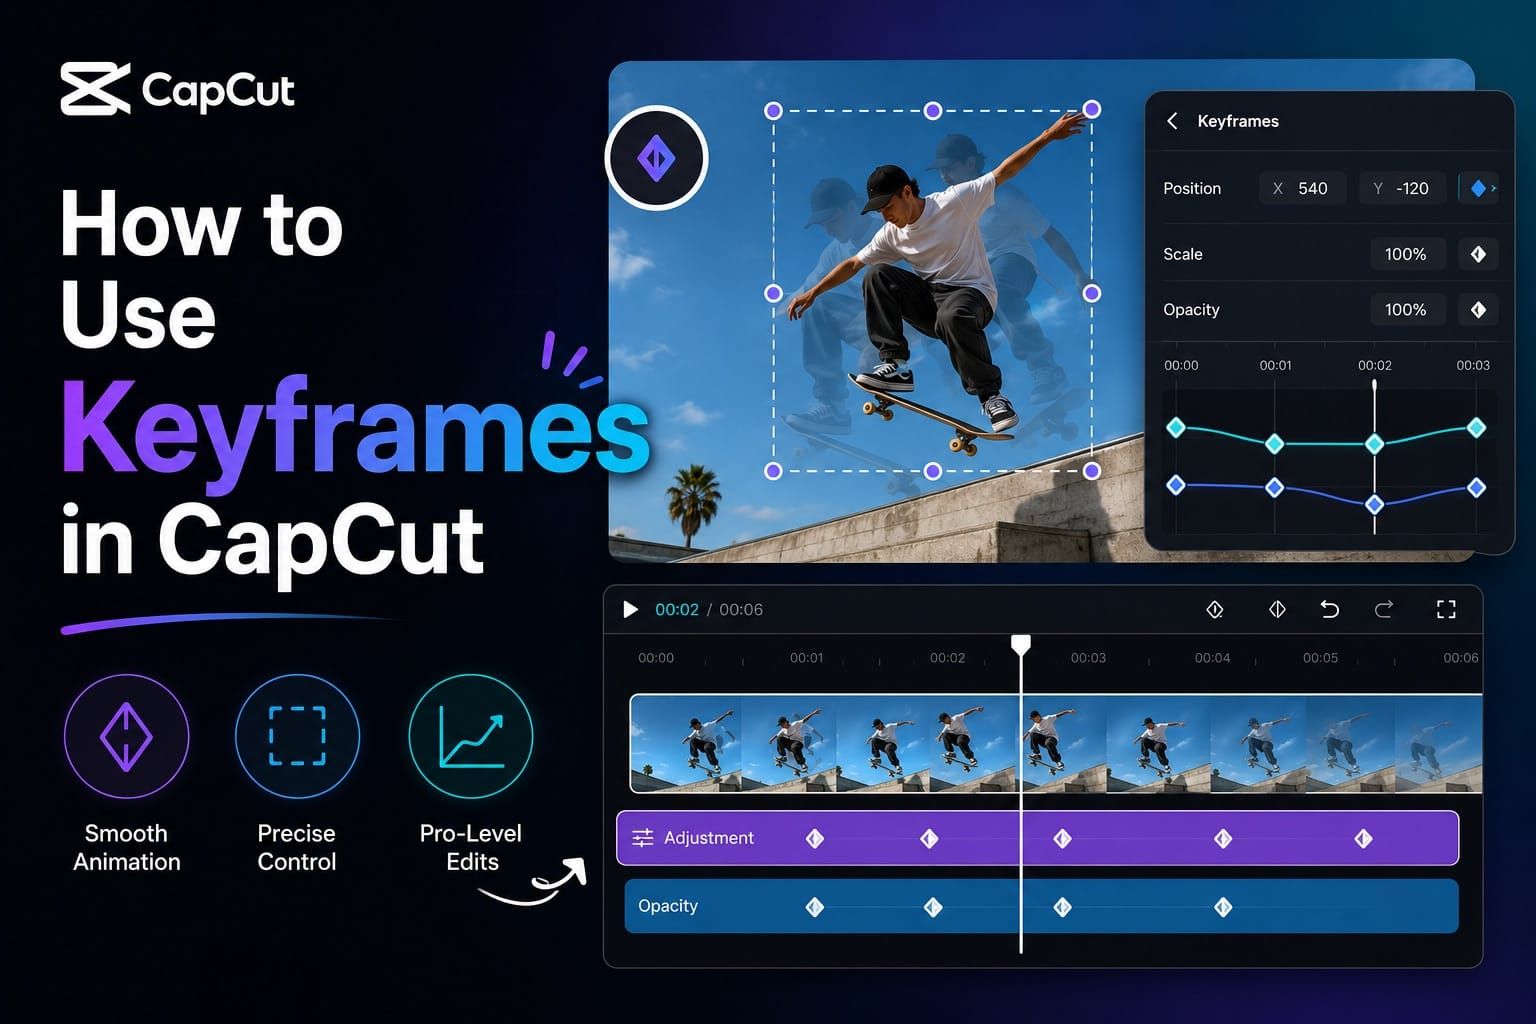
I burned through about 37 minutes on my first CapCut keyframe animation before it actually looked smooth. The zooms were jerky, the text snapped instead of gliding, and I had no idea why. The problem wasn't the feature. It was that most tutorials skip the part that matters most: how keyframes actually work before you touch a single diamond icon.
Quick answer: To use keyframes in CapCut, select a clip, move the playhead to the start of the animation, and tap or click the diamond keyframe icon. Then move the playhead forward and change a property such as position, scale, rotation, opacity, or volume. CapCut automatically animates the change between those two keyframes. On mobile, the diamond icon appears near the timeline controls; on PC and web, it appears next to editable properties in the right-side panel.
What CapCut Keyframes Actually Do
A keyframe is a saved state. You set one at a moment in time, and CapCut records the value of whatever you're animating at that exact frame. Set a second keyframe elsewhere with a different value, and CapCut calculates and renders everything in between.
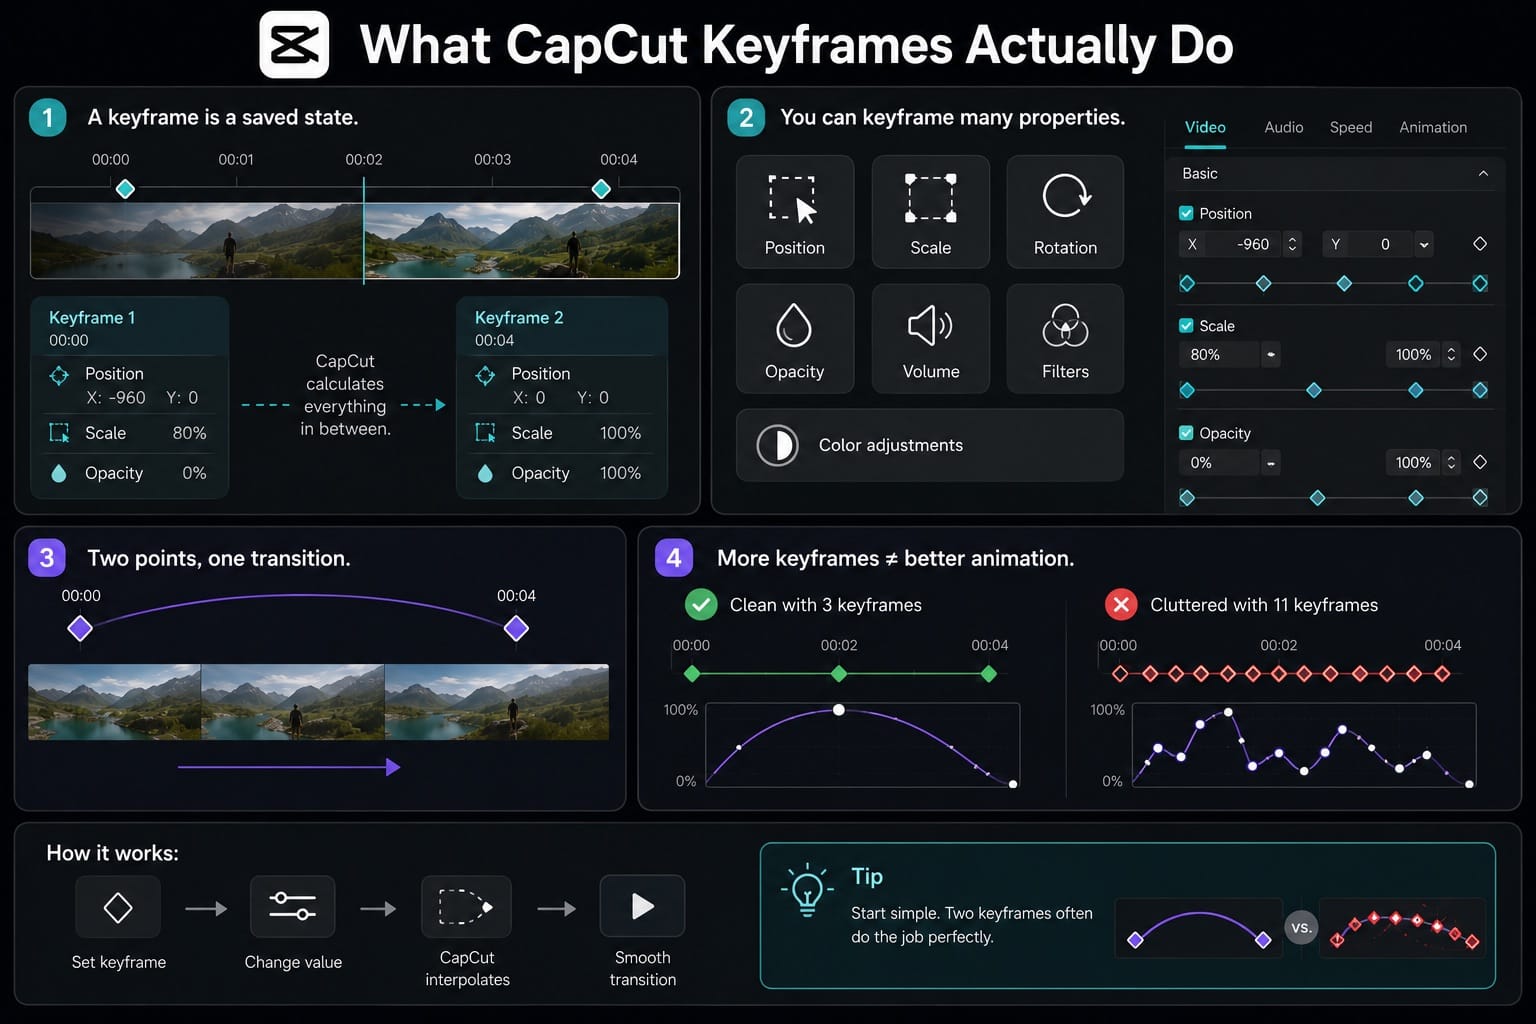
Most people think keyframes are just for movement. They're not. In CapCut you can keyframe position, scale, rotation, opacity, volume, and in some cases filters and color adjustments. The same logic applies to every one of them: two points, one transition.
That "two points" framing is worth holding onto. A lot of confusing animations happen because editors set 7 or 11 keyframes when three would do it cleaner. More keyframes doesn't mean better animation. It means more to manage and more opportunities for something to look wrong.
How to Use CapCut Keyframes on Mobile
The mobile interface looks different from desktop, but the logic is identical. Here's the exact flow:
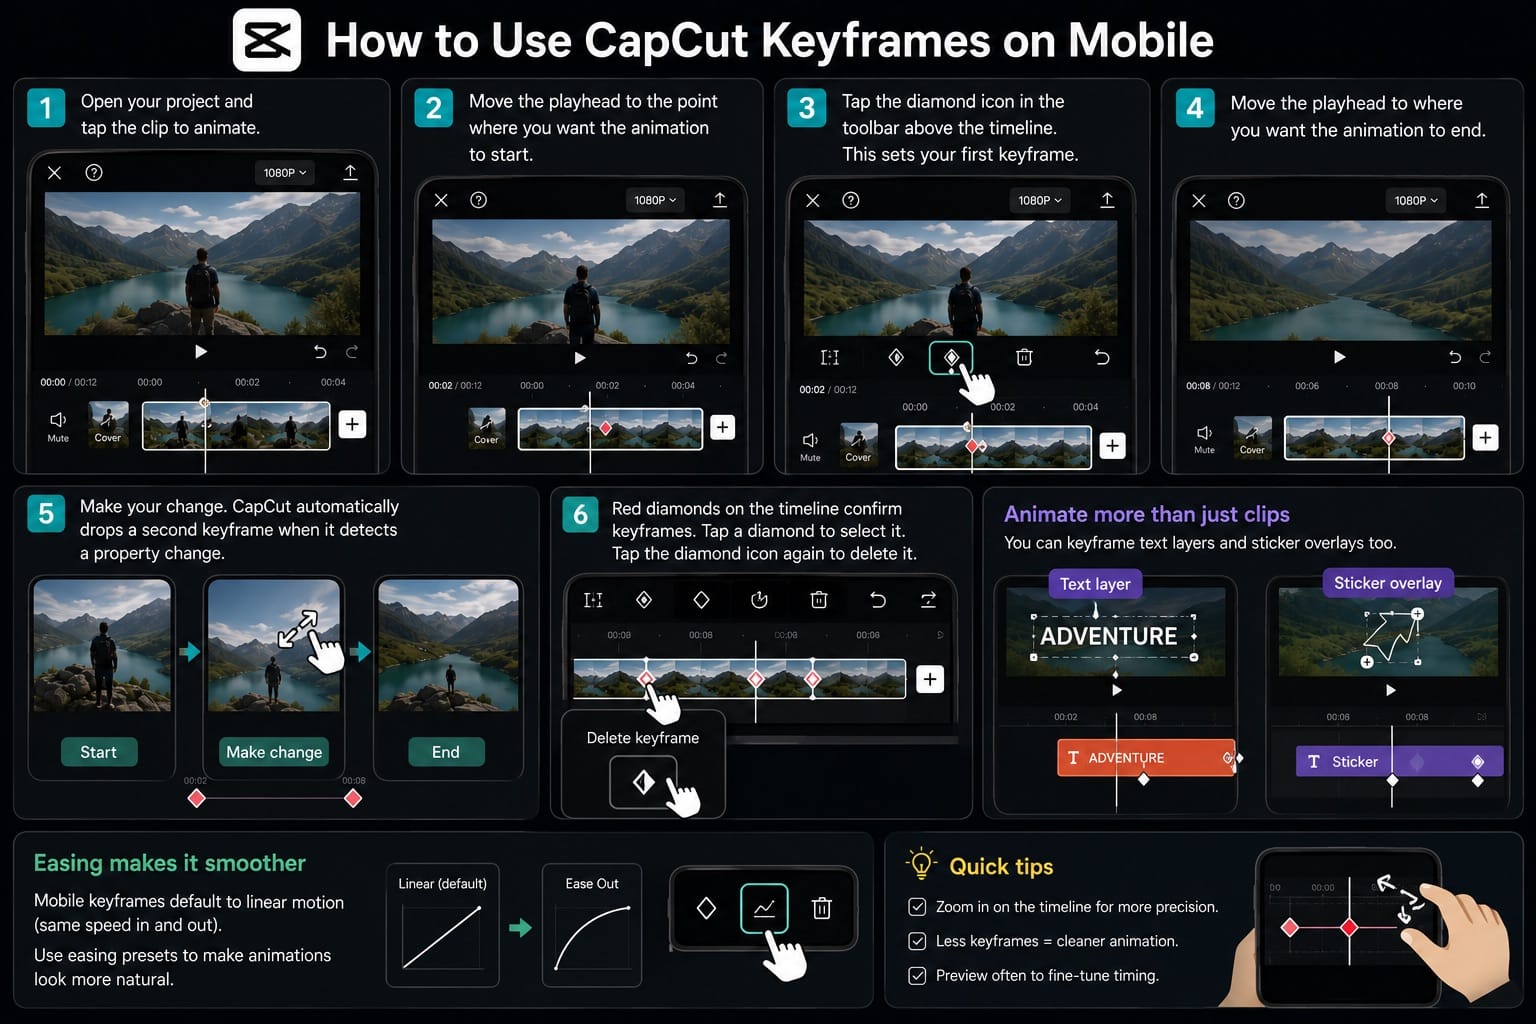
- Open your project and tap the clip you want to animate in the timeline.
- Move your playhead to the point where you want the animation to start.
- Tap the diamond icon that appears in the toolbar above the timeline. This sets your first keyframe.
- Move the playhead to where you want the animation to end.
- Make your change, whether that's pinching to scale, dragging to reposition, or adjusting opacity. CapCut automatically drops a second keyframe when it detects a property change.
The red diamond markers on your timeline confirm keyframes exist. Tap one to select it. Tap the diamond icon again while on that marker to delete it.
One thing I keep seeing tutorials skip: on mobile, you can also keyframe text layers and sticker overlays, not just video clips. Tap the overlay in the preview, then run the same process. Good for text fly-ins and lower thirds that don't look like they came from a template.
Mobile keyframes default to linear motion. That means a zoom or slide starts and ends at the same speed, which usually looks abrupt. On newer versions of the mobile app, look for the graph icon next to the diamond. Tapping it opens easing presets. Even a basic ease-out changes how polished the animation feels.
How to Use CapCut Keyframes on PC (Desktop)
The desktop version gives you more precision. The keyframe panel lives in the right-side editing panel under tabs like Basic, Transform, or Adjust, depending on which type of property you're animating.
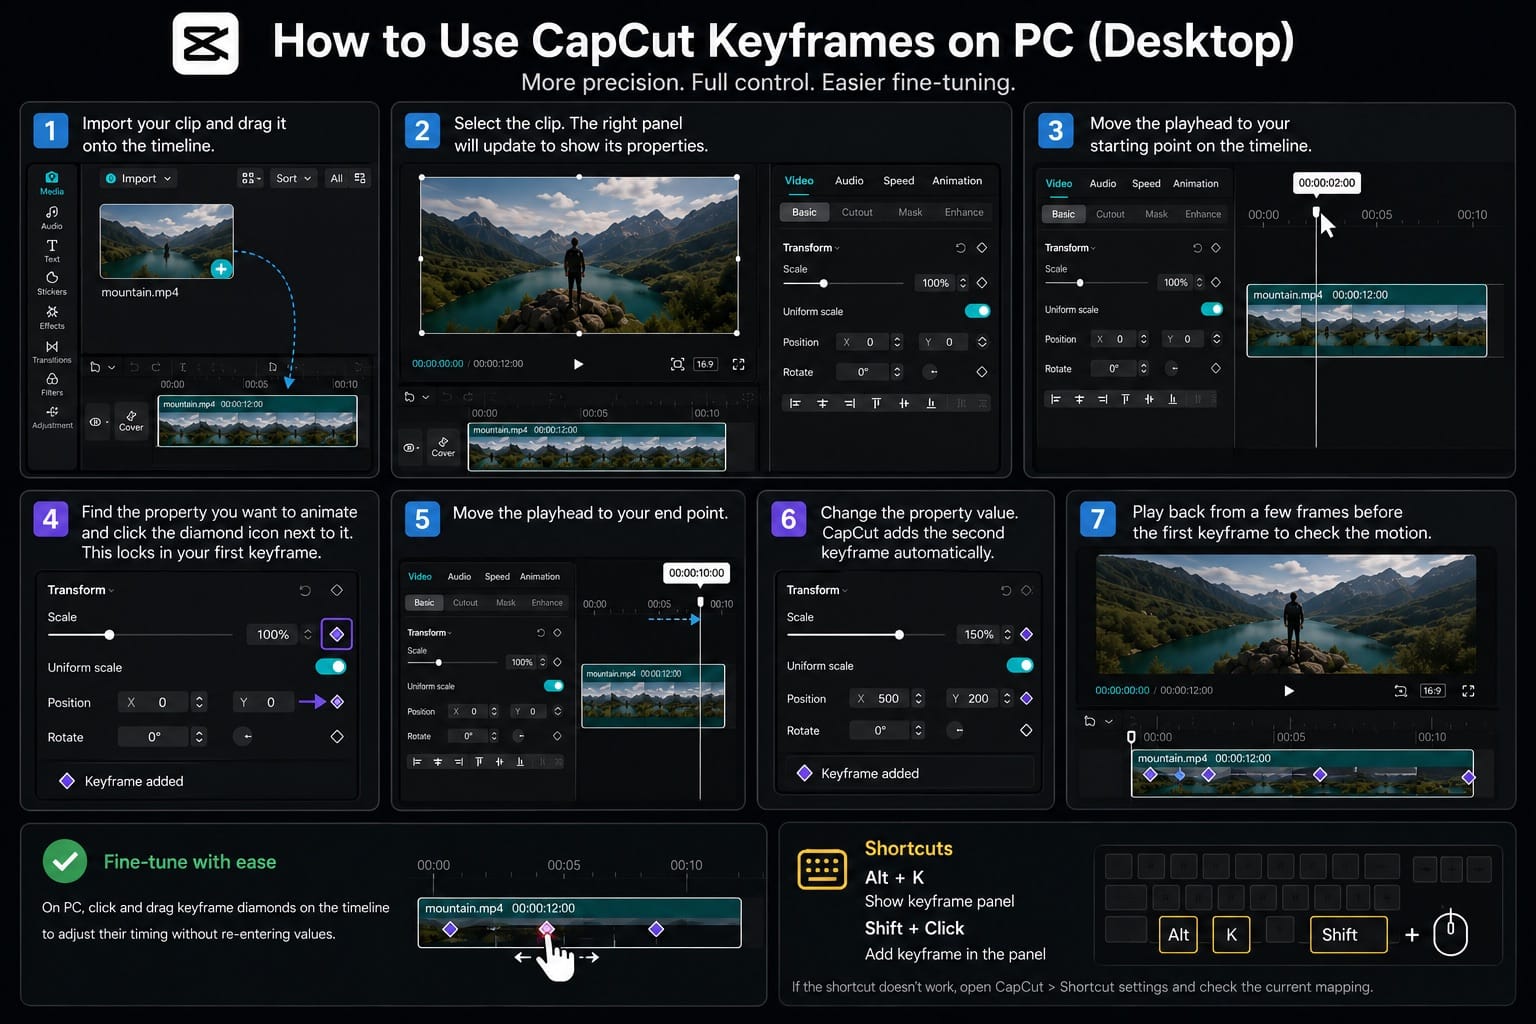
- Import your clip and drag it onto the timeline.
- Select the clip. The right panel will update to show its properties.
- Move the playhead to your starting point on the timeline.
- Find the property you want to animate (Position, Scale, Rotation, Opacity) and click the diamond icon next to it. This locks in your first keyframe.
- Move the playhead to your end point.
- Change the property value. CapCut adds the second keyframe automatically.
- Play back from a few frames before the first keyframe to check the motion.
On PC, you can click and drag keyframe diamonds directly on the timeline to adjust their timing without re-entering values. That's something mobile doesn't give you, and it makes fine-tuning much faster.
CapCut's official PC guide lists Alt + K as the shortcut for showing the keyframe panel, with Shift + Click used to add keyframes inside that panel. If the shortcut does not work in your version, open CapCut's Shortcut settings and check the current mapping.
How to Use CapCut Keyframes Online
CapCut's web editor also supports keyframe animation. The interface is closer to desktop than mobile: select your clip, open the Basic panel, find the property you want to animate, and use the diamond icon to set keyframes.
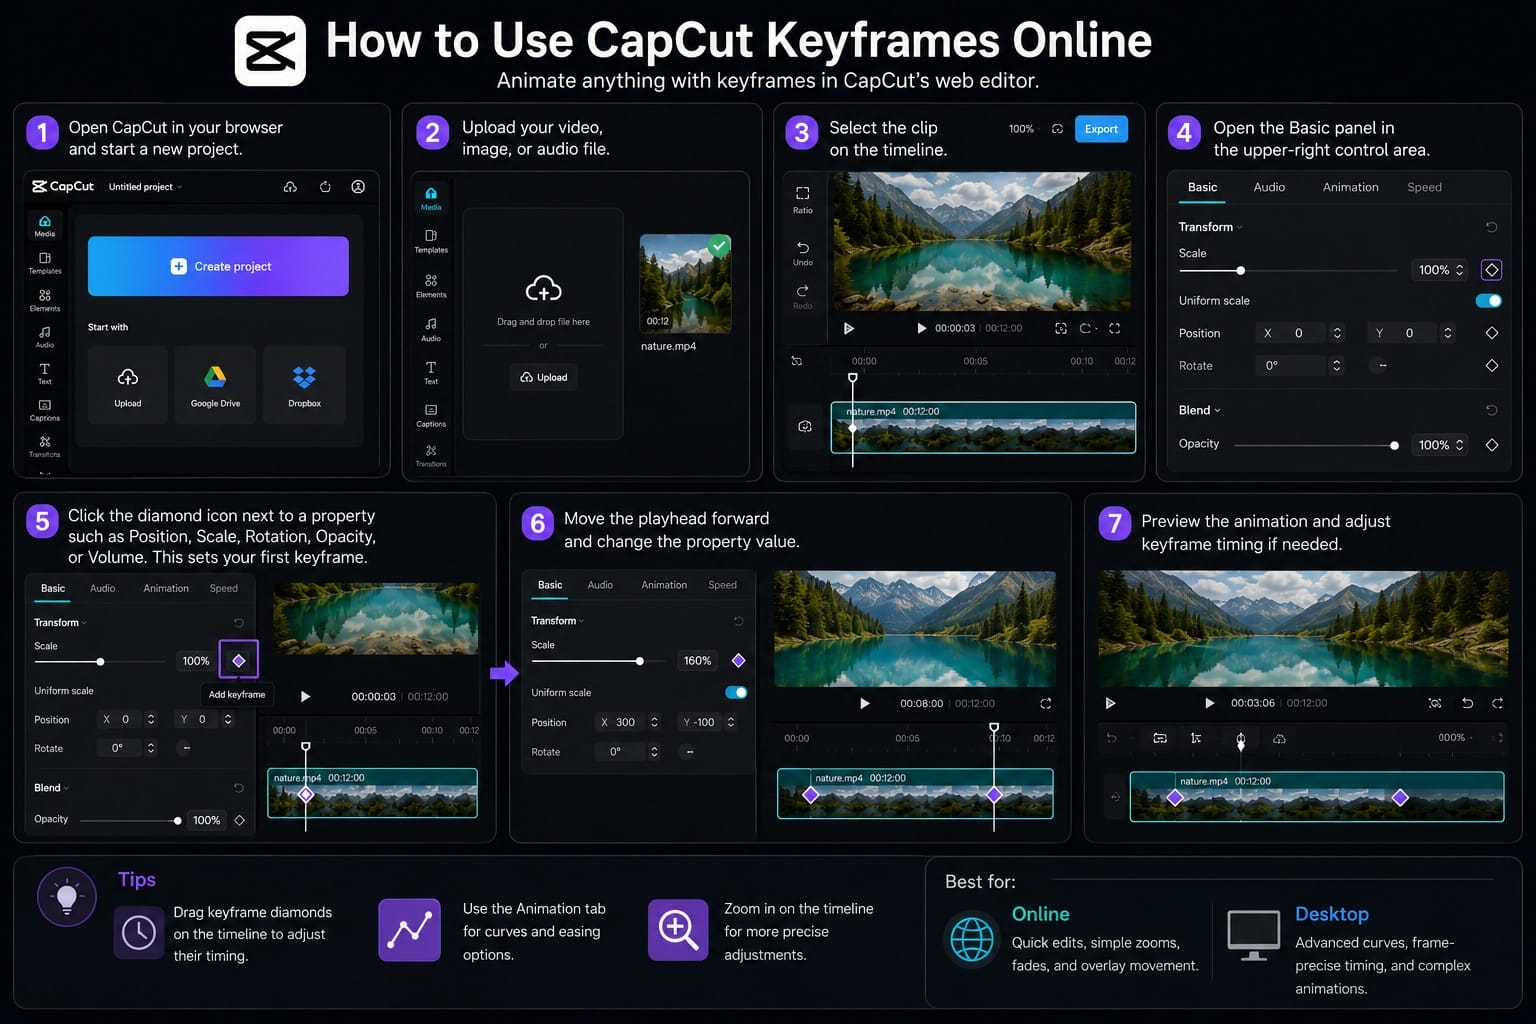
- Open CapCut in your browser and start a new project.
- Upload your video, image, or audio file.
- Select the clip on the timeline.
- Open the Basic panel in the upper-right control area.
- Click the diamond icon next to a property such as Position, Scale, Rotation, Opacity, or Volume.
- Move the playhead forward and change the property value.
- Preview the animation and adjust keyframe timing if needed.
The online editor works well for quick zooms, fades, and simple overlay movement. For heavy curve editing or frame-precise timing, the desktop version is easier to control.
How to Smooth CapCut Keyframes with Easing and Speed Curves
Most tutorials tell you to set keyframes and call it done. That's backwards if you care about quality. Linear keyframes, the default, look robotic because the animation moves at exactly the same speed from start to finish. Real camera motion, zoom included, accelerates and decelerates.
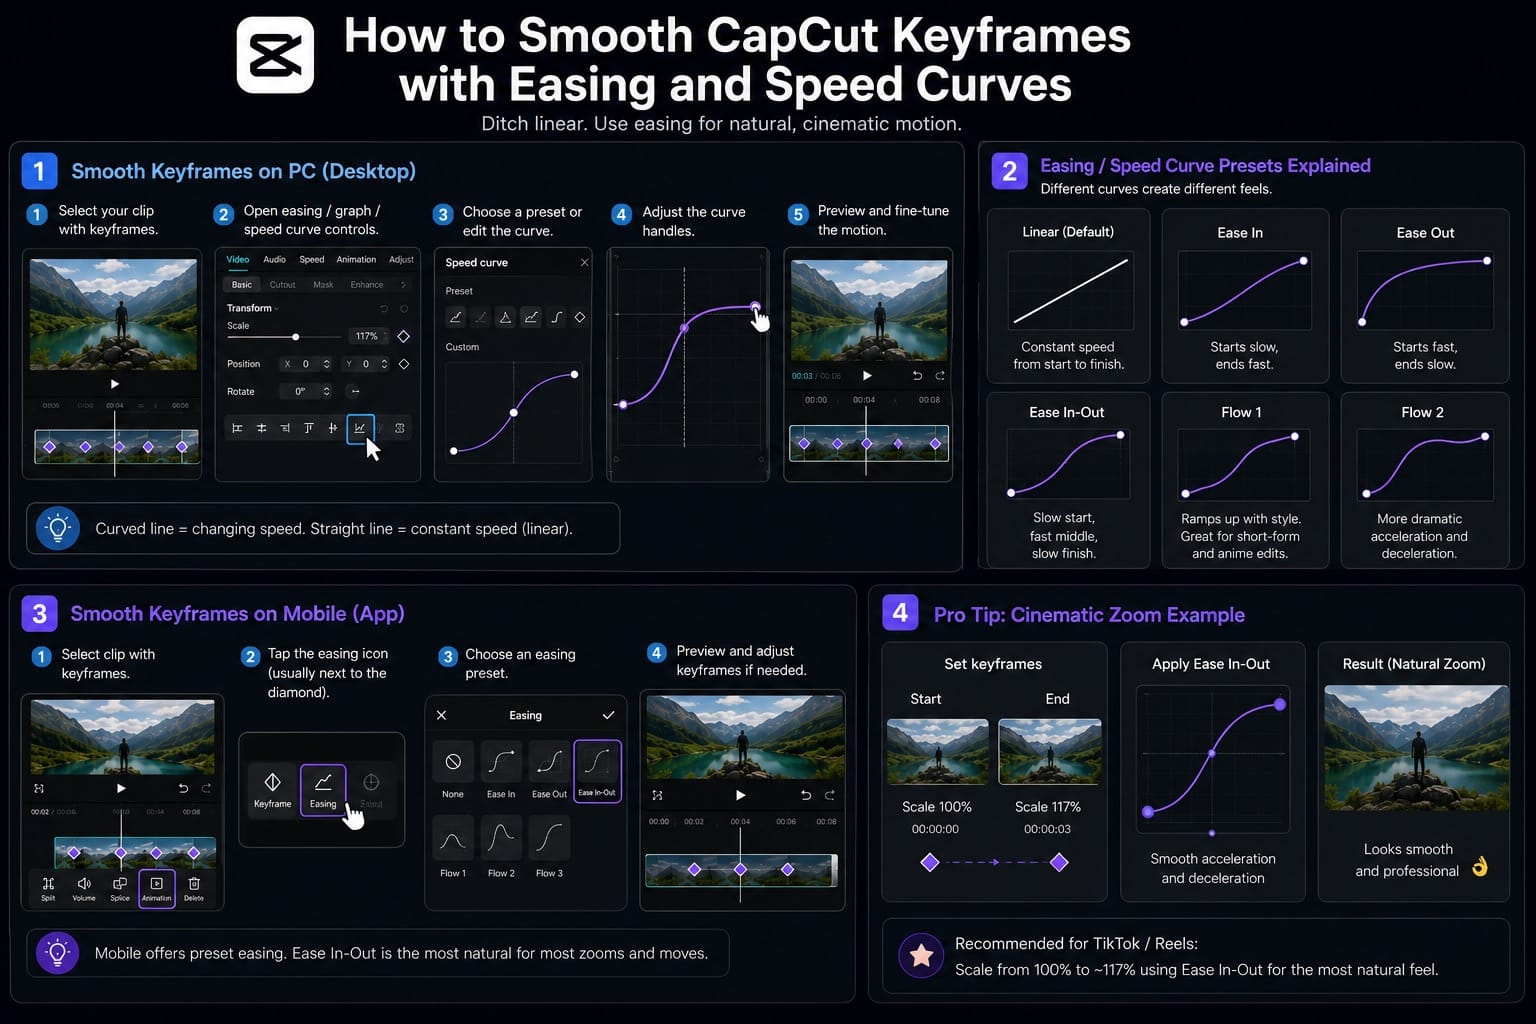
On PC, look for easing, graph, or speed curve controls after selecting a clip with keyframes. The exact label changes between CapCut versions, but the goal is the same: replace straight linear motion with a curve that accelerates and slows down naturally.
The default is a straight line. A straight line equals constant speed. Clicking on the line and dragging handles creates a curve. The presets you'll likely see include:
- Ease In: animation starts slow, ends fast
- Ease Out: animation starts fast, ends slow
- Ease In-Out: slow start, fast middle, slow finish, closest to natural camera movement
- Flow 1 / Flow 2: speed ramps popular in short-form and anime edits
On mobile, you get preset easing options rather than free-form curve handles. The options tend to be fewer than desktop, but Ease In-Out is usually available and covers most use cases.
For cinematic zooms on TikTok or Reels, I use Ease In-Out on a scale keyframe going from 100% to around 117%. That 17-point range feels much more natural than the default 20% jump you see in most tutorials.
CapCut Keyframes for Text, Stickers, and Overlays
This is where keyframes become useful for short-form video. A static title card is fine. A title that slides in from the bottom and fades out on a beat is what keeps people watching.
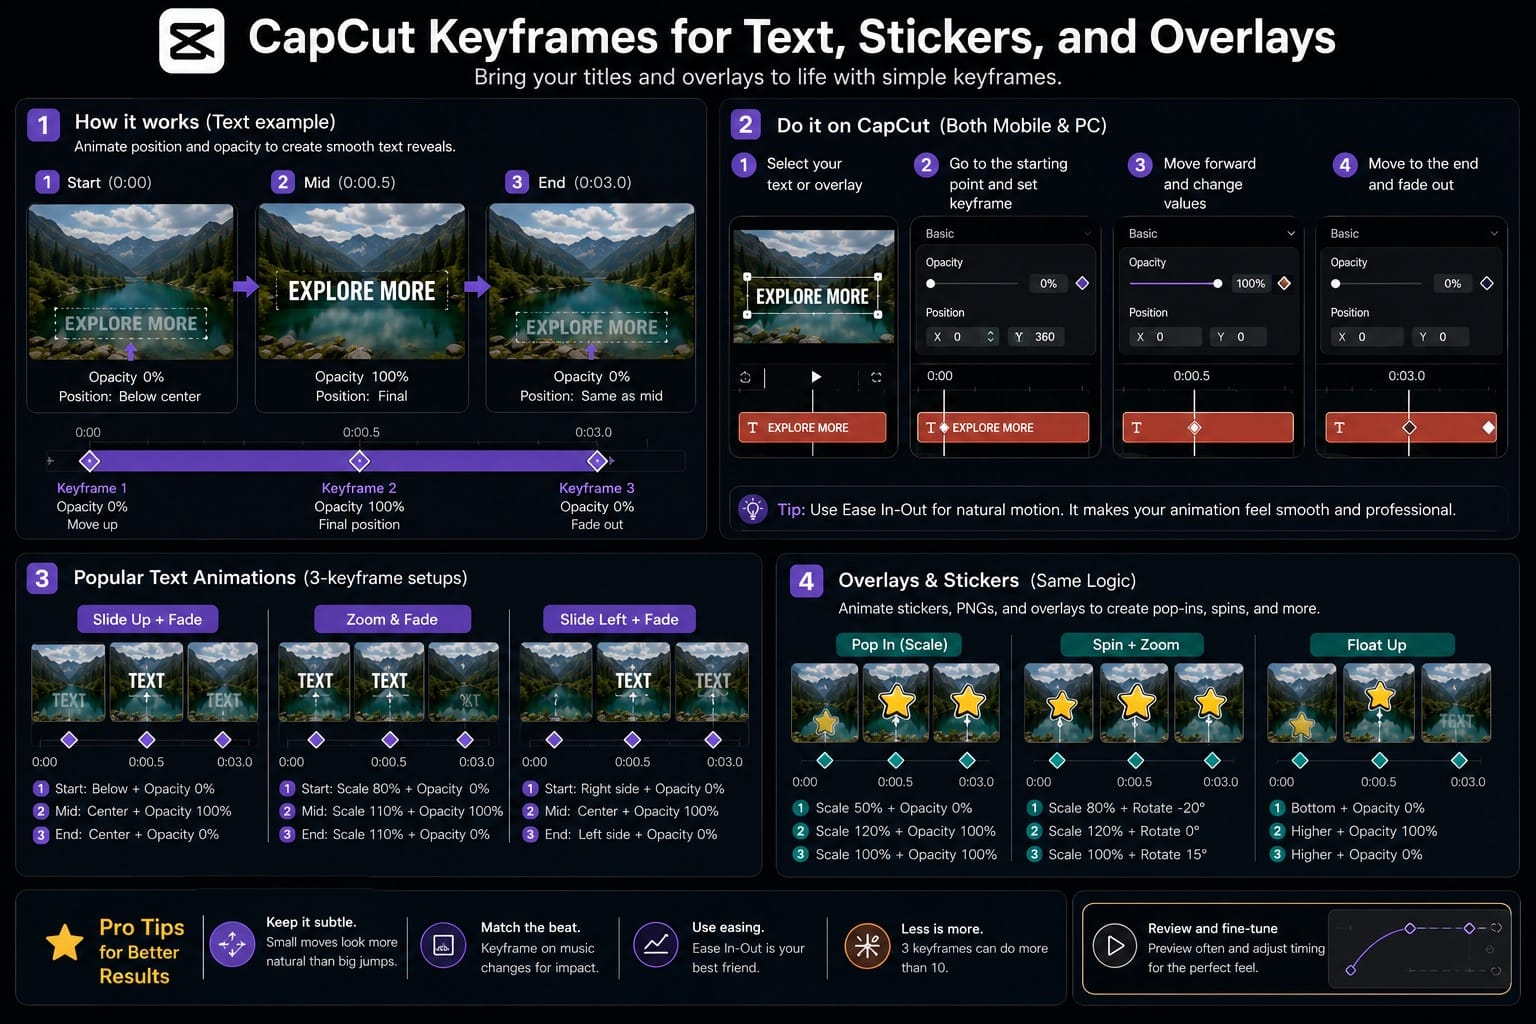
On both mobile and PC, the keyframe system works the same way on text layers as it does on video clips. Select the text element in the timeline, set a keyframe with your starting position and opacity, then move forward and change both values at the end point.
A simple 3-keyframe setup works well for most text animations: keyframe 1 at opacity 0 and position slightly below center, keyframe 2 about half a second in at full opacity and final position, then keyframe 3 near the end at opacity 0 again for a fade-out. That's a full reveal and disappear in maybe 23 clicks total.
For overlays like stickers or PNGs, the same logic applies. Combine scale and position keyframes to create a pop-in effect, or rotate slightly while zooming to make something feel alive rather than pasted on. If you're animating text alongside effects, see our CapCut effects guide for the difference between clip effects, body effects, and overlay-style edits.
Common CapCut Keyframe Problems and Fixes
The most common complaint I see: "my keyframes aren't showing in CapCut PC." Usually it's one of three things.
First, nothing is selected. The keyframe controls only appear in the right panel when a clip, image, or text layer is actively selected on the timeline. Click the clip first, then look for the diamond icons.
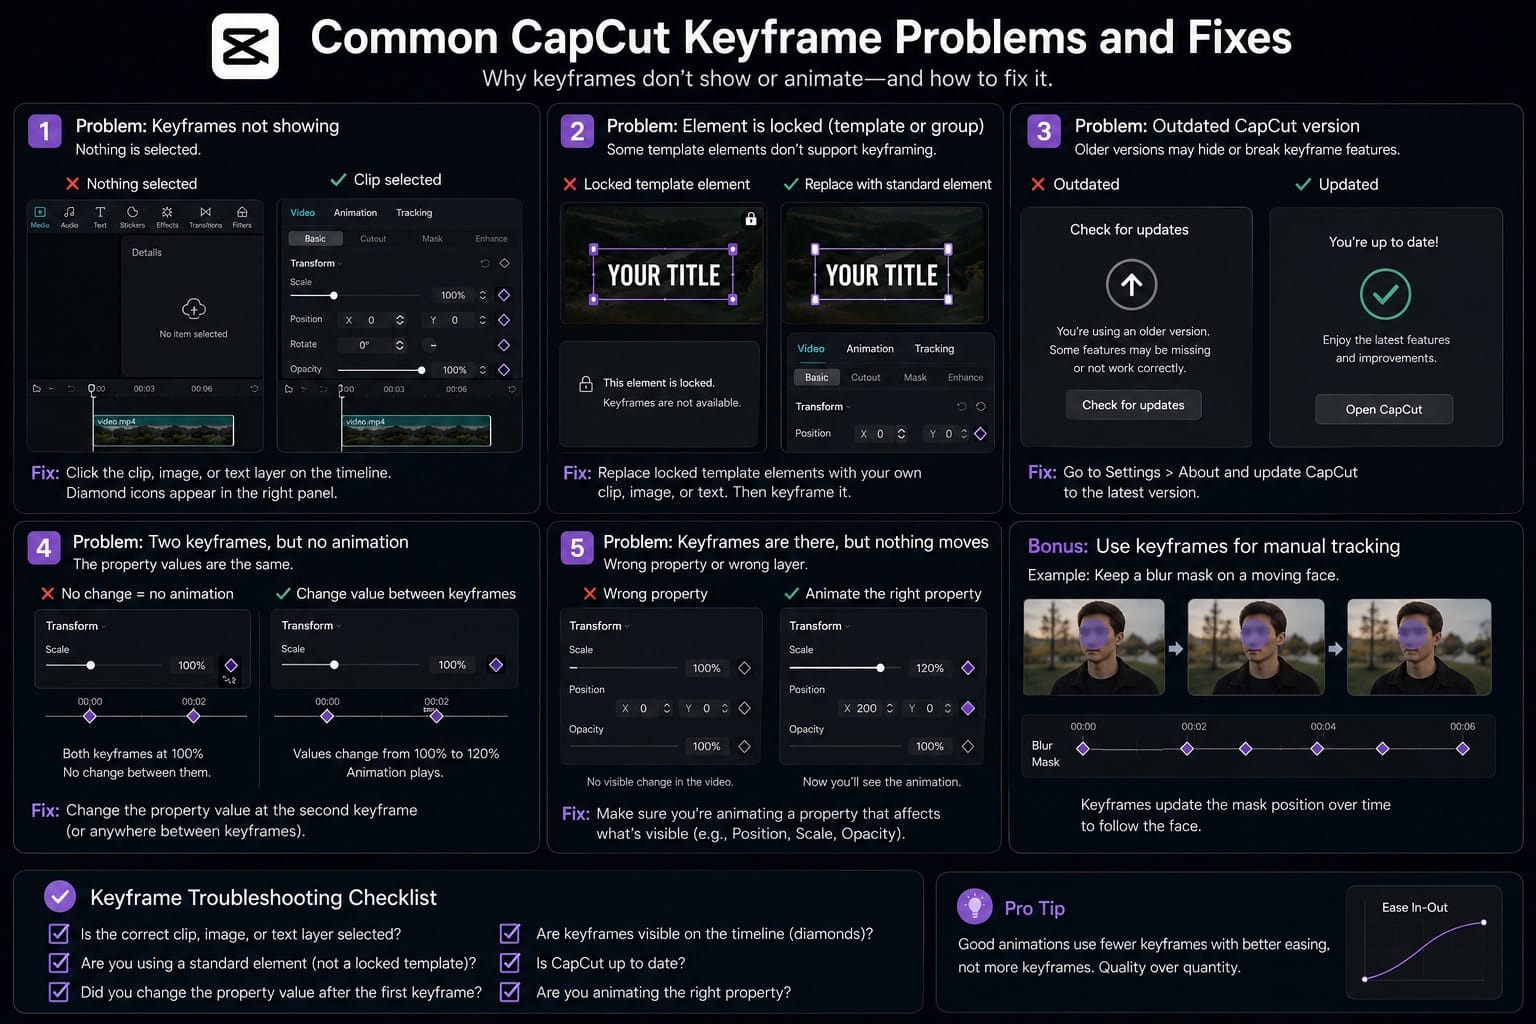
Second, the element is part of a template or grouped asset. Some template elements lock their properties and don't support custom keyframing. The fix is to replace the locked element with a standard clip or image, then keyframe that instead.
Third, the app is out of date. Older versions occasionally hide or break the keyframe panel. Check for updates in CapCut's settings before assuming the feature is missing. CapCut's own keyframe troubleshooting page walks through the full check sequence.
A less obvious problem: you set two keyframes but see no animation on playback. This usually means you forgot to change the property value between them. If both keyframes hold the same values, there's nothing to animate between them. Keyframes are also useful for manual tracking edits. In our CapCut face blur guide, they're used to keep a manual blur mask aligned with a moving face across the clip.
CapCut Keyframe Tips That Actually Speed Up Your Workflow
After a lot of trial and error on Reels and Shorts projects, a few habits stuck:
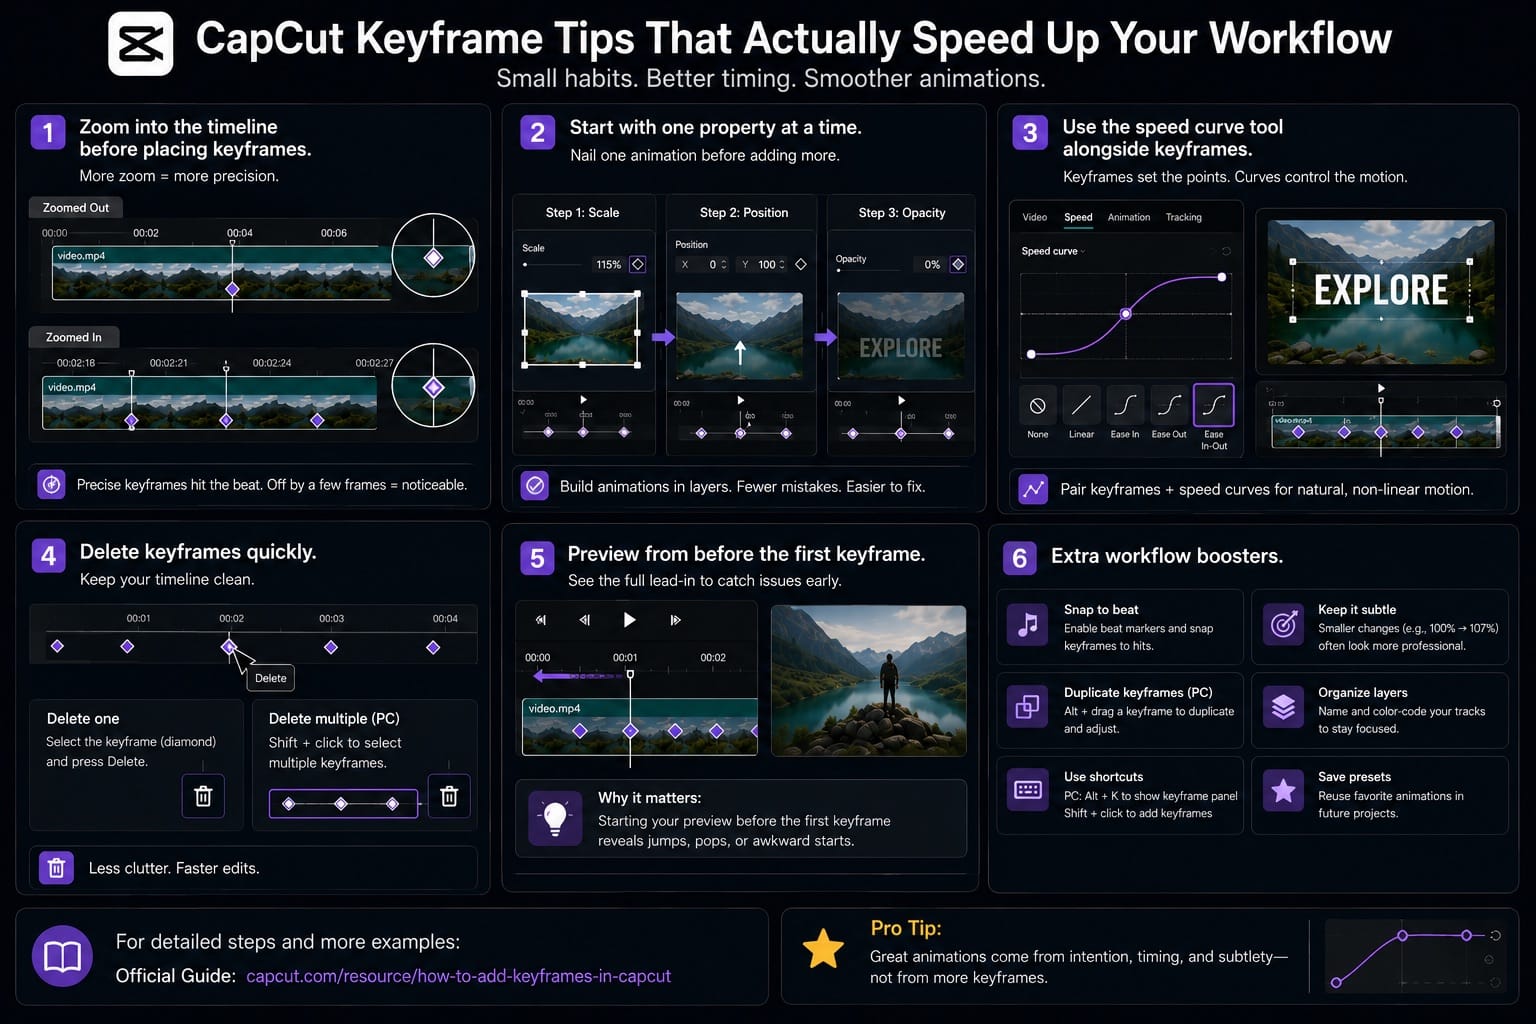
- Zoom into the timeline before placing keyframes. The more you zoom in, the more precisely you can place the diamond. A keyframe that's three frames off from a music beat is obvious on playback.
- Start with one property at a time. Animating position, scale, and opacity simultaneously on your first attempt leads to chaos. Get the scale animation right first, then layer the others.
- Use the speed curve tool alongside keyframes. The CapCut keyframe animation page specifically recommends pairing keyframes with the speed curve for non-linear motion. They're different tools but complement each other, especially on clips with slow-motion.
- Delete keyframes by clicking the highlighted diamond again. On PC, you can also select multiple keyframes by shift-clicking them and delete in a batch.
- Preview from at least four frames before the first keyframe. Starting playback exactly at the keyframe means you won't see the lead-in and may miss something that looks off.
The CapCut official guide for adding keyframes on PC covers the base steps in detail if you need a reference point alongside this: capcut.com/resource/how-to-add-keyframes-in-capcut.
Frequently Asked Questions About CapCut Keyframes
Are keyframes free in CapCut?
Basic keyframe animation is generally available without a Pro subscription on mobile, desktop, and web. However, some effects, templates, assets, or advanced editing options used together with keyframes may be marked as Pro depending on your region, app version, and account tier.
Can you use keyframes on CapCut online?
The online editor supports keyframe animation, but the feature set tends to be narrower than desktop. Basic property keyframing (position, scale, opacity) works in the browser. The graph editor for custom curve easing may be limited or unavailable depending on your browser version.
Why does my CapCut keyframe animation look choppy?
Usually one of two things: you're using linear interpolation when you need easing, or your keyframes are too close together on the timeline. Try adding Ease In-Out from the graph editor and space your keyframes at least half a second apart for most effects.
Can I keyframe audio in CapCut?
Yes. CapCut supports volume keyframes on audio tracks. Select the audio clip, look for the volume property in the right panel, and set keyframes the same way you would for video. This is useful for ducking background music under voiceover or fading audio in and out.
What's the difference between keyframes and CapCut's built-in animations?
Built-in animations (the ones under the Animation tab for clips and text) are fixed presets. They apply a set motion with no manual control over timing or values. Keyframes let you define exactly what changes, when, by how much, and at what speed. For anything beyond basic in/out animations, keyframes give you control that presets simply don't.