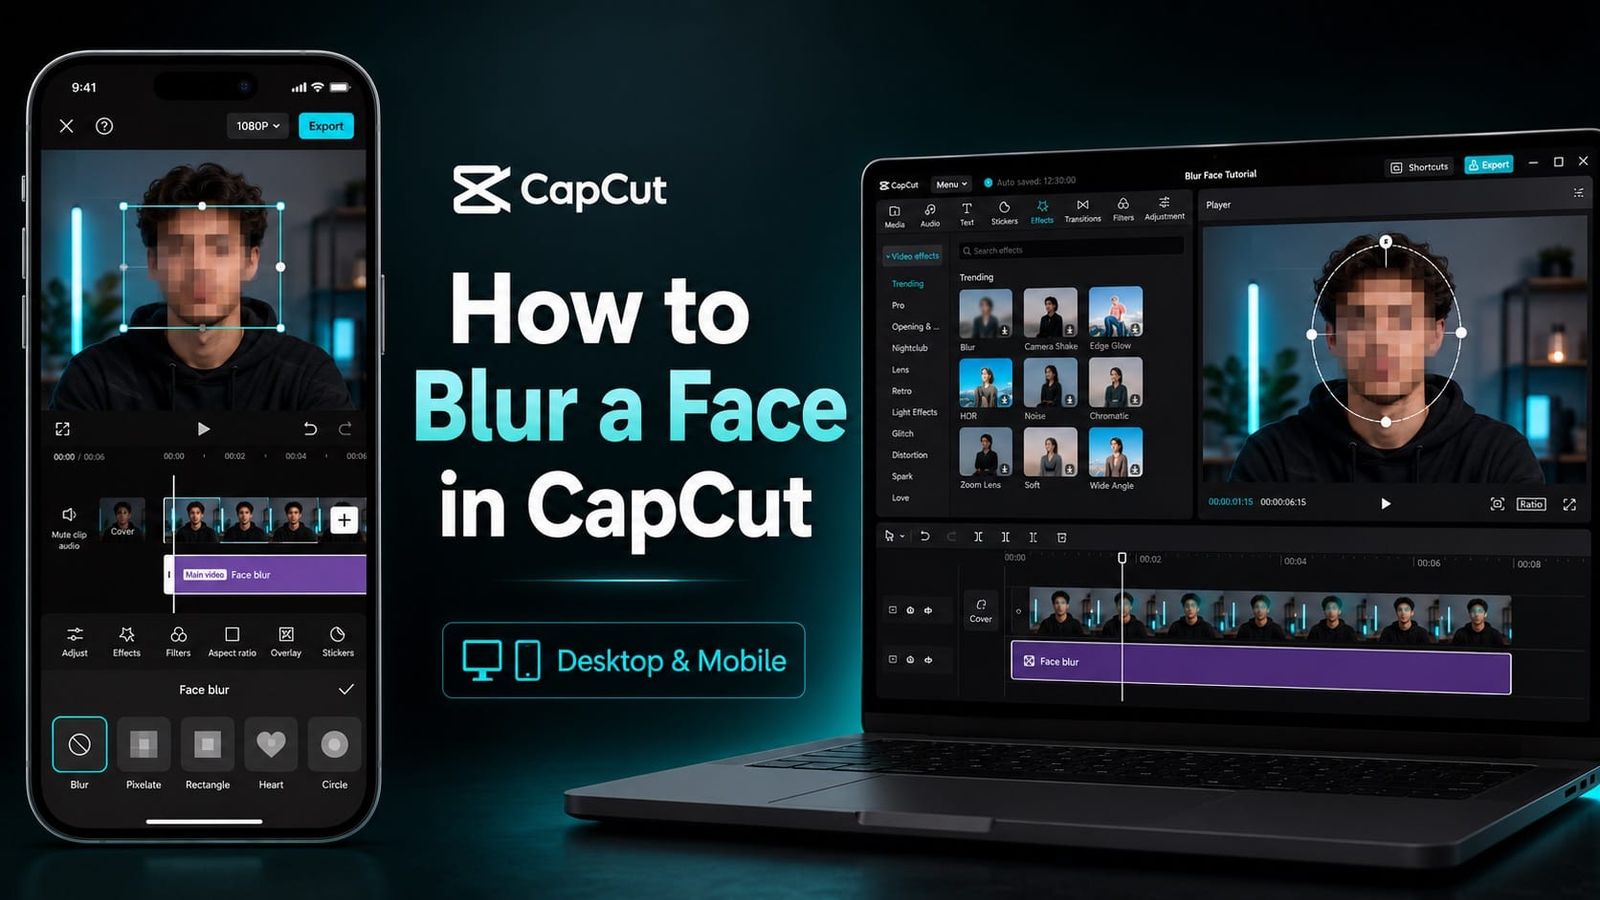
I was editing a street interview clip last month and realized I'd caught 11 bystanders in the background. No consent, no way to reshoot. CapCut got me out of it in under half an hour. That's the practical version of what this guide covers.
There are three ways to blur a face in CapCut, and they're not equally good. Which one you use depends on whether the face is moving, how many faces you need to cover, and whether you're on mobile or desktop. I'll walk through all three.
Quick answer: For one moving face, duplicate the clip, keep the lower clip clean, blur the upper duplicate, then apply a circle mask over the face and track it. For multiple faces, use Face Mosaic under Body effects, then scrub the full clip to confirm every face stays covered.
CapCut Face Mosaic: Fastest Method for Multiple Faces
Face Mosaic is the fastest option when you need a mosaic-style privacy blur on faces. It can detect and obscure faces automatically, but you should still scrub through the full clip and confirm that every face stays covered.
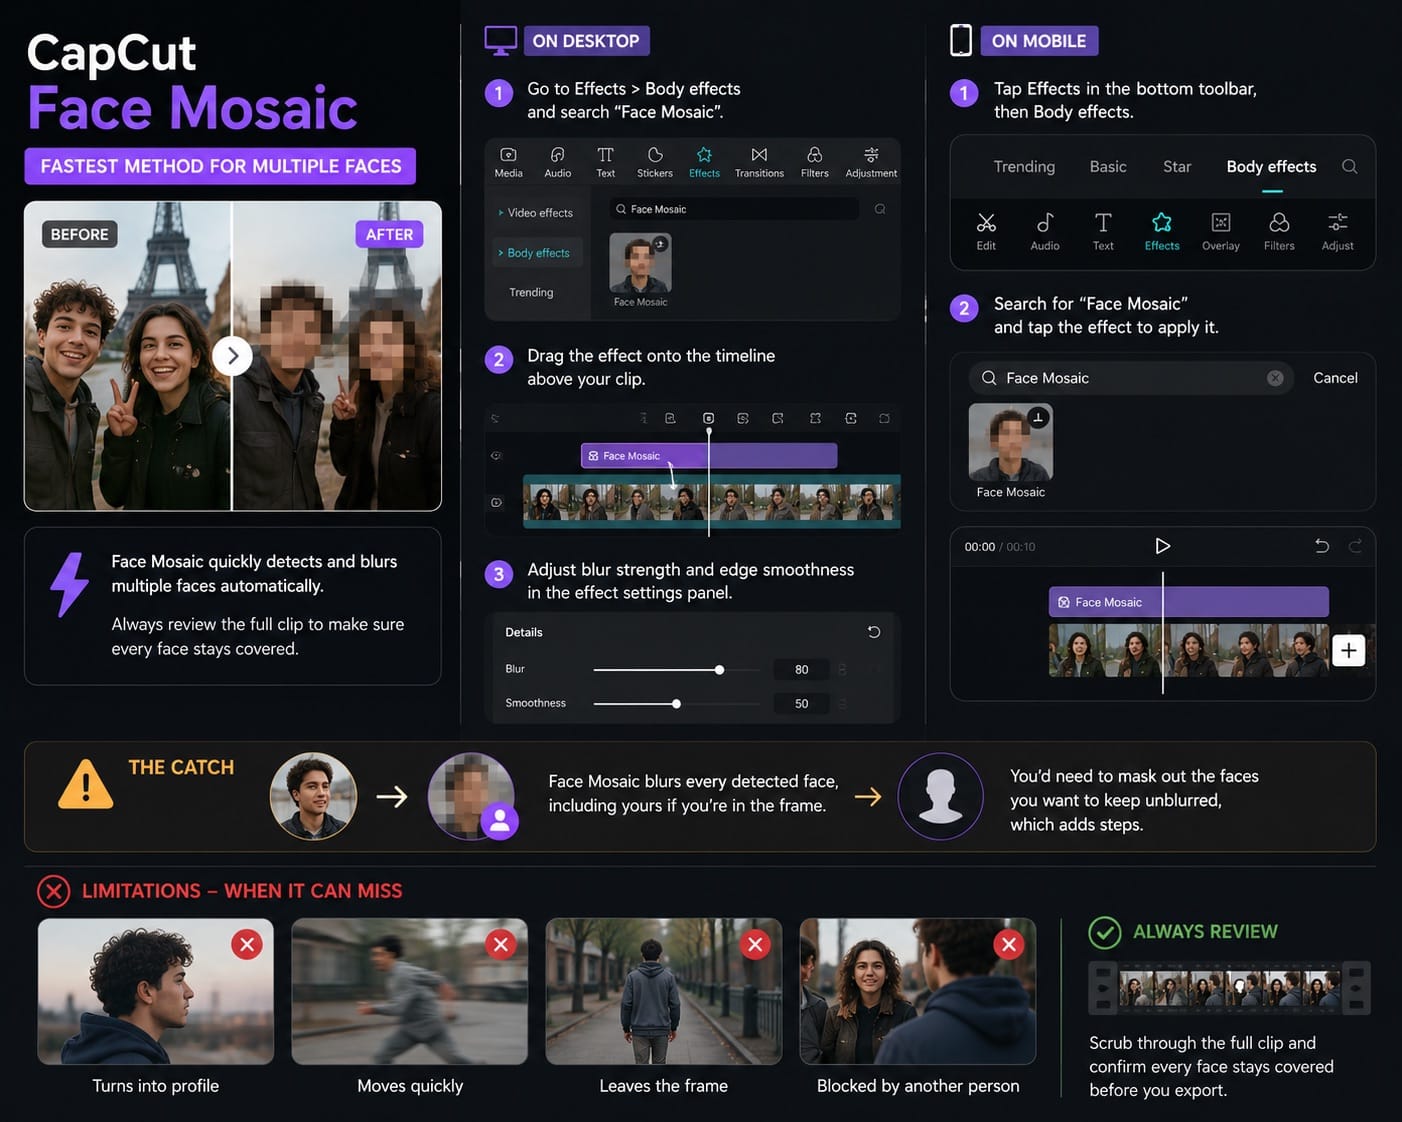
On desktop: Go to Effects > Body effects and search "Face Mosaic." Drag the effect onto the timeline above your clip. You can adjust blur strength and edge smoothness in the effect settings panel.
On mobile: Tap Effects in the bottom toolbar, then Body effects, and search for "Face Mosaic." Tap the effect to apply it.
The catch: Face Mosaic blurs every detected face, including yours if you're in the frame. You'd need to mask out the faces you want to keep unblurred, which adds steps. For a single face in an otherwise controlled shot, the method below is cleaner.
Face Mosaic becomes less reliable when the subject turns into profile, moves quickly, leaves the frame, or gets blocked by another person. Always scrub the full clip before you export.
CapCut Blur Effect with Mask: Best for a Single Moving Face
This method gives you the most control. You apply a blur to a duplicate of your clip, then mask it down to just the face area. The lower track stays clean; the blurred duplicate sits above it with a circle mask cutting out the face region.
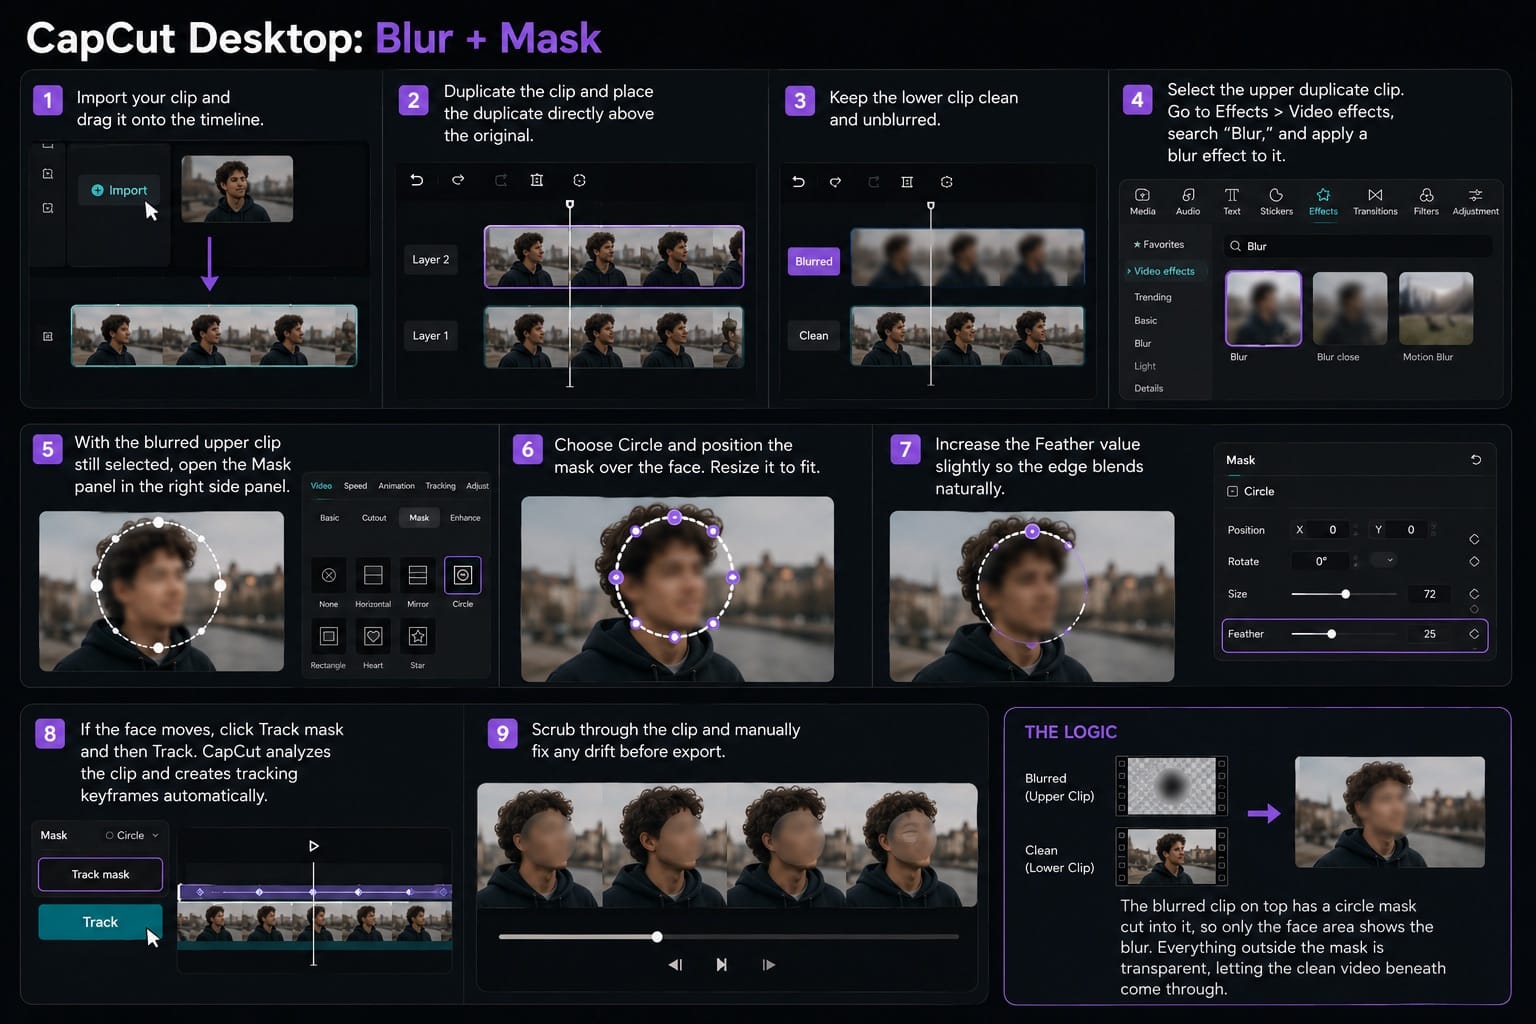
CapCut Desktop: Blur + Mask
- Import your clip and drag it onto the timeline.
- Duplicate the clip and place the duplicate directly above the original.
- Keep the lower clip clean and unblurred.
- Select the upper duplicate clip. Go to Effects > Video effects, search "Blur," and apply a blur effect to it.
- With the blurred upper clip still selected, open the Mask panel in the right side panel.
- Choose Circle and position the mask over the face in the preview window. Resize it to fit.
- Increase the Feather value slightly so the edge blends naturally rather than cutting out hard.
- If the face moves, click Track mask and then Track. CapCut analyzes the clip and creates tracking keyframes automatically.
- Scrub through the clip and manually fix any drift before export.
The logic: your clean original sits on the bottom. The blurred duplicate on top has a circle mask cut into it, so only the face area shows the blur. Everything outside the mask is transparent, letting the clean video beneath come through.
CapCut Mobile: Blur + Overlay + Mask
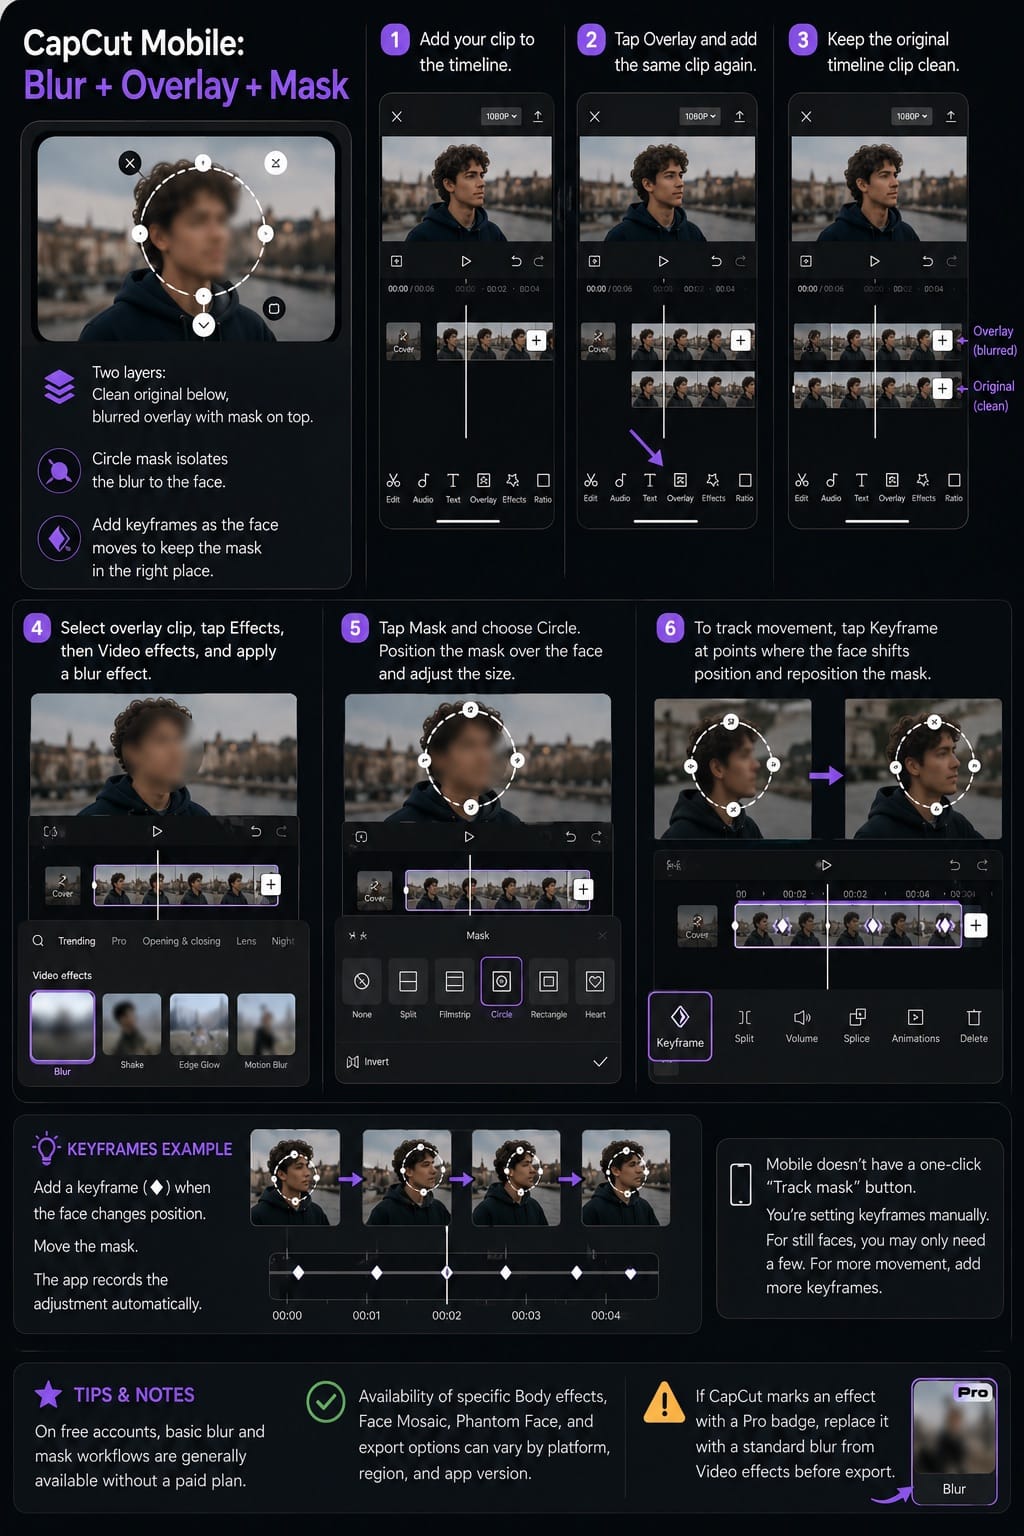
- Add your clip to the timeline.
- Tap Overlay and add the same clip again as a second layer. Align it exactly with the original.
- Keep the original timeline clip clean.
- Select the overlay clip, tap Effects in the toolbar, then Video effects, and apply a blur effect to the overlay.
- With the blurred overlay still selected, tap Mask and choose Circle.
- Position the mask over the face and adjust the size.
- To track movement, tap Keyframe at points where the face shifts position and reposition the mask at each keyframe. The app records the adjustments automatically.
Mobile doesn't have the same one-click "Track mask" button as desktop. You're setting keyframes manually. For a mostly still face, you may only need a few. For walking subjects or fast head movement, expect to adjust the mask much more often.
On free accounts, basic blur and mask workflows are generally available without a paid plan. Availability of specific Body effects, Face Mosaic, Phantom Face, and export options can vary by platform, region, and app version. If CapCut marks an effect with a Pro badge, replace it with a standard blur from Video effects before export.
CapCut Keyframe Tracking: When Auto-Tracking Fails
Auto-tracking in CapCut works well for steady movement: someone talking on camera, slow walking, gentle turns. It loses accuracy when the subject moves quickly, turns into profile, leaves the frame, or gets blocked by another person crossing the shot.
When that happens, fix it manually with keyframes.
After running auto-tracking on desktop, scrub the timeline slowly. You'll see small diamond markers along the mask track. Those are the auto-generated keyframes. Wherever the mask drifts off the face, move the playhead to that frame, reposition the mask manually, and the app records a correction keyframe at that position.
One limitation worth knowing: if you used the Brush tool to draw a freehand mask shape, CapCut won't let you add keyframe adjustments to it. Stick to geometric shapes (circle, rectangle) or the pen tool if you need manual keyframe control afterward.
For very fast movement, the cleaner fix is to split the clip at the problem section. Handle that segment separately with a fresh mask, then join the segments back. Takes longer but gives you a more accurate result than repeatedly fighting the tracker.
CapCut Phantom Face Effect: For Creative Blur Looks
Phantom Face is a Body effect that obscures and stylizes faces with a motion-blur-like distortion rather than a clean gaussian blur or pixelation. Find it under Effects > Body effects. It applies automatically to detected faces in the frame.
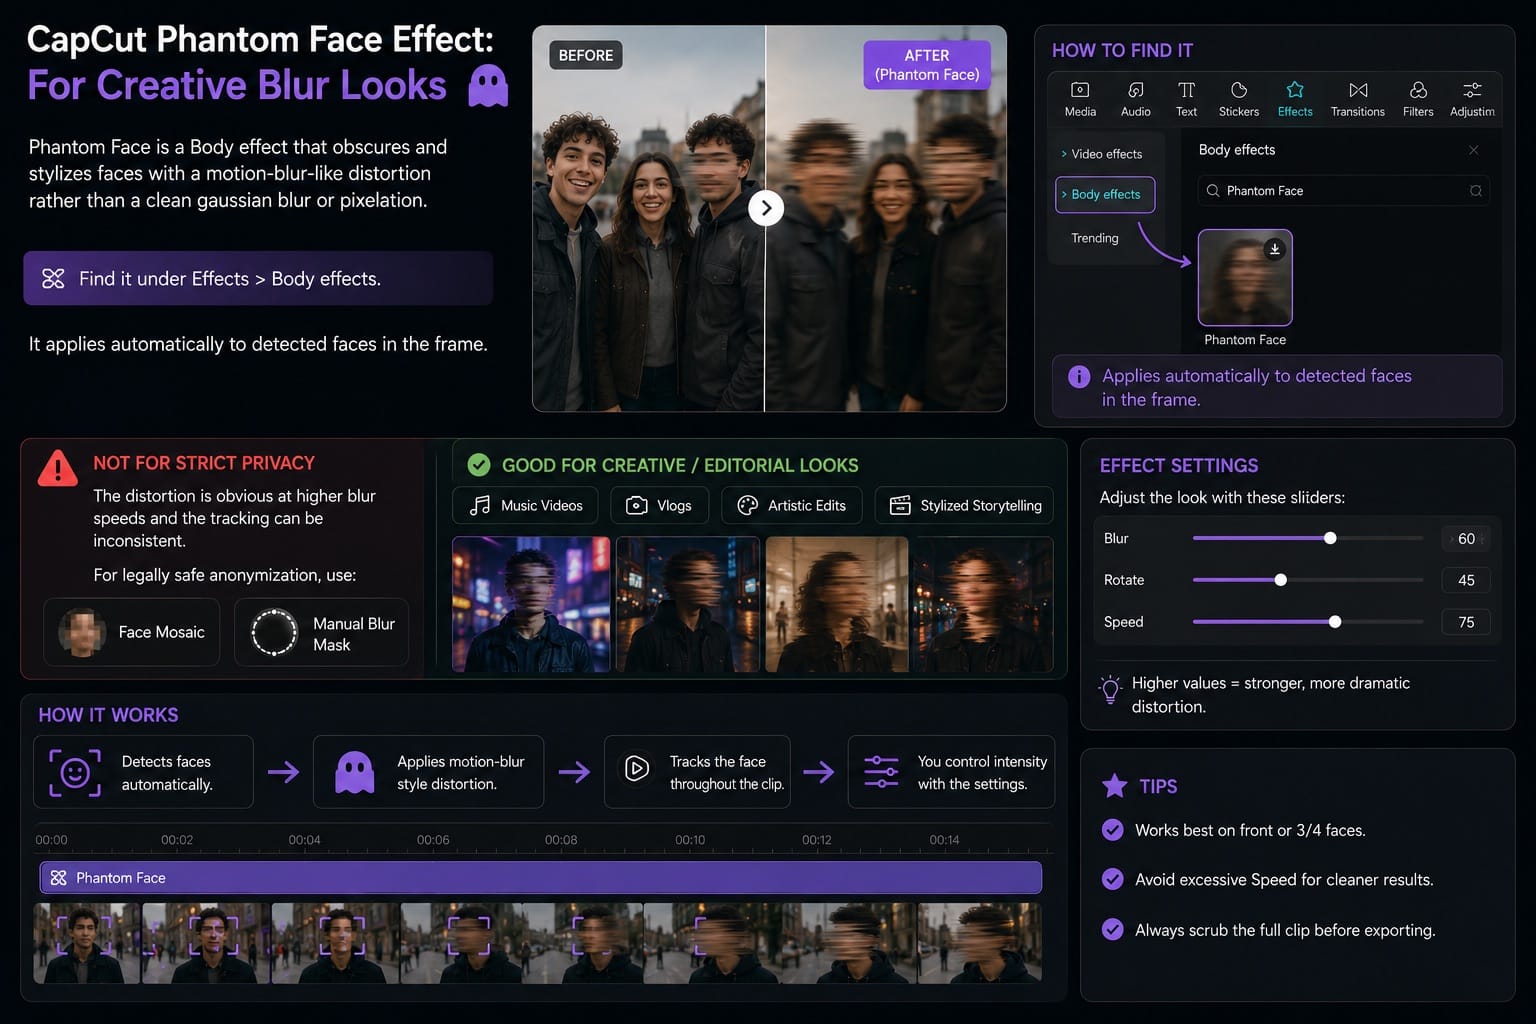
It's not the right choice for strict privacy use. The distortion is obvious at higher blur speeds and the tracking can be inconsistent. If the goal is legally safe anonymization, use Face Mosaic or a manual blur mask instead. If you're going for an artistic or editorial look rather than pure censorship, it's worth testing. The Blur, Rotate, and Speed sliders in the effect settings panel let you control how dramatic the distortion gets.
CapCut Face Blur FAQ
Can you blur a face in CapCut for free?
Basic blur, duplicate or overlay, and mask workflows can usually be done without a paid plan. Face Mosaic and Phantom Face availability may vary by account, platform, and app version. If CapCut marks an effect with a Pro badge, replace it with a free blur from Video effects and use the duplicate-clip mask method instead.
Does CapCut have automatic face blurring?
Face Mosaic in Body effects can detect and obscure faces without you drawing any mask. It works best on forward-facing subjects. Detection becomes less reliable on profile angles, fast movement, and when subjects leave and re-enter the frame. Always review the full clip after applying it.
How do you blur a moving face in CapCut?
On desktop, use the blur + mask method on the upper duplicate clip, then click "Track mask" and "Track" to let CapCut generate keyframes automatically. On mobile, apply blur to the overlay clip, add a circle mask, and set manual keyframes at each point where the face moves noticeably. For clips where auto-tracking drifts, split the clip at the problem section and re-apply the mask there.
Does blurring a face in CapCut affect video quality?
The blur only affects the masked region. The rest of the frame exports at your chosen resolution. For most social uploads, 1080p is sufficient. Higher resolution is available if your source footage and current CapCut plan support it.
Can you blur multiple faces in CapCut at the same time?
Face Mosaic can handle multiple detected faces at once, but you should review the full clip because tracking can miss faces during fast movement, profile turns, or when one person blocks another. For the manual blur + mask method, you need a separate overlay or duplicate track for each additional face.
Why does CapCut face tracking keep losing the face?
Tracking tends to fail when the subject turns into profile, moves quickly, leaves the frame, or gets blocked by another person crossing the shot. Split the clip at the problem moment, re-initialize the mask on the new segment, and track from there.