The first time I tested CapCut's auto captions on a short talking-head clip, they were done faster than I expected. Not perfect. I fixed 4 words. But the sync was tight and I didn't touch the timing once. That's the real story with this feature. It's not flawless, but it's fast enough that it changed how I work.
This guide covers the full auto captions workflow in CapCut: where to find it on mobile, desktop, and web; what the free plan actually gives you versus paid plans; how to handle accuracy problems; and how to get captions out as a burned-in export or a standalone subtitle file.
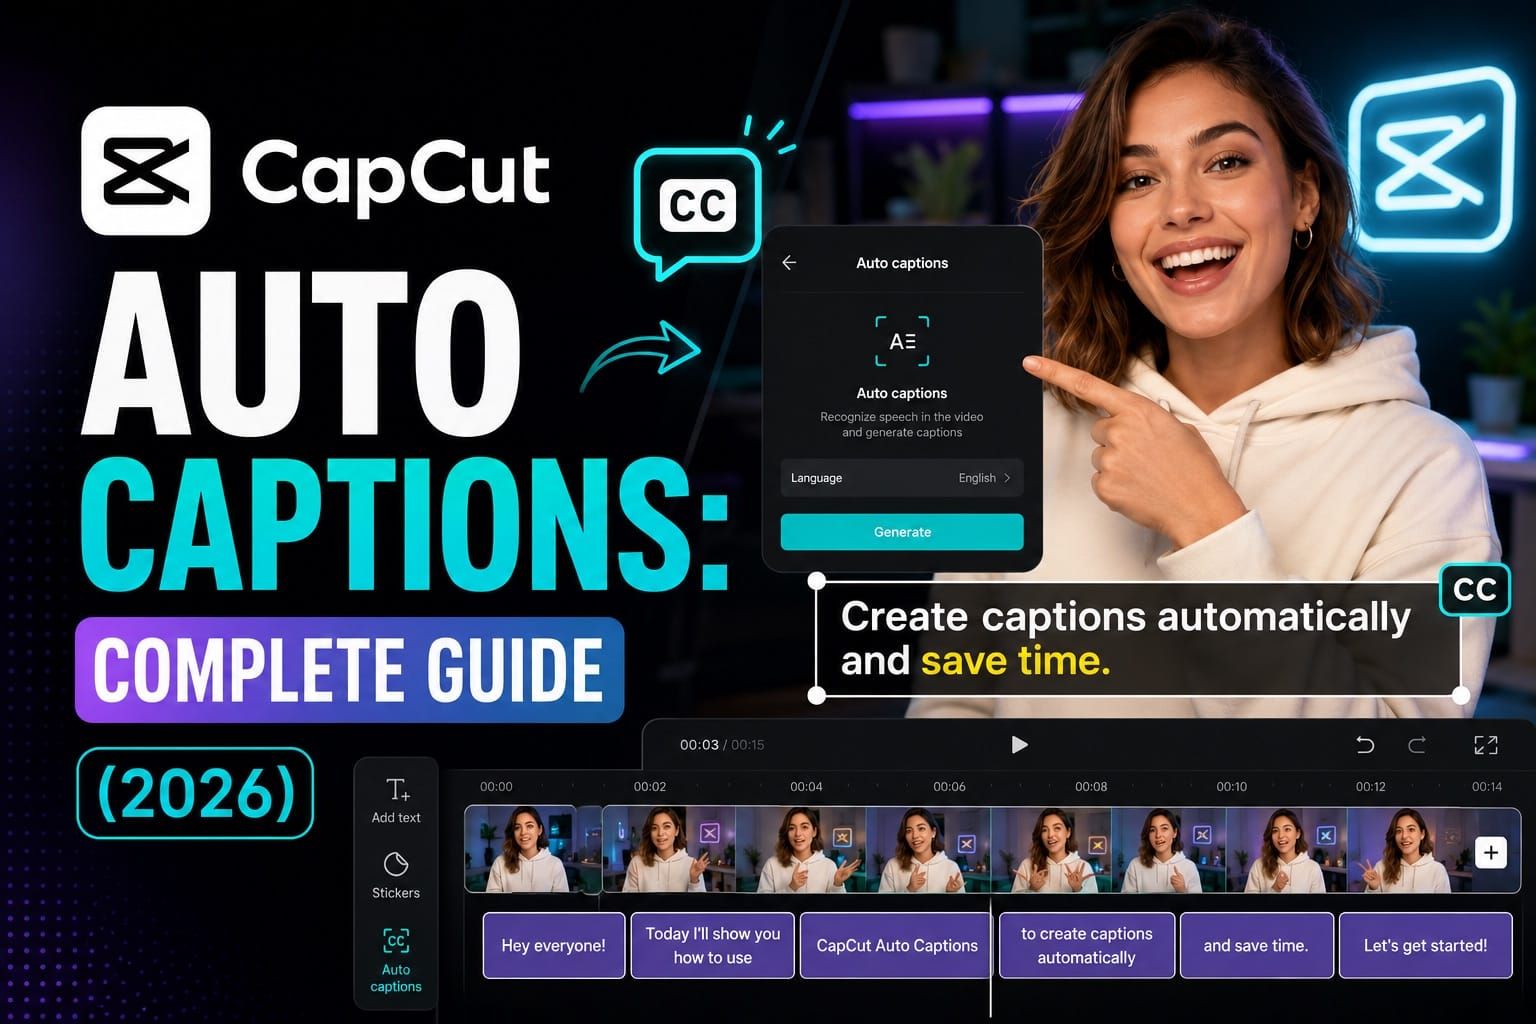
CapCut Auto Captions: What the Feature Actually Does
Auto Captions in CapCut uses cloud-based speech recognition to transcribe your video's audio and place synced text blocks directly onto the timeline. You pick the spoken language, hit Generate, and CapCut processes the audio on its servers. Short clips often process quickly, but generation time depends on clip length, audio quality, server load, connection speed, and platform.
The feature sits inside the Text menu on every platform. On mobile (iOS/Android), tap Text at the bottom toolbar, then select Auto Captions. On desktop and web, click the Text tab in the top toolbar and choose Auto Captions from the left sidebar. CapCut's interface naming is inconsistent: you may see "Auto caption" (singular) or "Auto captions" (plural) depending on your version. Same feature.
Because processing happens server-side, auto captions require an active internet connection. There is no offline mode for this feature.
Related: CapCut Text Effects Guide
CapCut Auto Captions Language Support and Accuracy
CapCut supports auto captions in many languages and dialects, with the exact language list varying by platform, region, and app version. The desktop and web interface lets you select the spoken language manually before generating. There is also an auto-detect option in some versions, though selecting the language yourself consistently gives better results.

For clean audio with one speaker, CapCut's auto captions are usually accurate enough for short-form publishing after a quick review. Accuracy drops with background music, overlapping speakers, fast speech, heavy reverb, technical terms, and strong accents.
The things that actually wreck accuracy are predictable: background music louder than the voice, multiple overlapping speakers, and regional accents the model hasn't been trained well on. Heavy reverb is another one most tutorials skip over. If your voice sounds echoey in headphones, the transcription suffers.
CapCut also flags and isolates filler words: "um," "uh," "you know." You can delete or clean them from captions without cutting the audio. Useful for interview content where you want the spoken words to read cleanly even if you didn't re-record.
For CapCut Web, try an up-to-date Chromium-based browser first if caption generation behaves oddly. Browser compatibility issues are easier to rule out than audio problems.
CapCut Captions vs Subtitles: What's the Difference?
In CapCut, auto captions are generated from speech in your video's audio track. Subtitles can also refer to imported or manually edited subtitle text, including SRT or TXT files on supported platforms. In everyday editing, creators use the terms captions and subtitles interchangeably, but the workflow differs: auto captions are generated from audio, while imported subtitles come from an external file.
As of 2026, CapCut supports subtitle file import primarily on desktop and web. If direct subtitle import is not available in your mobile app, use desktop or web for SRT/TXT workflows instead.
CapCut Auto Captions Free Plan vs Pro: What's Actually Restricted
This is where most tutorials get it wrong, and where most creators get surprised mid-project.
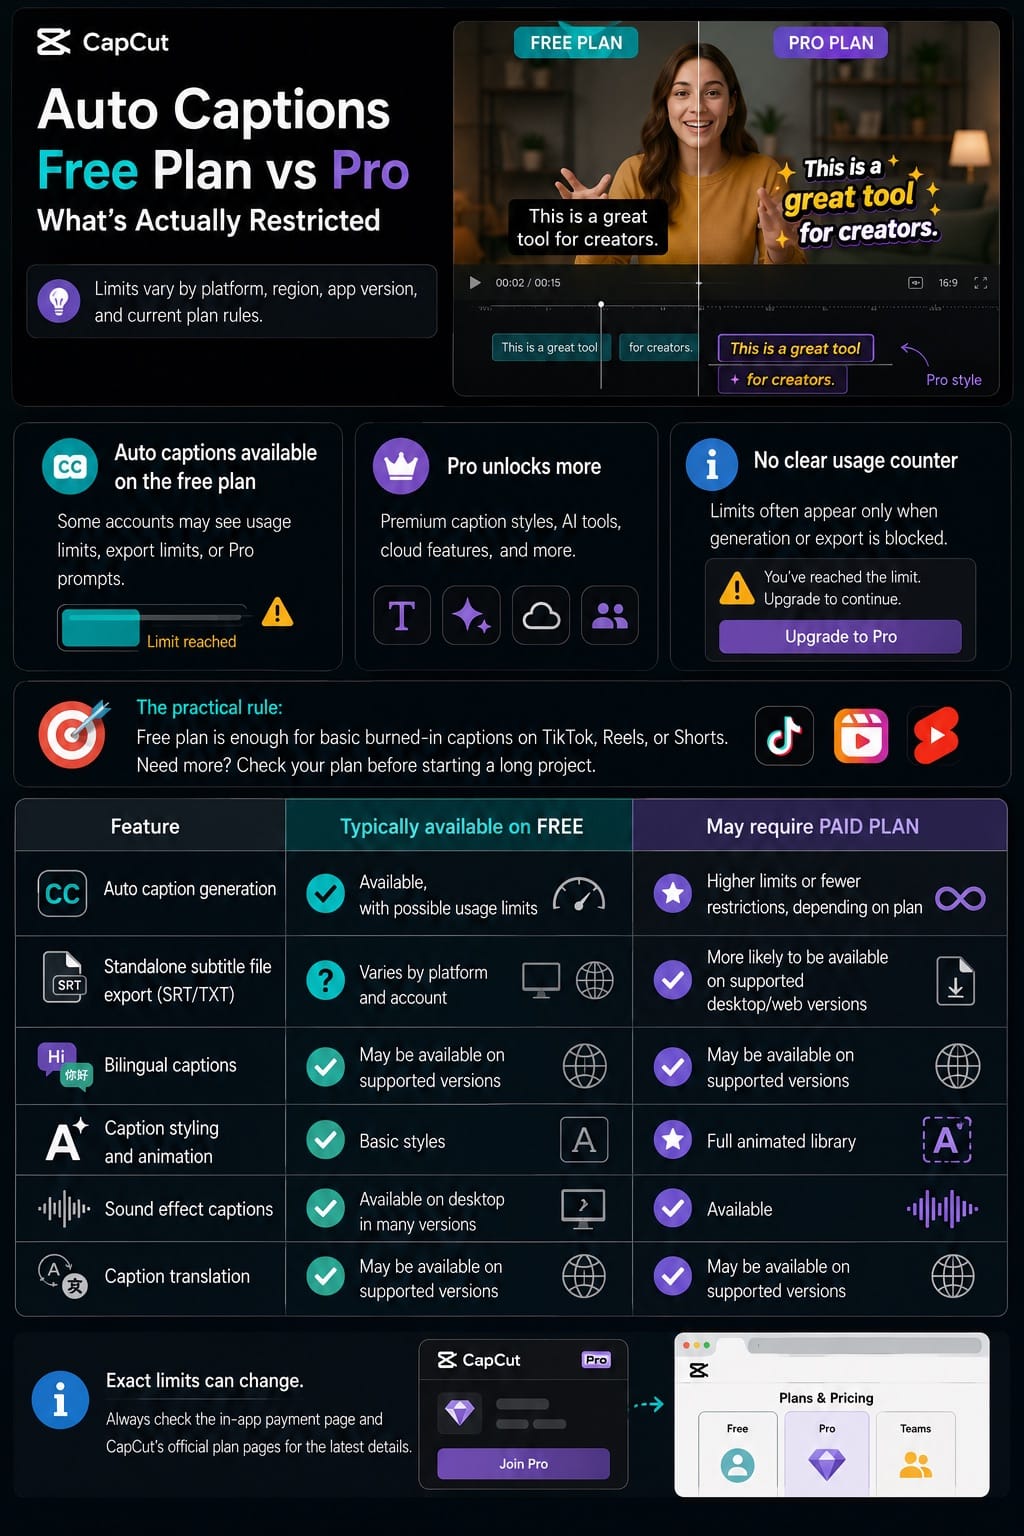
CapCut auto captions are available on the free plan, but some accounts may see usage limits, export limits, or Pro prompts depending on platform, region, app version, and current plan rules. CapCut does not always show a clear usage counter before generation, so the limit often becomes visible only when the app blocks a generation or export.
Paid CapCut plans generally unlock more premium text templates, caption styles, AI tools, and cloud features. Exact limits can change, so treat the in-app payment page and CapCut's official plan pages as the source of truth.
The practical rule: if you only need burned-in captions for TikTok, Reels, or Shorts, the free plan may be enough. If you need frequent caption generation, premium animated caption styles, team workflows, or standalone subtitle file export, check whether your current plan supports those features before starting a long project.
| Feature | Typically available on free | May require paid plan |
|---|---|---|
| Auto caption generation | Available, with possible usage limits | Higher limits or fewer restrictions, depending on plan |
| Standalone subtitle file export (SRT/TXT) | Varies by platform and account | More likely to be available on supported desktop/web versions |
| Bilingual captions | May be available on supported versions | May be available on supported versions |
| Caption styling and animation | Basic styles | Full animated library |
| Sound effect captions | Available on desktop in many versions | Available |
| Caption translation | May be available on supported versions | May be available on supported versions |
Related: Is CapCut Pro Worth It?
CapCut Auto Captions Step-by-Step: Mobile Workflow
The mobile flow is the one most creators use, and it's fast once you know where things are.
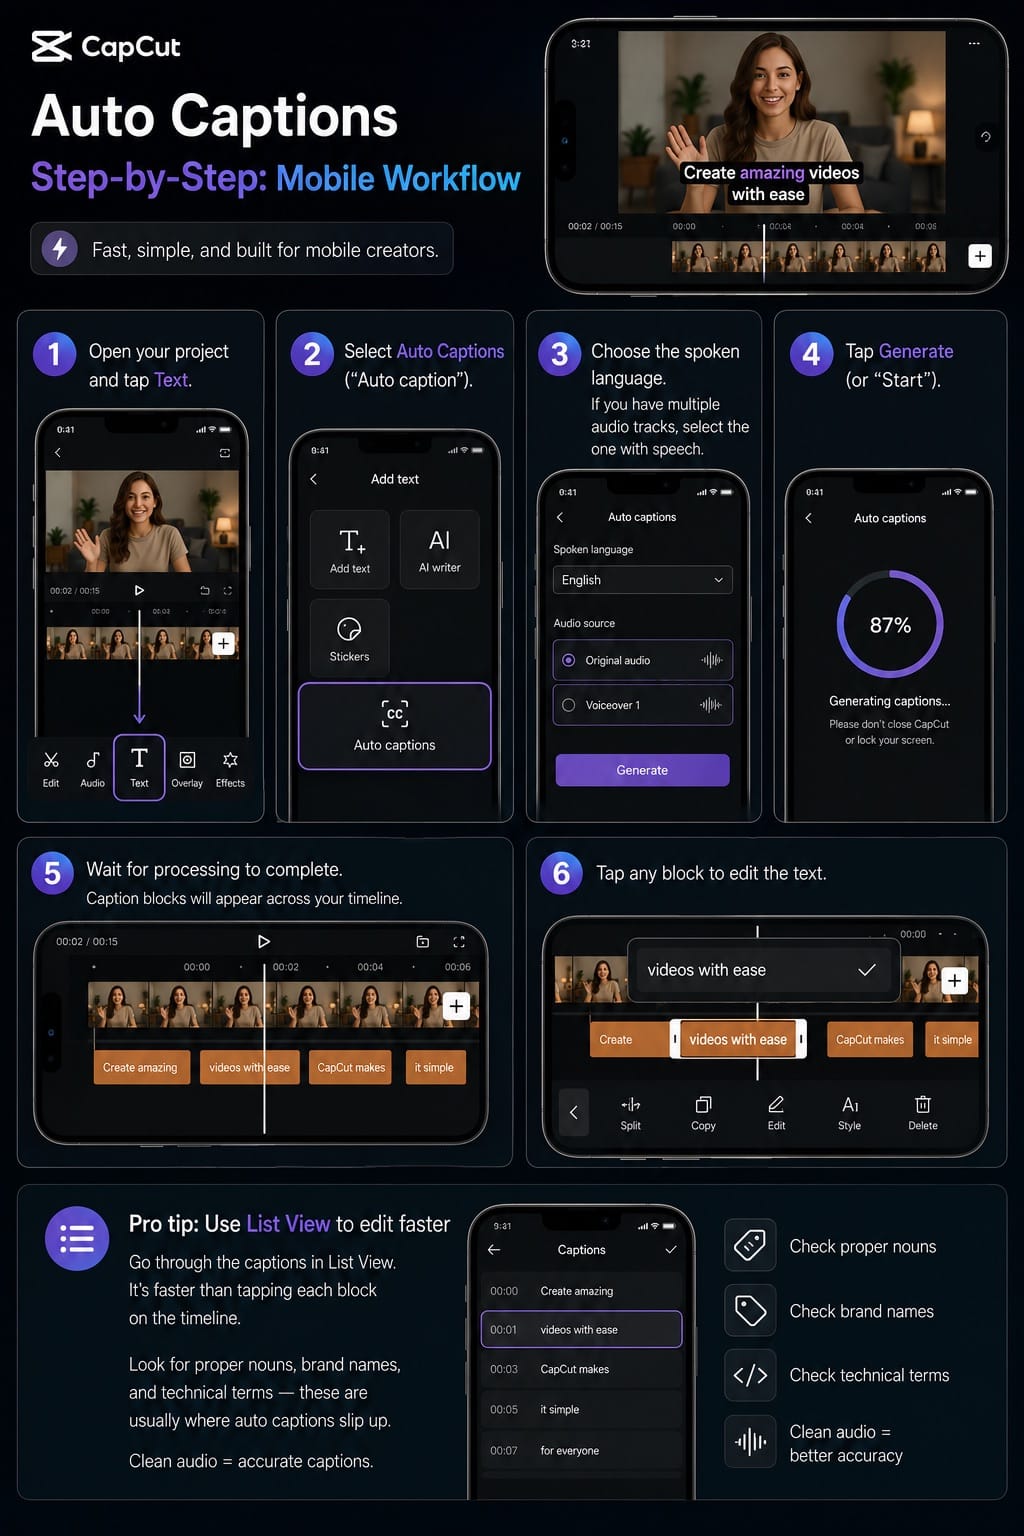
- Open your project and tap the Text icon in the bottom toolbar.
- Select Auto Captions (or "Auto caption", same thing).
- Choose the spoken language from the dropdown. If your clip has both original audio and a voiceover layer, you'll see an audio source selector. Pick the track the speech is on.
- Tap Generate (or "Start" on some versions).
- Wait for processing to complete. Caption blocks will appear across your timeline.
- Tap any block to edit the text.
After generating, go through the captions in list view, which is faster than tapping each block on the timeline individually. Look for proper nouns, brand names, and technical terms. Those are the words auto captions consistently get wrong in my experience. Everything else is usually fine on clean audio.
CapCut Auto Captions Step-by-Step: Desktop Workflow
Desktop gives you more control, especially for editing and export.
- Import your clip and drag it to the timeline.
- Click the Text tab in the top toolbar.
- Select Auto Captions from the left panel.
- Choose the spoken language. On desktop, you can also toggle Sound effect captions here. This adds bracketed cues like (applause) or (music) to the caption track, useful for accessibility but often not what short-form creators want.
- Click Generate.
- Edit captions in the caption list panel on the right. Use Ctrl+B (Windows) or Cmd+B (Mac) to split a caption block at the playhead, useful when one long phrase runs into two separate sentences.
To export captions as SRT on desktop, go to File > Export subtitles > SRT after finalizing edits. Availability depends on your version and plan. For burned-in captions, export the video normally and the captions bake into the frame.
Most tutorials say to use desktop for longer videos and mobile for short-form. That's largely accurate. The exception is when you need to edit caption timing with precision. Desktop's timeline tools are meaningfully better for that.
Related: CapCut Desktop Guide
CapCut Auto Captions Styling: Making Them Look Good
Default CapCut captions are fine for utility. They look like captions. If you want them to retain viewers past the 3-second mark, you need to style them.
The place everyone starts is the style presets. CapCut has word-by-word animated caption templates that highlight each word as it's spoken. You've seen this format dominate TikTok and Reels for the past 2 years. They work. The catch: the best-looking animated packs are behind paid tiers. The free library has functional options, but the styles that match current short-form trends tend to require an upgrade.
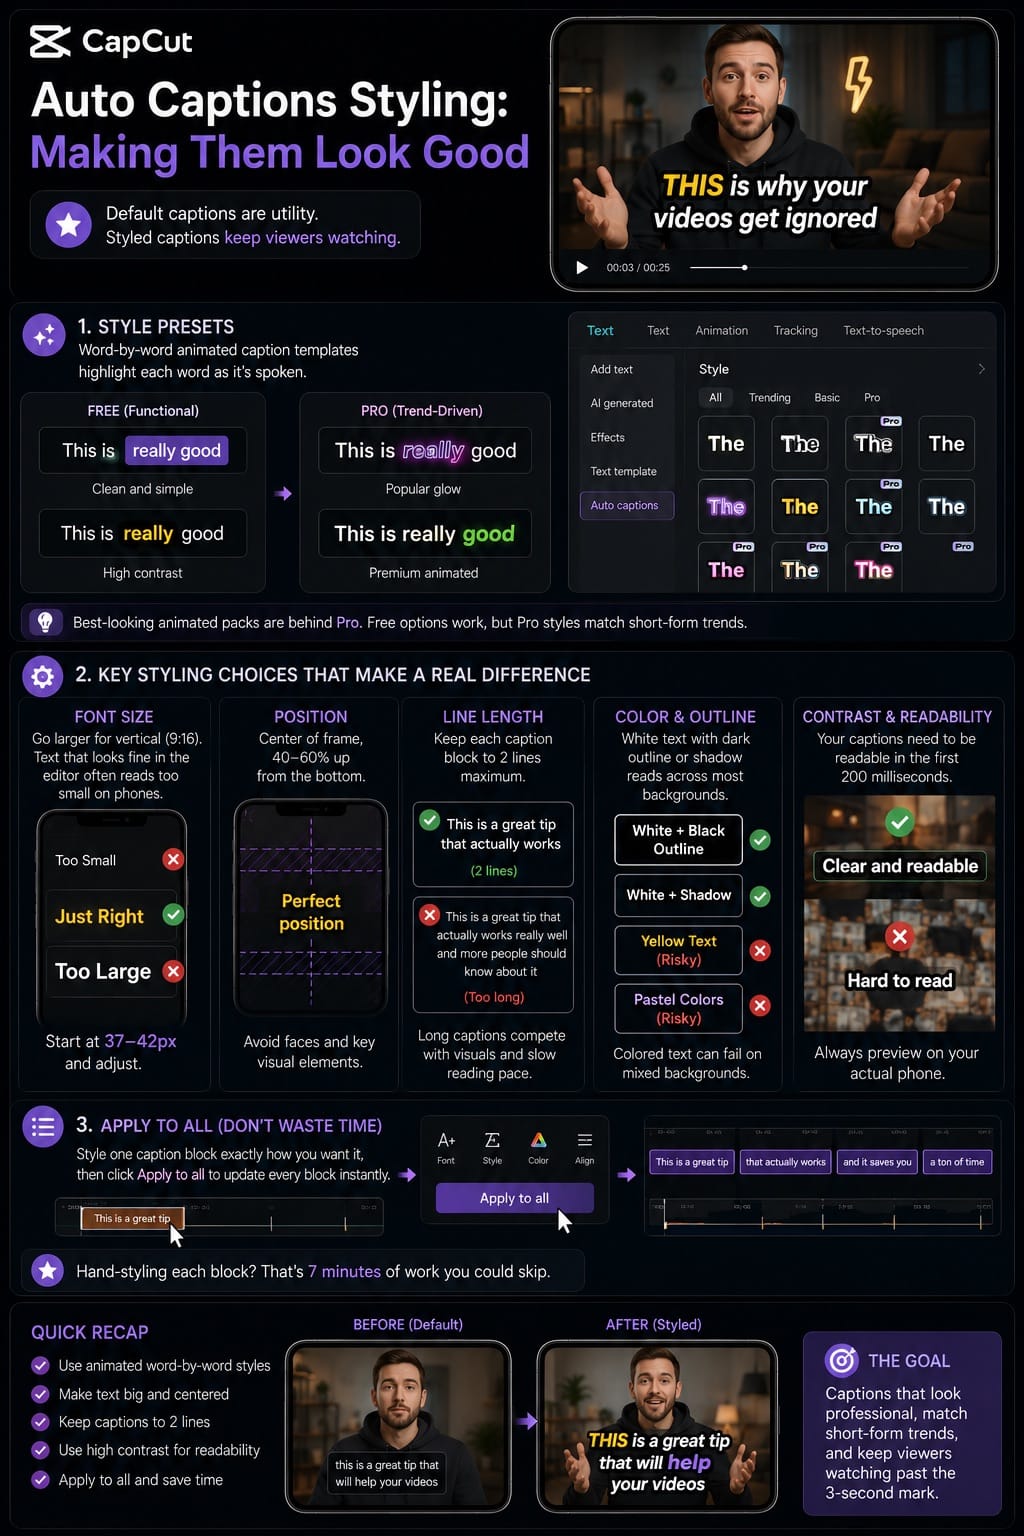
A few specific styling choices that make a real difference:
- Font size: For vertical video (9:16), go larger than feels comfortable on desktop. Text that looks fine in the editor often reads too small on a phone screen. I use 37–42px as a starting point and adjust from there.
- Position: Center of frame, roughly 40–60% up from the bottom. Avoid placing captions over faces or key visual elements. That requires adjusting the clip first or repositioning manually.
- Line length: Keep each caption block to 2 lines maximum. Long captions compete with visuals and slow reading pace. If a block is running over 2 lines, split it.
- Color and outline: White text with a dark outline or drop shadow reads across most backgrounds. Colored text looks great in templates but can fail on mixed backgrounds.
One thing I keep seeing people miss: you can apply a style to all caption blocks at once using "Apply to all" after styling one. If you're hand-styling each block individually, that's 7 minutes of work you could skip.
CapCut Auto Captions Accuracy Problems: What Actually Fixes Them
Most tutorials list "improve audio quality" as the fix and leave it there. That's true but not actionable if you've already recorded the footage.
For post-recorded clips with accuracy issues:
- Re-run generation after making manual fixes: If the first pass gets most of it right, it's sometimes faster to fix the remainder manually. But if accuracy is very low, try re-generating. Server load affects results, and a second attempt on the same clip can produce noticeably better output.
- Split problem segments and re-recognize them: On desktop, you can select a specific caption block, right-click, and re-recognize just that segment. Better than regenerating the whole track.
- Lower the background music first: If you added a music layer before generating captions, CapCut's speech recognition reads that combined audio. Drop the music track volume to near zero, generate captions, then bring the music back up.
- Check your language setting: The wrong language selection causes catastrophic inaccuracy, not marginal. I've seen "Spanish (Mexico)" produce completely different transcription output compared to "Spanish (Spain)" on the same clip.
Auto captions also fail entirely when CapCut's servers are under high load, when you're offline, or when the app is out of date. If the feature was working yesterday and isn't today, check for an app update first. CapCut's official troubleshooting guide for auto captions covers re-recognition and segment-level fixes for desktop and web.
CapCut Auto Captions Export: Burned-In vs Subtitle File
You have two ways to get captions out of CapCut: burned directly into the video frame, or as a separate subtitle file.
Burned-in (open captions) are the right choice for TikTok, Instagram Reels, YouTube Shorts, and X. These platforms display captions as part of the video image. There is no closed-caption toggle for viewers, and the text is permanent. Make sure all styling and text edits are final before exporting, because you cannot adjust them after render.
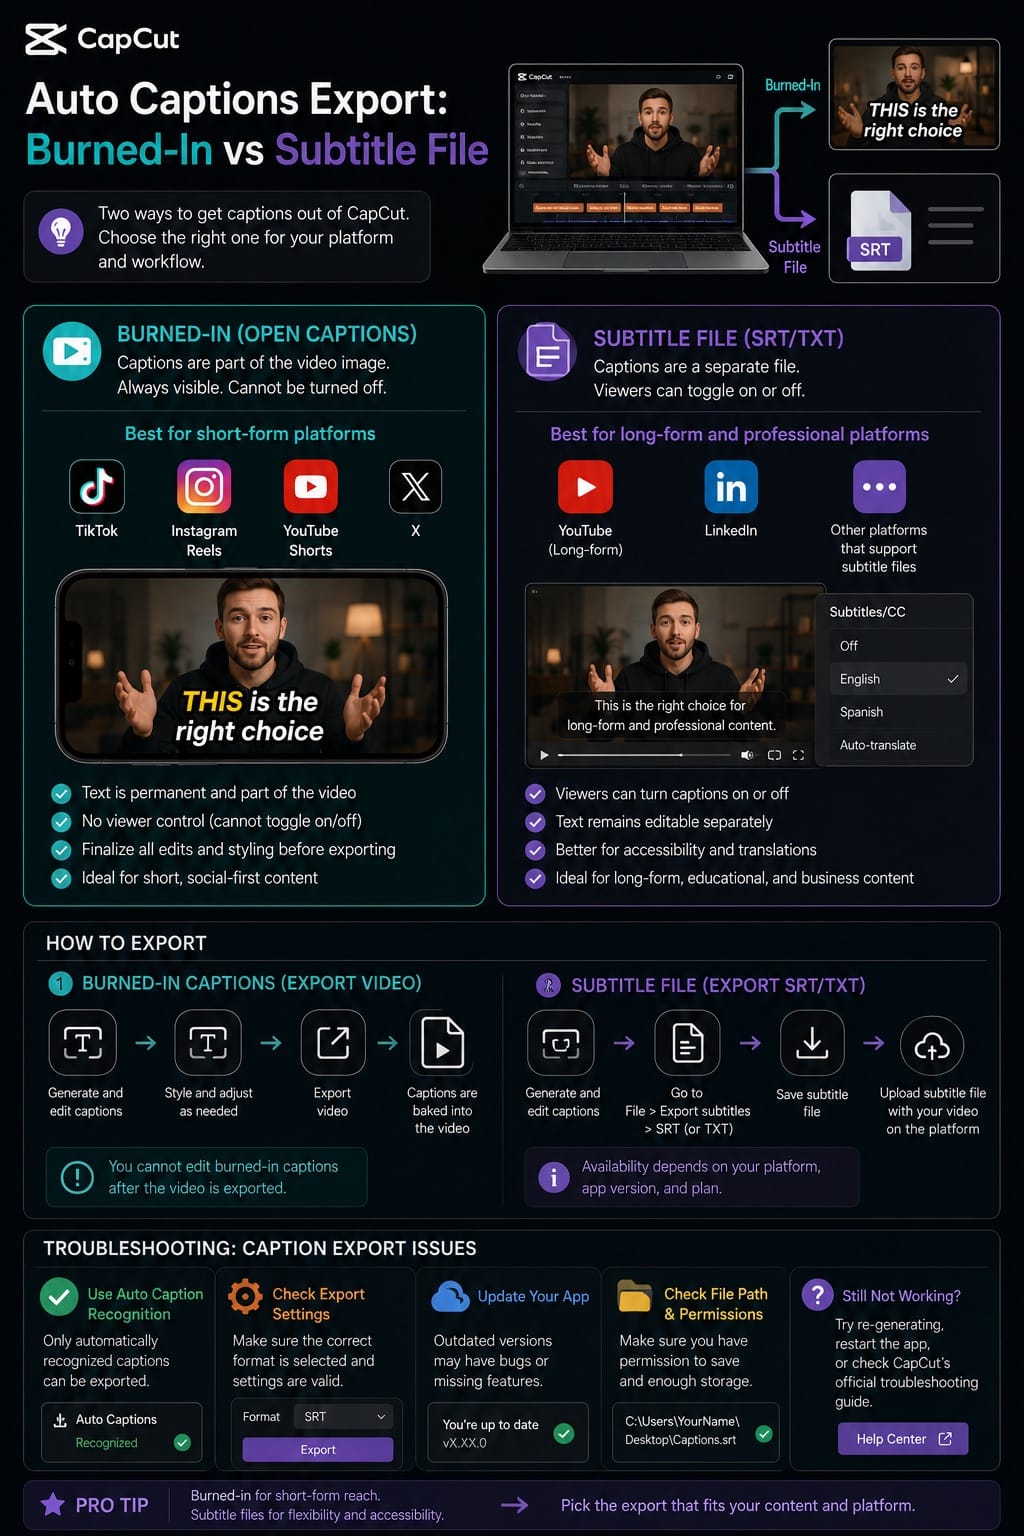
Standalone subtitle file export is better suited to YouTube long-form and LinkedIn. Uploading a subtitle file alongside your video lets viewers toggle captions on or off, and the caption text remains editable separately from the video. Burned-in captions are visible to everyone but cannot be toggled or edited after export. Availability of subtitle file export depends on your platform and plan.
If captions fail to export, make sure the text was generated through Auto Caption Recognition. CapCut's caption export troubleshooting page notes that only automatically recognized captions can be exported through the caption export workflow. Also check export settings, app version, and file path if the export fails.
CapCut Auto Captions Translation: Bilingual and Multilingual Workflows
After generating captions in your source language, CapCut lets you translate the entire caption track into another language. On desktop, select the caption track and click Translate in the captions panel, then pick a target language. CapCut generates a translated track you can stack alongside the original or use as a replacement.
Translation quality for major language pairs is generally clean for literal content. Idiomatic expressions and slang still require a manual review pass. The translation engine handles direct meaning well but sometimes misses register. A casual "let's go" in English can become a formal imperative in French that sounds off.
For creators building multilingual content, the workflow I use: generate captions in the source language, review and fix the source transcript, then translate. Translation quality is only as good as the input. Fixing the source first means the translated version is cleaner with less manual correction needed afterward.
Related: CapCut AI Voice and Text-to-Speech Guide
CapCut Auto Captions FAQ
Are CapCut auto captions free?
Auto captions are available on the free plan, but some accounts may hit usage limits or see Pro prompts depending on platform, region, and app version. Burned-in captions are generally accessible on free. Standalone subtitle file export may require a paid plan depending on your platform and account.
How accurate are CapCut auto captions?
For clean audio with one speaker, CapCut's auto captions are usually accurate enough for short-form publishing after a quick review. Accuracy drops with background music, multiple speakers, fast speech, heavy reverb, technical terms, and strong accents. Always review the output before posting.
Can I export CapCut captions as an SRT file?
CapCut supports subtitle export workflows for recognized captions on supported platforms, but availability can vary by desktop/web/mobile version and plan. If SRT export is not available in your app, export the video with burned-in captions or check CapCut's subtitle export documentation for the current options on your platform.
Do CapCut auto captions work offline?
No. Auto captions use cloud-based speech recognition, so an active internet connection is required to generate them.
How many languages does CapCut auto captions support?
CapCut supports a wide range of spoken languages for auto captions. The exact list can vary by mobile, desktop, web, region, and app version. Check the language dropdown before generating to confirm your language is available.
Why did my CapCut auto captions stop working?
The most common causes: you've hit a usage limit on the free plan, the app needs an update, you're offline, or CapCut's servers are under high load. Check for an app update first, which resolves more caption failures than most guides acknowledge.
Can I use CapCut captions on YouTube?
Yes. For YouTube Shorts, burned-in captions work fine. For long-form YouTube, a standalone subtitle file is better for accessibility because viewers can toggle captions on or off, and the caption text remains editable separately from the video. Upload the subtitle file in YouTube Studio under "Subtitles."