How to Use CapCut: A Complete Beginner's Guide (2026)
If you want to learn how to use CapCut without getting lost in every button, start with the editing loop most TikTok creators actually use. CapCut is the editor most people I know open
If you want to learn how to use CapCut without getting lost in every button, start with the editing loop most TikTok creators actually use. CapCut is the editor most people I know open first, before anything else. It's free, it runs fine on a four-year-old phone, and the timeline behaves the same way whether you're on an iPhone, a Pixel or a Windows laptop. This guide walks you through your first edit from a cold install: opening a project, dropping clips on the timeline, cutting them, adding captions and music, and exporting a file your platform of choice won't crush. We're working off the May 2026 build on iOS, Android and desktop, and everything below was tested on a real iPhone 14 and a Pixel 8 before it got written down.
Testing note: I checked the current CapCut beginner SERP, CapCut Help Center notes, and recent creator complaints before writing this. The guide spends extra time on the timeline, captions and export because those are the steps most short tutorials rush past.
Source check: I rechecked the workflow against the official CapCut Help Center and current creator complaints on May 17, 2026, then kept the guide focused on the steps beginners actually touch first: timeline, captions, audio, export.
Quick steps
- Install CapCut and tap New Project.
- Import your clips and arrange them on the timeline.
- Use Split and Delete to cut out the dead weight.
- Add captions with Auto Captions and music from the Audio panel.
- Tap Export, pick 1080p 30fps, and save.
Install CapCut and open your first project

Grab CapCut from the App Store, Google Play, or capcut.com for Mac and Windows. On mobile it's about 320 MB after install. On desktop the installer is closer to 700 MB and it'll ask for a TikTok or email login the first time you launch it.
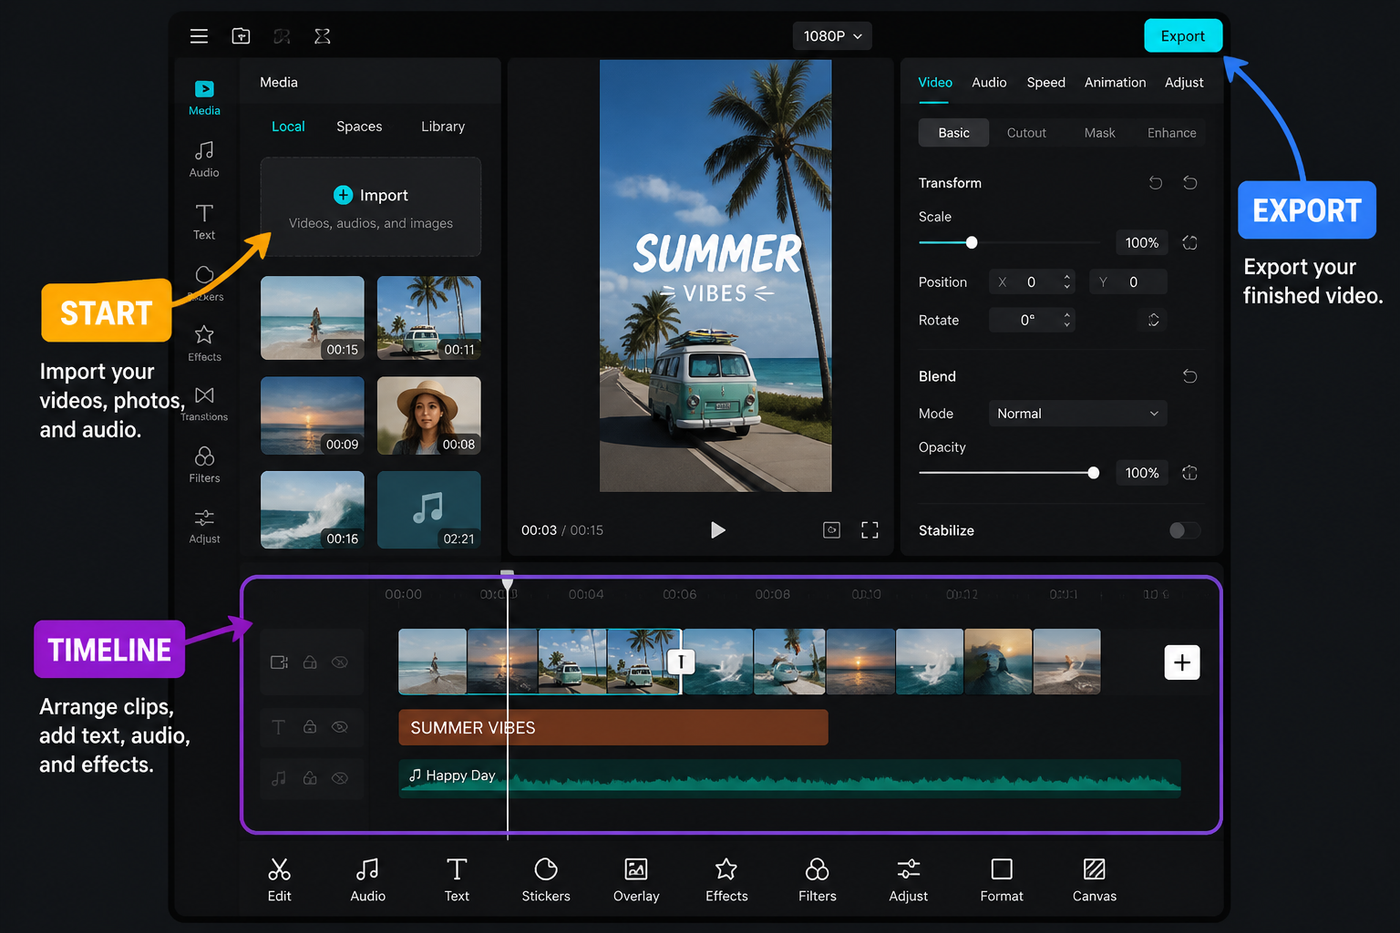
Open the app and tap the big purple New Project button. CapCut throws you straight into your camera roll. Don't pick anything yet — just hit Cancel in the corner so we can look at the empty editor first. You'll see a black preview window up top, a horizontal timeline strip in the middle, and a row of tools along the bottom (Edit, Audio, Text, Stickers, Overlay, Effects, Filters, Format). That's your whole toolbox.
Import clips into the timeline
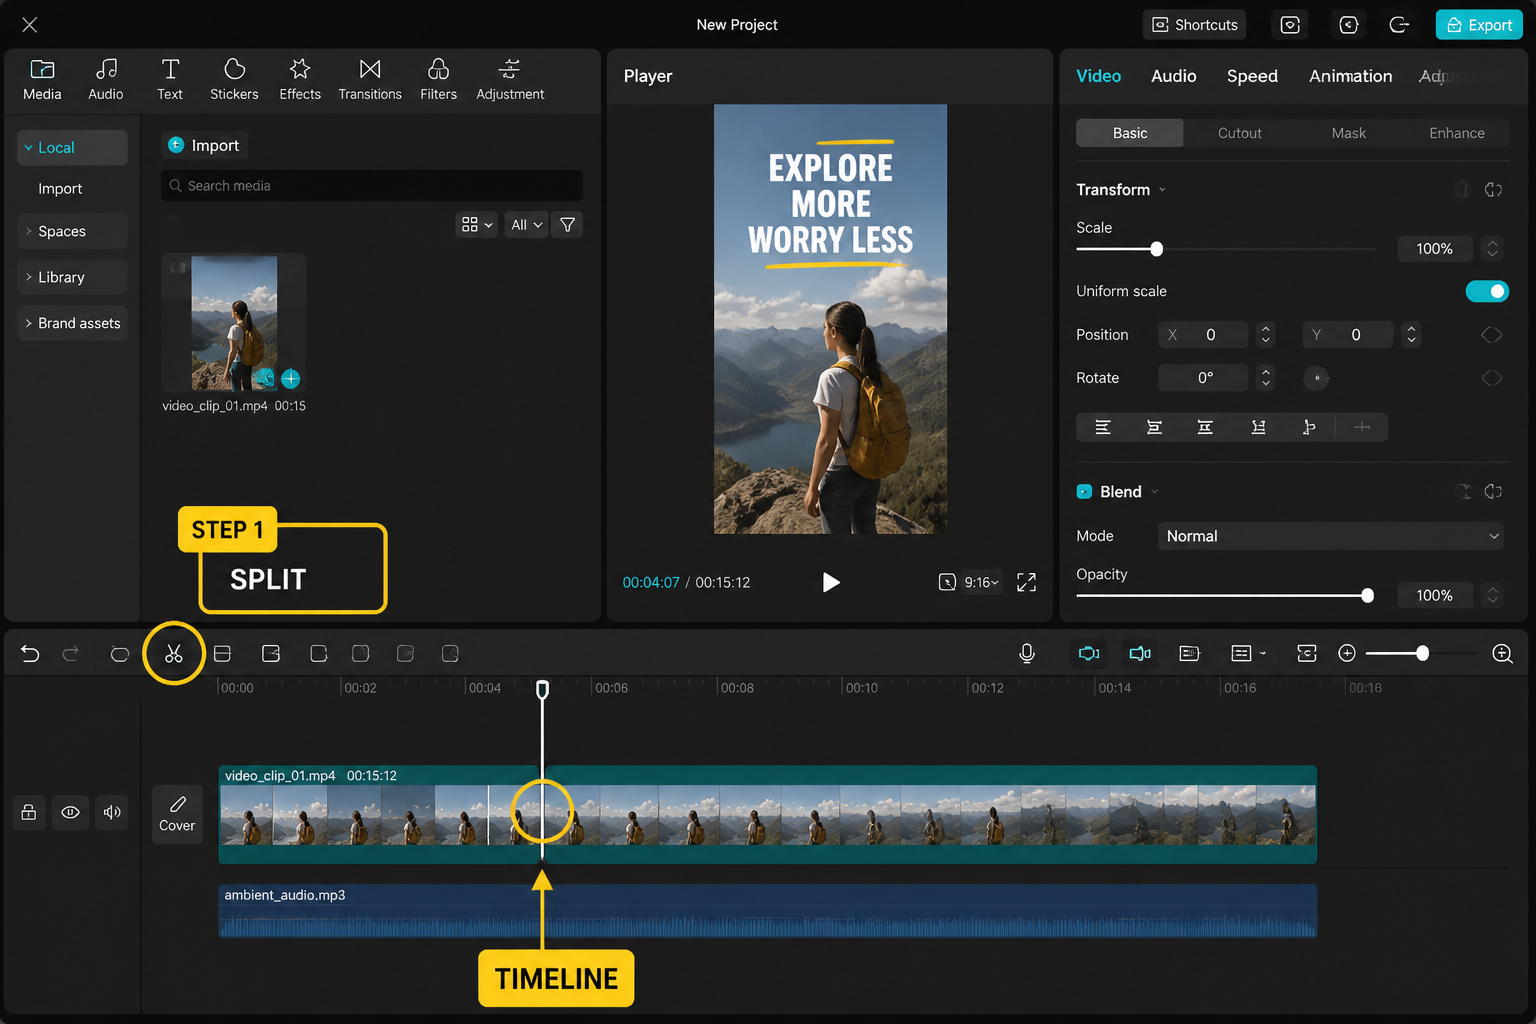
Tap Add at the left edge of the timeline. The media picker opens to Photos by default but you'll see tabs for Album, Stock and Cloud along the top. Long-press a clip to preview without selecting. Tap each clip in the order you want it on the timeline — CapCut numbers them as you tap — then hit Add.
Your clips land on a single video track. The first clip starts at 0:00 and they sit end to end. The little white playhead (CapCut calls it the cursor) is what you'll move around to scrub. Pinch in or out on the timeline to zoom — wider zoom = more precision. We usually zoom in until each second is roughly a thumb-width wide before making cuts.
The timeline, explained
Three things sit on the timeline: the main video track in the middle, audio underneath in blue or green, and overlays/text above the main track in their own colored lanes. Tap any clip and the bottom toolbar morphs into clip-specific tools — Edit, Audio Extract, Volume, Speed, Animation, Delete, and so on. Tap empty timeline space and you're back to the project-wide tools.
The playhead is sticky: anything you add (a sticker, a caption, a transition) drops in at the playhead's current position. So get into the habit of parking the playhead exactly where you want before tapping a tool. It saves you a lot of dragging later.
Basic cuts: split, trim, ripple
This is 90% of editing. Tap a clip to select it, drag the playhead to the moment you want to cut, then tap Split. The clip becomes two. To kill the dead air on either side, select the bad chunk and tap Delete. Everything to the right snaps left automatically — that's a ripple delete. CapCut doesn't make you toggle a mode for it, it just does it.
To trim without splitting, select a clip and drag the white handle on its left or right edge. Drag inward to shorten, outward to lengthen (until you hit the original clip's bounds). For frame-accurate trims, zoom way in first. On a 60-second project we usually do four or five rough splits, delete the obvious junk, then come back to fine-trim each cut.
Keyframes basics: your first slow zoom
Keyframes let a value change over time — position, scale, rotation, opacity. CapCut marks them with a little white diamond. To add one, select a clip, park the playhead at the start, then tap the diamond icon on the right side of the preview window. That locks the current scale/position as keyframe one.
Move the playhead to the end of the clip, then pinch the preview to zoom in a touch (say 1.15x). CapCut auto-creates a second diamond and animates between them. Play it back — you've got a slow push-in. That's it. We use this on almost every static shot to keep the energy up. For trickier moves, the full keyframes tutorial walks through camera moves, lazy whip pans and ease curves.
Transitions between clips
Between any two clips on the timeline you'll see a small white square icon. Tap it to open the Transitions drawer. The defaults are split into Basic (Dissolve, Fade Black, Fade White), Stylish, MG, Slice, Light and a few more. Each has a length slider (0.1s to 1.5s). A 0.3s Dissolve is the most useful one in our daily edits — invisible enough to feel like a normal cut, but it softens jarring color changes.
Less is more. We keep transitions on maybe 10% of cuts in a typical TikTok. If you want flashier options, the 15 best CapCut transitions roundup has the ones actually worth using in 2026.
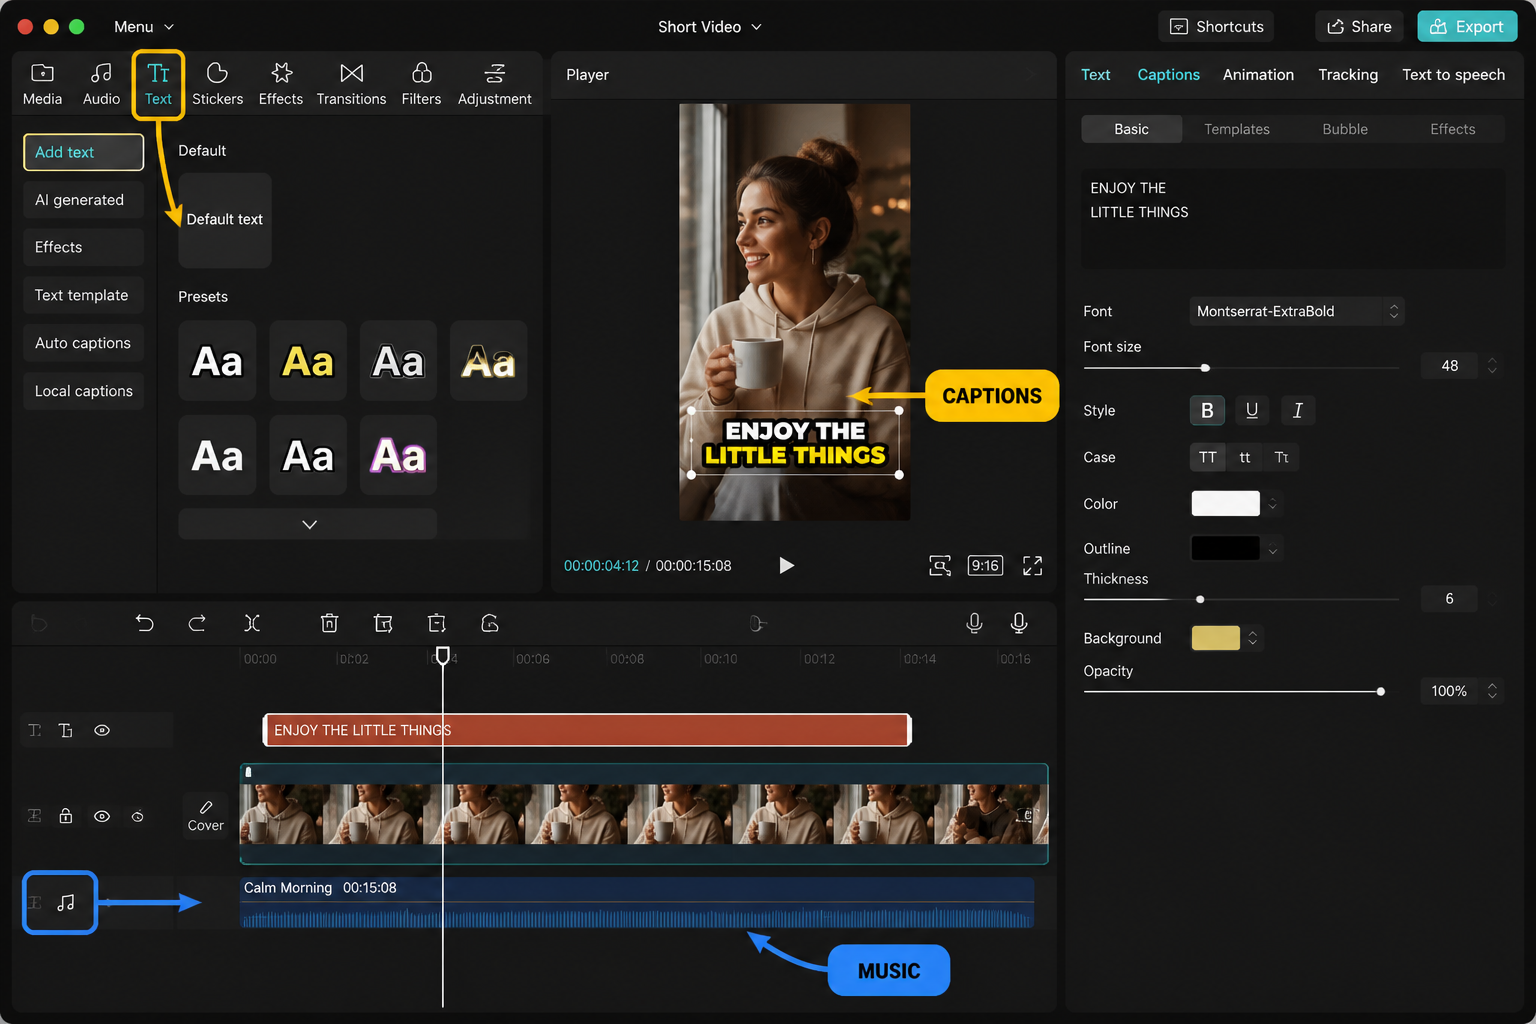
Captions and on-screen text
Tap an empty area of the timeline, then tap Text in the bottom bar. You'll see two main options: Add Text (manual) and Auto Captions. For dialogue or voiceover, Auto Captions is the move — it transcribes your audio in about 8 seconds for a 30-second clip on a recent phone. Accuracy on clear English audio is around 95% in our tests; the misses are usually proper nouns and slang.
Hit Auto Captions, pick your language and audio source (Original Sound), and tap Generate. Each caption shows up as its own text clip you can restyle in one go. Tap any caption, scroll the style presets in the Style panel, and pick one that sits high enough on the frame to clear the TikTok UI. For the full process, see CapCut auto-captions.
Adding music and sound
Tap empty timeline, tap Audio, then Sounds. CapCut's library is sorted by mood and trend; the Recommended tab pulls songs trending on TikTok this week. Tap a track to preview, hit the red plus to add it. If you want a song from your own files, Extracted pulls audio from any video in your camera roll — handy for ripping a sound from another TikTok.
Once the audio lands, select it and you can trim, fade in/out (the little teardrop icons), or split to delete a section. Drop the music volume to around 30-40% when there's dialogue on top. For tight beat work, the beat-sync workflow covers manual and auto markers.
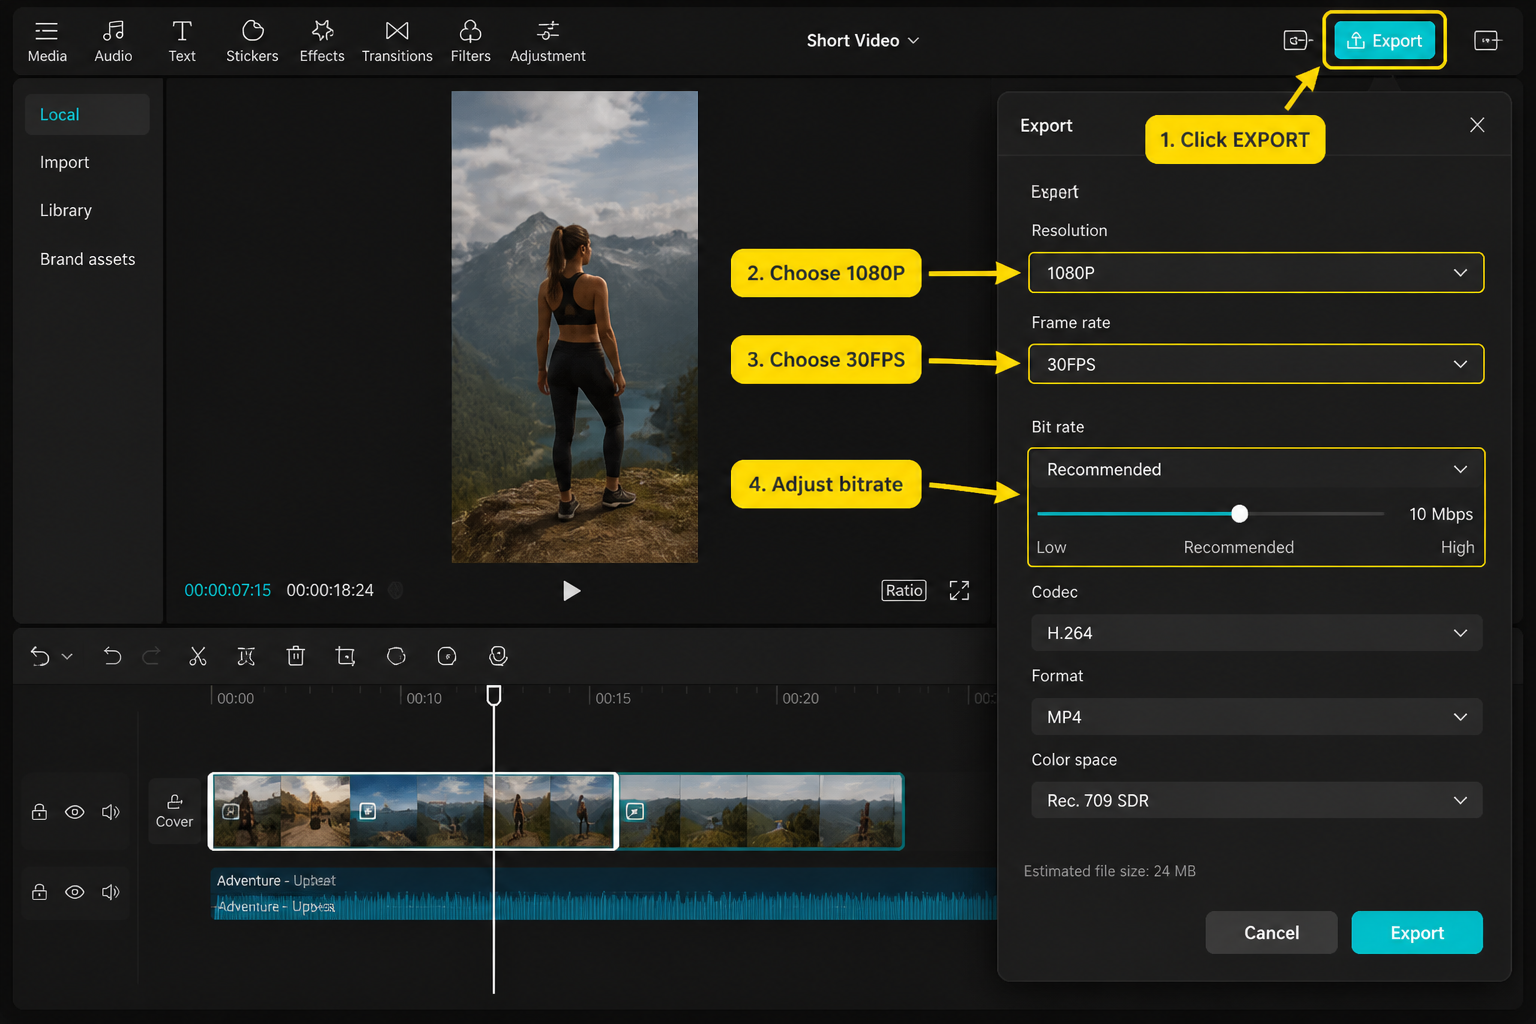
Export settings that don't look terrible
Top-right corner: the resolution/fps badge and the Export arrow. Tap the badge first. For TikTok, Reels and Shorts, set 1080p resolution and 30fps. Bump fps to 60 only if you shot at 60 or you're doing slow-mo — otherwise it's wasted bitrate. Set Smart HDR off unless your source is HDR (it can crush colors on platforms that downconvert). Code rate stays on Recommended.
Hit the white arrow to export. A 60-second 1080p 30fps clip took us about 18 seconds on iPhone 14 and 24 seconds on Pixel 8. The file lands in your camera roll automatically, and CapCut offers direct upload to TikTok or saves a draft. Files run roughly 30-50 MB per minute at these settings.
Common beginner mistakes (and quick fixes)
- Overusing transitions. A Glitch transition on every cut screams beginner. Use a hard cut by default; reach for transitions when the energy or location changes.
- Captions covering faces. Drag captions into the top third of the frame. TikTok's like/share UI eats the bottom 25%.
- Music louder than voice. Set the music track to 30% when voice is present, then ramp to 100% in B-roll sections.
- Exporting at 4K for a phone audience. 1080p uploads faster, compresses cleaner, and looks identical at 6 inches from a face.
- Editing on the original. Always duplicate the project (long-press a project on the home screen → Duplicate) before a major restructure.
FAQ
Is CapCut completely free for beginners?
Yes for the core editor. Cutting, trimming, captions, basic effects, music from the in-app library and 1080p exports are all free. CapCut Pro unlocks premium effects, cloud storage and some AI tools, but you'll never hit a wall doing basic edits on the free tier. We cover the full breakdown in is CapCut free.
Does CapCut put a watermark on free exports?
Not on the video itself, no. CapCut adds an optional end-card with the CapCut logo that you can disable per project — open the project, tap the settings cog top-left, and toggle off Add default ending. After that, free exports are clean.
How long does it take to learn CapCut?
About an hour to get comfortable with cuts, captions and music. Maybe ten hours to be fast. The big leap is muscle memory for split-delete-trim — once that's automatic you stop thinking about the tool and start thinking about the edit. Watching a few finished edits from creators you like and trying to recreate them is the fastest practice.
Can I edit on phone and finish on desktop?
Yes, if you log in with the same account and save the project to Cloud. Open it on desktop and continue. Be aware: a handful of mobile-only effects and stickers won't render on desktop, and vice versa. The mobile vs PC breakdown has the full parity list.
What aspect ratio should I use for TikTok?
9:16 vertical at 1080×1920. Open the Format tool from the bottom bar of an empty timeline and pick 9:16. Do this before you start cutting — switching ratios mid-edit means re-framing every clip.
Why are my exports laggy or stuttering?
Usually a frame-rate mismatch. If you mixed 24fps, 30fps and 60fps clips on the same timeline, set the project frame rate to 30fps in export settings and let CapCut conform everything. If it's still rough, free up phone storage — CapCut needs roughly 2x your final file size as scratch space.
Can I use CapCut commercially?
Personal social posts, yes. For paid client work, check the music license — CapCut's in-app music library has rights cleared for personal use but not always for ads. Use your own licensed music or royalty-free libraries for client deliverables. Full license details are on capcut.com.
Final cut
The whole CapCut workflow boils down to: import, split, delete junk, caption, music, export. Everything else — transitions, keyframes, effects — is dressing on top of that core loop. Get the loop fast first, then start adding the dressing one tool at a time.
The best practice is rebuilding a TikTok you already like. Watch it five times, count the cuts, then try to recreate the structure with your own clips. After three or four of those you'll know the tool well enough to stop thinking about it and just edit.