


To export a selected clip in CapCut Desktop, click the clip on the timeline, press Shift+X and check the highlighted range. Then use the ordinary Export button. For a section that starts or ends inside a clip, position the playhead and use I for the start and the letter O for the end. For the cut, timing and export steps around that range, follow our step-by-step CapCut tutorial.
CapCut's published range instructions describe these keyboard routes. The steps below use that Desktop workflow; a batch-export command is a separate feature whose availability must be checked in your app.
For output quality and the other export guides, use the CapCut Export hub.
Choose the file you need
- One complete timeline clip: select it, try Shift+X and inspect its marked boundaries.
- Part of a clip or several adjacent shots: set an In/Out range. It can cross cuts.
- Several separate video files: test the batch command if present, or export each range in turn.
- Separated moments in one video: arrange them together in a project copy. Our guide to joining clips covers the sequence; a single range cannot skip the footage between two moments.
A range selects time, not layers. Music, captions and overlays active during that interval can enter the video. If you need a clean shot without those additions, change them in a separate working copy. Keep the master and its source files intact; the project-backup guide explains how to verify a recoverable copy. An in-app duplicate alone does not protect against deleting the app's data.
If you need one still image rather than a moving clip, use frame export instead.
Export one complete clip with Shift+X
- Open the project in CapCut Desktop. Make a separate working copy before changing its layers or edits.
- Click the video clip on the timeline and confirm that the intended item is selected.
- Press Shift+X and inspect the marked boundaries. If they do not match, set the start with I and the end with O.
- Preview the interval, including overlapping captions, visuals and audio.
- Open Export. Check the proposed range or duration where shown, choose the required output settings and use a distinct filename and a folder you can find again.
- Finish the export, then open the saved file outside CapCut. Check its duration, opening, ending, picture, captions and audio before accepting it.
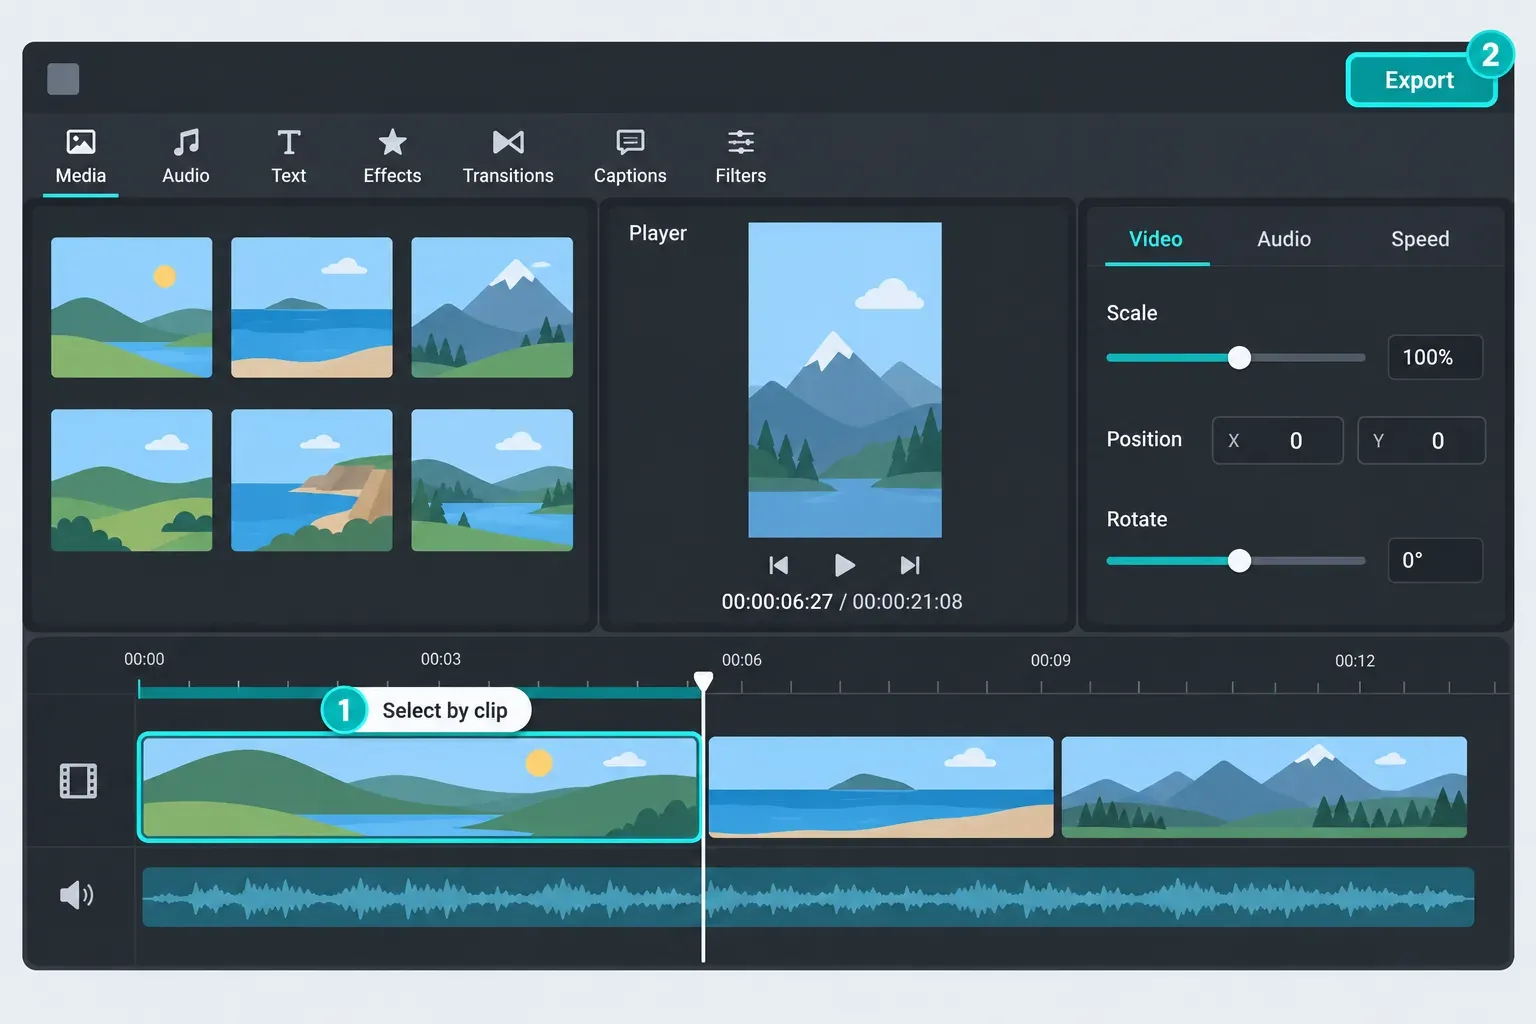
If the shortcut does nothing, click back into the timeline so that a text field does not have keyboard focus. Inspect your build's range controls or shortcut assignments. CapCut's Desktop help labels this command Select by clip; use it if available, or define the interval with I and O.
Marking a range leaves the rest of the timeline in place. You do not need to delete the other clips, and selecting a different clip later should not be treated as proof that the export range moved with it.
Export a custom section with I and O
For an answer inside a long interview, put the In point just before the answer and the Out point after its ending. For a title followed by two shots, include that whole interval. Keep any required opening or closing audio inside the boundaries.
- Click into the timeline, move the playhead to the intended start and press I.
- Move to the intended end boundary and press the letter O. CapCut says the markers can be set in either order.
- Inspect the highlighted span. Zoom in when a cut needs frame-level precision, then preview the picture and sound across it.
- Export under a new name. Open the file and check the actual first and last frames; move the relevant marker and repeat if the boundary is wrong.
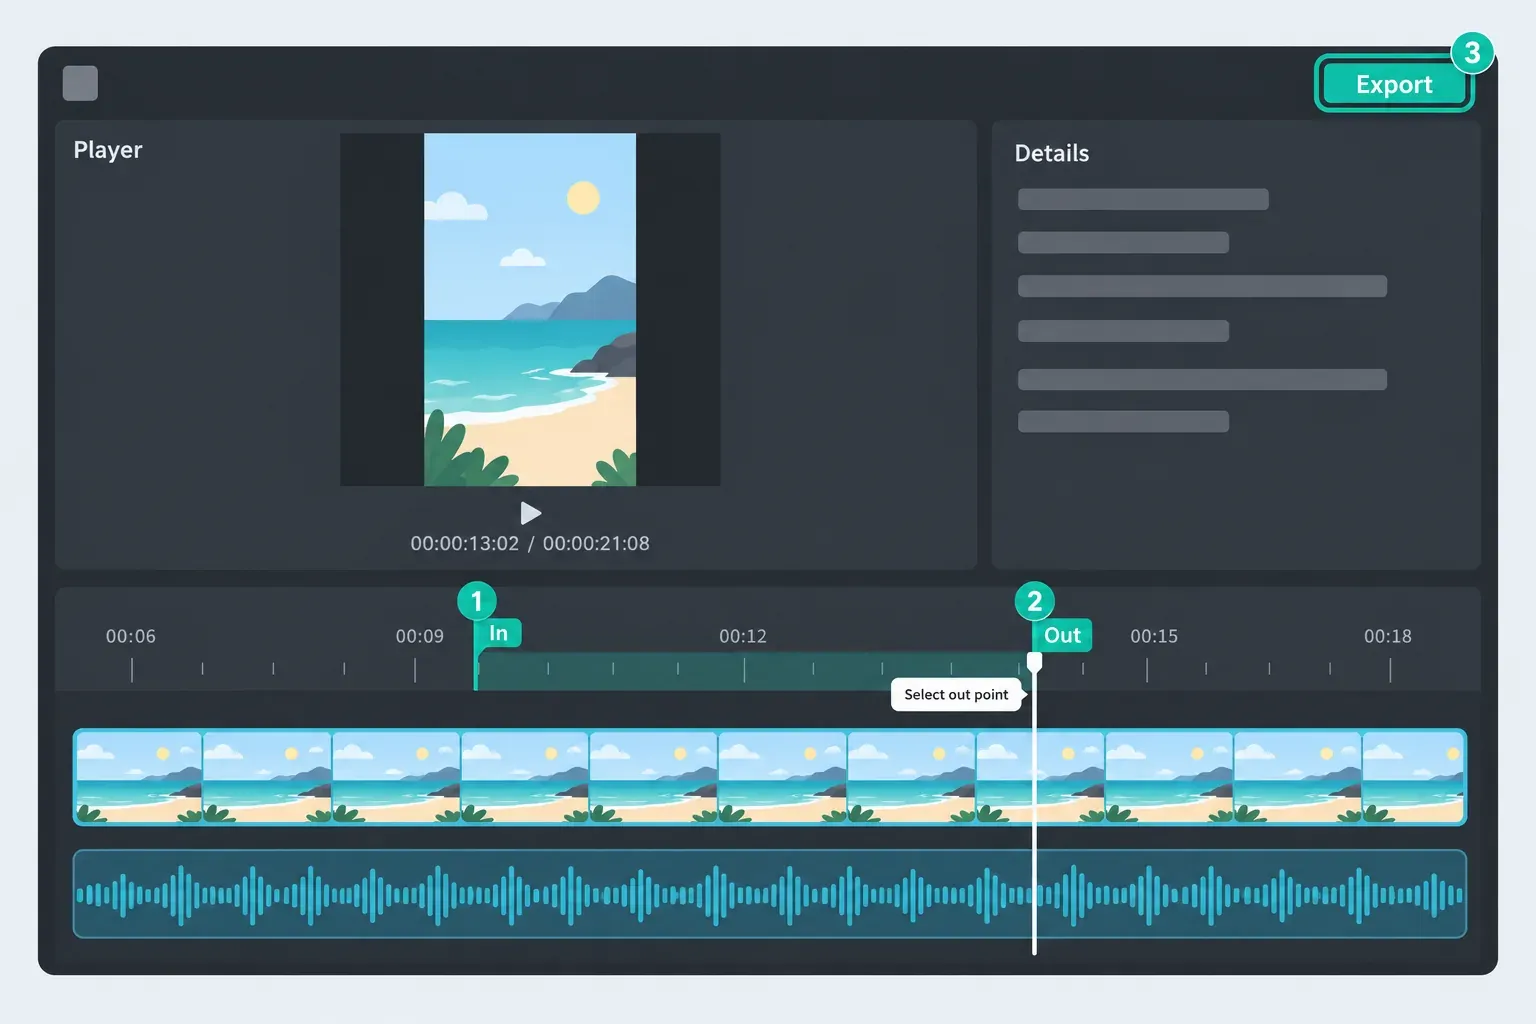
The help page does not define whether every build includes the frame displayed at the Out point. Treat it as an end boundary, not a promise about the final included frame. If another editor needs extra footage for a transition, agree that handle length before exporting; there is no universal one-frame or two-frame allowance.
Return to the whole project
Clear the range with whatever cancellation command your build offers. Users in an April 2026 discussion describe Range → Deselect; that is a reported interface route, not a guarantee of today's menu wording. If you cannot find the command, set I at the beginning of the complete intended timeline and O at its end.
Before starting, check that the proposed export covers the full expected duration. Afterward, inspect its opening and ending. Do not assume a successful short test has restored the full selection.
Export multiple clips as separate files
One In/Out range produces one continuous video. It is not a render queue. A Mac batch-export discussion makes the distinction clear: exporting a section repeatedly is different from saving several selected clips as separate files in one operation.
The April reports describe changing access to Export Selected Clips. They do not establish which builds or accounts have it now. Check your own menu before planning a large batch; do not install an unofficial or older build just to chase a missing command.
If Export Selected Clips is visible
- Use a disposable project with two short clips, or a working copy of your edit. Select those two clips on the timeline and inspect their context menu.
- If Export Selected Clips appears, use a new output folder and run the two-clip test.
- Count the results and play both. You need two separate files with the intended edits, captions, overlays and audio, rather than one combined sequence or a different layer mix.
- Use that route for the real selection only if the test produces what you need. Check the real outputs too.
If the batch command is missing
Export one range at a time. Mark the first clip, give it a distinct name and finish its export. Then select the next clip, mark the new range again and repeat. Keep the same output settings unless the delivery needs different ones.
Names such as 01-intro.mp4, 02-demonstration.mp4 and 03-result.mp4 keep a short sequence in order when sorted by name. These examples assume MP4; use the extension that matches the format you selected. For a larger set, record each file's expected duration and whether you have checked it.
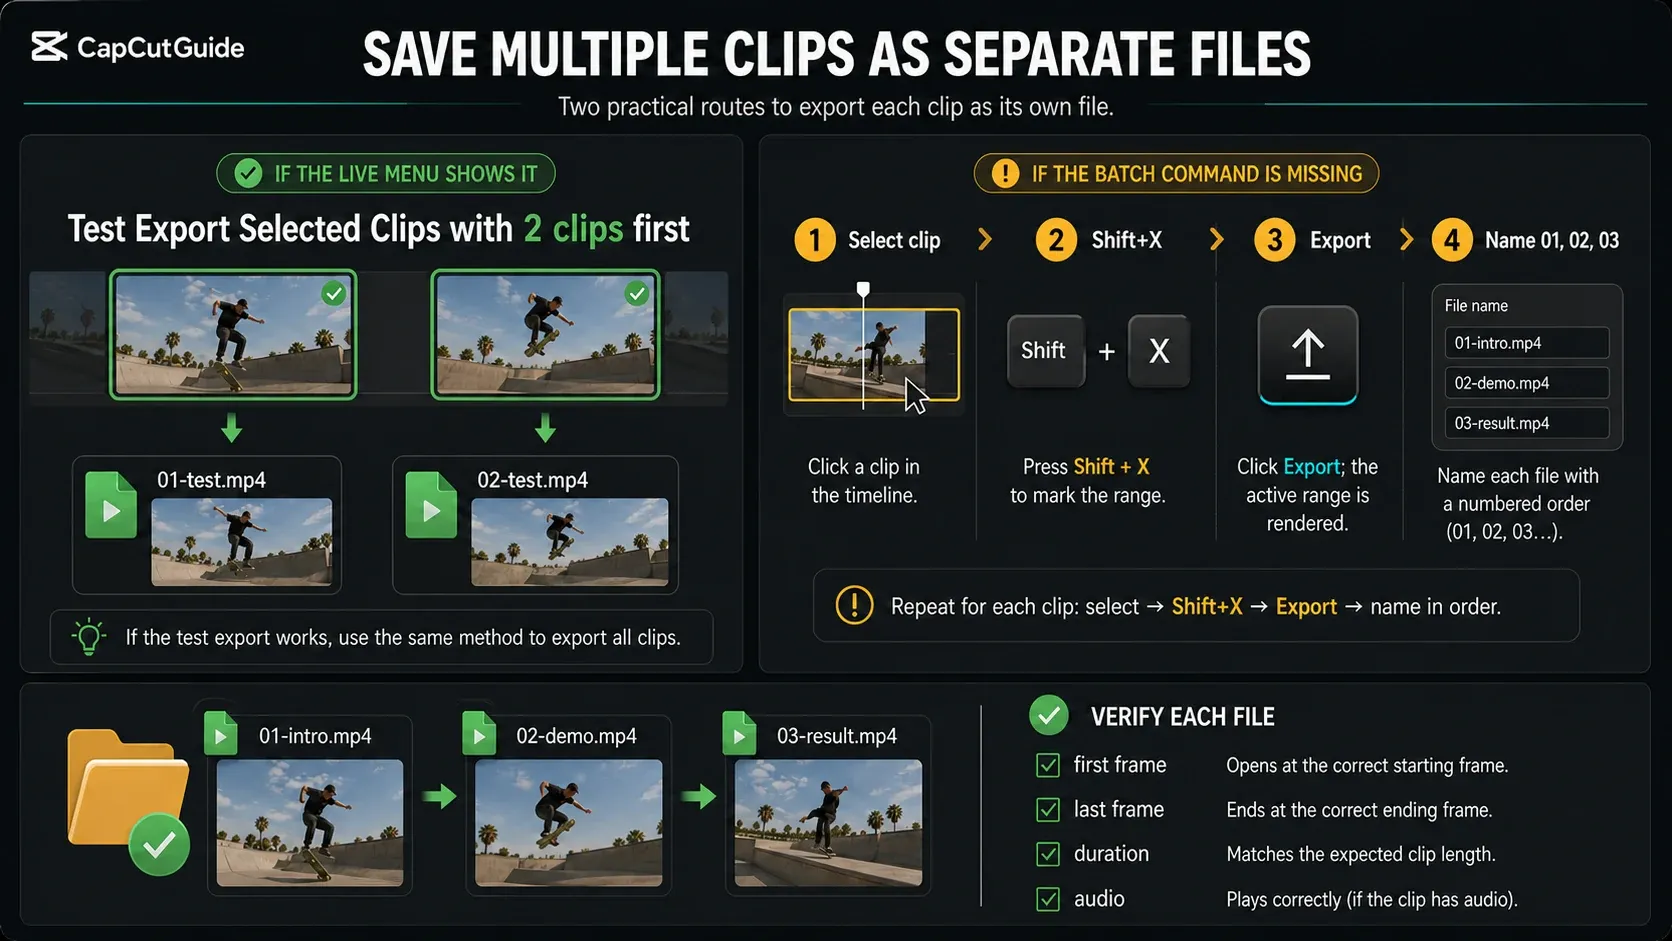
Compare the completed folder with your intended clip list. Repeated manual exports can handle individual deliveries, but they will not run unattended as a batch queue.
Mobile and Web: use a copy if no range tool is available
The keyboard instructions above come from Desktop documentation, not a verified universal Mobile or Web route. Check your editor's own controls first. If it has no suitable range tool, trim a separate working copy instead:
- Return to the project library and inspect that project's menu for a duplicate or copy action. Use it only if available. CapCut recommends duplicating before major changes, but the location and wording vary.
- Give the copy a distinguishable name where possible. Open it, check its media and tracks, and confirm that the original is still a separate project containing the full edit.
- In the copy only, trim or remove material outside the desired section. Check all tracks: audio, text or overlays can extend past the main video.
- Export the copy, inspect the saved file and leave the original and source media untouched.
If you cannot make and verify that separate copy, stop before removing material. Do not rely on undo after closing an autosaving editor, and do not clear app data as part of this workflow.
Moving a finished video to Desktop will not restore its original layers. CapCut explains that an exported video is flattened when re-imported: its captions, effects and tracks are no longer independent project elements. Use an editable-project transfer only when you have verified it opens correctly on the destination.
Fix the wrong section or result
The whole timeline exports
A clip may be selected without an export range being active. Check the correct project and timeline, mark the range again and inspect its highlight. If the export panel displays duration, compare it with the intended section. Check shortcut assignments if nothing changes; selection alone does not identify the cause.
Only part exports when you wanted everything
Start with the full-range reset above. If the range and proposed duration are correct but the file is still incomplete, treat it as an export failure rather than repeatedly changing selection. The stalled-export checks cover control projects, range tests and error messages.
Music, captions or an overlay appear unexpectedly
Inspect every active track across the range, including the ones above and below the selected video clip. CapCut's overlapping-caption guidance illustrates why extra text layers can appear together. Mute, hide or remove unwanted additions in your working copy using the controls it provides, then check the new file. Leave the master unchanged.
You cannot find the file
Confirm that the export finished and check its chosen destination. Use Open folder if the completion screen offers it, or search for the filename; these are the routes in CapCut's file-location help. Do not assume every installation saves into the same folder.
The right section exports, but it looks soft
That is a different problem from choosing the wrong range. Open the local file before judging an uploaded copy, then use the blurry-export guide to compare source quality and output settings.
Check the files before handing them over
Open every completed file outside CapCut. For each one, check:
- the intended first frame, last frame and duration;
- picture, sound and sync throughout, including cuts;
- captions and other layers near both boundaries;
- the name, file format and destination;
- the number of outputs against your clip list.
A test made with different settings is not the final delivery. If you change the frame rate, resolution or layer mix, play the new export too.
CapCut selected-clip export FAQ
Can CapCut export only one selected clip?
Yes, its documented Desktop workflow uses an export range. Select the timeline clip, press Shift+X and inspect the highlighted boundaries before using Export. Use I and O if you need to adjust the interval.
What does Shift+X do in CapCut?
It is the documented shortcut for selecting a clip range. Check the highlight and your current shortcut assignment. Selecting the clip alone is not the same as setting its export range.
Can CapCut export all clips as separate files?
Use Export Selected Clips only if it appears in your app and passes a two-clip test. Check the output count and layer mix. If it is missing, export each marked range separately; one In/Out range is not a batch queue.
How do I export part of a clip?
Position the playhead at the desired start and press I, then at the end boundary and press O. Inspect the range and export. Check the saved first and last frames and adjust a boundary if necessary.
Can I export a selected range on Mobile or Web?
Do not assume Desktop shortcuts apply. Use a suitable range control if your editor provides one; otherwise create and verify a separate project copy before trimming it. Stop if you cannot keep the original and its media safe.
Why is CapCut exporting only part of my project?
An earlier range may still be active. Clear it with your available range controls or set In and Out around the full intended timeline. Check the proposed duration and the completed file. If the range is correct but the file is incomplete, investigate export failure.
Does range export preserve editable layers?
No. The rendered video contains the visible and audible result. Importing it again does not restore its captions, effects and tracks as separate project elements. Keep the editable project and original media.