

To move a CapCut project without losing its editable layers, upload the project to an available Space and open it on the destination device. Keep the original until you have checked the transferred timeline, source media and export. For a desktop backup, also copy the complete draft folder and its source files to separate storage—but do not mistake that file copy for a proven transfer.
What to keep before you move the project
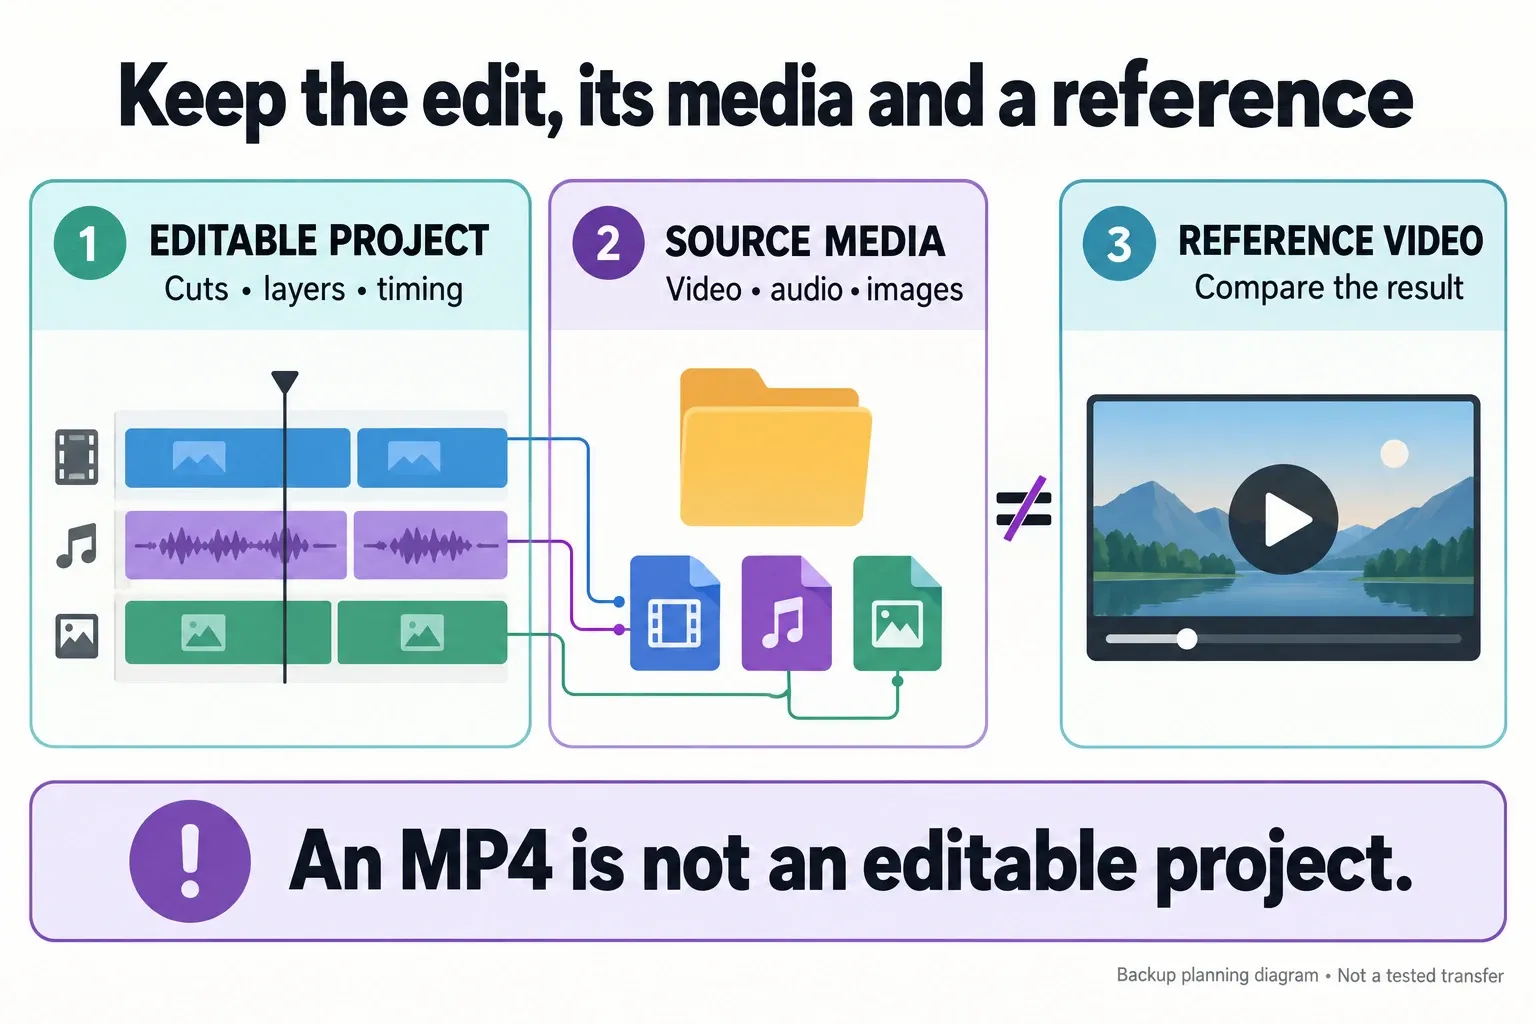
You need the editable draft and the media it uses: video, photos, voiceovers, music and graphics. If the original can export, keep a reference video too. Add a short note with the CapCut version, operating system, font names and any paid or licensed assets the next editor will need.
Choose the route that fits the move
| You need to… | Start here | What this does not prove |
|---|---|---|
| Continue on another device | Upload the editable project to Spaces, where supported. | A project card alone does not confirm that its clips and effects work. |
| Keep a desktop safety copy | Copy the draft folder and media to separate storage. | A raw folder is not a guaranteed importable project package. |
| Let someone else edit | Give the recipient project access in the intended Space. | A review link or MP4 does not hand over the original layers. |
Back up and transfer through Spaces
CapCut's saved-project instructions describe Spaces for cross-platform access. Do not assume that signing in uploaded every local draft. Check the specific project.
- Save the edit on the source device. Return to its project library after saving normally. Keep the original and its media intact.
- Upload the editable project. Use the project's available Upload, Project sync or Space control. Select the intended Space and check upload permission and available storage. Uploading an MP4 as media is not the same operation.
- Wait for the upload to finish. Keep the app and connection available. Resolve any upload or quota error before relying on the cloud copy.
- Open that Space on the destination. Use the owning account—or an accepted invitation with edit access when handing the project to someone else. Open the project as an editable timeline.
- Verify a working duplicate. Follow the full checklist below: timeline, copied media, fonts and effects, saving, and export. Keep the original while you check the result.
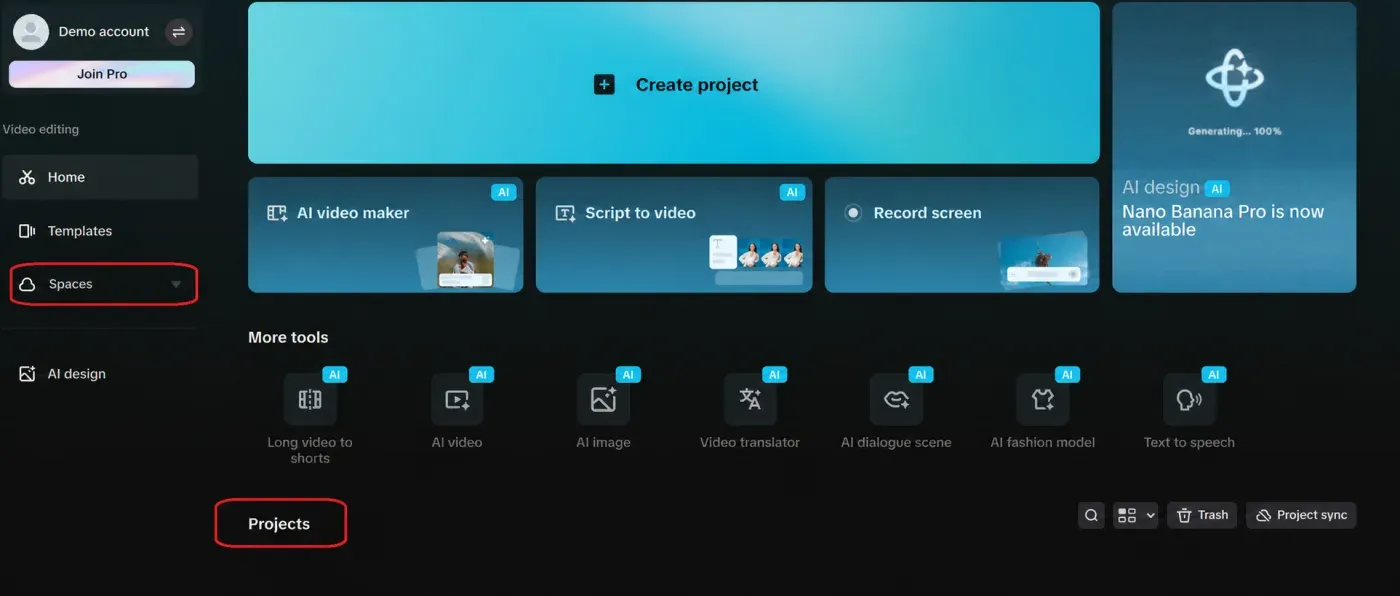
Check capacity before a large upload. CapCut's new-Space storage notice says newly created Spaces have no complimentary capacity and may show a 1 KB placeholder. Existing accounts and purchased storage can differ. Use the allowance displayed in your Space, not an old tutorial's 5 GB meter.
If the Space will not load, check the selected account, connection and supported app version. Preserve local drafts before an update. An inaccessible Space is not, by itself, evidence that the project was deleted.
An empty account may be the wrong account
Google sign-in and email-and-password sign-in can lead to different CapCut accounts even when the email address looks identical. Follow CapCut's cross-device login instructions: use the original method, or a login you deliberately linked to that account. QR sign-in from your signed-in phone can help you reach the account; it does not upload local drafts.
Keep the old device signed in while you check. If the new device shows an empty library, retry the original login route there instead of deleting either account. Our CapCut login guide covers account-access problems.
Back up desktop files without cloud storage
This preserves files; it is not a universal restore procedure. A draft can depend on source files outside its folder. If you do not know which folder belongs to the project, first find its actual draft location. The current default save folder may not contain an older edit.
- Save the working project and close CapCut normally. Do not change the save-location setting as a migration step.
- Copy the complete draft folder to a dated folder on separate storage. Copy—do not move the only version or overwrite another project library.
- Copy its source video, audio, photos and graphics too, preserving filenames and subfolders. Open a selection of the copied files to check that they are usable, not just cloud placeholders.
- Add the reference export, if available, and the version, font and asset notes. Keep this archive separate from the device you plan to replace.
What if the copied folder does not appear on the new computer? Leave both copies intact. Folder presence alone does not register a project or repair file paths. Even the third-party CapShare project's packaging documentation describes path and project-index work beyond simply copying files. That is evidence of the dependencies, not a recommendation to install the tool; we have not tested or verified it.
Do not rename draft JSON files, merge libraries or overwrite a project index to force the edit to open. A ZIP can preserve files without being a package CapCut can import. If your installed version has no documented import route for the copy, use a working Space transfer from the intact original or ask CapCut support about that specific version. We have not verified a universal raw-folder restore method.
A newer draft may also be incompatible with an older app, and matching version numbers do not guarantee matching fonts, effects or account access. Test on the destination before giving up the working installation.
Moving to a new iPhone or Android phone
Use the Spaces procedure above when project upload is available, and preserve the original camera clips separately. Keep a phone backup as an additional safeguard—not as proof that the CapCut timeline will restore. Apple includes eligible app data in iCloud Backup; Google explicitly warns that not all apps back up or restore all their data.
A file in iCloud Drive or Google Drive is different from a device backup. Neither route turns an arbitrary draft folder into a supported cross-platform import. Modern Android also restricts access to app-data folders, so do not depend on an old file-manager tutorial.
Do not uninstall as a transfer step: Android removes app-specific files on uninstall, and Apple's Delete App action removes related data. Offload App retains data on that iPhone, but it is not a second copy. Keep the old phone intact if the new one cannot reproduce the edit.
Handing the editable project to another person
Invite the recipient to the intended Space. Check that they accepted with the correct account and have an editing role; a pending invitation or view-only link is not enough. CapCut's Teams access guidance explains the membership requirement.
If your editor offers Transfer editing permission, the documented handoff is to open the project, open its … menu, choose that command, select the recipient and confirm. Ask them to open and edit a duplicate before you leave. Do not assume every plan or editor supports simultaneous editing; check the controls available to both people.
Agree who owns the Space, who keeps the archive, which export is the approved reference, and whether the recipient can use the required fonts, music and paid assets. Before leaving a team, preserve only the work you are authorized to keep: leaving can remove access to team projects and assets.
Why the MP4 is not enough
An exported MP4 preserves the rendered picture and sound, not the original editable text, masks, keyframes and audio tracks. CapCut's instructions for reusing an exported edit explain that it returns as one clip. Keep a reference export for comparison, but do not send it when the recipient needs the original layers.
Check the project on the destination
Run these checks on a working duplicate, not your only original or a teammate's live edit. An early sample export can catch problems quickly. It cannot verify the rest of a long project.
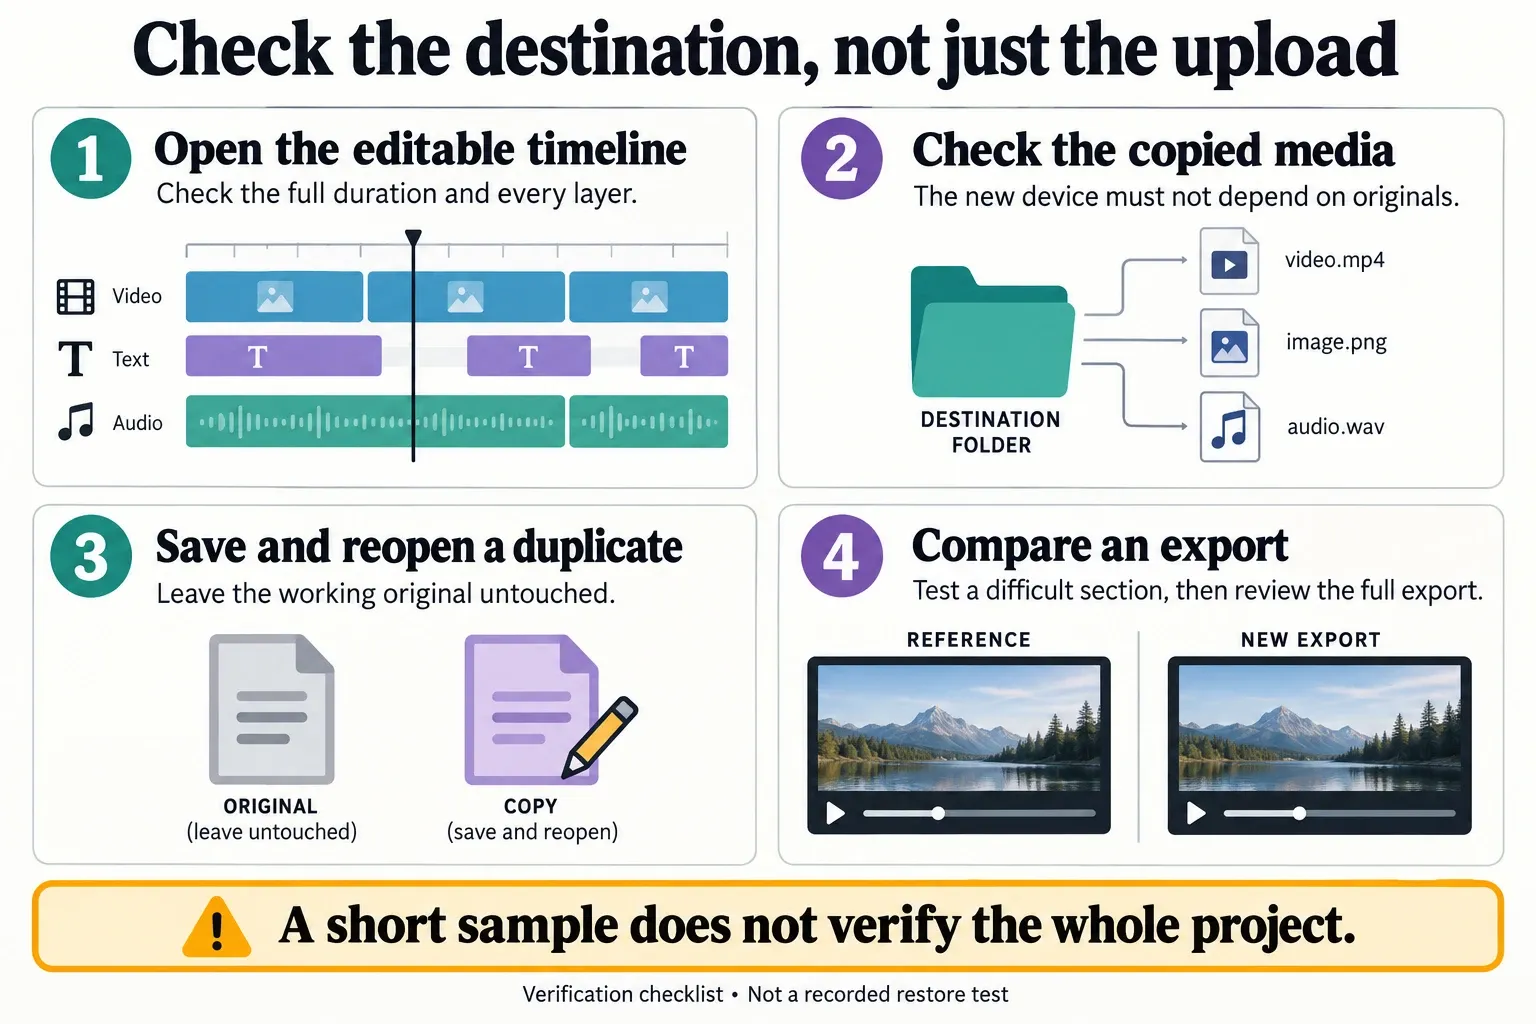
- Review the full timeline. Compare duration, layers, captions and transitions with the original. Inspect all sections, not just the opening frame.
- Check the copied media. Confirm the destination can use the preserved source files. A project reopened on the old computer may still be reading the originals. Do not delete or rename those originals just to test the backup.
- Check fonts, effects and access. Look for substitutions, missing downloads and unavailable paid assets. The recipient needs their own appropriate access and usage rights.
- Test saving. Make a harmless change to the duplicate, close it normally, reopen it and confirm that the change remains.
- Compare the export. Start with a difficult section containing captions, overlays, speed changes and layered audio. Watch it outside CapCut beside the reference, if available. Review the full final export before delivery or retiring the old device.
A real PC-to-phone transfer report describes missing video after the user uploaded a project to a Space. The cause was not established; it illustrates why a completed upload is not the last check.
If clips are missing, preserve both copies. Use a relink control only if your build offers one, on a duplicate, and point it to the copied source files. Importing clips again does not guarantee their old timing returns. Do not delete placeholders or overwrite the original while investigating.
Keep an archive after the move
Keep dated project and media copies outside the device you might erase. Avoid replacing your only known-good archive every time you save an edit. Autosave protects ongoing work, not necessarily an earlier version you want back.
A synced Space is not an independent archive either: CapCut says deleting a Web project affects linked devices. Retain a separate recovery point and recheck important archives periodically, especially before changing devices or app versions.
Frequently asked questions
Does CapCut automatically back up projects?
Do not assume every local draft uploaded because you signed in. Autosave is not an independent archive. Check the intended Space, upload completion and editable timeline on the destination, then verify media, saving and export.
Can I transfer a CapCut project from phone to PC?
Use Spaces when project upload and enough storage are available to your account. Open the project on the PC with the same account, then check the full timeline, media, effects, saving and export. Keep the phone copy if the PC cannot reproduce the edit.
Can I transfer a CapCut project without exporting it?
Yes, an available Space can carry the editable project without flattening it to MP4 first. A reference export is useful for comparison, not the transfer itself. A copied desktop draft folder is a preservation copy, not a guaranteed cross-device import.
Can I copy a CapCut project folder to another computer?
You can preserve the complete draft folder and source media after saving and closing CapCut. Another installation may not recognize the folder or its file paths. Do not overwrite its library or rename JSON files to force it; keep the working original while checking a supported transfer route.
Why is my CapCut project empty on the new device?
Check the account, selected Space and upload status first. If the timeline opens but clips are missing, check the copied source files and any available relink control on a duplicate. Do not delete placeholders or the original project while investigating.
Is CapCut cloud storage enough for a long-term archive?
No single synced service should be your only archive. Keep dated project and source-media copies in another location you control, plus a reference export when available. Recheck important archives; deletion, account access and unavailable assets can affect reopening.
Can I back up CapCut projects for free?
Copying desktop draft folders and media does not require a CapCut cloud subscription, but you need separate storage. It does not prove the files will reopen on another device. Newly created Spaces have no complimentary capacity under CapCut's current notice; check your account's allowance.
Can I use iCloud or Google Drive instead of Spaces?
They can hold source media and copied desktop files. Phone device backups are a separate process and may not restore every app's data. Neither is proof of a successful CapCut transfer until you verify the restored editable timeline and its dependencies.
Checked September 12, 2026 against current CapCut Help, Apple and Android documentation. We did not perform a new cross-device restore test for this revision. The Spaces image is an anonymized Help illustration; the other inline images are editorial diagrams, not proof that a transfer succeeded.