


On CapCut Desktop, pause on the frame you want, open the menu near the Player and choose Export still frames. Pick PNG or JPEG, save the file and open it outside CapCut. This is separate from exporting a video. For the full edit around that still-image output, our CapCut tutorial for beginners connects framing, timing, audio and export lessons.
On a phone, look for Frame Capture under All tools on the home screen. It uses a saved video where available; do not assume every Mobile build has it. If you cannot find it, the Desktop and Mac alternatives below give you another way to get the picture.
First decide which picture you need. For the original scene, use the source video. For a frame with your CapCut captions, crop or graphics, use the edited timeline or its finished video. Extracting the camera file will leave those additions out.
Documentation and reported workflows checked September 12, 2026. Menu names can shift between app builds, so follow the labels in your version.
Choose the route for your device
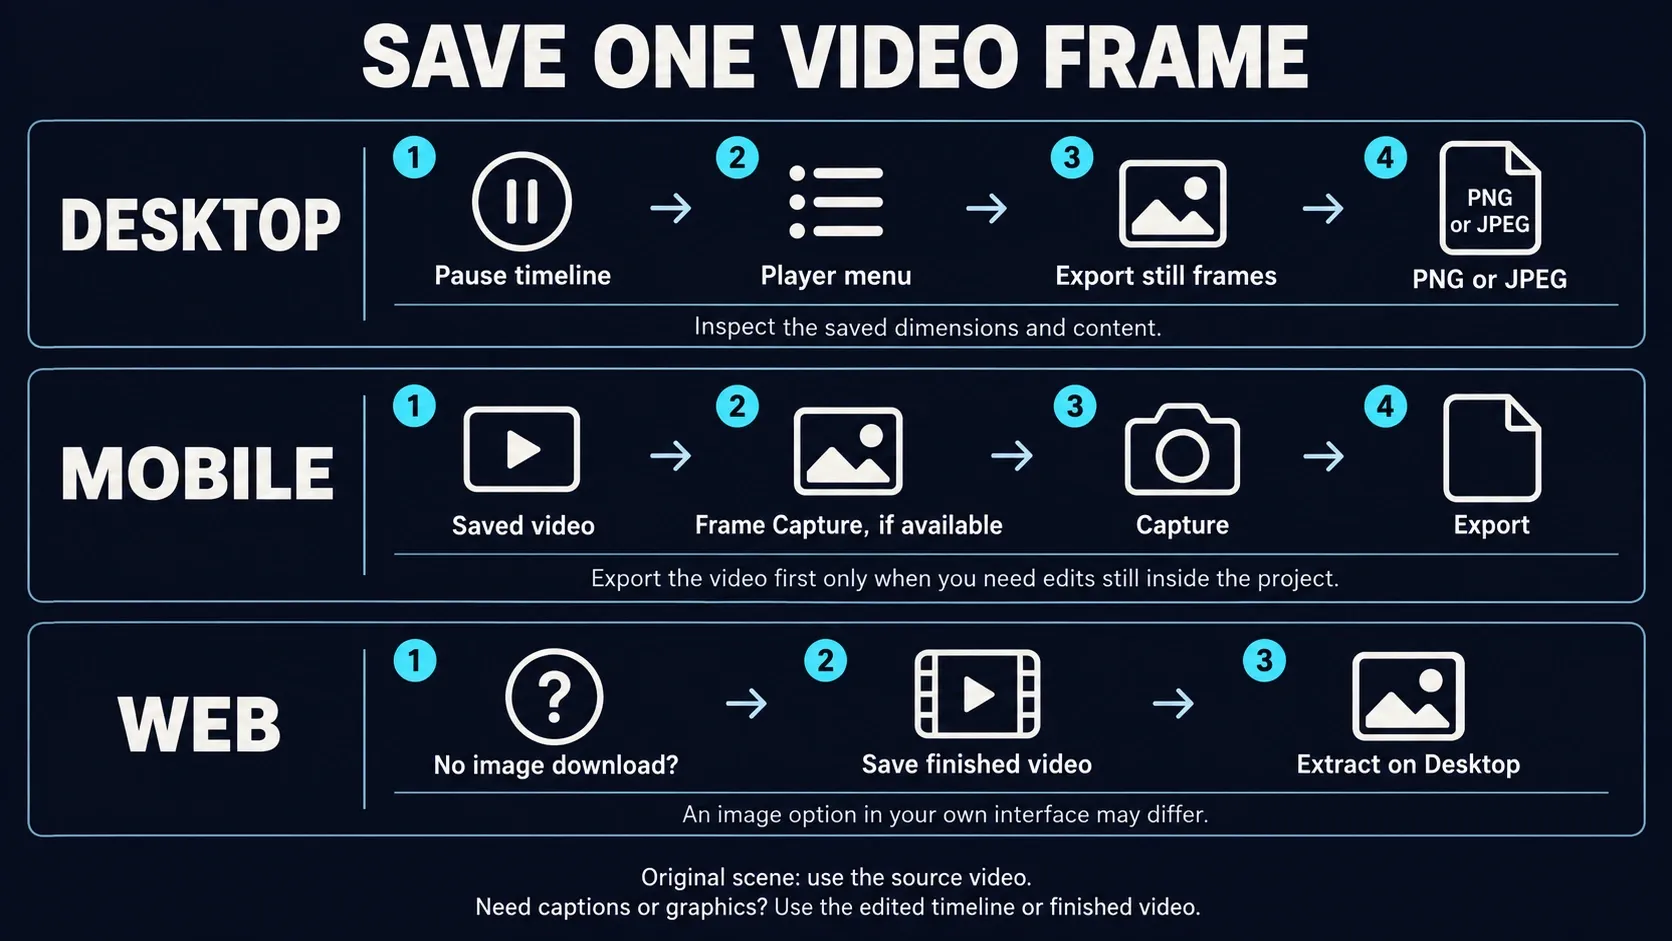
- Windows or Mac: use Desktop's dedicated still-export command for a frame from the timeline.
- iPhone or Android: try Frame Capture only if it appears in your tools. Check the saved image's dimensions and format instead of expecting Desktop's choices.
- Web: use an explicit image-download option if your interface offers one. Otherwise download the finished video and extract its frame on Desktop.
- A quick reference: a cropped screen capture may be enough for a message. Judge the actual crop at the size you will use it.
Export a frame on CapCut Desktop
CapCut's Desktop instructions identify the still-export menu near the Player. The vendor's frame-export example also shows a destination, resolution selector and image-format field.
- Open the intended video on the timeline. Use the source clip for the original scene, or keep the project’s intended layers visible for the edited picture.
- Pause on the wanted moment. Zoom the timeline and compare nearby frames before settling on one.
- Open the menu near the Player and choose Export still frames. Check that this is the image dialog, not the video-export window.
- Enter a distinct filename, check the destination and choose the available resolution and PNG or JPEG format. Export the image.
- Open the saved file in an image viewer outside CapCut. Check the moment, pixel dimensions, orientation, text and overlays. Keep the source video and project.
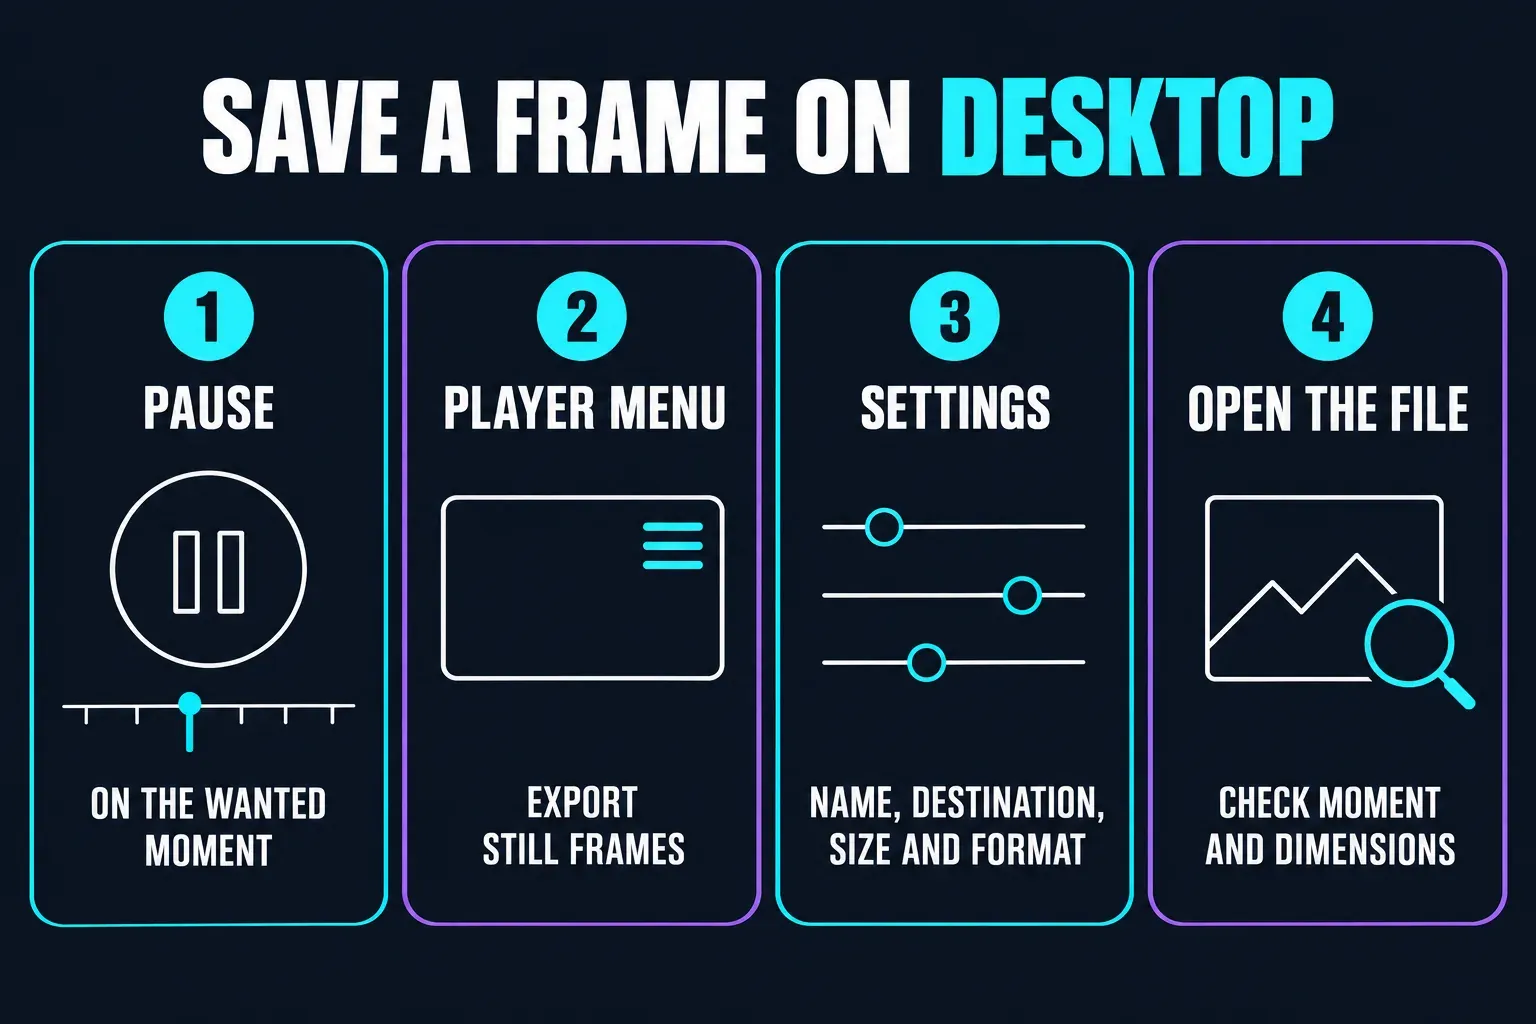
Pick the resolution from the options in your own dialog; a value shown in a tutorial is not a maximum-resolution claim. Likewise, an optional import-to-project switch is not proof that you have found the file on disk.
Spend a moment on frame selection. In a product video, the clearest label may be a few frames before the shot you first picked. With a talking head, compare nearby expressions. Wait until an animated title has settled if you want the full wording in the image. Pausing playback cannot remove motion blur already recorded by the camera.
For a thumbnail, save a useful source frame here, then build the title and layout with the CapCut YouTube thumbnail guide. If you already have the picture and only need to crop or adjust it, start with the photo-editing guide.
Save a frame on iPhone or Android
Mobile instructions are less consistent. CapCut's resource above describes a Cover workflow, while firsthand reports in this r/CapCut discussion describe a separate Frame Capture tool. The thread also contains reports of controls changing or disappearing. Treat these as routes to check, not a promise about your phone.
If All tools → Frame Capture is present, the reported sequence is:
- Choose a video already saved on the device. Export your edit first only if it contains changes you need in the photo.
- Select that video in Frame Capture and tap Next.
- Move to the moment you want and tap Capture.
- Tap Export, then open the resulting picture in the gallery. Inspect its dimensions and file type.
Do not infer a fixed resolution limit from another user's result. If your app offers no quality setting, the saved file is what you need to check. A photo suitable for a small message may not hold up when tightly cropped.
If Frame Capture is missing
Check the home-screen tools as well as the editing toolbar. An official-store update may change the interface, but it does not guarantee this tool will appear. Do not clear app data or reinstall just to look for it.
For an independent image file, transfer the saved video to a computer and use Desktop still export. On a Mac, Photos is another option, subject to the privacy check below. For a rough reference, take a screen capture and crop out playback controls.
If the app says it saved a picture but you cannot see it, check the location shown during export and the gallery's recent items. Do not delete the source video while you are still trying to find the output.
What to do in CapCut Web
The documentation checked here does not establish one still-export button shared by every Web interface. If yours explicitly offers an image download, try it and check the file. Otherwise, download the completed video and open it in CapCut Desktop.
Use the finished download when you need your Web edits included, not the original upload. For the video settings involved, see the CapCut export hub. If the download itself stalls or fails, work through the export-failure checks before troubleshooting the still.
Mac Photos: export a still, then convert it
Before importing private footage, check whether the Photos library syncs to iCloud. Apple's Photos settings documentation explains that iCloud Photos can upload photos and videos and make them available on other devices. A saved local video can enter that sync when you import it. If the footage must stay local, use a workflow you have verified does not sync it; do not import it into a synced library as a shortcut.
When the library is appropriate for the footage, Apple's Mac still-photo instructions give this route:
- Open the video in Photos on Mac and move the playhead to the wanted frame.
- Choose File → Export → Export Frame to Pictures.
- Find the TIFF named Frame [date] in the Pictures folder.
Need PNG or JPEG? Open the TIFF in Preview, choose File → Export and select the format, following Apple's image-conversion instructions. Save a separate copy. Renaming .tiff to .png does not convert it. These are Mac commands, not instructions for the iPhone Photos app.
PNG or JPEG: which should you choose?
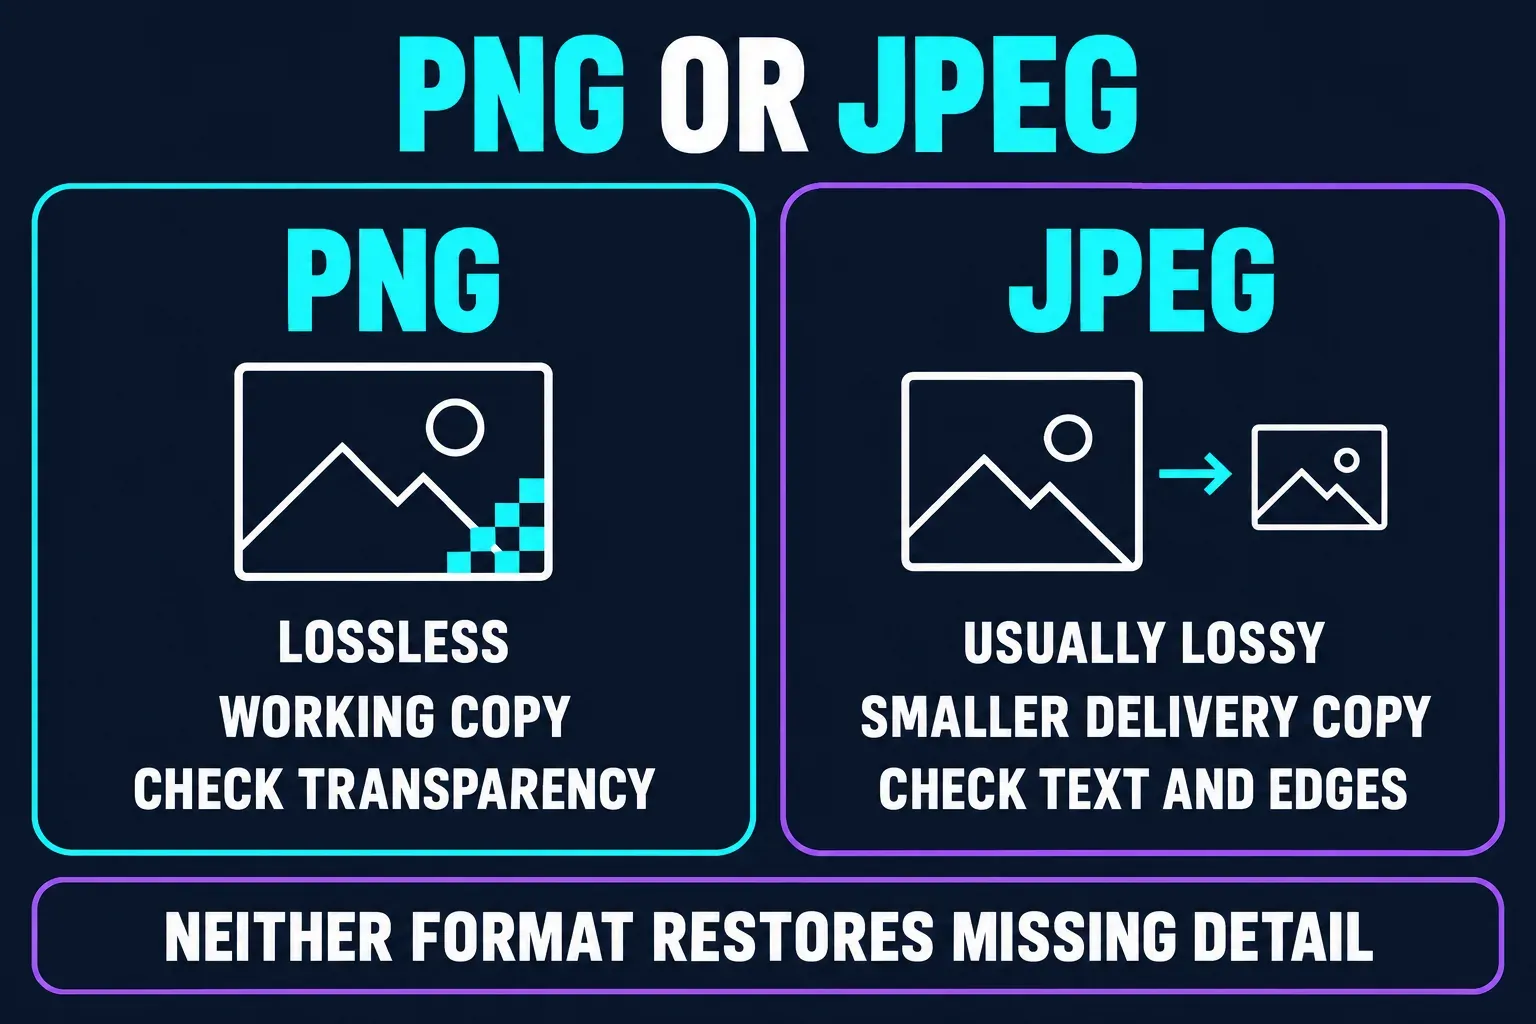
Use PNG as a working copy when you expect more edits. The PNG specification defines lossless compression and optional transparency. That means PNG can preserve the image data being encoded; it cannot restore detail already lost in the video.
JPEG often makes a smaller delivery copy for a photograph. Its usual compression is lossy, as explained in MDN's image-format reference. Check small lettering and edges after saving, and keep an original working copy rather than repeatedly recompressing your only image.
Transparency needs a separate check. Selecting PNG does not prove CapCut exported an alpha channel. Open the file in an editor that supports transparency and inspect it against both light and dark backgrounds. A black background in one viewer alone does not settle the question.
Neither format guarantees print quality. Ask the printer for the required pixel dimensions, format and colour profile. Enlarging a small video frame changes its size, not the detail the camera captured.
Why a screen capture can look softer
A screen capture records the displayed picture. If the video occupies a small preview panel, cropping that capture does not give you the source video's full pixel dimensions. Scaling it up later cannot recover the missing detail.
That does not make every screen capture unusable. For a message or layout reference, inspect the crop at its intended size. For a close product crop or small lettering, compare it with the direct still export before choosing.
Cover, freeze frame and image export are different jobs
- Cover: sets poster or thumbnail artwork. Some published workflows describe saving an image too; confirm a standalone file rather than assuming that happened.
- Freeze frame: holds a moment within the video. It is useful when you want playback to pause on that shot.
- Still export or Frame Capture: aims to produce a separate picture that you can attach, open or edit elsewhere.
Setting project artwork is not proof that a separate photo was saved, or that every video player will use it as its thumbnail.
Fix a wrong, black or blurry frame
The moment is wrong
Check the source file and timeline, compare neighbouring frames, then let the paused preview finish updating before saving again. If the problem occurs in one clip only, preserve its original and investigate that clip separately; do not convert the whole project on a guess.
The saved image is black or blank
Check that the playhead is over visible media rather than a gap. If an effect seems involved, test with it disabled in a verified duplicate project, not your only working copy. A black result is a symptom, not proof of a particular codec or graphics-driver fault.
The picture is soft
Compare nearby frames, inspect the original video's focus and check the saved dimensions. If the whole rendered video is soft, use the blurry-export troubleshooting guide. Switching between PNG and JPEG will not fix recorded motion blur.
Captions or graphics are missing
Use the edited timeline or finished video, not the unedited camera file. Check the intended tracks are visible and pick a moment when the graphic has appeared.
The Desktop command is missing
Confirm you are in the Desktop editor with media on the timeline and inspect the menu near the Player. An original user-reported shortcut method describes finding Export still frame in Shortcuts → Basic and assigning a key combination. Check your own shortcut panel: that report does not establish a universal default key.
Need more than one frame?
For a handful of images, save each chosen moment with a distinct name, such as product-front.png and product-label.png. Check that a later save has not overwritten an earlier one.
Extracting every frame or one image at fixed intervals is a different job. The vendor's image-sequence article shows a still-export dialog, but that dialog alone does not demonstrate an automatic batch or interval control. Do not plan a large extraction around an unverified button.
Keep the source video and editable project. A still gives you one chosen moment; it does not preserve the option to change the timing, crop or layers later.
CapCut frame export FAQ
How do I export a frame from CapCut on PC or Mac?
Pause on the wanted timeline moment, open the menu near the Player and choose Export still frames. Select the available resolution and PNG or JPEG format, save, then inspect the image outside CapCut.
Can I save a frame as a photo on iPhone or Android?
Look for All tools → Frame Capture on the home screen. Reported versions use a saved video, then Next, Capture and Export. Availability and output options vary; if it is absent, use a computer fallback or a cropped screen capture for a rough reference.
Does the Cover button save a separate image?
Do not assume so. Published instructions and user reports describe different behaviour. Confirm an independent image in the gallery or saved folder; setting project artwork alone is not enough.
Is freeze frame the same as exporting a still?
No. Freeze frame holds a moment inside the video. Still export produces a separate image for use outside the timeline.
Should I choose PNG or JPEG?
PNG is useful for further editing because its image compression is lossless. JPEG often gives a smaller photo for delivery. Neither restores lost video detail, and PNG does not guarantee a transparent background.
Why is my exported frame blurry?
Check whether the chosen moment already has motion blur or poor focus, then inspect the saved dimensions. Compare nearby frames. Changing the image format or enlarging the output cannot restore missing source detail.
Can CapCut Web export a still image?
The reviewed documentation does not establish a shared still-export control for every Web interface. Use an explicit image option if offered; otherwise save the finished video and extract its frame on Desktop.
Will using Photos on Mac keep the video private and local?
Not necessarily. Importing into an iCloud Photos library can sync the video. Check before importing private footage. Use a verified non-syncing workflow if it must stay local; the Mac still-export command itself does not establish privacy.