

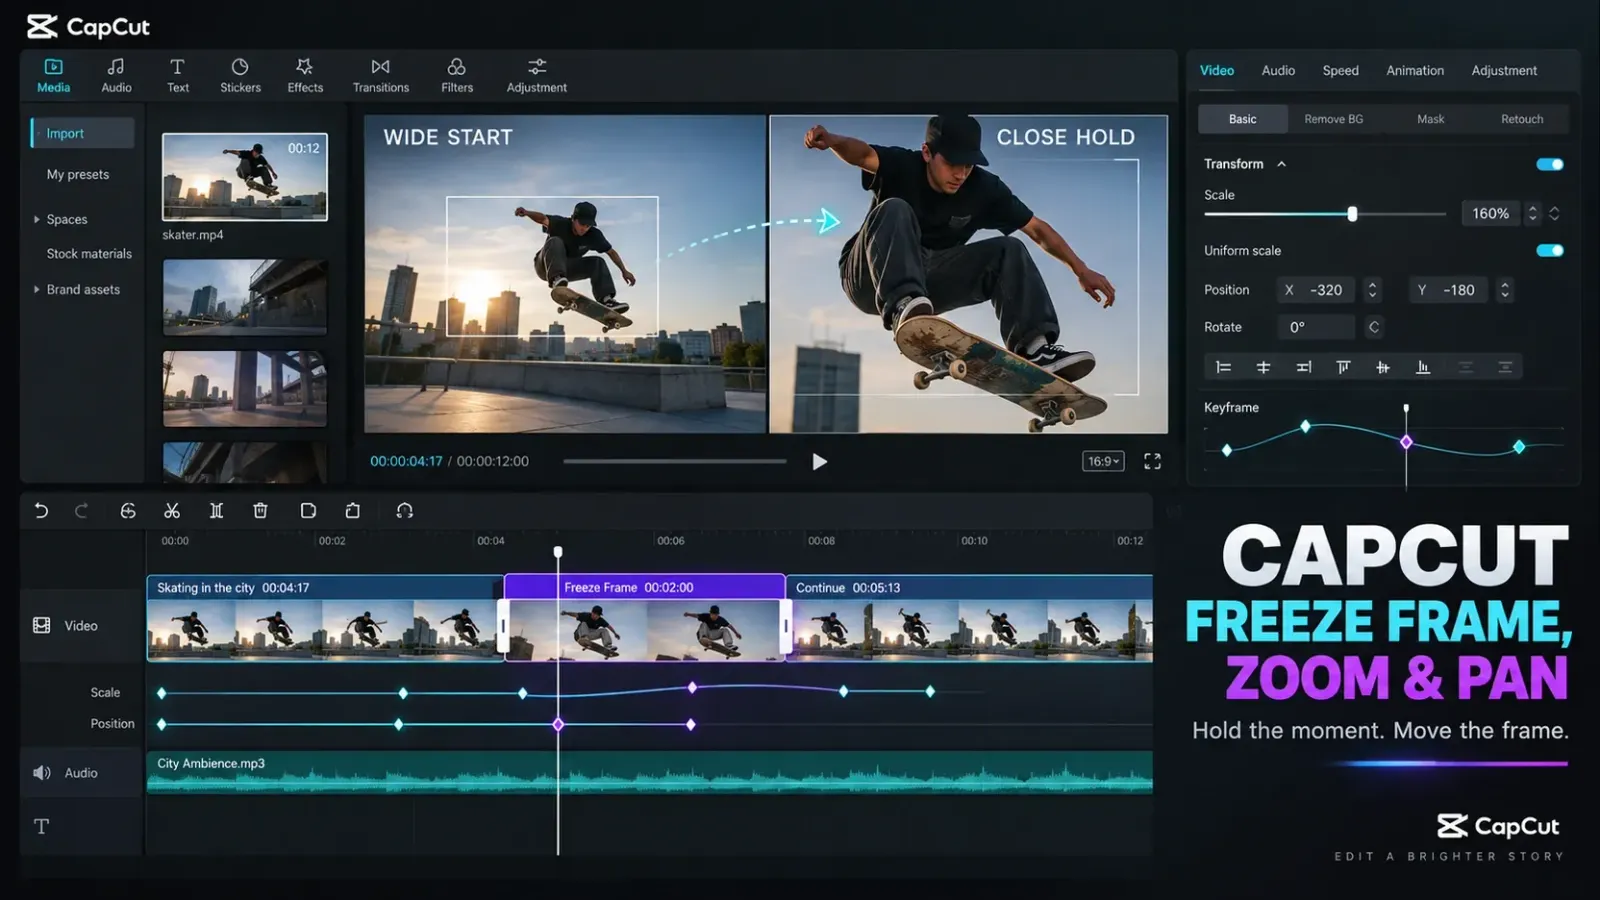
Checked September 23, 2026. CapCut moves controls between mobile, desktop and individual builds, so this guide follows the stable editing logic: place the playhead, create the hold, then animate Scale and Position when the frame needs to move.
To freeze a frame in CapCut, put the playhead on the exact image you want to hold, select the clip, and choose Freeze. CapCut creates a still segment at that point. Drag the segment's edges to set the hold length. For movement during the hold, add Scale and Position keyframes to the freeze segment: one state at the start and another later in the segment.
The key decision is whether the viewer needs a pause, a closer look, or a guided move across the image. Freeze stops time. Zoom changes the apparent distance. Pan shifts attention across the canvas. Combining all three works only when each one has a clear job.
Fast rule: freeze first, trim the hold to the right duration, then add motion. Trying to time the hold and the zoom at the same time makes both harder to judge.
Choose freeze, zoom, pan, or a combination
| Editing goal | Best method | Timeline logic |
|---|---|---|
| Stop on one moment | Freeze frame | A still segment inserted at the playhead |
| Keep part of a clip closer | Static Scale and Position | One fixed transform for the selected section |
| Push smoothly toward a detail | Scale and Position keyframes | A wide state followed by a close state |
| Move across a still image | Position keyframes, with optional Scale | Start and end framing on the freeze segment |
| Pause, move closer, then continue | Freeze plus keyframed zoom | Moving footage → animated hold → moving footage |
| Emphasize a fast cut | Zoom transition or effect | Preset treatment around a clip boundary |
A freeze frame is useful when the image itself needs time to register: a reaction, a product detail, a sports position, a label, a before-and-after comparison, or a moment that needs narration. A static crop is better when playback should continue normally but the composition is too wide. Keyframes are the right choice when the framing must change while the clip or freeze segment is on screen.
CapCut's official freeze-frame tool guide describes the basic hold workflow, while its keyframe guide identifies Scale and Position as properties that can change over time. The exact button location may move, but the relationship between playhead, segment and transform states remains the same.
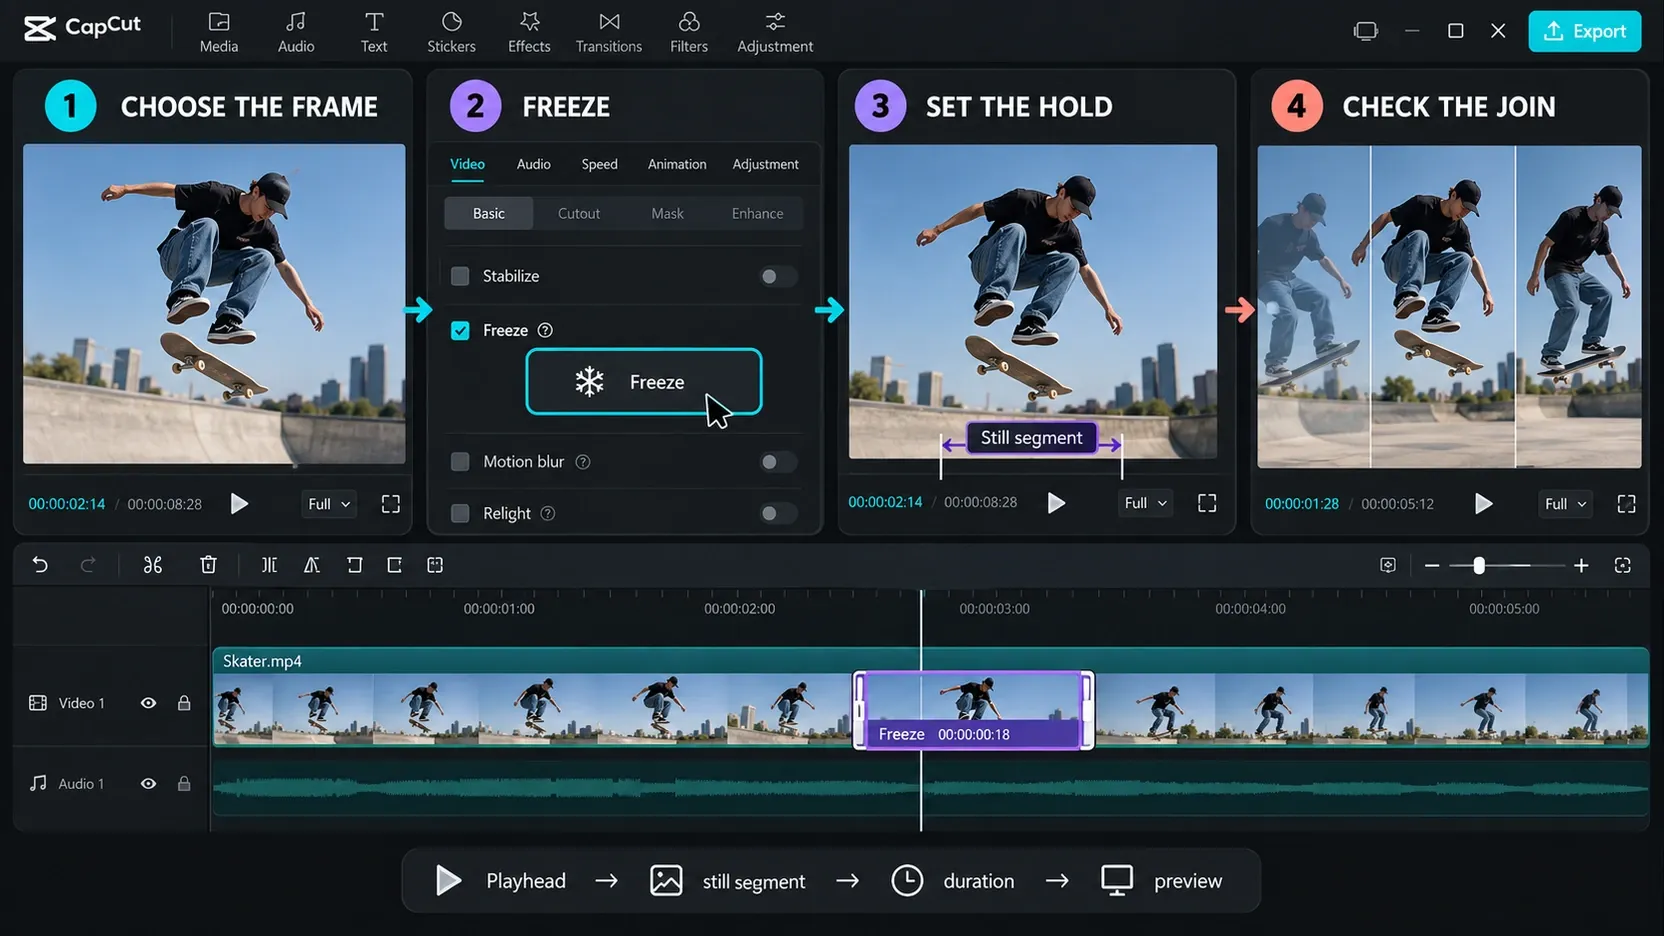
How to freeze a frame in CapCut mobile
- Add the video to a project and select the clip on the timeline.
- Scrub slowly until the playhead sits on the exact frame you want to hold.
- Open the clip tools and choose Freeze. You may need to swipe through the toolbar in some mobile layouts.
- Select the new still segment that CapCut inserts at the playhead.
- Drag either edge of that segment to shorten or extend the hold.
- Play from a few seconds before the freeze through a few seconds after it.
- Trim the adjacent clip edges if the action appears to repeat when playback resumes.
Frame choice matters more than hold length. A motion-blurred frame, half-closed eyes, or an in-between gesture becomes much more obvious when held still. Move the playhead a frame or two in either direction before creating the freeze if the first choice looks awkward.
If you struggle to land on the intended image, use the CapCut playhead guide to separate the active frame from the selected clip. The Freeze command uses the current playhead position, not the middle of the selected segment.
Set the right freeze duration
Start with the shortest hold that gives the viewer enough time to understand the point. A brief reaction accent may need less than a second. A labeled product detail or narrated explanation may need several seconds. Read the caption or narration aloud while the freeze plays; the still should not disappear before the thought is complete or linger after the viewer has understood it.
Music and sound effects can make the hold feel intentional. Keep the original audio running when continuity matters, or split and shape the audio separately when the freeze is meant to feel like a dramatic stop. The visual freeze does not automatically decide what should happen to every audio layer.
How to freeze a frame in CapCut desktop
- Select the video clip in the timeline.
- Move the playhead to the frame that should become the still.
- Use the current Freeze command in the toolbar or clip menu.
- Confirm that a separate still segment appears at the playhead.
- Drag the freeze segment's left or right edge to set the hold duration.
- Inspect the first and last frame around the inserted segment for a repeated gesture or jump.
- Preview the sequence with audio before adding text, zoom or effects.
Desktop provides more room for frame-by-frame placement and transform controls, but the same two checks apply: choose a clean source frame and inspect the edit on both sides of the still. If the wrong portion of the clip is selected or a nearby cut interrupts the workflow, use the split and trim guide to isolate the shot cleanly first.
Freeze frame versus exporting a still image
Freeze keeps the chosen image inside the video timeline as a segment. Exporting a frame creates a separate image file for thumbnails, graphics or use in another project. If you need the file rather than a timed hold, follow the separate guide to export a frame as an image in CapCut. Do not add a long freeze segment merely to capture a picture.
Add a zoom to a freeze frame
Once the hold duration feels right, animate the still segment itself.
- Select the freeze segment.
- Put the playhead at the start of the hold.
- Add a keyframe for the current Scale and Position.
- Move the playhead to the point where the close-up should be reached.
- Increase Scale and adjust Position so the intended detail stays framed.
- Play the move and change keyframe spacing to control speed.
- Check the maximum scale for blur and every edge for exposed canvas.
More distance between keyframes makes the same transform change slower. Less distance makes it faster. Keep the endpoint framing unchanged while judging speed; otherwise you are changing motion distance and duration at the same time.
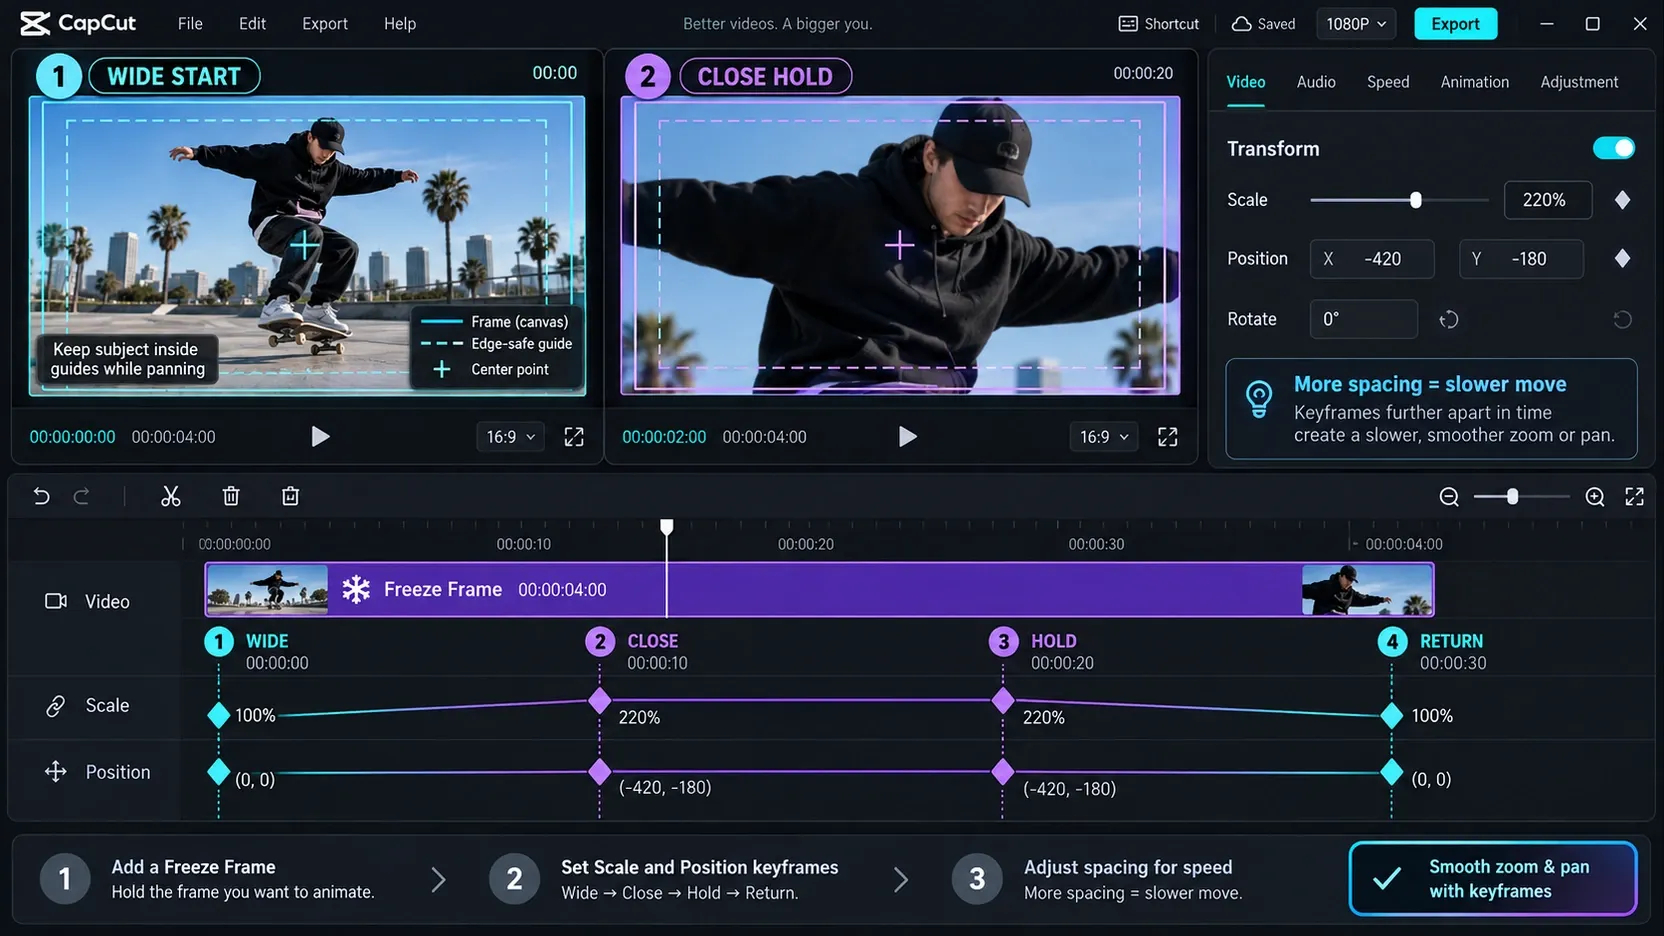
Zoom in, hold, then zoom out
Use four transform states when the close-up needs its own pause:
- Wide start: the original Scale and Position.
- Close-up reached: enlarged and repositioned.
- Close-up held: the same values as state 2.
- Wide return: the original values restored.
The gap between states 2 and 3 creates the close hold. The first and last gaps control the speed of the move in and out. Matching the opening and ending values prevents the frame from returning to a slightly different composition.
For a faster editorial punch, you may not need animated movement at all. Split the section and apply a fixed close crop, or cut directly from wide to close. Motion should clarify the moment rather than decorate every pause.
Pan across a frozen frame
A pan is a Position change across time. It works well when a still image contains two meaningful areas: a face and an object, a before and after, a headline and a result, or two people whose reactions matter in sequence.
- Select the freeze segment and set a modest Scale that leaves room to move.
- Add a starting Scale and Position keyframe.
- Frame the first point of attention.
- Move the playhead later in the freeze segment.
- Change Position to frame the second point of attention.
- Add a small Scale change only when the move also needs to feel closer.
- Check all four edges through the entire movement.
Zooming in too far before a pan leaves little usable canvas and makes black edges more likely. Set the route first: decide where the move starts, where it ends, and which edge has enough image area to support the shift.
Create a Ken Burns-style move
For a restrained photo-documentary look, combine a slow scale increase with a gentle diagonal position shift. The movement should be visible when compared with the first frame but quiet during normal playback. If the motion calls attention to the tool instead of the subject, reduce either the Scale change or the Position distance.
CapCut's official zoom guide covers pinch scaling and keyframe-based movement. On desktop, the same idea usually appears in the selected clip's Video, Basic or Transform controls. Labels and panel order can vary by build.
Keep the subject framed during motion
Two keyframes work when the subject stays in roughly the same place. A moving subject in the original video may drift out of the intended composition during an animated zoom. Add the fewest intermediate Position keyframes needed to correct that drift.
- Build the main start and end states.
- Scrub to the point where the subject moves farthest from the intended framing.
- Add a Position keyframe there.
- Recenter the subject without changing Scale unless the story requires it.
- Replay the entire move and remove correction points that create wobble.
A freeze segment has no independent subject movement, so two Position states are usually enough. Any apparent drift in a freeze animation comes from the path you created, not from the subject itself.
The broader CapCut keyframe guide explains property animation beyond this workflow. For a freeze move, Scale and Position are normally sufficient; adding Rotation or Opacity without a clear reason can make a simple emphasis feel busy.
Avoid blur, black edges and awkward jumps
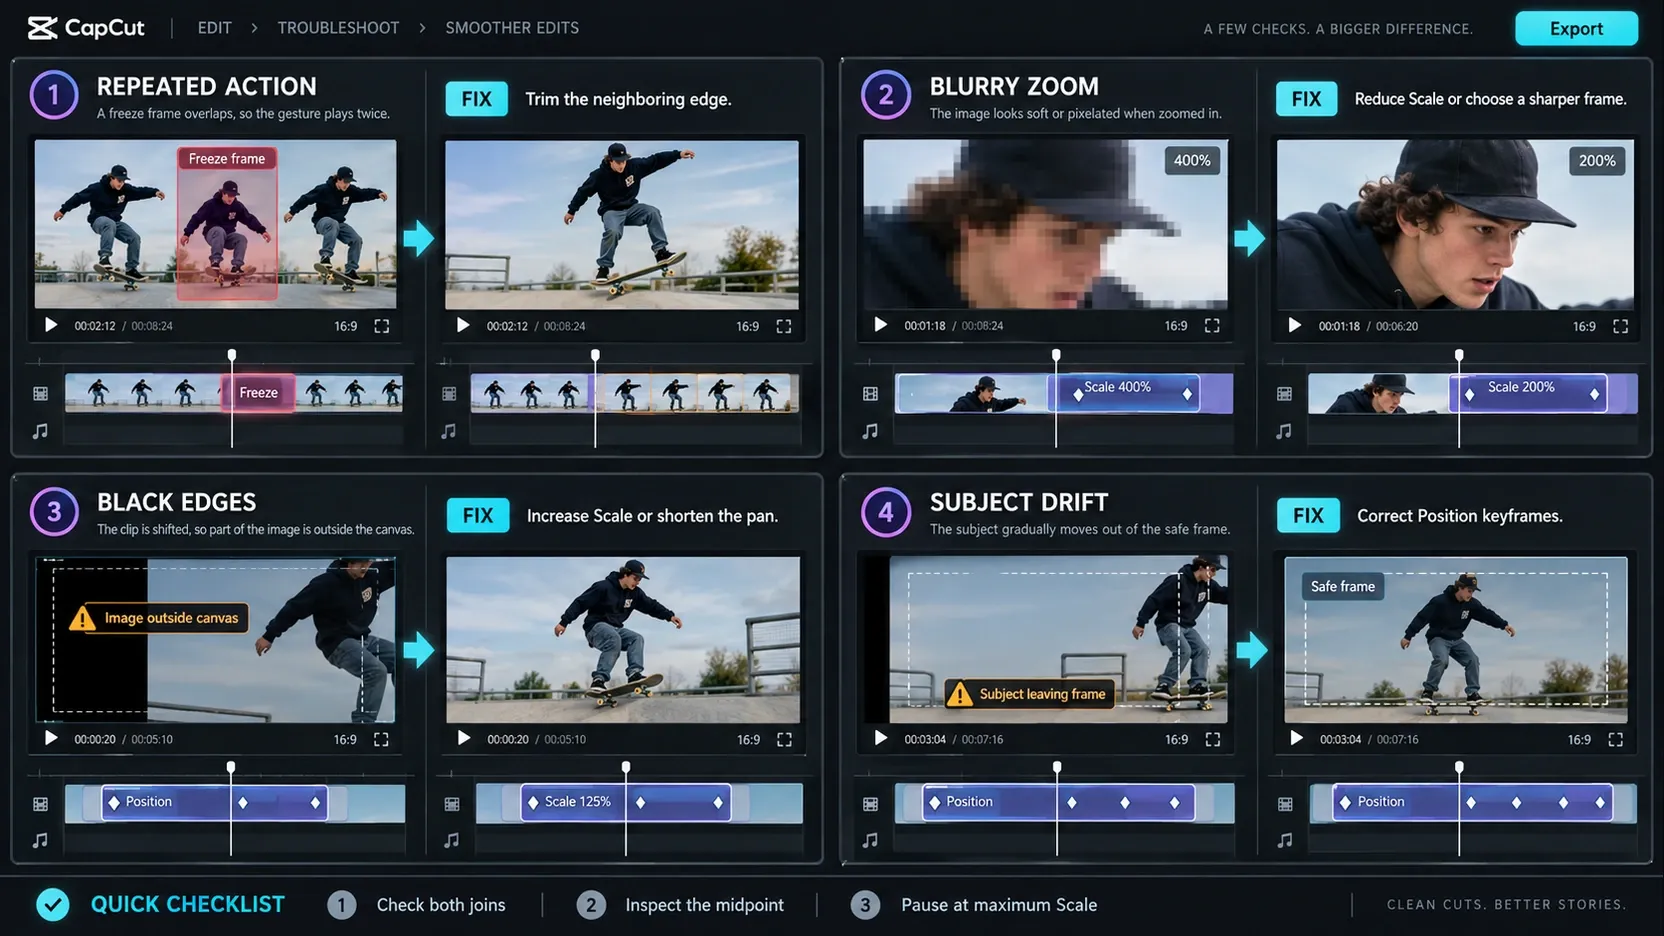
Playback repeats when the freeze ends
The held frame may also remain in the neighboring moving footage, making the action seem to repeat. Trim a small amount from the outgoing or incoming clip edge and replay the cut. Preserve the part of the movement that makes the return feel natural.
The freeze starts on the wrong frame
Delete the inserted still, move the playhead to the correct image, and create the freeze again. Stretching the existing still changes duration, not the source frame it contains.
Black edges appear during the pan
The transformed image no longer covers the project canvas. Increase Scale slightly or reduce the Position shift. Check corners at the midpoint as well as the endpoints. Rotation and stabilization can reduce the usable image area further.
The zoom looks blurry or pixelated
A digital zoom enlarges existing pixels; it does not restore detail the source never captured. Pause at the maximum Scale. If the preview is already soft, reduce the enlargement or choose a sharper source frame. If the entire exported file is soft, including sections without zoom, use the blurry CapCut export guide to inspect export resolution, bitrate and platform processing.
A high-resolution source usually gives more room for an HD delivery, but no single Scale percentage is safe for every clip. Focus, compression, crop, stabilization and final output size all affect the result.
The zoom jumps instead of moving smoothly
Confirm that the keyframes do not sit on the same frame or almost touch. Separate them on the timeline and make sure the first state contains the wide framing while the second contains the close framing. Remove accidental duplicate keyframes near either endpoint.
A jump can also come from a split. Each segment has its own transform history. Build the move within one selected segment or recreate the necessary state on both sides of the cut.
The pan moves in the wrong direction
Position controls describe where the clip sits on the canvas, which can feel opposite to the direction you expect the virtual camera to travel. Set the ending composition by eye: frame the detail that should be visible at the end, then preview the path. The finished composition matters more than memorizing a sign convention.
A dependable freeze, zoom and pan workflow
- Name the exact moment the viewer needs to inspect.
- Choose the cleanest source frame around that moment.
- Insert the freeze segment at the playhead.
- Set the hold duration before adding motion.
- Decide whether the hold needs a static frame, zoom, pan, or both.
- Add the starting Scale and Position keyframe.
- Set the ending composition around the intended detail.
- Adjust keyframe spacing for speed.
- Add a matching pair of states when the close-up needs a hold.
- Check the midpoint for black edges and unwanted drift.
- Pause at maximum Scale to judge source detail.
- Preview the moving footage on both sides of the freeze.
- Check captions, narration and audio timing.
- Export a short sample before committing to a long render.
The CapCut tutorial hub covers the wider workspace if selecting clips, navigating the timeline or locating transform controls is still unfamiliar.
CapCut freeze frame FAQ
Where is the Freeze button in CapCut?
Select a video clip and place the playhead on the intended frame. Freeze is normally available in the selected clip's toolbar or menu, though its position can differ between mobile, desktop and later builds. Swipe the mobile toolbar or inspect the desktop clip controls if it is not immediately visible.
How do I make a freeze frame longer?
Select the inserted still segment and drag its left or right edge to change its duration. Extending the segment holds the same source image longer; it does not choose a new frame.
Can I zoom in on a frozen frame in CapCut?
Yes. Select the freeze segment, add a starting Scale and Position keyframe, move the playhead forward, then increase Scale and reposition the image. CapCut animates between the two states.
How do I freeze a frame without repeating the action?
Inspect the moving clips on both sides of the inserted still. Trim the neighboring edge that repeats the held image or gesture, then preview the cut from before the freeze through the resumed motion.
Is Freeze the same as exporting a frame?
No. Freeze creates a still segment inside the video timeline. Exporting a frame creates a separate image file. Use the method that matches the final asset you need.
Why does my freeze frame look blurry?
The chosen frame may contain motion blur, compression or weak focus, and a digital zoom makes those defects more visible. Choose a cleaner nearby frame, reduce Scale, or replace the source with a sharper clip.
How do I make a slow pan in CapCut?
Create start and end Position keyframes farther apart on the freeze segment. Keep the same endpoint positions while adjusting spacing so you judge speed separately from travel distance.
Final recommendation
Build the pause before the motion. Choose the exact frame, set the hold duration, and check the join back into playback. Only then decide whether the viewer needs a static hold, a close-up, or a guided pan.
For most explanatory edits, a short freeze with one deliberate move is enough. Use Scale to control distance, Position to control attention, and keyframe spacing to control pace. Stop adding motion when the important detail is already clear.