

To crop, brighten or add text to an existing photo in CapCut, look for New image on Mobile or open the official online photo editor. On a PC or Mac, CapCut also documents AI Design in its Desktop app. Check that your chosen workspace offers an image download before you build the edit. A normal video export gives you a video, even when the project contains just one photo.
Start with New image
Use this for a quick crop, color adjustment, portrait cleanup, text or simple graphic. Confirm the button exists in your current app before following an old screen recording.
Use the photo editor or AI Design
Best when you need a standalone still, a larger canvas or a prompt-led edit without installing another app. Download the result as an image, not as a one-frame video.
Open AI Design from Home
CapCut's current help documents AI Design on Desktop. It is a separate design workflow; importing a photo to the video timeline is not the same job.
Use the timeline
Use a video project for duration, motion, narration or other video layers, then follow the video export settings. Saving one frame from a video is a separate option, covered below.
Does CapCut Have a Photo Editor?
Yes, but the name covers several workspaces. CapCut's Mobile photo-editing instructions describe New image, followed by a photo picker and categories such as Filters, Portrait, Edit, Elements and AI effects. The online photo-editor page currently leads with AI Design: upload a reference, describe a change, then refine the result. Its January 6, 2026 AI Design help documents Web and Desktop workflows with JPG and PNG downloads.
That split explains why two people can both be “using CapCut” and see very different home screens. One may have a manual Mobile image editor, another may see AI Design, and a third may only be looking inside a video project. Don't hunt for Mobile toolbar labels inside the Desktop timeline; start from the output you need.
Choose the Route Before You Edit
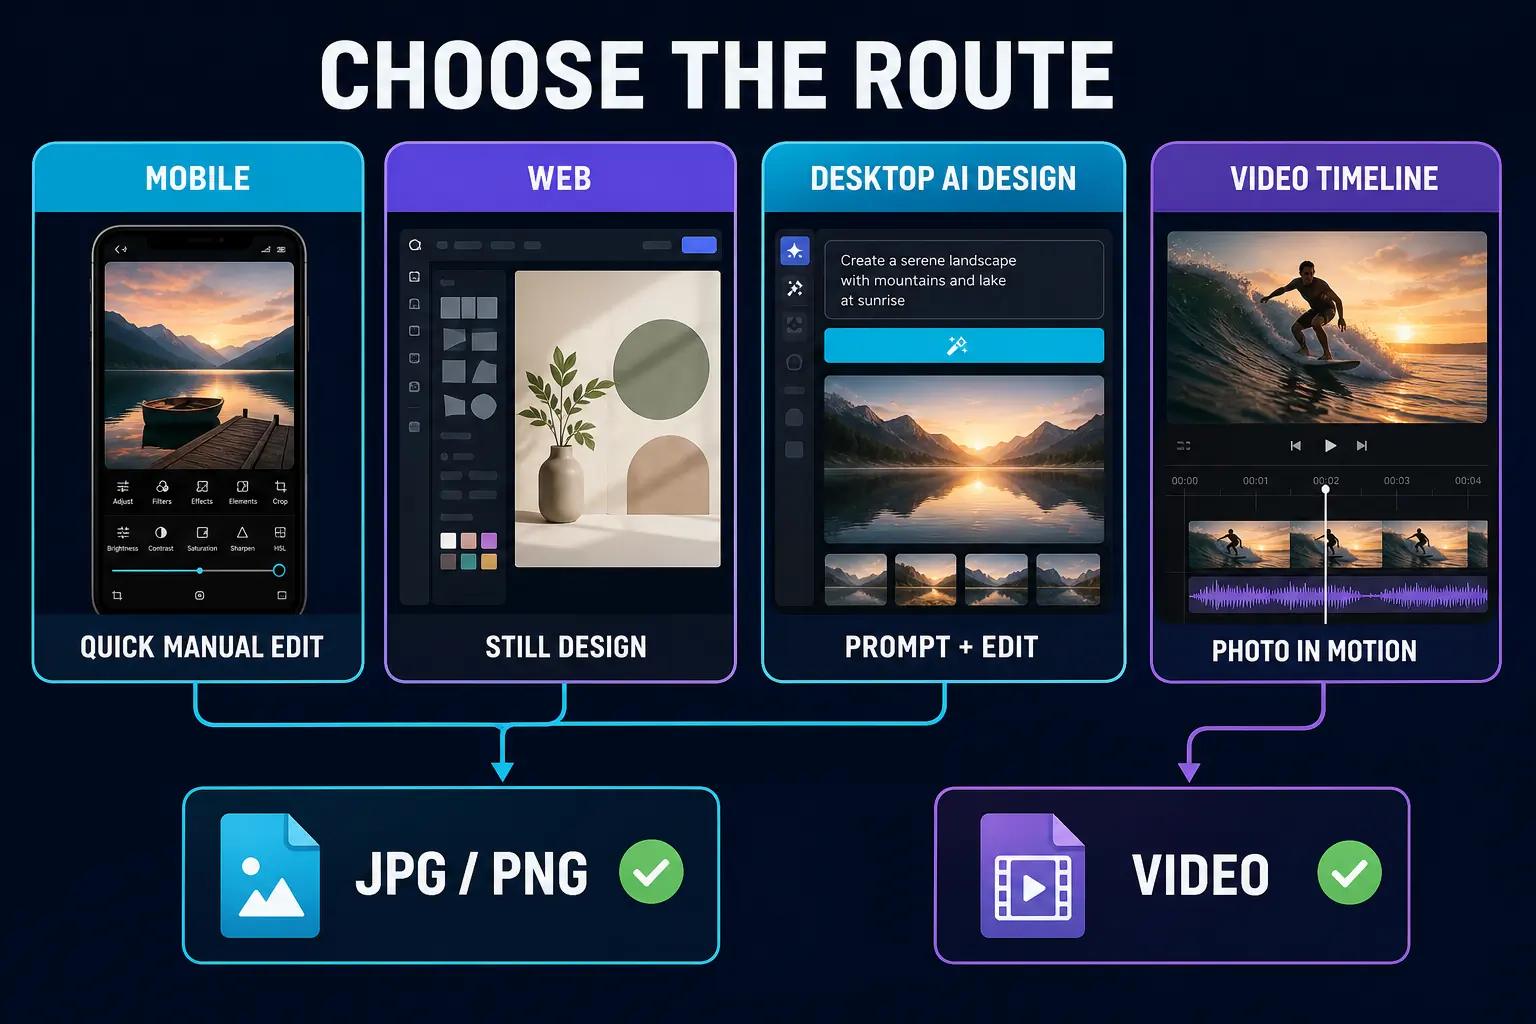
Decide what you need to deliver: an edited photo, a social graphic or a moving video. For a thumbnail or logo, the CapCut design guides cover the composition and file checks for those jobs. For a photo, start in a still-image workspace instead of exporting a short video and taking a screenshot of it.
Need a picture from an existing video? CapCut's Desktop frame-export instructions document Export still frames with JPEG or PNG output. Follow our guide to saving a CapCut video frame; you do not need to rebuild that frame in the photo editor. The route diagram above describes the usual starting choices, not every export the timeline supports.
Work from a duplicate of the original. A crop is easy to repeat, but an overwritten source, flattened text layer or aggressive retouch is not. Keep the untouched file until the delivered image has been opened on another device. If the photo belongs to a client or contains private information, decide whether a browser upload is appropriate before choosing Web merely because its canvas is convenient.
Quick manual correction
Look for Mobile New image when you want a crop or color correction. On Desktop, use the manual canvas described below if your AI Design workspace offers it.
Standalone social design
Web gives you room to work on a computer without installing the app. Check whether your workspace opens a blank canvas or a prompt box; those require different first steps.
Prompt-led change
AI Design can accept a reference image and a written request. Treat the returned draft as material to inspect, not proof that the job is finished.
Photo with motion
A timeline is right for pans, zooms, keyframes, music and narration. The image becomes timed media, so the final output is a video.
Edit a Photo on CapCut Mobile
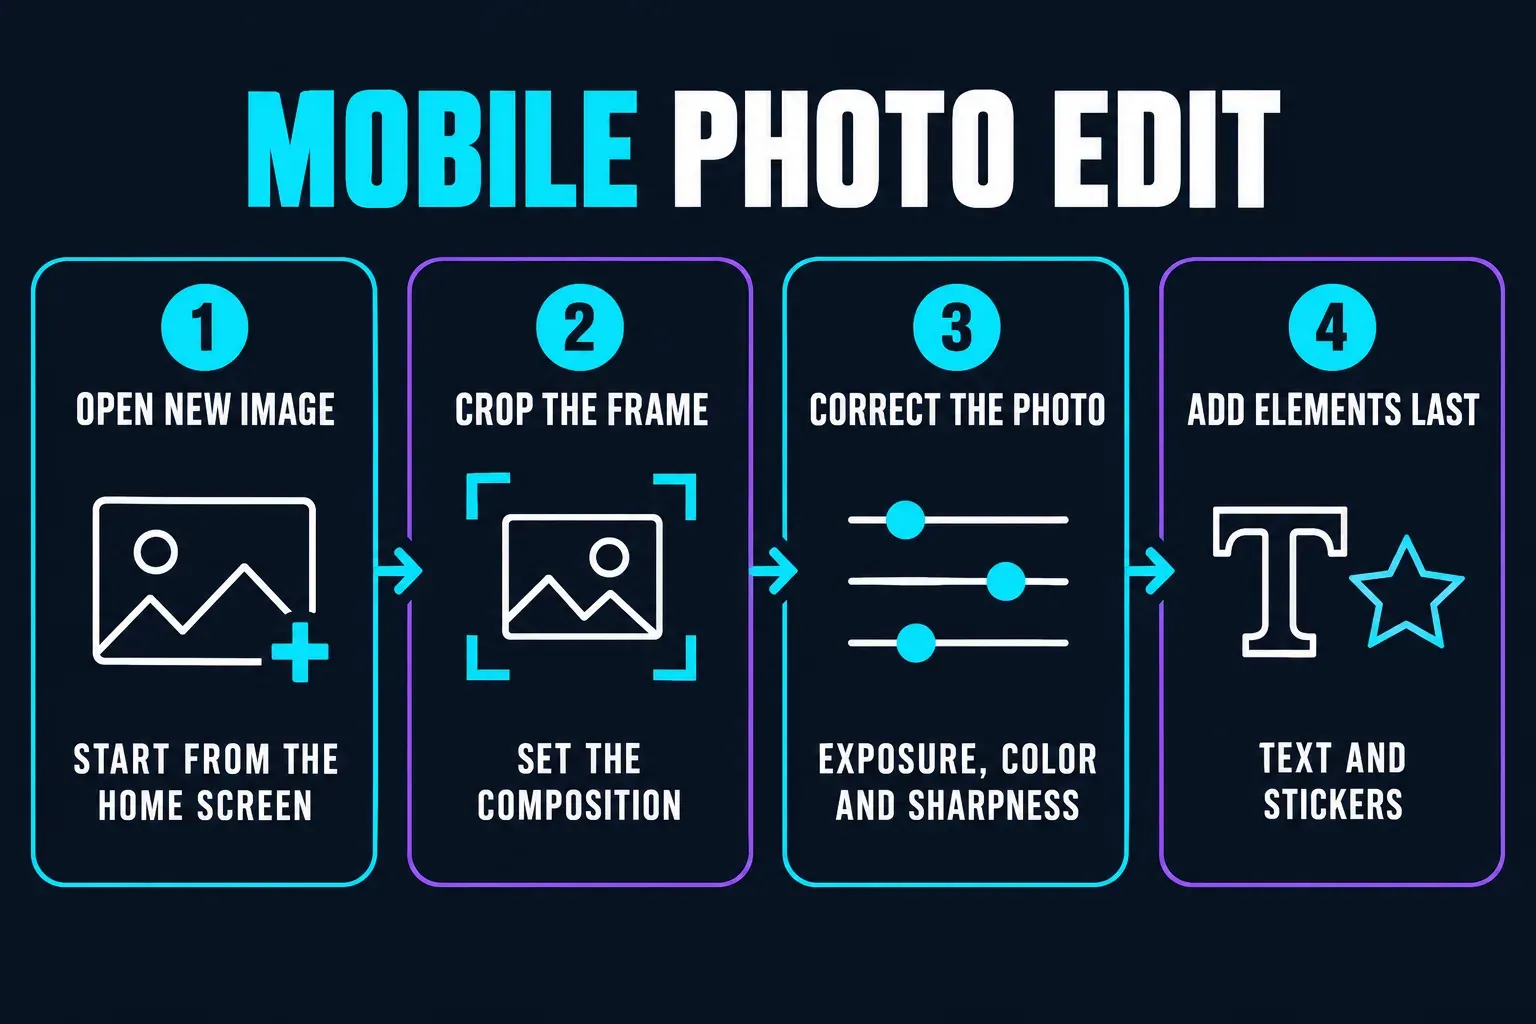
- Look for New image on the home screen. If you only see New project, don't assume that importing a photo there will create a still file.
- Select the source photo. If it is missing and the picker has Videos and Photos categories, switch to Photos. Check the app's photo-library permission before moving files around.
- Set the crop and frame first. Cutting the image again after adding text or stickers can push useful details outside the composition.
- Correct the image before styling it. Adjust exposure, contrast, color and sharpness with a light hand. Retouching is optional; it should solve a visible problem, not flatten every face or texture.
- Add elements last. Text, stickers and overlays should clarify the image. If they become the subject by accident, remove one rather than shrinking everything.
- Open Export and read the live options. Save the image, then open the newest file from the device gallery and check its crop and detail.
CapCut's Mobile product page advertises free, high-resolution, watermark-free photo editing. That does not establish the entitlement for every AI action, asset or export option in your account. Before editing a batch, save one small test using the tools you need. If a paid label appears, remove that optional asset or effect, or check the displayed terms before proceeding. Do not assume you must pay for the whole workflow because one effect is locked.
Edit a Photo in CapCut Web
Open the official online photo editor linked above and sign in if asked. Its documented AI Design route uses a prompt and reference image. Upload only a photo you have permission to use and are comfortable sending to an online service; keep your original file.
- Upload the original photo. Use the image-upload control rather than pasting a preview copied from another app.
- Describe one visible change. For example: “Replace the background with plain light gray; keep the product shape and label unchanged.” Read any usage or credit notice before sending.
- Review the result before refining it. Compare the subject, edges, lettering and proportions with the original. Reject a result that changes something you needed to preserve.
- Open the editing controls. Adjust the crop or add your final text where those controls are available. Do not rely on generated lettering for an exact name or price.
- Choose Download and an image format. CapCut documents JPG and PNG for AI Design. Check the available size, download the file and open it outside the browser.
If Web fails to load tools or media, test the problem before clearing everything. CapCut's connection troubleshooting separates browser cache, extensions and connectivity from account or app problems. Our CapCut connection guide keeps those checks in a safe order.
If you see a blank canvas rather than a prompt box, use the manual workflow below. Either way, keep the page open until the download completes and the file opens. Check the newest file, not an older export with a similar name.
Use AI Design on CapCut Desktop
For a prompt-led edit, CapCut's Desktop AI photo-editing instructions describe opening AI design, adding a reference image and prompt, and selecting Send. Review the generated result, then refine it with the available editing tools. The AI Design help linked above documents JPG and PNG downloads; Desktop can also offer video when motion has been added. An installed app does not make an AI upload a local-only edit.
For a manual edit, look for Create image
CapCut's April 3, 2026 photo-editing guide describes another Desktop route: AI design → Create image → choose dimensions → Create → + Upload. Select the photo to crop it, use More for color and light adjustments, and add wording with Text. Finish with Download or the documented Copy as PNG option; when copying, paste into an image-capable app and save a file. Follow these steps only if those controls appear in your workspace. They are an alternative to the prompt flow, not buttons every account is guaranteed to have.
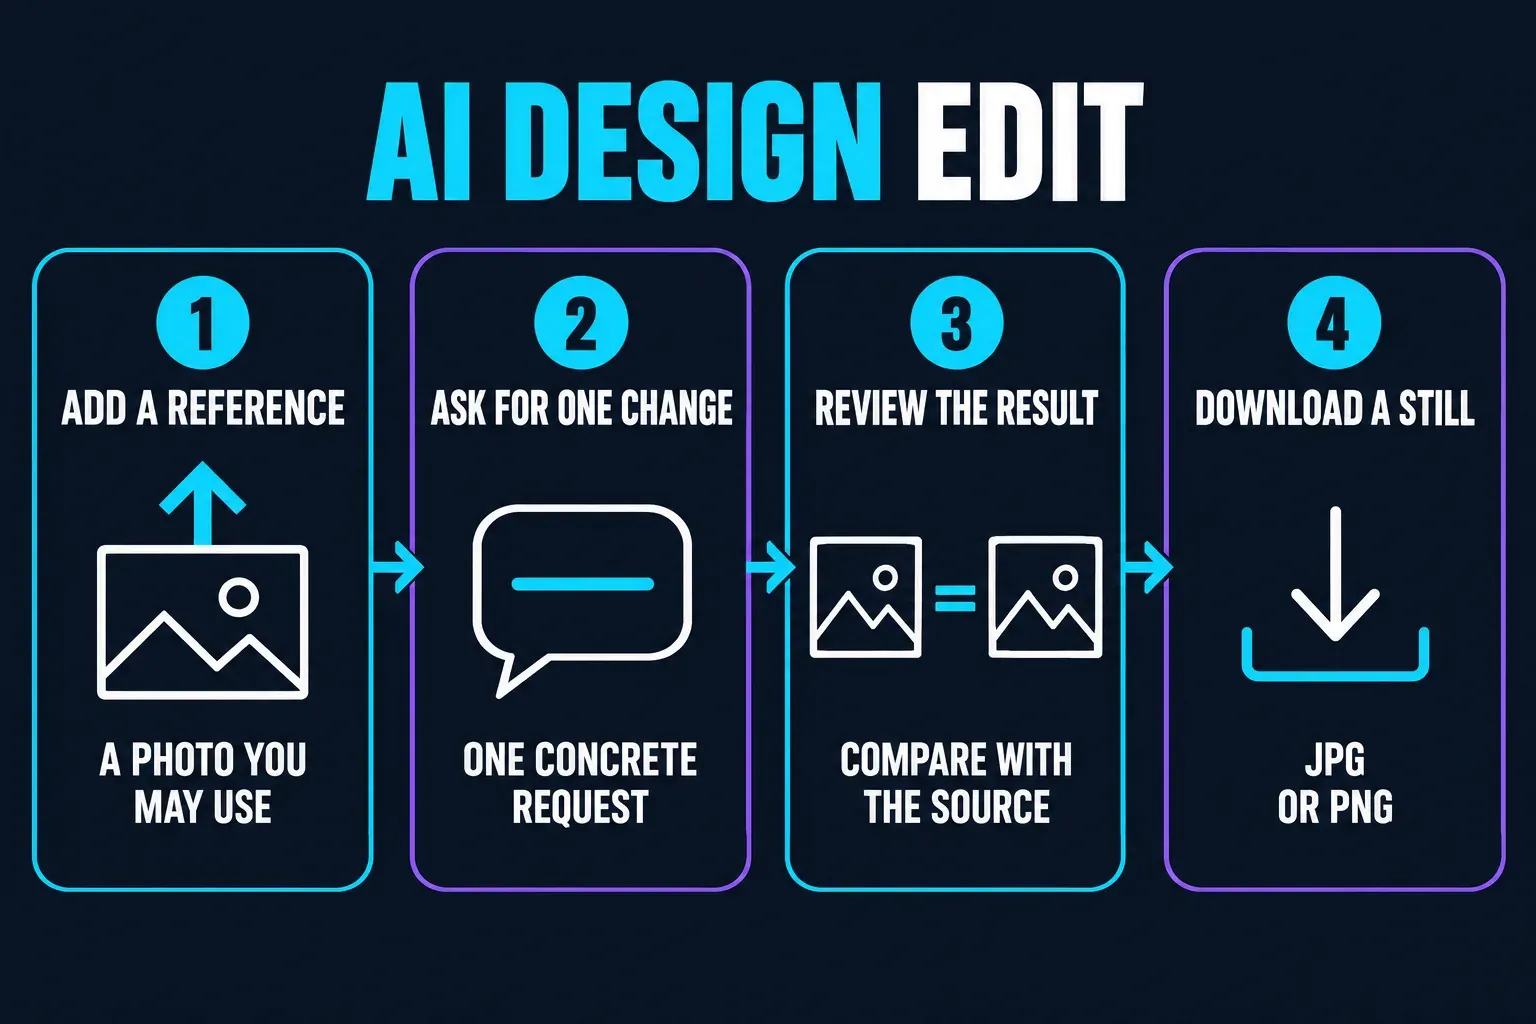
Keep the request narrow and compare the result with your source. For a product photo, count buttons, inspect its outline and read the label. A cleaner background is not an improvement if the editor invents a feature the product does not have. Return to a manual correction when preserving the subject matters more than a new look.
Check the notice beside the exact AI action before sending it. Our CapCut AI credits explainer covers the difference between an available tool, a subscription and a credit balance. No allowance or price is assumed here.
Manual Photo Edit or AI Prompt?
Use it for controlled adjustments
- Crop and straighten
- Exposure and color correction
- Exact text and typography
- Precise subject placement
- Checking a cutout against contrasting backgrounds
Use it when the change is generative
- Replace or extend a background
- Remove a complex object
- Try layout directions
- Build a rough campaign concept
- Restyle a non-critical image
Use AI for a change you are willing to review, then correct the final type and spacing yourself. If you need a clean subject cutout, see the background-removal guide; its Mobile and Desktop video controls may differ from the still editor. To put the finished picture above a video, follow the overlay guide.
Export a Real Still Image
Choose JPG for an ordinary photograph when transparency is not needed and a smaller file helps. Choose PNG for hard-edged graphics, text or real transparency when the live export offers it. That boundary matches MDN's image-format guidance: JPEG is a lossy still-image format, while PNG is preferred when precise reproduction or transparency matters. PNG doesn't make a low-resolution image scalable; it preserves pixels and, when present, an alpha channel.
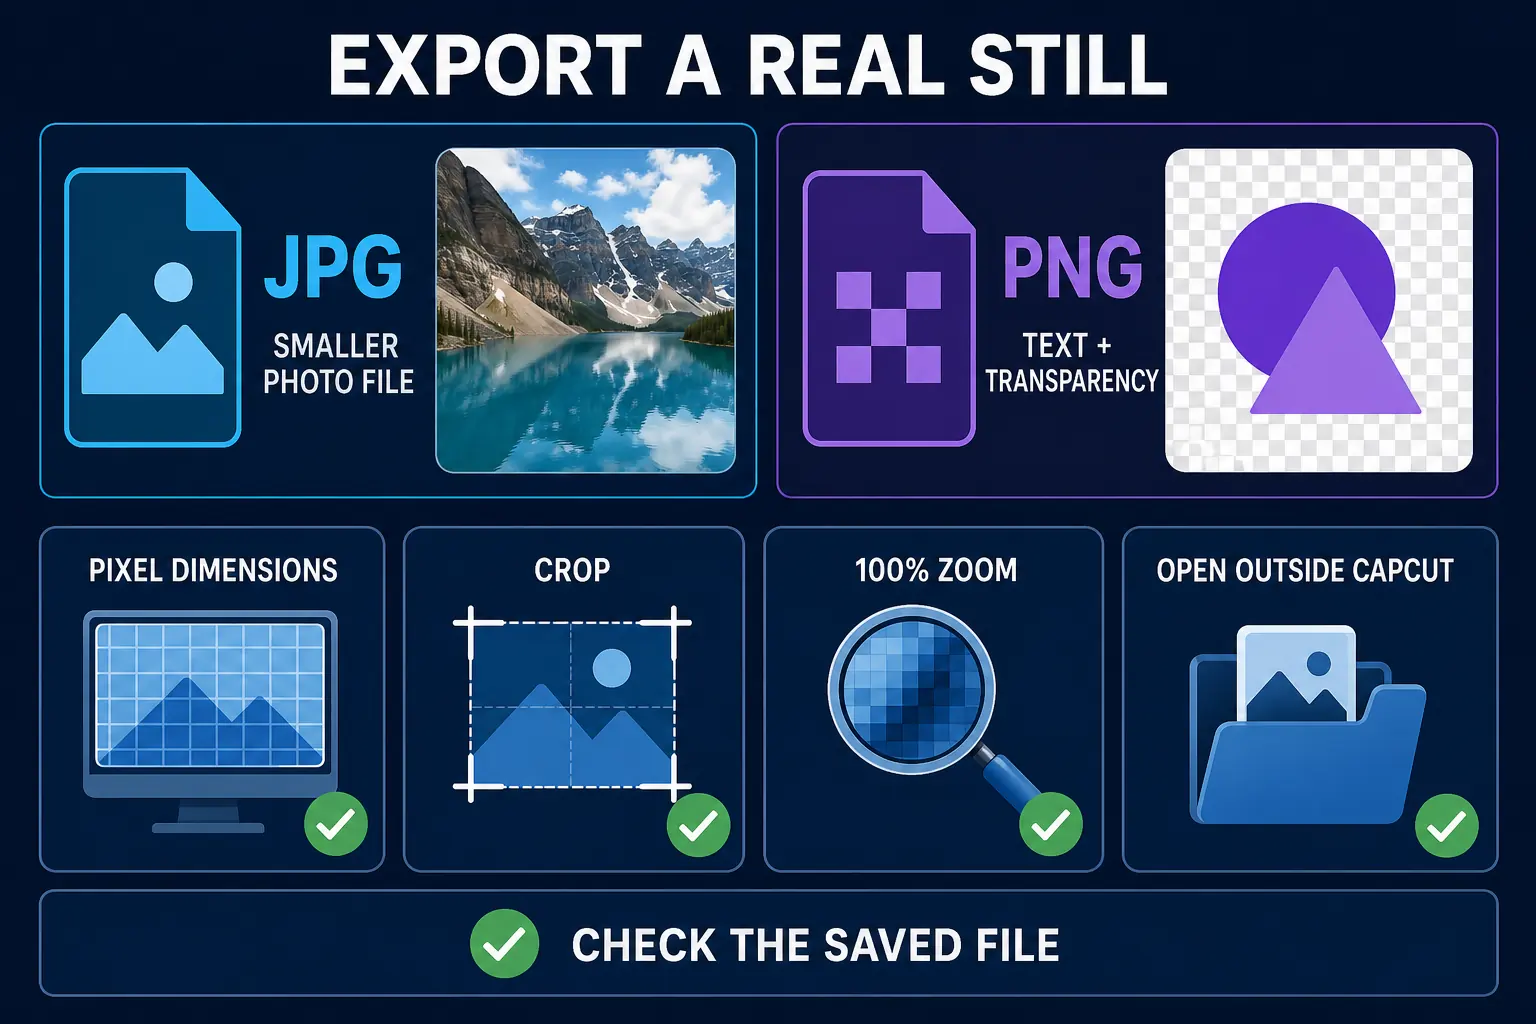
- Pixel dimensions: check the saved width and height instead of trusting a “high quality” label.
- Crop: confirm no face, product, title or edge detail was cut off.
- 100% zoom: inspect hair, text, thin lines, repeated patterns and generated edges.
- Transparency: open the PNG over a contrasting background; a checkerboard in the editor is not enough.
- Newest file: match the filename and modified time so you don't review an older export.
- Destination preview: reduce the image to the phone-size card or profile icon where people will see it.
If the saved photo looks blurry
Compare the original, the downloaded image and the uploaded version at the same viewing size. That tells you where to investigate before you apply more sharpening:
- The original is already soft: find the full-resolution source, avoid a tighter crop or use another photo. AI upscaling can invent detail; it is not proof of what the camera captured.
- The original is sharp but the download is soft: compare their pixel dimensions. Try the appropriate larger export size if offered, reduce enlargement of a small crop, and compare a less-compressed JPG or PNG where available. Change one setting at a time.
- The download is sharp but the posted version is soft: check that platform's image-size requirements and the actual uploaded file. Reworking the CapCut edit will not help if the wrong copy was uploaded.
- Only the editor preview looks soft: judge a downloaded test before rebuilding the edit. A small preview alone does not establish damage to the saved image.
Fix a Missing Photo Editor or Missing Image
Older reports show why one screenshot is not a reliable map of every build. A November 2025 Mobile discussion describes losing layer-order controls, while a separate Desktop discussion about a missing Image Editor includes users seeing different results. These are individual reports, not evidence that CapCut removed photo editing everywhere.
First separate two problems: a missing editor shortcut is not the same as a photo missing from the import picker. Photo-library permission can help the second problem; it will not restore a removed tool.
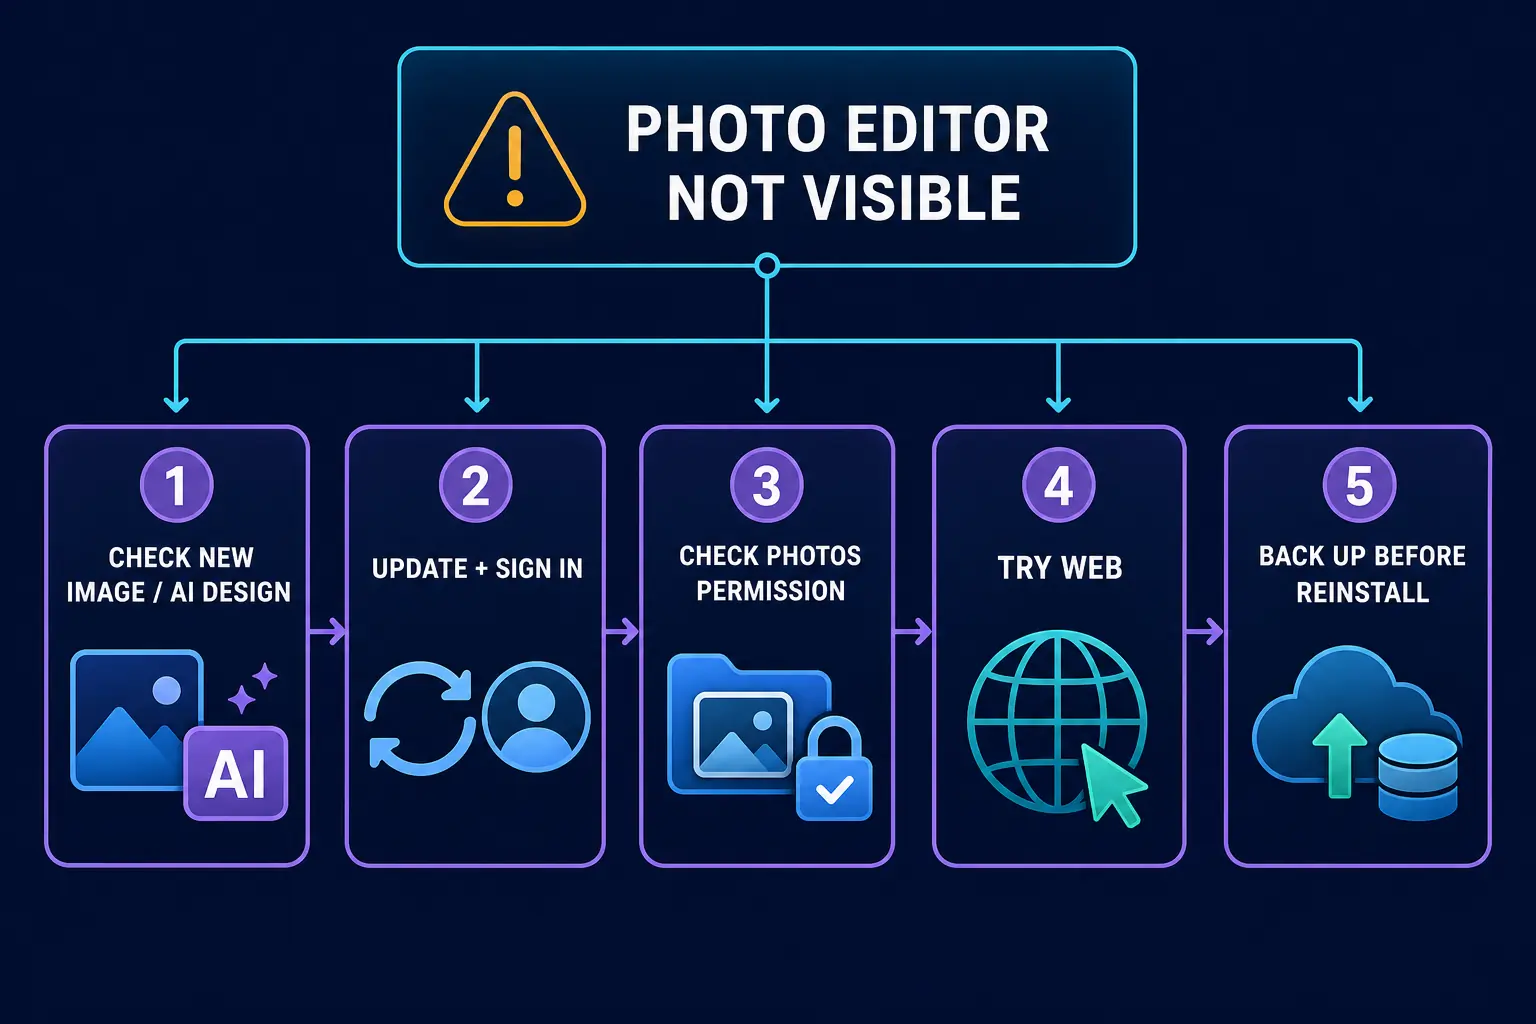
- Return to Home. Search for New image, Photo Editor or AI Design outside the video timeline.
- Check the app and account. Save your work, check for an official app update and sign in if the tool asks. These checks do not guarantee that a missing feature will return. Do not install an unofficial old build to chase a shortcut.
- Check the picker. CapCut's official import help says a Videos category will hide photo files. Switch to Photos.
- Check permission for a missing photo. On iPhone, review Settings → Privacy & Security → Photos → CapCut. If access is limited to selected photos, include the image you need; you do not have to expose unrelated photos. On Android, review CapCut's media permission in the app settings; labels vary. CapCut's photo-access help also recommends checking that the file is stored on the device rather than only in cloud storage.
- Try the official Web editor. Check that it opens and offers the tools you need before moving the job. Upload only material you are allowed to send to that service.
- Do not clear app data or reinstall with unprotected drafts. Preserve local projects and source media first, and verify that any backup is usable. One missing shortcut is not a reason to risk a working project.
If AI Design rejects the file: use its upload button instead of clipboard paste. CapCut's reference-image upload help notes that format and encoding can cause misleading size errors. For a troublesome HEIC image in a browser, try a genuinely converted JPEG or PNG copy; renaming the extension does not convert it. Keep the original and check the current upload panel for its own size and format limits.
If the whole app crashes or will not open, use the CapCut not-working checks. That is a different problem from a missing photo shortcut.
What CapCut Is Good At — and Where to Stop
CapCut is useful when the still will become part of a video, social post, thumbnail, collage or campaign. The tools sit close to text, cutouts, templates and motion. That convenience is the reason to use it.
For exact print colors, a scalable vector master or a required delivery format, confirm that your current editor can produce the file before committing the job. A PNG is not a vector logo, and an attractive AI result is not a substitute for checking the source image and asset permissions. Use another editor when CapCut cannot supply the format or control you need.
Final Photo Check
- The chosen route ends in the file type you need.
- The crop still works at the destination's actual size.
- Text is readable, correctly spelled and not too close to an edge.
- AI edits didn't change the subject, product, hands, logos or geometry.
- The saved width, height and format match the delivery job.
- A transparent PNG remains clean on both light and dark backgrounds.
- The final file opens outside CapCut and is the newest export.
Frequently Asked Questions
Does CapCut have a photo editor?
Yes. CapCut currently documents New image on Mobile, an online photo editor, and AI Design on Web and Desktop. They are separate routes, and availability can differ by build, account and region.
Is CapCut photo editing free?
CapCut advertises free photo-editing options, but that does not mean every AI action, asset or export choice is free for your account. Check the labels on the tools you need and save a test image before committing to a paid step.
Can I edit photos in CapCut on a PC or Mac?
Yes. CapCut documents AI Design on Web and Desktop. Some workspaces also offer a manual Create image canvas. Use the controls your account shows; a video timeline is a different workspace, although Desktop can export a still frame from it.
Why is Photo Editor missing from CapCut?
First check Home for New image or AI Design. Save your work, check for an official update and sign in if asked, but do not assume those steps restore every missing feature. Try the Web editor if suitable. Protect local projects before clearing data or reinstalling.
Can CapCut export a photo as JPG or PNG?
CapCut's current AI Design help documents JPG and PNG downloads on Web and Desktop. Read the live export panel because format, resolution, transparency and paid gates can differ by route.
Does CapCut add a watermark to edited photos?
CapCut advertises watermark-free Mobile photo editing. That is not a verified promise for every asset and account combination. Export a test with the actual tools you plan to use, check for paid labels and inspect the saved image for a watermark.
Can I edit a photo in CapCut without AI?
Yes, when the manual still editor is available. Use crop, color adjustments, filters, text and elements without asking AI to regenerate the image. CapCut documents Mobile New image and a Desktop Create image route, but their controls are not identical.
Is the CapCut photo editor the same as the video editor?
No. A still-image workspace is for editing and downloading a picture. The video editor places photos on a timeline with duration, motion and audio. Desktop also has a separate still-frame export, so using the timeline does not always mean the final file must be a video.