


Checked September 4, 2026: all four CapCut template pages below still open, and their 2, 3, 4 and 19 clip counts, aspect ratios and durations match CapCut's live details. Template access, music and editable controls can still change by region, account and app build. For related slideshow, meme, intro and template-led layouts, our overview of CapCut design tools groups the next choices by output.
“Collage” causes more confusion than it should because it can describe three different outputs. You may want one still image made from several photos, a quick template video with fixed replacement slots, or several videos playing at the same time. Those are three different CapCut workflows.
Pick the output first. If you start in the video editor when you need a JPG, you can end up with a three-second video. If you merge clips that should play together, they will appear one after another. This guide gives you the right route, four live template examples and a manual split-screen fallback.
If your only goal is to find and open templates, start with our broader page on CapCut templates. This page owns the narrower collage job: several photos or videos inside one composition.
First decide what “collage” means for this project
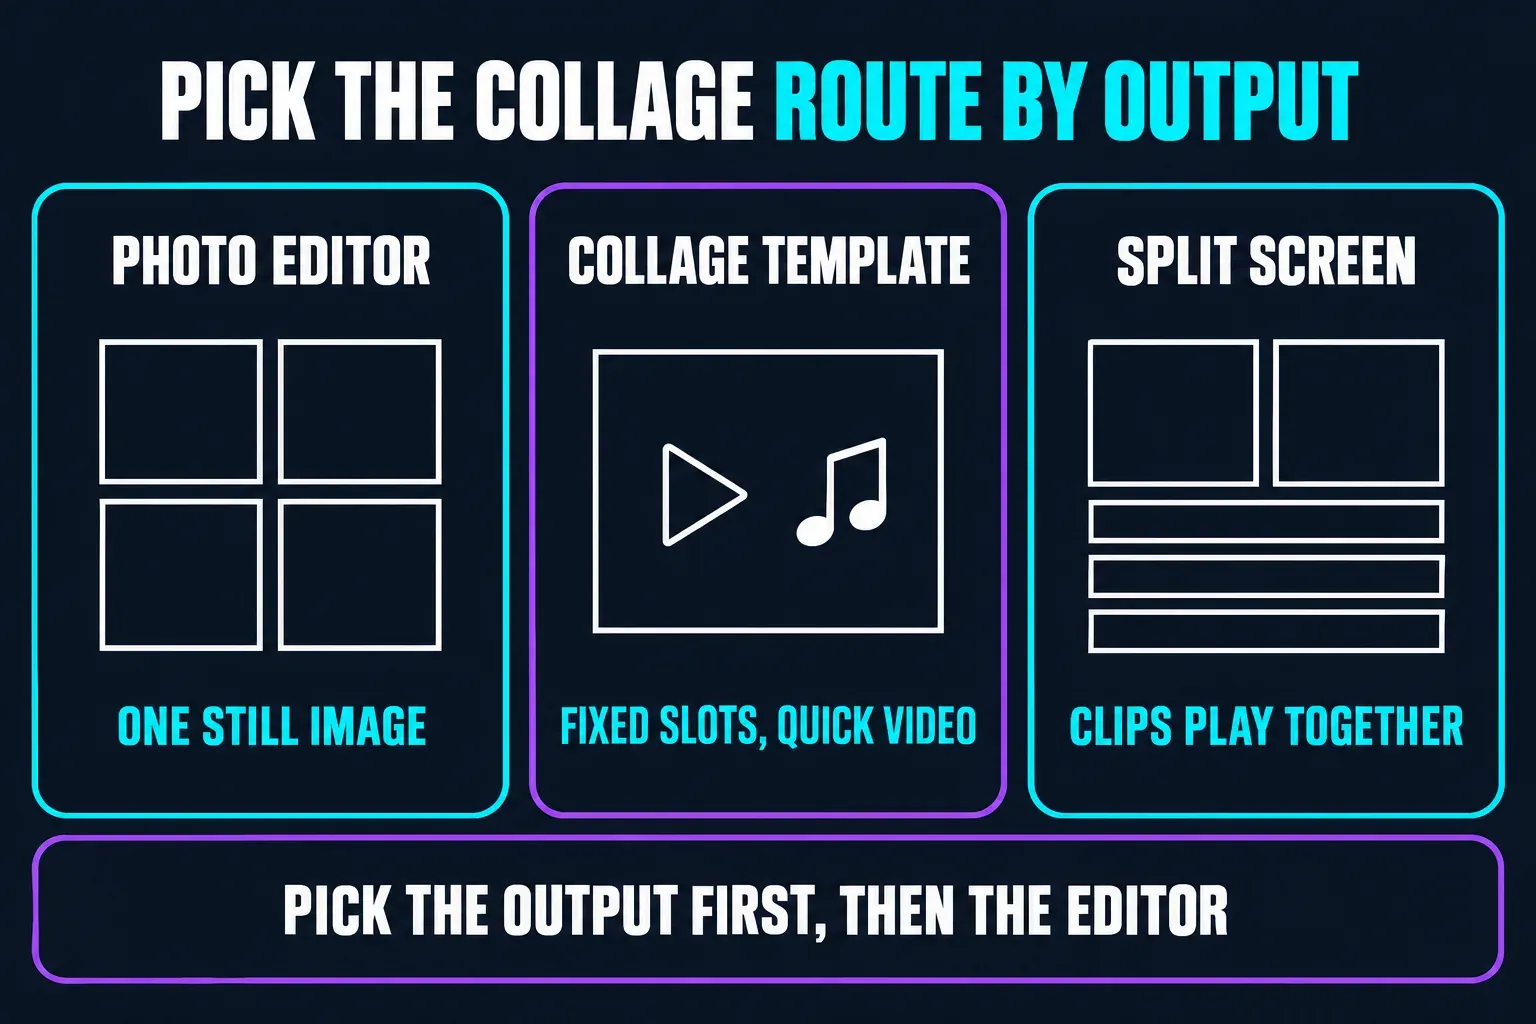
Use the photo editor
Best for a social post, thumbnail, card or wallpaper. Build the grid in an image project and export a still-image format.
Use a collage template
Best when the preview, fixed slot count and timing already fit your media. Replace the placeholders, check the crop and export the video.
Build a split screen
Best when several clips must play together and you need control over their size, position, start time, duration and audio.
A slideshow is not a collage just because it uses many photos. In a slideshow, images normally replace one another over time. In a collage, several items share the same composition or appear together. Use our CapCut slideshow templates guide when the sequence, rather than the shared frame, is the main idea.
Live CapCut collage templates checked September 4, 2026
These are practical format examples, not a ranking based on changing use counters. Open the detail page and confirm that the same clip count and ratio still appear before you prepare the full set.
Two-video vertical collage
The official 2 video collage template asks for two clips in a vertical frame.
Choose it for: a comparison, two viewpoints or a paired reaction.
Skip it if: both clips need their full original width.
Three-panel video grid
The official 3 Grid Videos template asks for three clips in a 9:16 output.
Choose it for: three equal moments or three synchronized angles.
Skip it if: one subject needs more space than the others.
Square four-item collage
The official 4 collage template combines four inputs in a square format.
Choose it for: a balanced four-part post or compact comparison.
Skip it if: the destination requires a full-height 9:16 video.
High-capacity photo collage
The official photo collage template asks for 19 inputs in a vertical video.
Choose it for: a moving photo collection where the preview pace works.
Skip it if: you need one static 19-photo grid or time to read every image.
For alternatives, browse CapCut’s live collage template collection, photo-and-video collage collection and video collage collection. Their order and contents change, so treat them as shelves to search rather than permanent “best” lists.
Choose the layout and output ratio together
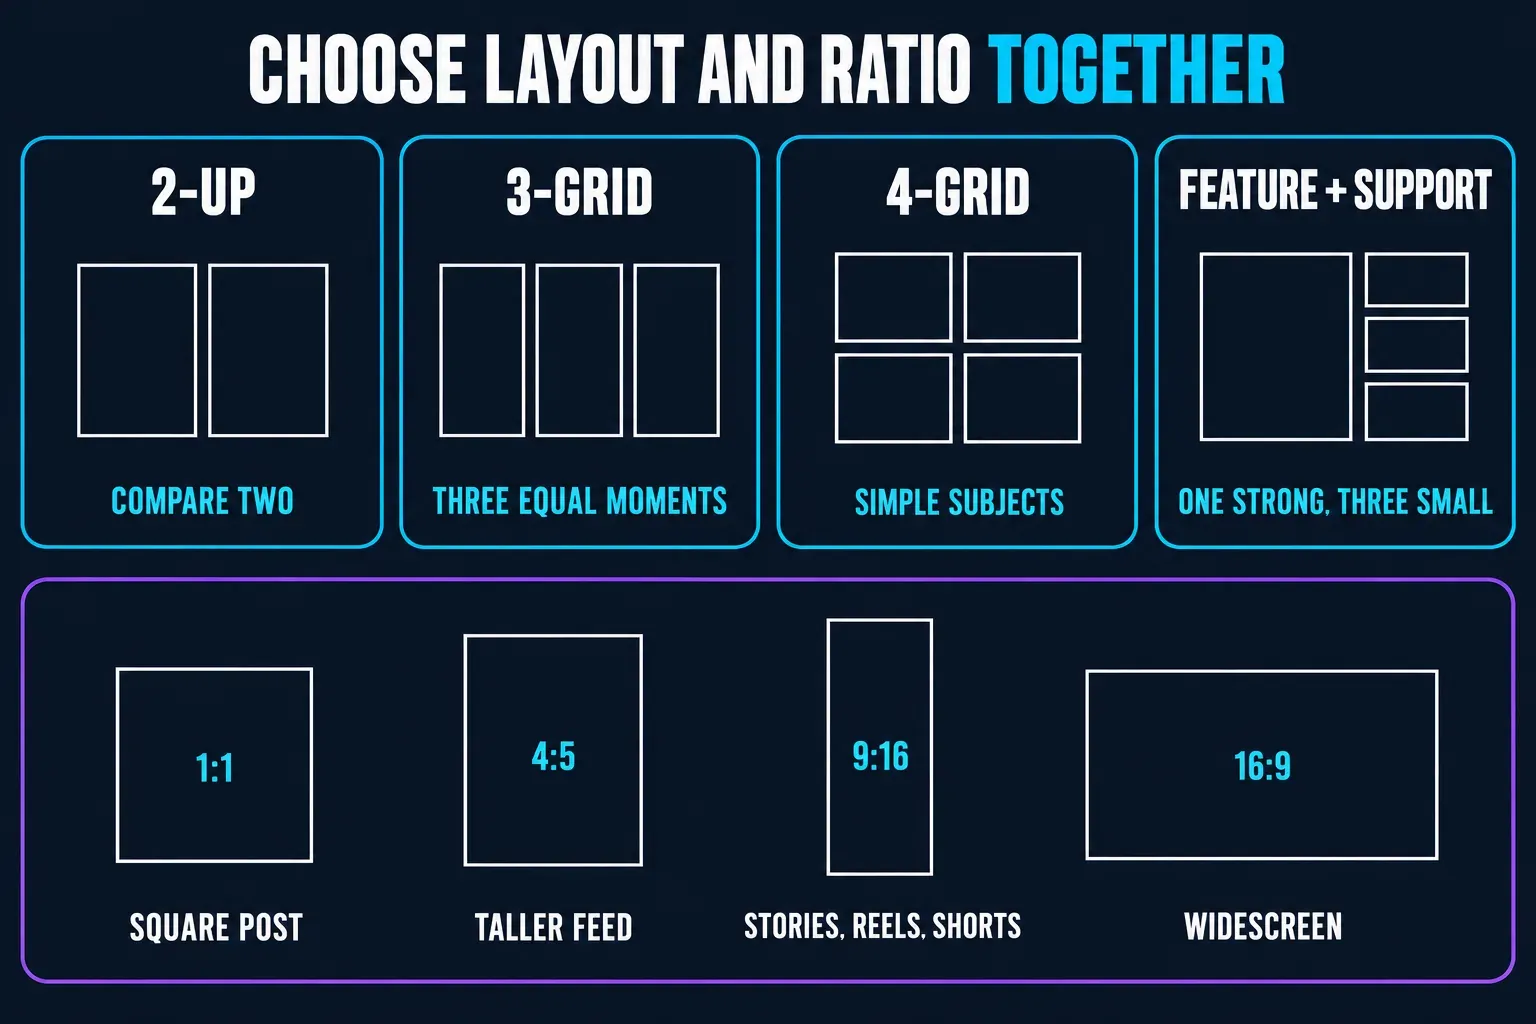
- 2-up: use it when the viewer should compare two subjects. A vertical divider works for portraits; stacked panels often give landscape clips more usable width.
- 3-grid: use it when all three moments deserve equal weight. On a phone, each panel is small, so avoid distant faces and text-heavy screenshots.
- 4-grid: use it for a balanced set with simple subjects. Four busy scenes in a 9:16 frame can become unreadable.
- Feature plus support: give the strongest photo or clip most of the canvas and use the smaller panels for context. This is usually clearer than pretending every item is equally important.
Set the final ratio before fine cropping: 1:1 for a square post, 4:5 for a taller feed image, 9:16 for Stories, Reels or Shorts, and 16:9 for widescreen video. Changing the canvas at the end can cut faces twice: first inside the panel, then at the outer frame.
Judge the layout at the size people will see. A four-panel grid that looks spacious on a desktop monitor may reduce every face to a thumbnail on a phone. When one panel carries the important action, enlarge it and let the remaining images supply context. Clear hierarchy is more useful than perfect symmetry.
Make a static photo collage
For one still image, start from CapCut’s image or photo-editing surface rather than a normal video project. CapCut’s current iPhone guide documents selecting up to nine photos in Photo Editor, then opening Collage. Its online guide describes a separate route through Create new image, Collage, layout selection and image export. Menu labels and capacity can vary, so follow the live photo editor in your build.
- Choose the destination ratio. Do this before selecting a layout.
- Add the photos and pick the simplest grid that gives the main subject enough room. More panels are not automatically more informative.
- Reposition every photo. Check faces, product edges, captions and horizons rather than accepting the first automatic crop.
- Set gaps and background once. Uneven borders make an otherwise clean collage look accidental.
- Export as an image and inspect it at its real posting size. If the output route only offers a video, you're probably in the video editor.
The nine-photo figure belongs to CapCut’s documented mobile Photo Editor route, not to every animated template: one live example on this page asks for 19 inputs. A community report about a two-photo collage turning into a short video instead of a still is not proof of a universal bug. It is a useful diagnostic clue: check which editor you opened and whether its export screen offers an image file.
Use an animated collage template without wasting an hour
Start by checking three things on the template page: required clips, original aspect ratio and whether the preview shows several items together. A high clip count can also mean a rapid sequence, so don't assume that “19 clips” means a 19-cell grid.
- Test the hardest media first. Replace one wide group shot, one close face and one moving clip.
- Watch the whole preview. Check whether crops shift, whether a slot is too short and whether the template’s motion hides key details.
- Confirm the soundtrack. Don't build the edit around audio that is missing, muted or unavailable in your region.
- Replace the rest only after the test passes. If the first three difficult inputs fail, choose another layout.
CapCut’s help pages currently contradict each other. One says templates can be used on Web, PC and Mobile. The other, dated January 2026, says the full community-template experience is on Mobile while Web and Desktop have narrower access. Both pages were still live when rechecked on September 4, 2026. Trust the buttons shown in your current account, and use our fixes for CapCut templates not working if a shared link opens the wrong surface.
Build a manual video collage or split screen
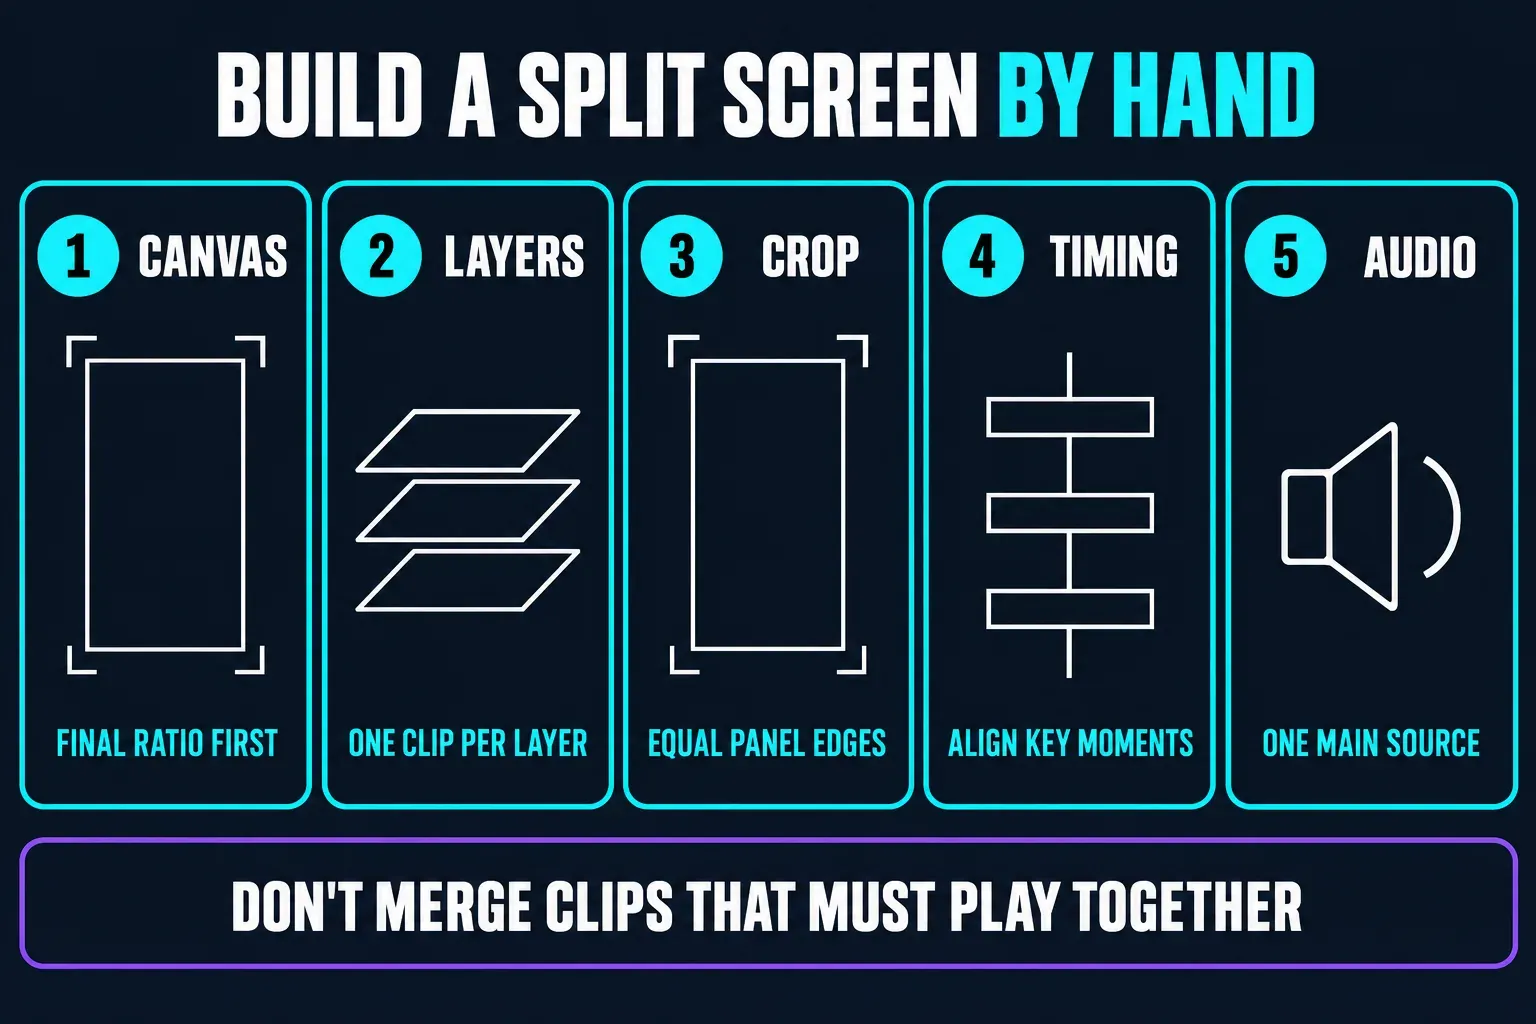
CapCut defines a video collage as multiple clips or images sharing one screen, often in a grid or side-by-side layout. Its current official video-collage tutorial includes a Web template route. A manual build is the better fallback when the preset crop or timing doesn't fit.
- Set the canvas. Choose the final ratio before positioning anything.
- Add each clip on its own visual layer. Use one base clip and additional overlays or tracks. Our CapCut overlay guide covers the control itself.
- Crop and position each layer. Use equal panel edges or a deliberate feature-plus-support layout. Masks are optional, not required for a basic grid; use the masking guide only for shaped or feathered boundaries.
- Align the important moments. Move and trim clips so the actions that should be compared happen together.
- Choose the audio hierarchy. Keep one main soundtrack or one primary voice. Mute or lower competing clip audio unless the contrast is intentional.
Don't use the merge workflow if the clips must play simultaneously. Merging normally places clips in sequence; that separate job belongs to our guide to joining clips in CapCut. One 2026 r/CapCut thread on split-screen video describes consistent crop and position across repeated scenes as the difficult part. That is a workflow signal, not a documented product limit: write down or reuse the same panel geometry instead of eyeballing every scene.
What changes on Mobile, Web and Desktop
- Mobile: often has the clearest community-template route. CapCut’s current iPhone tutorial documents Photo Editor, selection of up to nine photos and a Collage control, while its template Help warns that the Template button can be absent by region or app version.
- Web: is useful for image projects and manual multi-layer video work. Official documentation shows both photo-collage and video-collage routes, but the available template shelf can be narrower than Mobile.
- Desktop: gives you a large timeline for manual split screens. Don't rely on a dedicated Collage button being present; stacked tracks, crop and position controls are the dependable construction method.
CapCut changes interface labels and rolls features out unevenly. The safest instruction is therefore based on the editing principle (separate layers for simultaneous video, the image editor for a still) rather than on one fragile button path.
Fix crop, timing, borders and competing audio
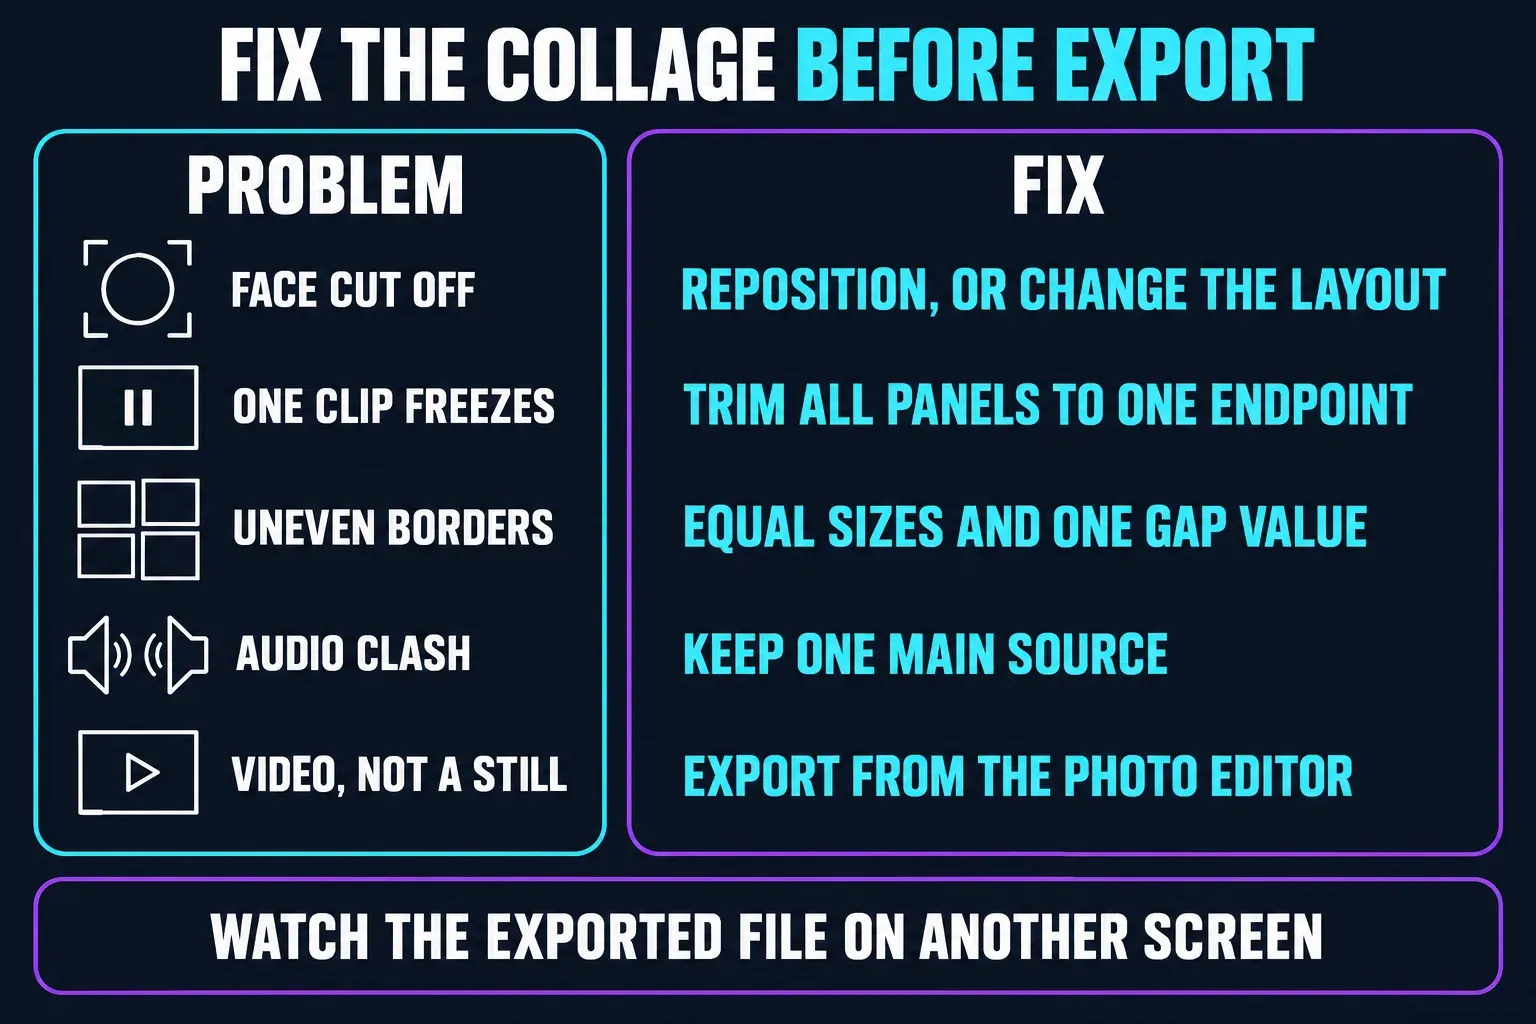
- A face is cut off: reposition the media inside its panel. If there is not enough room, change the layout instead of shrinking every subject.
- One clip freezes while the others continue: trim all panels to a shared endpoint or loop a short clip deliberately. An accidental frozen last frame looks like a failed export.
- The borders look uneven: use guides, equal dimensions and one gap value. Check the outer edge as carefully as the space between panels.
- Several tracks are audible: pick one main source. Keep ambient sound only where it adds information.
- You expected a still but received a video: return to the photo editor and confirm that the export offers an image format.
Export and inspect the actual file
Watch the exported video from beginning to end on another screen. Check the first frame, every panel boundary, synchronized action, audio balance and the last frame. Pause where faces sit near an edge. A collage can look fine in a roomy editor and become unreadable at phone size.
For a still image, open the exported file at 100% and at the size it will appear in the feed. Look for soft text, inconsistent gaps and accidental crops. For a video, use the destination’s frame shape and a sensible export setting; our CapCut export settings breakdown covers resolution, frame rate and compression in detail.
Keep the source photos and clips until the final file has passed that check. A successful export is not a backup of the original media or the editable project.
Collage, slideshow, recap, overlay or merge?
- Collage: several items share one composition or play together.
- Slideshow: photos usually appear one after another.
- Recap: the order tells a month, year or event story; use the CapCut recap templates guide.
- Overlay: the editing technique used to place one visual layer above another.
- Merge: clips are joined into a sequence rather than displayed simultaneously.
Those boundaries do more than label the pages. They prevent you from choosing the wrong editor, the wrong template and the wrong instructions for the output you need.
FAQs about CapCut collage templates
Can CapCut make a photo collage as one image?
Yes, when the photo or image editor and its collage layouts are available in your version. Start an image project and confirm that the export offers a still-image format rather than a video-only output.
How do I put two videos side by side in CapCut?
Use a two-video template or place both clips on separate visual layers, crop each to half of the canvas and align their start and end times. Keep one main audio source unless both tracks are intentionally needed.
Why does my CapCut collage export as a video?
You probably created it in a video project or used an animated template. If you need a still-image file, rebuild or export from CapCut’s photo-editing surface where an image format is offered.
Is a CapCut collage the same as a slideshow?
No. A collage places several items in one composition or shows clips simultaneously. A slideshow normally presents photos one after another over time.
Can I use collage templates on CapCut Desktop?
Template access is not consistent across CapCut’s own current help pages. If the template is unavailable in Desktop, rebuild it with stacked tracks, crop and position controls, or open the community template on Mobile.
How do I stop faces being cropped in a collage template?
Test the widest group shot and closest face before replacing every slot. Reposition the media if the template allows it; otherwise choose a layout or aspect ratio that gives the subject more room.
How many photos can a CapCut collage template use?
The number depends on the route. CapCut’s current iPhone Photo Editor guide documents up to nine photos for a static grid, while the animated examples checked here require 2, 3, 4 or 19 inputs. More slots do not guarantee a clearer collage or a slower pace.