

Sources rechecked August 13, 2026: CapCut’s current image-generator page, image-quality help, credit guidance and terms. The model list below is a dated observation from the English CapCut Web selector inspected on August 10.
The CapCut AI image generator is easiest to understand as a design workspace, not a magic button. You give it a prompt or reference image, choose a model, put the result on the right canvas, then decide whether the image is sound enough to edit. The awkward part is that CapCut’s marketing page, help center and live menu don't always describe the same models or platform access. Our CapCut AI tools hub maps the wider toolset; this page stays focused on still images.
This guide separates those layers. It shows the controls visible in CapCut Web on the check date and explains where official pages disagree. It also gives you a practical way to prompt and review an image without pretending every output will be usable.
I opened the public AI Design workspace, inspected its model menu on August 10 and followed the product/help routes again on August 13. I didn't sign in, send a prompt, buy credits or grade a generated result. The quality sections below are a repeatable inspection method for your own image. They are not a test score for an image I never generated. Every interface visual is an anonymized editorial reconstruction, not a capture of a personal account.
Those are the two surfaces CapCut’s help material describes most consistently for user-initiated image generation.
The inspected Web menu contained more current models than the product page named.
Don't budget from an old screenshot or convert credits with a universal rate.
Check prompt match, text, anatomy, edges, reflections, composition and file size before building around the result.
Choose the right image workflow first
“AI image” can mean four different jobs. CapCut also uses image-to-image language for reference-guided generation. Choosing the wrong route wastes time before the prompt is even written.
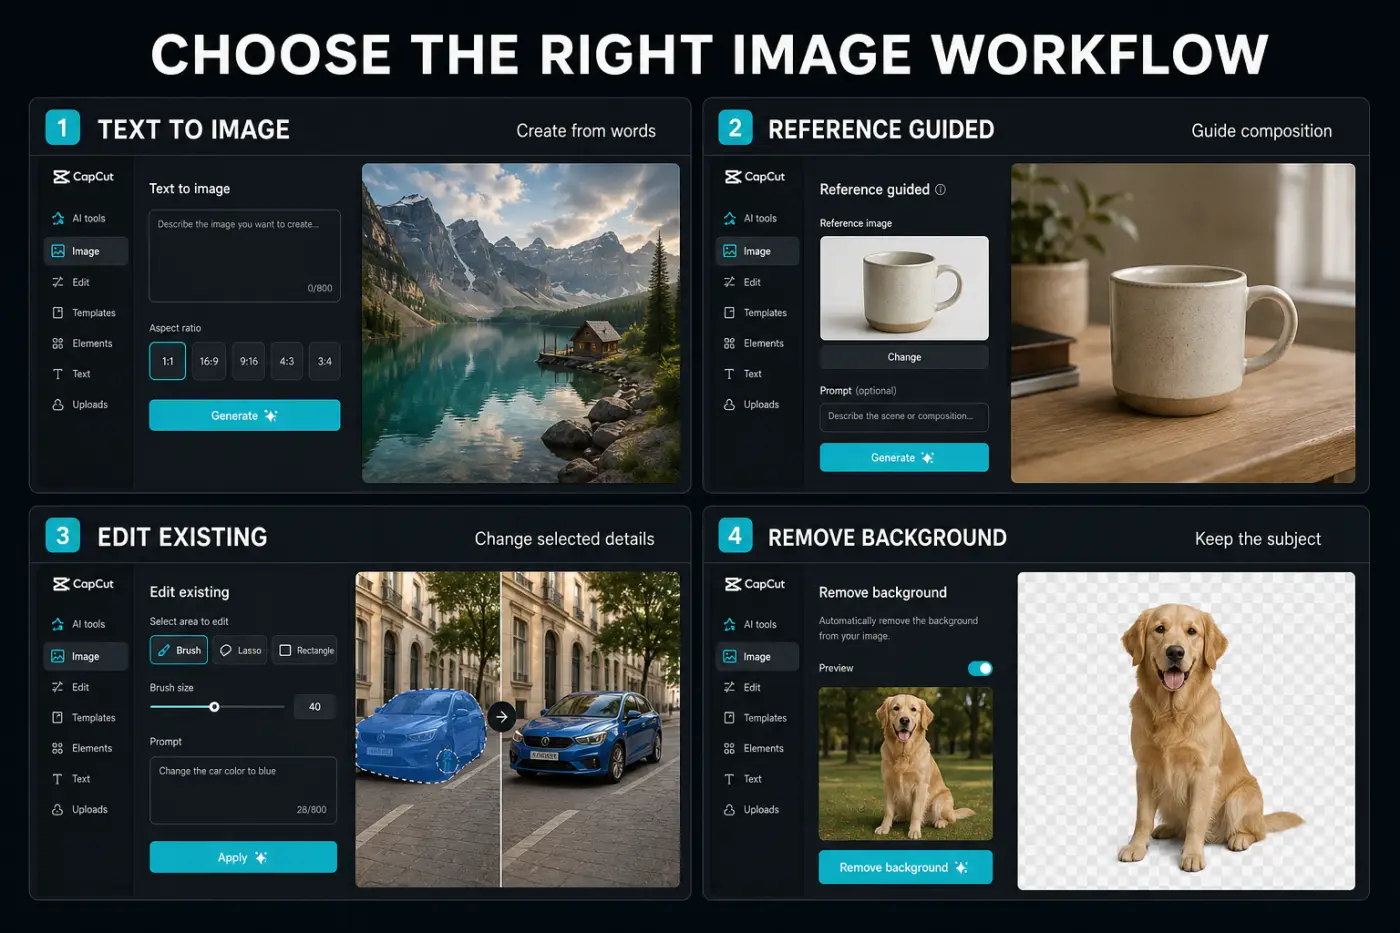
Describe the subject, scene, light and composition. Use this for a fresh concept, background or illustrative asset.
Upload an image you have the right to use, then state what should stay and what should change.
Keep the base frame and replace a selected detail instead of regenerating the whole composition.
Use the dedicated cutout route. Our CapCut background removal guide covers that workflow in depth.
If you need a moving shot, this is also the wrong page. Use the CapCut AI video generator guide for prompt-to-video models, duration controls and temporal quality checks.
Where to find CapCut AI Image
On the checked Web route, CapCut AI Design opened a design canvas with a Design with AI panel. The visible controls were a prompt box, reference upload and model selector. CapCut’s product walkthrough describes Desktop as AI media → AI image.
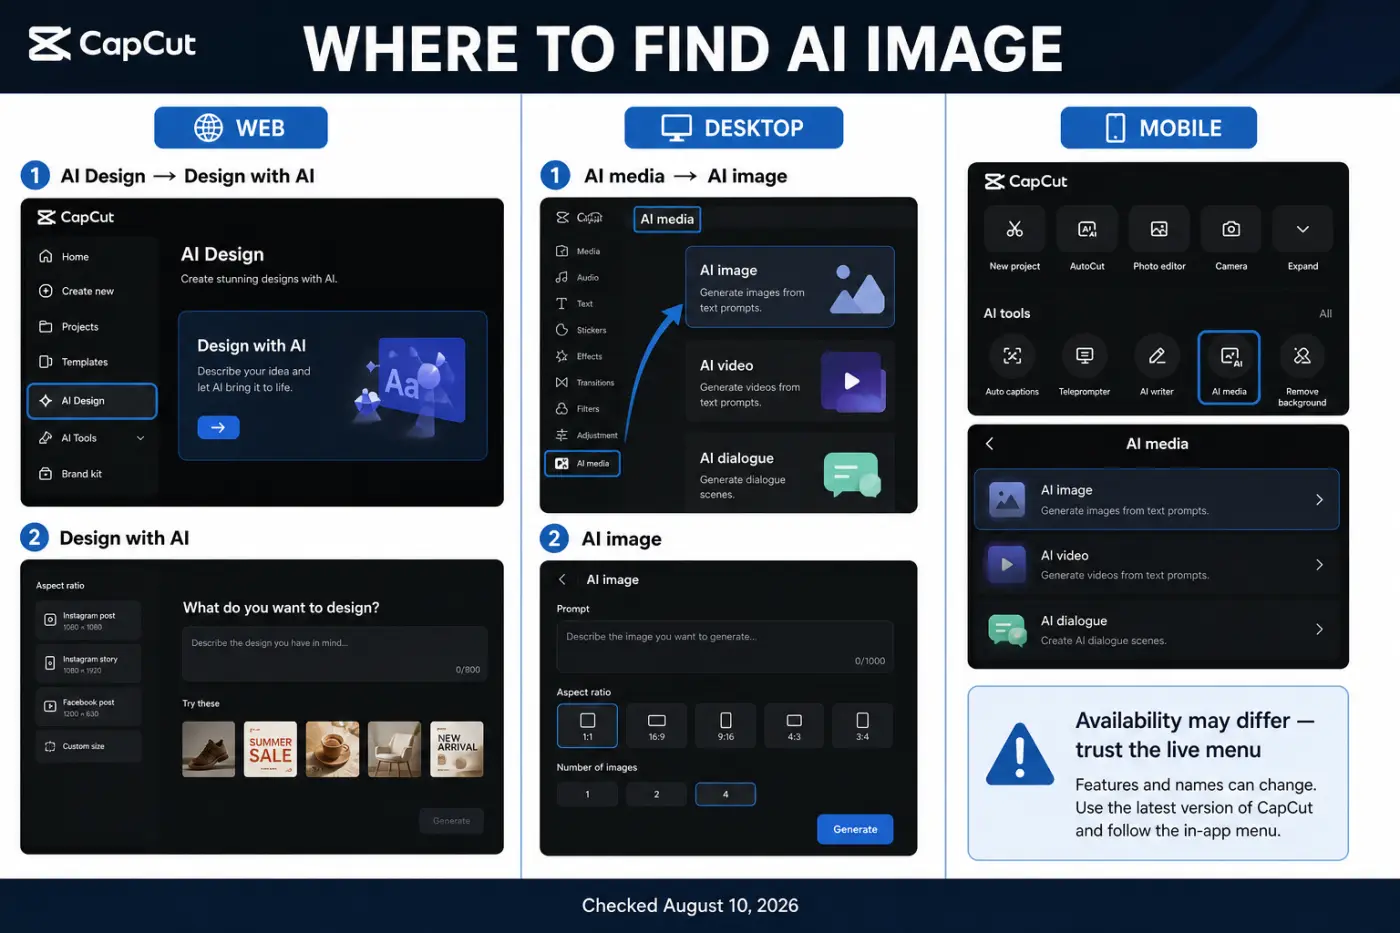
- Web: open AI Design, expand Design with AI, enter the brief or add a reference, then inspect the model selector.
- Desktop: open AI media and look for AI image. Update CapCut first if the panel is missing.
- Mobile: check the signed-in AI tools or AI media menu, but don't assume a product-page screenshot guarantees access.
The AI image product page, rechecked August 13, includes a mobile walkthrough. A separate image-generation help article still says that user-initiated AI generation was unavailable on Mobile as of December 2025. Because both are official, check the live signed-in menu instead of assuming one universal mobile route.
Models visible in CapCut Web
The Web selector checked on August 10 offered Auto plus six named models: GPT Image 2, Nano Banana 2, Nano Banana Pro, Seedream 5.0 Pro, Seedream 5.0 and Seedream 4.0S. CapCut positioned GPT Image 2 around reasoning and image quality. Nano Banana 2 was the faster everyday option, while Nano Banana Pro emphasized multilingual text and knowledge. The Seedream labels focused on realism, editing and composition.
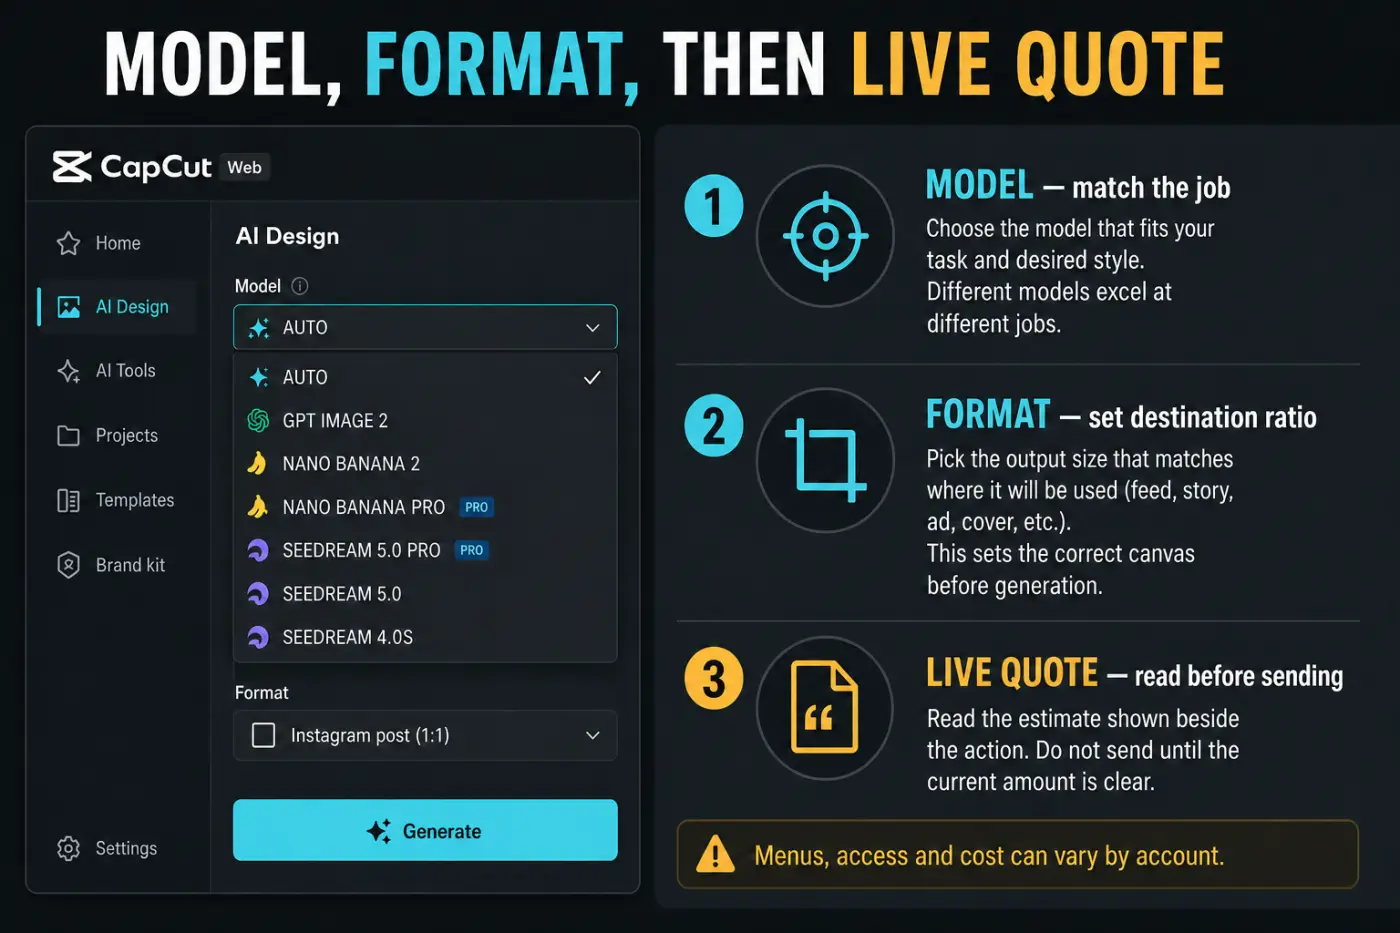
| Starting point | Use it to test | Don't assume |
|---|---|---|
| Auto | Whether CapCut can route a normal brief without manual model research | That Auto will choose the cheapest or most controllable option |
| GPT Image 2 | Instruction-heavy composition, reasoning and difficult image edits | That the picker description proves better results for your prompt |
| Nano Banana 2 / Pro | Fast iterations or prompts where text and knowledge matter | That “fast” or “Pro” fixes anatomy, spelling or rights |
| Seedream 5.0 variants | Realism, precise editing and layer-isolation tasks | That every CapCut surface exposes the same variant |
| Seedream 4.0S | A comparison against the current 5.0 family | That the older number means it is useless for your composition |
This menu exposes a conflict in the public marketing copy. One section names Seedream 5.0 and Nano Banana Pro, while another still mentions Seedream 4.5. A dated live selector is better evidence of what that account could choose, but it is only a list of available models. It doesn't prove their quality.
Credits, resolution and the “up to 8K” claim
CapCut’s credit help lists AI Image Generation as a credit-consuming action. It says Web should show the cost before the action, while Desktop should show a confirmation estimate. Read that number after the prompt, model and format are set. If you change a setting and the quote changes, the new quote is the one that matters.
I'm not turning credits into dollars here. CapCut’s help pages conflict about credit value, purchase routes, expiry and deduction order. The dedicated CapCut AI credits guide tracks those mechanics without pretending there is one permanent exchange rate.
The product page also promotes export “up to 8K.” CapCut’s clarity help describes more modest generation sizes. It lists typical Web formats around 1024 pixels on the short side and Desktop tiers of 1024, 1536 or 2048 where available. Those statements can both be true if the editor later upscales or exports the image on a larger canvas. A larger exported file is not proof that the model created native 8K detail.
After download, inspect pixel dimensions and open the image at 100%. Upscaling can make a file larger without restoring eyelashes, small type, texture or edge detail the generation never contained.
Write a prompt the model can follow
A useful image prompt is a compact art direction note. “Make a beautiful ad” leaves the subject, material, setting, light, angle and empty space to chance. Give the model one composition with visible constraints.
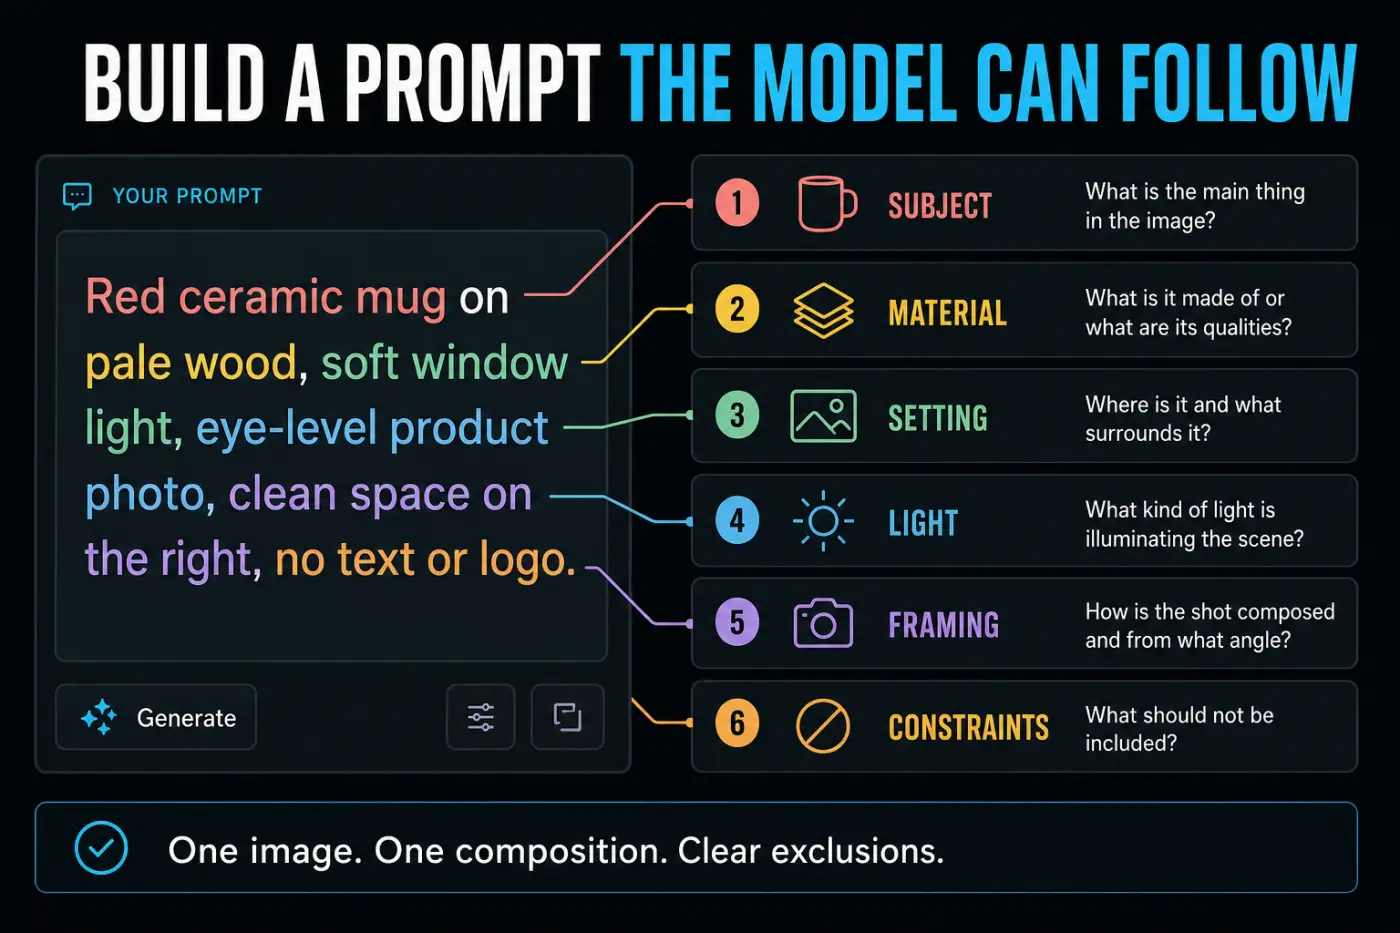
[Subject and material] in [specific setting], [light], [camera angle and framing], [space needed for later text], [details to preserve], no [unwanted text, logos, extra objects or distortions].
- Name one main subject. If five products fight for attention, the model must invent a hierarchy you never approved.
- Describe visible material. Ceramic, brushed metal, translucent glass and matte paper react to light differently.
- Specify one lighting idea. “Soft window light from the left” is easier to judge than “cinematic, dreamy, premium, dramatic.”
- Choose the destination before framing. Set the aspect ratio first: a 9:16 Story needs safe space in different places than a 16:9 thumbnail.
- Reserve space for copy. Ask for clean negative space, then add final typography in the editor. Generated spelling is still something to inspect, not trust.
- State exclusions that matter. No logo, no extra handle, no text, no duplicate object. A long list of vague negatives is less useful than three clear failure conditions.
Use reference images without losing control
A reference can guide composition, color, product shape or identity. Tell CapCut which part is the anchor. “Use this image” is ambiguous; “keep the mug shape and camera angle, replace the background with pale stone, remove all text” gives the model a testable job.
Reference helps when
- The object silhouette must remain recognizable
- You need a close pose or camera angle
- Brand colors or material should stay stable
- The text prompt alone keeps drifting
Reference creates risk when
- You don't own or license the image
- A real person has not consented to the use
- Confidential client material leaves an approved workflow
- The prompt asks the model to copy protected details too closely
Don't upload private client assets just because the button exists. CapCut’s Terms of Service treat User Content as non-confidential and tell users not to upload confidential or proprietary material. They require the necessary input rights, allow third-party AI terms to apply, and grant CapCut and its affiliates a broad service licence over submitted User Content. You retain ownership of content you own; that doesn't make an upload private.
Review the result before export
Look at the full frame first, then zoom in. A polished thumbnail can hide broken small type, doubled edges, impossible reflections or anatomy that falls apart around fingers and joints.
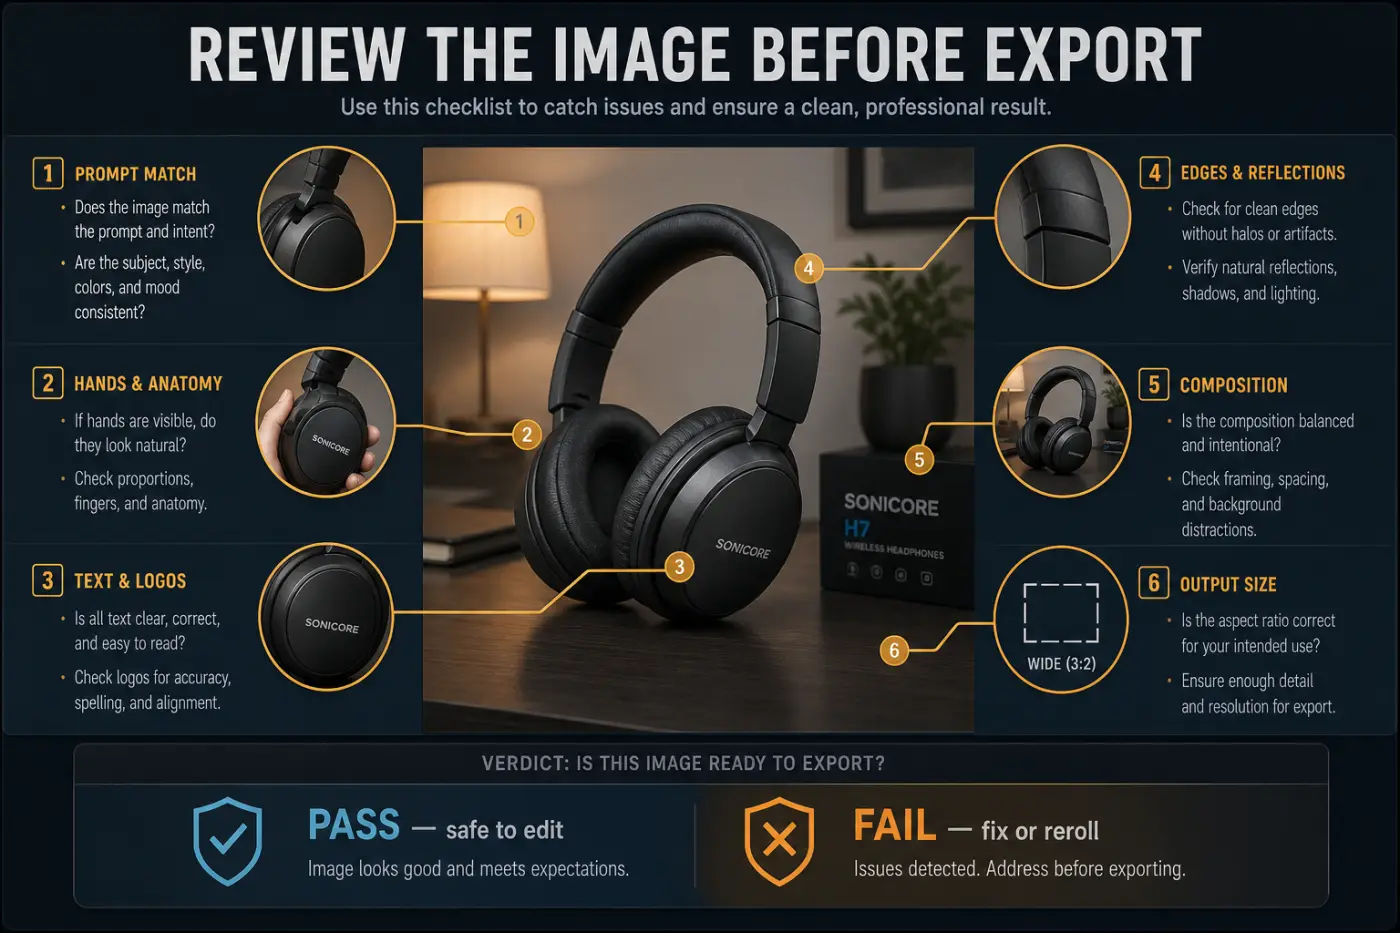
- Prompt match: is the requested subject present, or did the model swap material, color, count or setting?
- Anatomy and geometry: count fingers, handles, straps, spokes, windows and repeated objects.
- Text and marks: read every visible word. Check invented logos, misspelling and distorted packaging.
- Edges and reflections: inspect hair, glass, chrome, shadows, contact points and the boundary around the subject.
- Composition: confirm the subject is not cropped badly and the promised negative space is still usable.
- File properties: verify dimensions, format, transparency where needed and whether detail survives at the intended display size.
Refine the image or reroll?
The decision is simple: keep a sound base image and repair local defects; rerun a failed composition. Spending twenty minutes masking a wrong subject is not thrift.
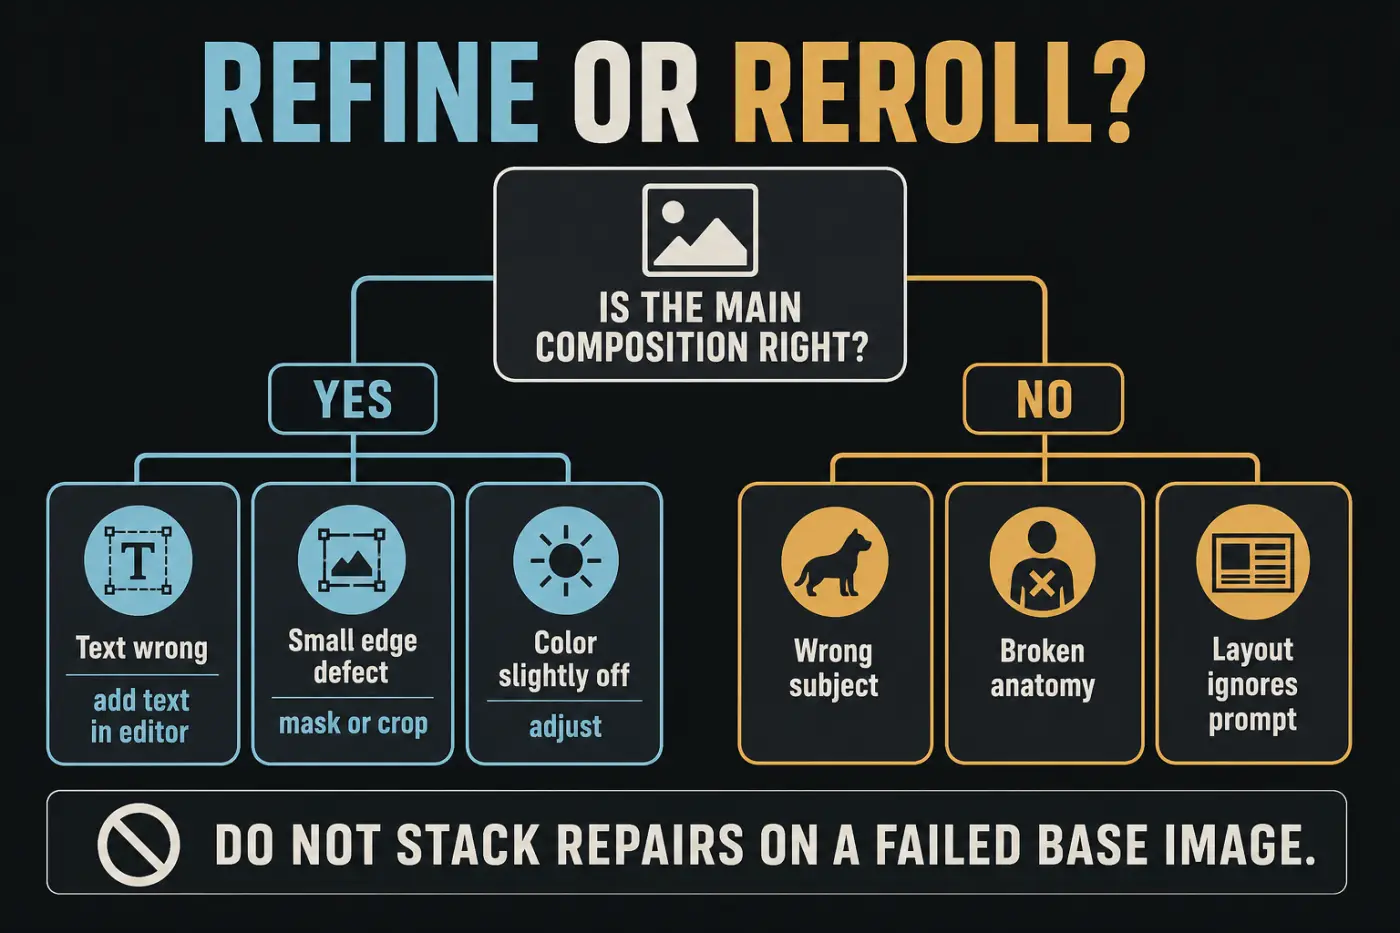
Add final copy in the editor when generated text is wrong; the CapCut text guide shows the controllable route. Crop a clean edge defect if the destination allows it. Correct a small color shift with adjustment controls. But narrow the prompt and rerun when the subject is wrong, anatomy is broken across the frame, or the layout ignores the requested safe space.
Commercial use needs a rights check
The product page calls results commercial-ready. Treat that as a capability claim, not permission for every input and output. Your rights depend on what you uploaded, who appears, what the model produced, which CapCut materials you used and whether another model provider adds terms.
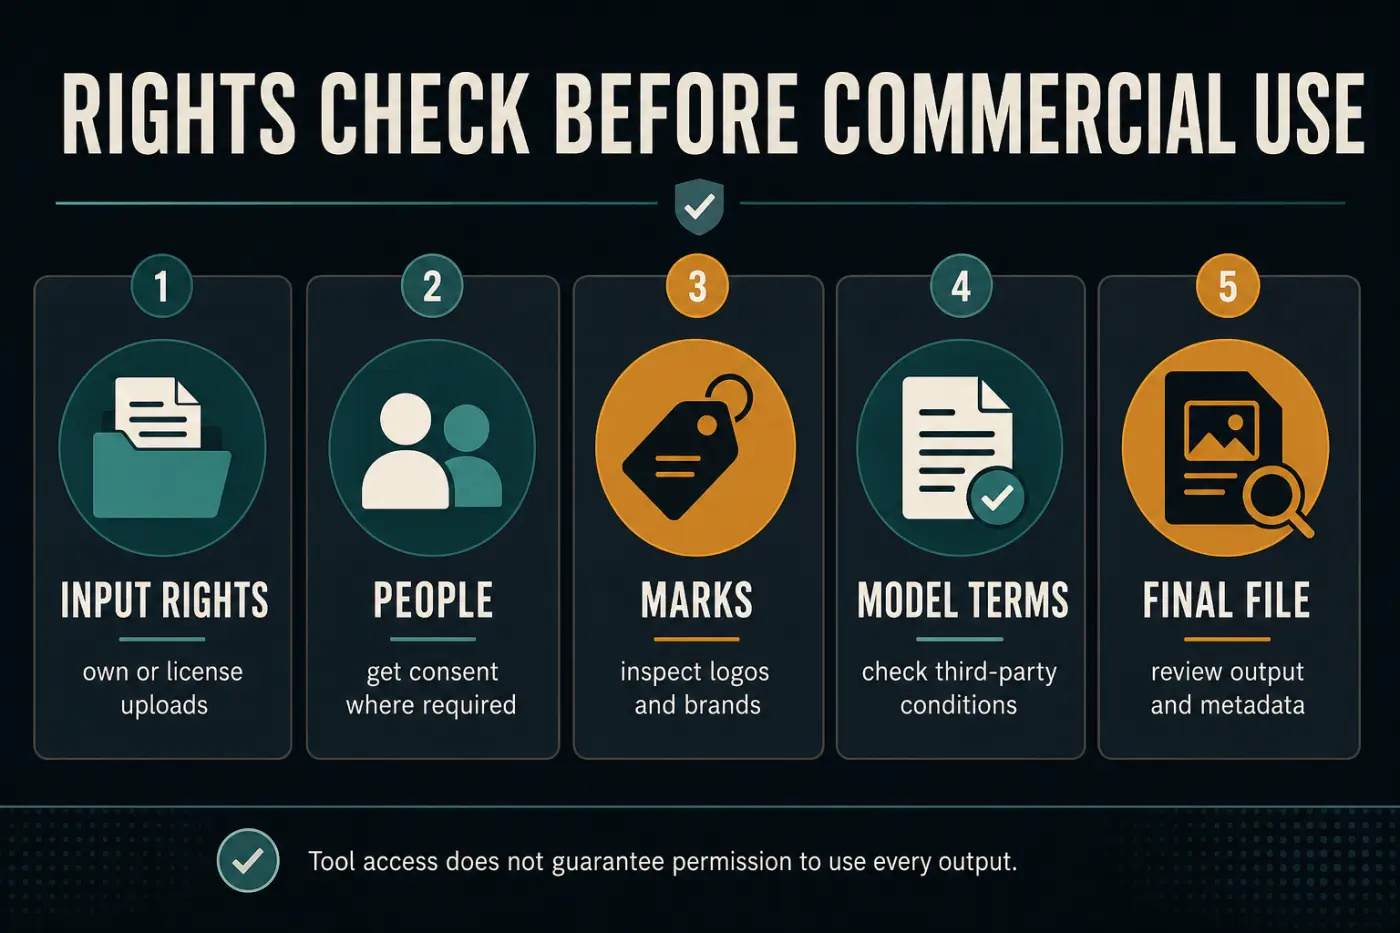
Use images you own or can license. Obtain consent where identifiable people and local law require it. Inspect generated brands, characters and likenesses. Read the terms linked to the selected model, and check CapCut’s Materials License Agreement when templates, stock or other CapCut-provided assets enter the design. This is a production checklist, not legal advice.
If CapCut AI Image is missing or not working
Update Desktop or refresh Web, sign in, compare the two surfaces and check whether the feature is available in your region and account.
Model access can roll out unevenly. Use the current picker; don't follow an old tutorial that assumes every model is universal.
Confirm the prompt, required reference, sign-in state, network and any credit or plan gate shown beside the action.
Check native dimensions, inspect at 100%, use the appropriate quality tier where available and don't confuse later upscale with regenerated detail.
Remove competing styles, state one subject and composition, make preservation instructions explicit and rerun one controlled change at a time.
Use our CapCut not working guide for sign-in, network, cache, version and device checks.
CapCut’s own AI availability help also points to region, account, version and rollout conditions. If the menu is absent on both Web and an updated Desktop build, access may be limited for that account or region. Don't assume there is a hidden toggle.
CapCut AI image generator FAQ
Is the CapCut AI image generator free?
CapCut may provide plan, activity or promotional credits, but there is no reliable universal free image count. Set the model and format, then read the current access or credit estimate before sending.
Where is the AI image generator in CapCut?
On Web, open AI Design and expand Design with AI. On Desktop, look under AI media for AI image. Mobile availability is inconsistent across CapCut’s own documentation, so check the signed-in live menu.
Which image models are available in CapCut?
The Web menu checked on August 10, 2026 offered Auto plus six named models: GPT Image 2, Nano Banana 2, Nano Banana Pro, Seedream 5.0 Pro, Seedream 5.0 and Seedream 4.0S. Availability can differ by account, region and app surface.
Can CapCut generate images from a reference photo?
Yes. The current AI Design panel accepts an image upload, and CapCut describes reference-guided or image-to-image generation. Upload only media you're allowed to use and tell the model what should stay or change.
Does CapCut AI Image generate 8K images?
CapCut promotes export up to 8K, while its help material describes smaller native generation tiers. Export or upscale dimensions are not the same as native model detail, so inspect the saved file at 100%.
Why is CapCut AI Image missing?
The feature or a specific model may depend on region, account, plan, rollout and app version. Compare current Web and Desktop menus, update the app and check CapCut’s AI availability help.
Can I use CapCut AI images commercially?
Don't rely on a blanket promise. Check rights to the input, consent for people, generated marks and likenesses, CapCut terms, Materials License terms and any third-party model conditions before commercial use.
Verdict: control the assignment, then judge the file
Use CapCut AI Image when
- You need a concept, background or campaign draft
- The destination format is known before generation
- You can describe one clear composition
- You will inspect and edit the saved result
Use another workflow when
- Exact product geometry or typography can't drift
- You can't upload the reference under your agreement
- The live access or credit gate is poor value
- A licensed original asset already solves the job
CapCut gives you a convenient prompt-to-canvas route, but convenience is not quality control. Choose the right image workflow, write a brief with visible constraints, read the current gate, and reject a weak base image early. The useful result is not the prettiest thumbnail in the grid; it is the file that survives a close look and still fits the job you opened CapCut to do.