

Checked September 22, 2026. CapCut moves audio controls between desktop, web and mobile, and some automatic tools depend on the app version or account. The workflow below uses controls documented in CapCut’s current guidance; use the equivalent Volume, Fade, Keyframe or Ducking control if your layout differs.
The fastest reliable mix starts with the voice. Make speech clear on its own, add music at a lower baseline, lower the music further only while someone speaks, smooth those moves with keyframes or fades, then check the saved file on headphones and a phone speaker. Do not begin by copying somebody else’s volume percentage. A dense song, a quiet voiceover and a phone recording all need different balances.
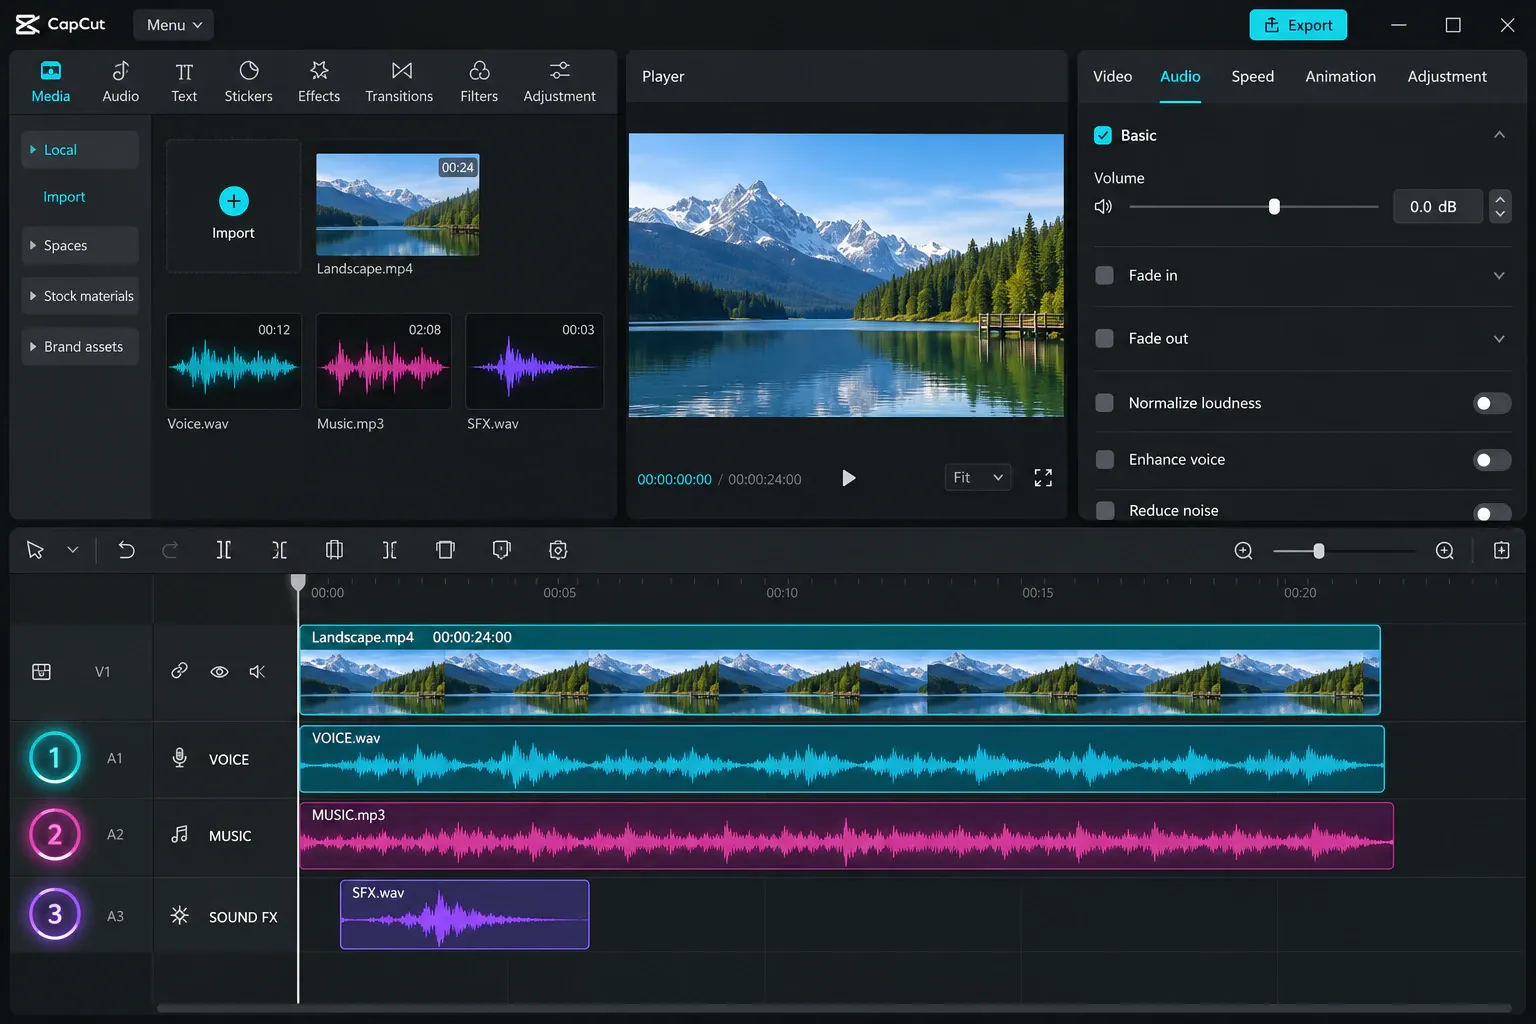
CapCut’s current audio mixer overview confirms that dialogue, music and sound effects can sit on separate layers with independent volume control. That separation is what makes a clean mix possible. If speech and background sound are already baked into one recording, the options are narrower; you may need a replacement voiceover or a more specialized audio tool.
Use separate tracks before touching volume
Keep narration, music and important sound effects on different timeline layers. Name or position them consistently if the project is long: voice at the top of the audio stack, music below it, then effects. The visual organization matters because a volume move intended for music can otherwise land on a sound effect or the original camera audio.
If you still need to bring music into the project, follow the separate guide to adding music in CapCut. For the steps that come before and after the mix, use the main CapCut tutorial hub. This page begins after the clips are already on the timeline.
Before mixing:
- Trim obvious empty space and unwanted starts or endings.
- Split the music where a section needs its own treatment.
- Mute duplicate audio tracks that play the same sound twice.
- Check whether the voice itself clips, distorts or contains strong room echo.
- Leave the original recordings available so a destructive edit is reversible.
A loudness tool cannot recreate a voice that was clipped during recording. Noise reduction may help steady background noise, but aggressive processing can damage consonants and make speech sound watery. Use our CapCut noise-reduction guide when the recording needs cleanup before the mix.
Set the voice first, then bring in music
Solo the narration or temporarily mute the music. Listen to a representative section that includes ordinary speech, a quieter sentence and the loudest word. Set the voice so it is comfortably understandable without sounding strained or distorted. If several voice clips jump in level, correct those differences before deciding where the music belongs.
CapCut offers loudness normalization as a way to make levels more consistent. That can reduce distracting jumps among similar voice clips, but it does not decide the relationship between narration and music. A normalized music track can still mask speech, and a normalized voice can still be too quiet in a busy mix.
Now unmute the music and start it low. Raise it until it contributes energy, then back it down if you notice any of these problems:
- words become harder to understand;
- you need to concentrate on the narration;
- consonants disappear beneath drums or vocals;
- the music feels like the subject rather than support;
- the mix sounds acceptable on headphones but speech vanishes on a phone speaker.
There is no useful universal “voice at 100, music at 10” rule. Music with vocals or dense midrange often competes more strongly with speech than a sparse instrumental at the same displayed level. Judge the actual passage, not the slider number.
Duck the music only where speech needs room
Ducking means lowering the music or ambience during speech and bringing it back between spoken sections. The goal is not to make the background disappear. It should remain part of the scene while leaving enough space for every important word.
CapCut’s current ducking guide documents both manual volume changes and a mobile Auto Ducking option in supported interfaces. If you see an automatic control, treat it as a first pass and listen to every transition. If you do not see it, or it lowers the wrong sections, keyframes give you direct control.
Build a four-point ducking envelope with keyframes
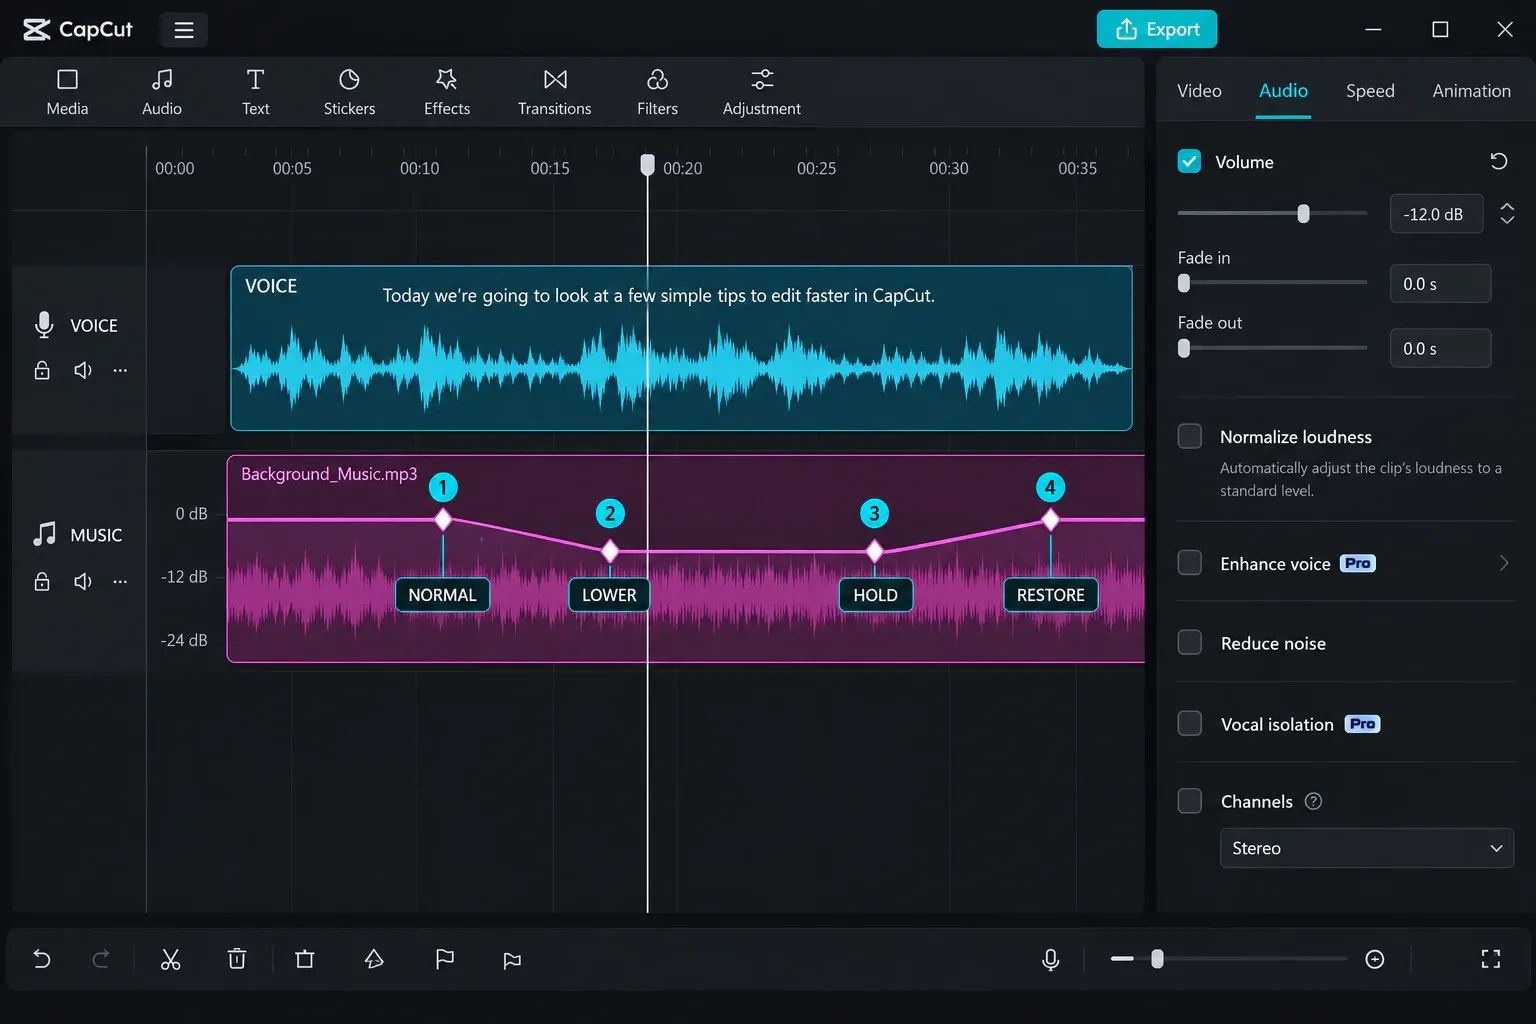
CapCut documents keyframes as controls for changing properties over time, including volume in supported audio workflows. On the music track, build each duck around a spoken section:
- Before speech: place a keyframe at the normal music level shortly before the first word.
- At the start: place another keyframe after it and lower the music until the voice becomes easy to follow.
- Near the end: hold that lower level through the final word with a third keyframe.
- After speech: place a fourth keyframe and return the music gradually to its normal level.
The horizontal distance between each pair controls how quickly the level changes. Keyframes almost on top of one another create a sharp move. More space creates a gentler ramp. Watch for breaths and short pauses: if the speaker resumes immediately, leaving the music down usually sounds calmer than making it pump up and down between phrases.
For several short lines close together, one longer duck may sound more natural than a separate dip for every sentence. For a long music-only section, let the track return to its baseline so the edit regains energy. This is a listening decision, not a requirement to draw the same envelope everywhere.
When Auto Ducking helps—and when it does not
Use Auto Ducking if it is present and the result follows the spoken sections accurately. Then check:
- Does the music fall before the first important word?
- Does it stay down through quiet syllables and pauses?
- Does it rise after the thought ends rather than after every breath?
- Does it react to the intended voice track rather than unrelated sound?
If the automatic result pumps, cuts musical accents or misses a quiet line, replace that section with manual keyframes. Availability and naming can differ, so do not spend time hunting for a button shown in a tutorial from another platform when the same result can be built directly on the timeline.
Use fades for clip edges, not as a substitute for ducking
A fade shapes the beginning or end of a clip. Ducking changes volume around speech inside a longer clip. They solve related but different problems.
CapCut’s audio editing guidance describes volume, fade-in and fade-out controls for a selected audio track. Use a fade-in when music should enter gradually at the start of a scene, and a fade-out when it should leave without an abrupt stop. If two music clips meet, overlap or shape their edges only when the transition benefits from it; not every cut needs a crossfade.
For a spoken section in the middle of a song, keyframes usually preserve the music better than splitting the track and fading every fragment. Repeated clip-edge fades can create gaps, uneven timing and more pieces to manage.
A clean sequence often looks like this:
- short fade-in at the start of the music;
- stable baseline under nonverbal footage;
- keyframed duck during narration;
- return to baseline after the line;
- fade-out at the end of the scene.
Improve voice clarity without over-processing it
If the voice is inconsistent but otherwise clean, normalization can help even out clips. If it lacks presence, CapCut’s Voice Enhancer guidance describes processing intended to improve clarity. Keep the unprocessed version available and compare a short section before applying the same treatment to the entire project.
Use these tools for the problem they actually address:
| Problem | First move | What the tool cannot guarantee |
|---|---|---|
| Voice clips jump in level | Normalize or adjust clips individually, then rebalance music. | Correct creative balance against every song. |
| Steady fan or room noise | Apply restrained noise reduction and compare consonants. | Repair severe echo or separate music baked into the voice track. |
| Voice sounds dull but is recorded cleanly | Try subtle voice enhancement. | Restore clipped peaks or microphone detail that was never recorded. |
| Music covers only some words | Duck the music with keyframes or supported Auto Ducking. | Fix an unclear or distorted voice source. |
| Whole project has no audible output | Check mute, track level, device output and export separately. | A mix adjustment cannot solve every playback or device problem. |
If the project is silent rather than merely unbalanced, use the CapCut no-sound checklist before rebuilding the mix.
Mix sound effects around the story
Sound effects should be audible for a reason: a transition, action, notification or impact. Place each effect on its own layer when you need independent control. Check it once with music muted and again in the full mix. An effect that sounds fine alone can become harsh when it lands on a snare, a loud word or another effect.
Prioritize in this order:
- dialogue and essential information;
- effects that explain an action;
- ambience that establishes the scene;
- decorative effects and music accents.
That order is editorial guidance, not a CapCut rule. A music-led montage may reverse the emphasis because music is the main content. The useful question is which sound the viewer must notice at that exact moment.
Troubleshoot the mix by symptom
| What you hear | Likely cause | Practical fix |
|---|---|---|
| Voice is clear alone but disappears with music | Music competes in the same moments or frequency range. | Lower the music baseline, then add a deeper duck only during speech. |
| Music jumps up after every sentence | Automatic or manual duck ends too early. | Hold the low level through short pauses and restore it after the thought. |
| Music vanishes whenever somebody speaks | Duck is too deep or the voice source is still unclear. | Raise the ducked level slightly; improve the voice before lowering music further. |
| Every clip begins with a click or abrupt entrance | Clip edge is too hard or cut at a difficult point. | Add a short fade and inspect the cut position. |
| Voice sounds watery after cleanup | Noise reduction or enhancement is too strong. | Reduce or remove the processing and compare with the original. |
| Preview sounds right but the saved video does not | Export, player or device stage differs. | Play the local file outside CapCut and compare the same passage. |
| Audio is good on headphones but weak on a phone | Mix depends on stereo width or subtle low-level detail. | Recheck speech on a phone speaker and simplify the balance. |
When you need only the finished audio track, the audio-only export guide covers available routes and format limits. For an ordinary video, keep the audio check tied to the actual exported video because image and sound timing can shift your perception of a transition.
Check the saved file before calling the mix finished
Listen to the local export outside CapCut. CapCut includes export as the final step in its general editing workflow, but the saved file deserves its own review.
Use two short passes:
- Headphones: listen for abrupt ramps, clicks, damaged consonants, duplicate audio and music that changes level for no reason.
- Phone speaker: check whether every important word remains understandable and whether key effects still register.
Then watch the beginning and end of each ducked section. The music should make room for speech without sounding like someone switched it off. If a problem starts only in the saved file, investigate the export or playback stage instead of changing a timeline mix that was already balanced.
My recommendation is to finish one representative minute before treating the whole project. Set the voice, choose the music baseline, build one good duck, check it on a phone, and reuse that decision pattern rather than copying identical numbers. CapCut can handle straightforward narration, music and effects mixes; move to a dedicated audio editor when you need detailed EQ, compression, routing, metering or repair that your current CapCut interface does not expose.

Frequently asked questions
What volume should music be under voice in CapCut?
There is no universal percentage. Start with the voice at a comfortable clean level, add the music quietly, and lower it until every important word is understandable on both headphones and a phone speaker. Dense music with vocals usually needs more room than a sparse instrumental.
Does CapCut have automatic audio ducking?
CapCut documents Auto Ducking in some mobile workflows, but availability and naming can vary by platform, version and account. If the control is missing or the result pumps, use volume keyframes on the music track.
Is loudness normalization the same as ducking?
No. Normalization makes levels more consistent within or among clips. Ducking changes the music level around speech. A normalized track can still be too loud beneath narration.
How do I fade audio in and out in CapCut?
Select the audio clip and look for Fade in and Fade out in its audio or Basic controls. Increase the duration until the entrance or ending sounds natural. Use keyframes instead when the volume must change inside a longer clip.
Why is my voice still unclear after lowering the music?
The recording may contain clipping, strong echo, noise or speech already mixed with other sound. Compare the voice by itself, reduce processing that damages it, and consider a replacement voiceover when the original cannot be separated cleanly.