

On CapCut Desktop, open Export, turn off Video exporting and enable Export audio. Pick MP3, WAV, AAC or FLAC from the formats your panel offers, then save the file. You don't need to detach every clip's sound first. For the editing that comes before a separate audio file, our step-by-step CapCut tutorial connects cutting, sound, motion and export.
On iPhone, Android or the Web, look for an explicit audio-only download option first. If there isn't one, the fallback below uses a saved video and a computer. An extracted waveform on the timeline still lives inside the project. It isn't an MP3 sitting in Downloads.
Documentation and output routes checked September 12, 2026. Menu labels and access can differ by platform, build and account.
Export audio only on Windows or Mac
CapCut's Desktop conversion instructions cover the native route. Get the mix right before you open the export window. Keep the voice, music and effects you want, and mute any camera sound or reference tracks you don't want in the file.
Check music permissions first. Just because a song is available in CapCut doesn't automatically mean you can distribute it as a separate audio file or use it somewhere else. The materials licence restricts standalone redistribution and sets conditions for music use, and it points US users to a separate agreement. Check the terms for your region and for the specific track. A Pro subscription or a commercial-use label isn't blanket permission.
- Open the finished project. Check its start, end and total duration. Use a duplicate if you need to remove part of the edit.
- Mute the tracks you do not want in the saved file, then listen to the intended mix.
- Click Export in the upper-right corner of the Desktop editor.
- Turn off Video exporting so CapCut does not render an additional video.
- Enable Export audio and select a format available in that panel.
- Give the file a distinct name and choose a destination folder.
- Click Export. Open the saved audio outside CapCut and check its format, duration and sound.
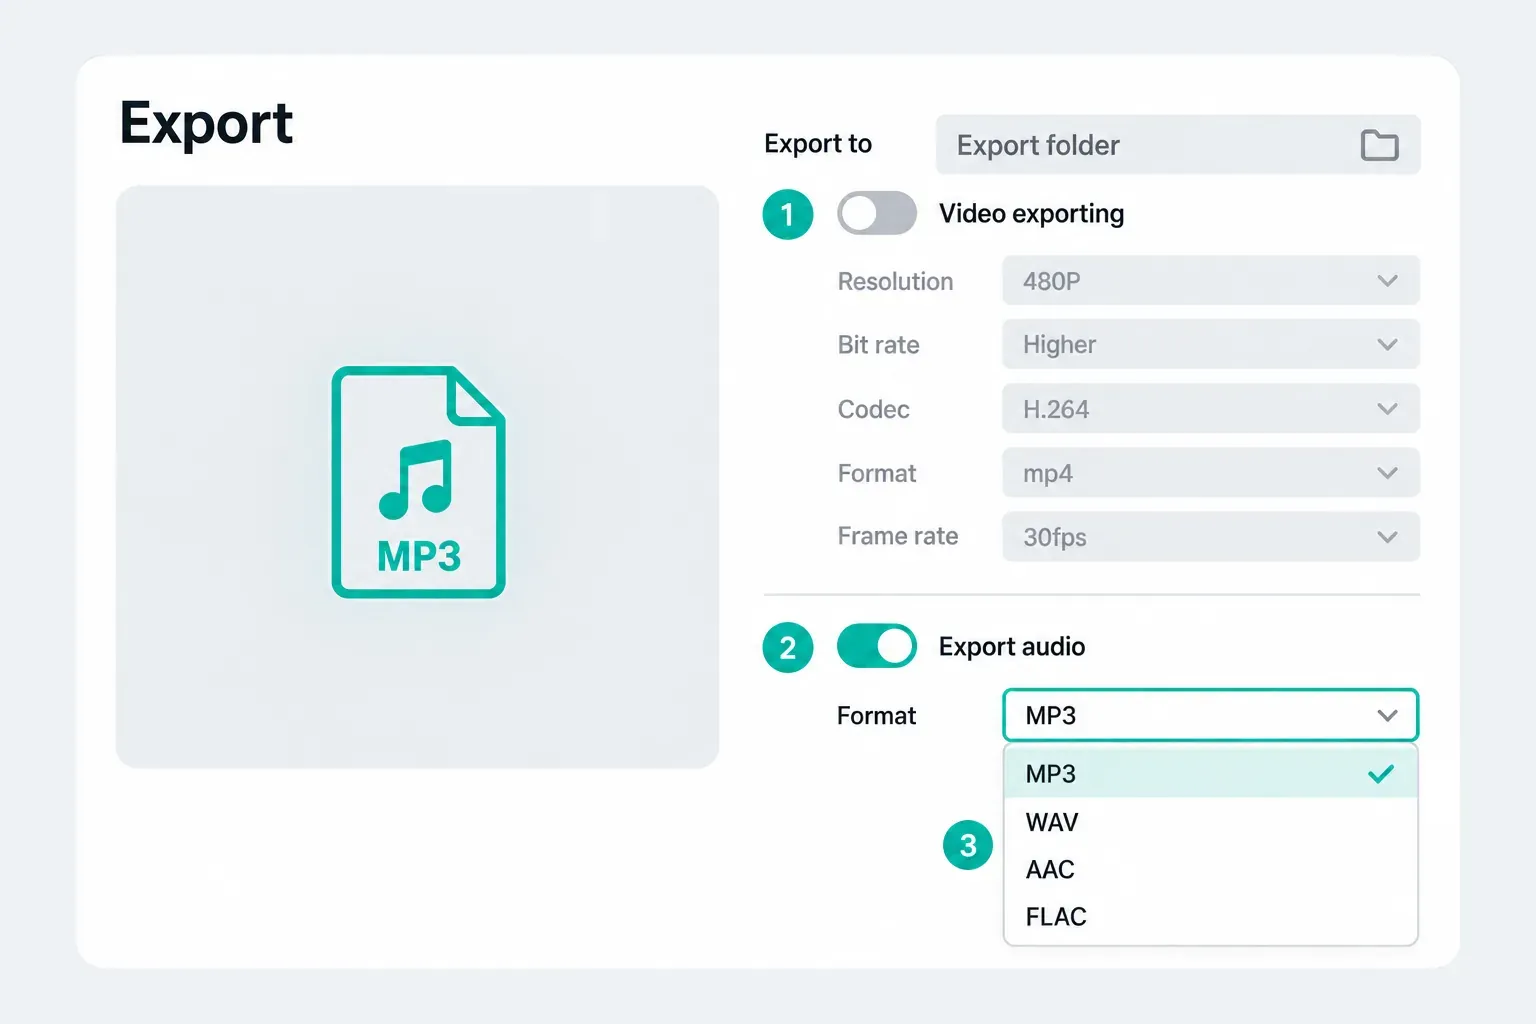
Those disabled resolution, codec and video-bitrate fields belong to the video render, and they aren't MP3 quality settings. Read the numbered menu as a guide to the controls, not a promise that every current account gets the same options.
Save one clip or one track without extra silence
Clicking a track isn't a reliable way to tell CapCut to export only that track. Set up what should be heard, and how long it should last, before you export.
- Complete soundtrack: keep the intended tracks audible. Listen through transitions where voice, music and effects overlap.
- Sound from one source video: create a temporary project, import that video, trim it to the wanted part and put the retained clip at 0:00. Leave nothing after it.
- One already-edited voiceover or music track: use a duplicate of the edited project. Keep the required sound and processing, remove unwanted time in that copy, and check its duration. Reimporting the original recording will not carry over your edits.
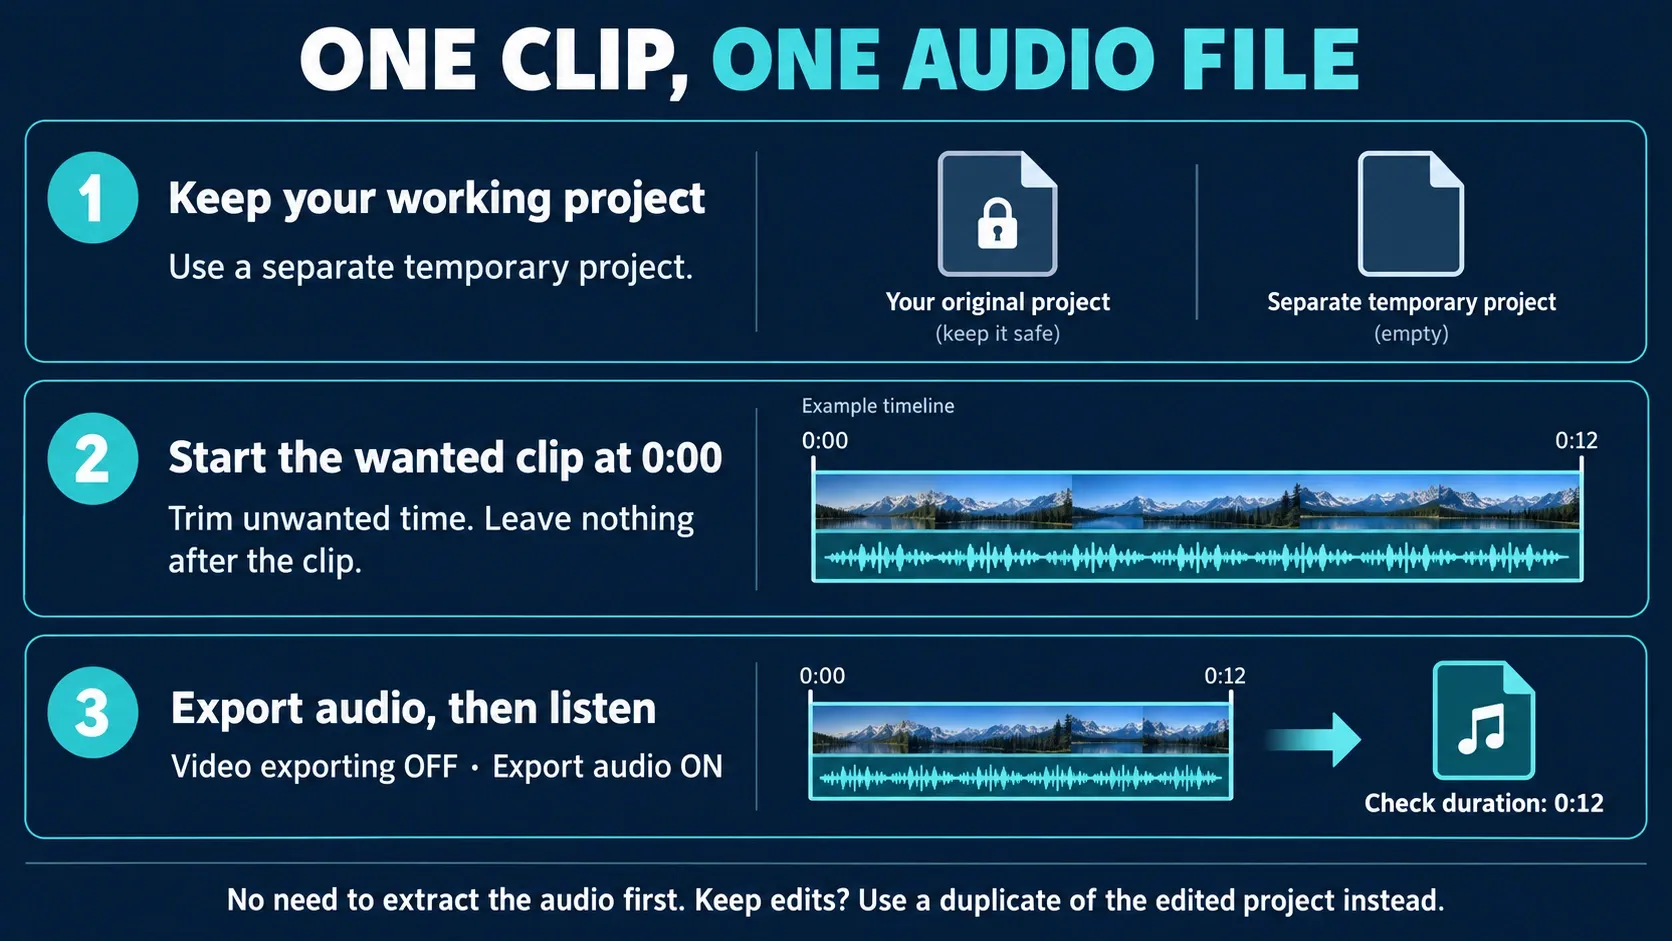
A muted track can still leave its time span in the project. If the saved audio starts or ends with a long stretch of silence, check the timeline boundaries instead of switching file formats over and over. The example above uses a twelve-second clip. That's not a CapCut duration limit.
Our selected-clip export guide covers video range controls. Don't assume the same selection automatically controls the audio output. If your audio panel has no clear range setting, keep the project short so it's easier to check you got what you intended.
When do you need Extract audio?
Use it when you want to edit the embedded sound apart from its video, say to move a spoken line while the picture stays put. CapCut's extraction instructions show the result as a separate timeline layer. Export comes later, and that's the step that gives you a playable file outside the editor.
For a simple video-to-audio copy, you can leave the video itself on the timeline. If you've also imported or duplicated an audio track, check for doubled sound. Keep in mind that native audio export renders the result, so it isn't a guaranteed bit-for-bit copy of the original encoded stream.
Which audio format should you choose?
MP3 is a practical delivery choice for speech, review copies and services that accept it. If another editor will work on the recording, WAV with uncompressed PCM is a good fit. It usually takes more space than a lossy MP3 or AAC of the same length.
AAC is another compact, lossy delivery format, so check which extension and codec your destination accepts. FLAC uses lossless compression and is handy for a working master when the next app supports it. If you want a size estimate before you export, run the numbers in the audio file size calculator.
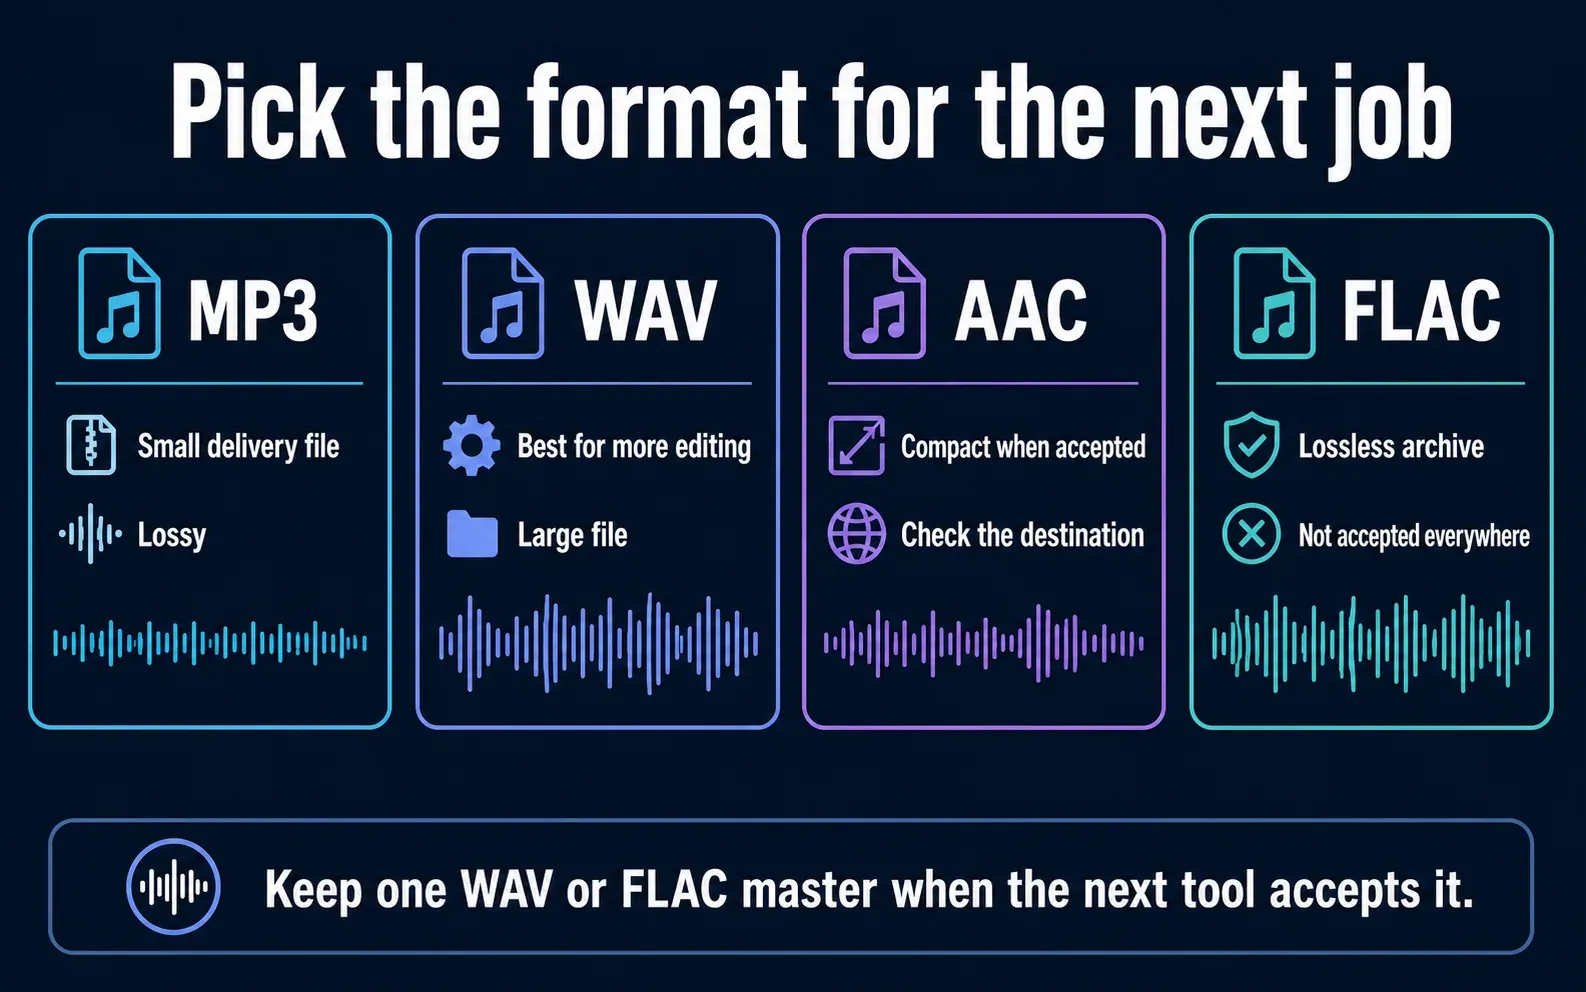
FLAC preserves the PCM data fed into its encoder. It can't bring back detail that's already lost in an MP3. Keep a PCM WAV or FLAC master for further editing, and make the delivery copy you need from that instead of re-exporting a lossy file again and again.
When your audio panel shows bitrate, sample rate or channel options, go with whatever the receiving editor or service asks for. Don't go hunting for controls that only show up in someone else's version. A higher number can't fix clipped speech, room echo or a noisy microphone recording.
Audio-only export on iPhone and Android
Start on your project's export screen. If it explicitly offers an audio file, pick one of the available formats, save it, and make sure the result plays outside CapCut.
If it only offers video, detaching the sound won't add an MP3 download on its own. CapCut's Mobile extraction guide still describes saving a video, and it includes an undated promise about future audio export. That's not a reliable release date, and it's no guarantee for your build.
Your practical fallback is to export a video with the finished sound, move that file to a computer, and use QuickTime or Audacity as described below. Hang on to your project and original media. A finished video holds the mixed soundtrack, not your separate CapCut tracks.
Users have also reported missing Mobile audio export despite having Pro. That's a good reason to check the control on your own screen, but those reports don't prove every current phone build lacks it. I wouldn't pay again as a first troubleshooting step.
Convert a saved video on your computer
Stick to footage you have permission to convert. For private recordings, use a local file workflow and a destination folder that doesn't sync, instead of uploading the video to an unknown converter. These are computer workflows, not phone-only solutions.
Mac: QuickTime Player for AAC
- Open the exported video in QuickTime Player and confirm that it has the sound you need.
- Choose File → Export As → Audio Only.
- Enter a name, choose the destination and click Save.
- Play the resulting audio file and check its duration.
Apple specifies MPEG4 audio with an AAC track for this command. That menu doesn't offer MP3 or WAV. Renaming the file extension doesn't convert the format either.
Windows or Mac: Audacity for MP3 or WAV
Start a new local Audacity project and import the saved video, not a CapCut project file. If it won't open, follow the official Audacity import and FFmpeg instructions. That optional library lets Audacity import audio from many video files, as long as they aren't DRM-protected.
- Listen to the imported sound. Keep only this intended recording in the temporary project.
- Choose File → Export Audio, then export to your computer if asked to choose between local and cloud output.
- Select MP3 or WAV, a filename and a folder.
- For the whole imported recording, choose Entire Project in the Audacity 3 export dialog. Confirm the length, export and play the saved file.
The Audacity export manual separates this from Current Selection. That mode can export selected tracks even when Mute or Solo makes them inaudible during playback. So if you export a selection on purpose, check both the time span and which tracks are selected.
Routing the audio through a video adds one more conversion step. When native audio output from the original CapCut edit is available, use that instead. Converting a silent video can't recover the missing soundtrack.
What if you are using CapCut Web?
The browser editor can split a video's sound out into its own timeline track. When you're done editing, open Export and look for an explicit audio-only format. If it's there, save it and check the downloaded file. If the panel only exports video, download that result and follow the computer conversion steps above.
Don't treat a share or review link as your final audio file. Before you send anything to another editor, make sure the download itself is in the format you need.
Missing control, Pro prompt or silent file?
Read the exact message before you change anything in the project. A locked extraction action, an unavailable audio-export control and a premium item inside the edit aren't the same problem.
- No audio control: confirm the platform first. A Desktop tutorial does not establish what Mobile or Web can export.
- Unexpected upgrade prompt: compare with a short project made from your own ordinary recording. This helps distinguish a project-specific restriction from a control missing in that account; it does not guarantee free export.
- Already subscribed: follow CapCut’s account and subscription checks. Confirm the active entitlement belongs to the account currently signed in before buying again.
- Thinking of updating: first back up the project and its source media. Do not reinstall while an important local draft has no recoverable copy.
- Silent output: check the source and mix, then use the CapCut no-sound checks.
- Export starts but fails: use the export-stuck troubleshooting guide rather than changing audio formats at random.
There's no useful universal price to quote for this one action. CapCut says subscription prices vary by region, device and promotion, and the price list alone won't tell you whether an audio control is included.
Before you send the file
Open it in another player. Check the beginning, middle and end, the full duration, and the balance between voice and background sound. If the clip is short, listen to the whole thing. Then make sure no unwanted camera audio or reference music slipped into the mix.
Hold on to the original project and media until the receiving app accepts the file. If you're exporting a video next, the CapCut export guide covers resolution, frame rate and codec choices.
Audio-only export FAQ
Can CapCut save an MP3?
Yes, the documented Desktop route offers MP3 under Export audio. Disable Video exporting if you only want sound. Confirm the format and any access requirement in your current panel.
Do I need to extract audio before exporting?
No, not for a normal copy of the audible project mix. Extract audio is useful when you need to edit a video’s embedded sound as a separate timeline track.
Can I export audio only on iPhone or Android?
Check for an explicit audio-file option in your export screen. If it is absent, save a video and convert it on a computer using the steps above. The fallback in this guide is not a phone-only workflow.
Is audio-only export free?
Check the specific action and upgrade message in your app. Extraction, audio export and premium project items can involve different restrictions. A general Pro price list does not prove that an action is included.
Why does my exported audio contain extra silence?
The project may include gaps or material outside the wanted clip. Muting a track need not shorten the timeline. Use a temporary short project at 0:00, or trim a duplicate of the edited project, then check the saved duration.
Should I use MP3 or WAV?
Use MP3 for a compact delivery file when your destination accepts it. Prefer uncompressed PCM WAV for further editing when supported. Neither choice repairs noise or detail already lost in the source.
Can CapCut Web download MP3?
Separating sound on the timeline is not proof of an MP3 download option. Inspect Export for an explicit audio format; if only video is available, download it and use the computer conversion steps.
Can QuickTime export MP3 or WAV with Audio Only?
No. Apple documents MPEG4 audio with an AAC track for QuickTime Player’s Audio Only command. Use a suitable converter such as Audacity when you need MP3 or WAV.