

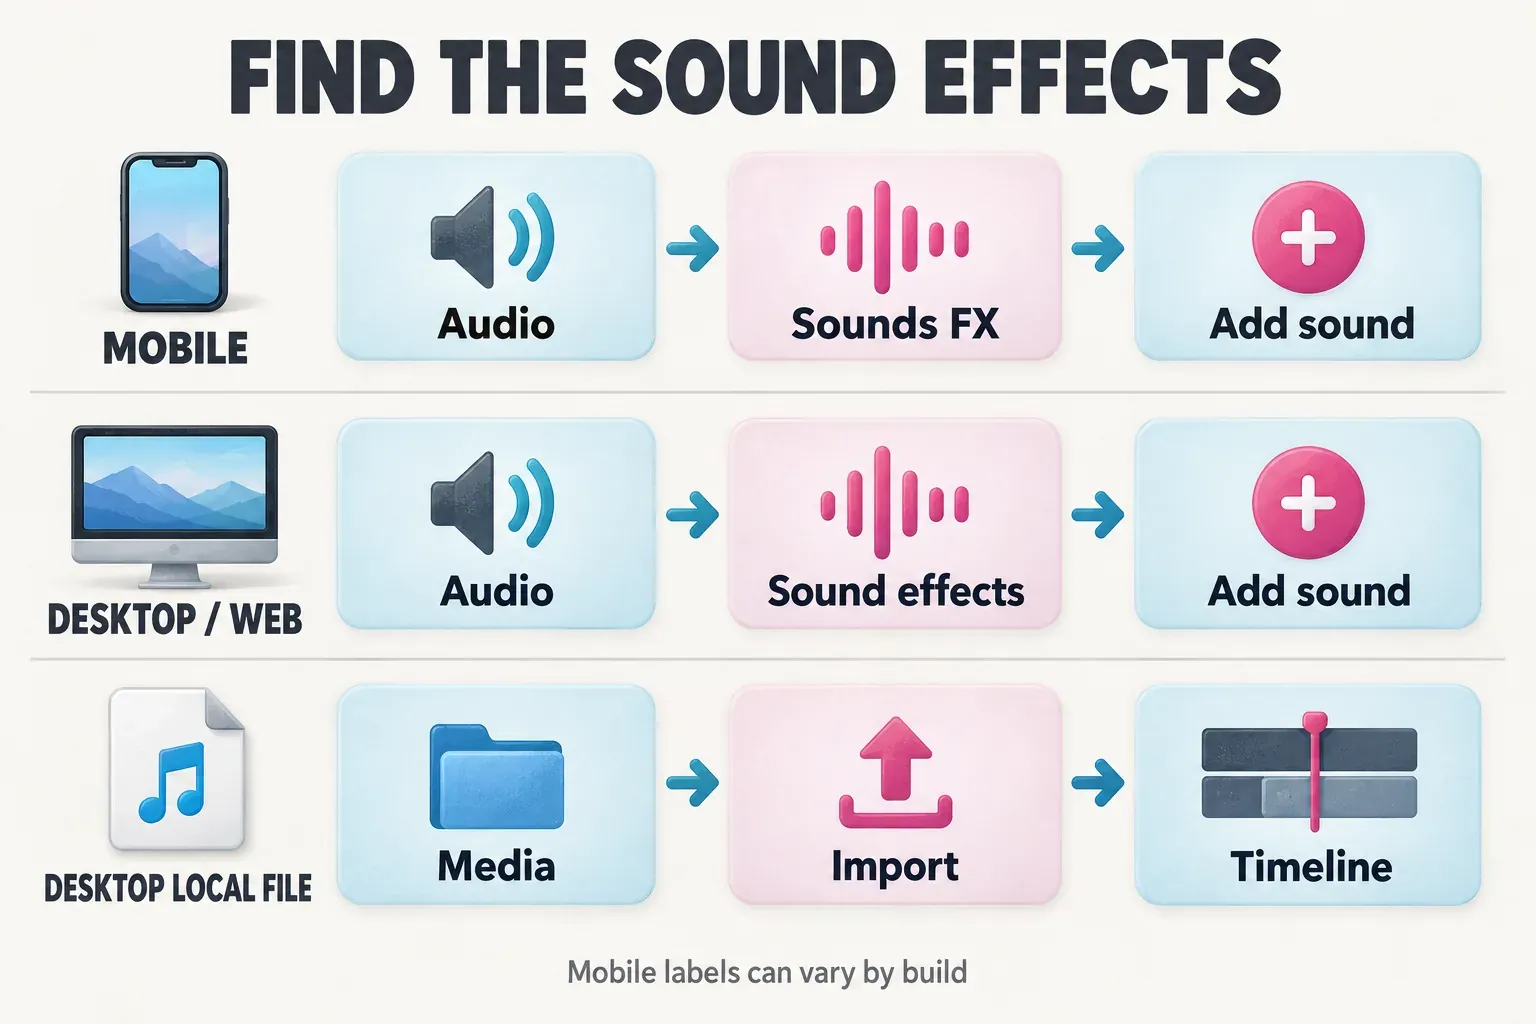
To add sound effects in CapCut, open Audio, choose the sound-effects library, preview a sound and add it to the timeline. Move the new audio clip to the action you want to emphasize, then select that clip to adjust its volume. On a phone, the library may be labelled Sounds FX; Desktop and Web instructions use Sound effects.
Finding a whoosh is the easy part. Making it land on the cut takes more care: the strongest part of the sound may occur after the file begins. I’d choose the visual moment first, then place the sound around it. That gives the effect a purpose instead of making every transition louder.
This guide covers separate SFX clips, including your own licensed audio. Changing a recorded voice is a different job; a voice effect changes the voice already in the project.
Add a sound effect on your device
Open a project with your video on the timeline. Decide whether you need a library effect or a file you already own, and check the sound’s usage terms before committing to it. A free download and permission to use it in an advertisement are separate questions.
Mobile: start from Audio
CapCut’s phone sound-effects instructions describe Audio → Sounds FX, followed by adding the sound and adjusting its clip on the timeline. The label and toolbar layout can differ between builds.
- Open Audio in the project toolbar and look for Sounds FX or Sound effects. If you are still inside a selected video’s editing tools, return to the main project toolbar first.
- Open the library. Browse the available categories, or use its search field if your build provides one. Try an action word such as whoosh, click, pop or footsteps.
- Listen to the candidate before adding it. Check any paid-access badge and the asset’s usage information. Use the add control beside the chosen sound.
- Find the added audio clip under the video. Drag the whole clip to change its timing; trim an edge to shorten it. Tap that audio clip to adjust Volume.
For a sound saved on your phone, use the device-audio option offered by your build. The local-file branches in our add-music guide explain file access and what to do when that entry is missing. You do not need to extract a song from someone else’s video to get a usable sound effect.
Desktop: Audio for the library, Media for your files
The official Desktop notification-sound workflow uses Audio → Sound effects, a search field and the + control to add the chosen sound. Search for the action, preview the available choices and add one. Then move its audio clip beneath the relevant video moment.
For your own file, use Media → Import, select the audio and place it on the timeline. CapCut documents this local-audio import route and MP3/WAV support. Keep the original file and its license outside the project so you can locate both later.
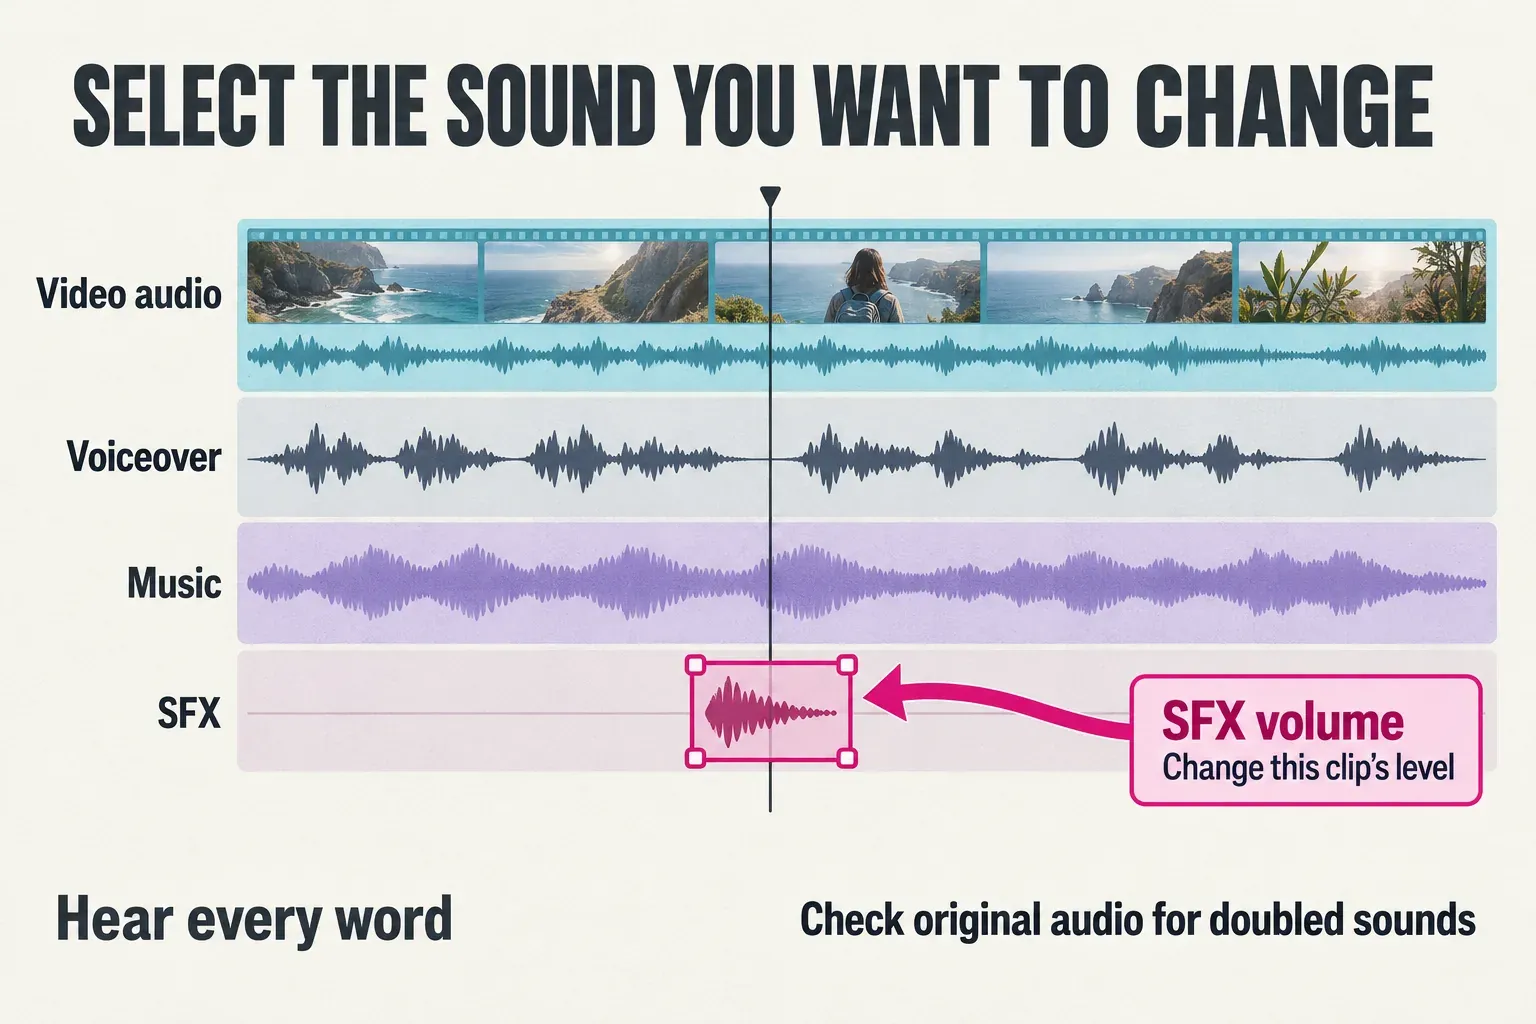
Select the SFX clip before adjusting its audio properties. The volume control belongs to the selected sound; selecting the video instead changes that video’s original audio.
Web: open Sound effects in Audio
In CapCut Web, the documented sound-effects route is Audio → Sound effects in the left sidebar. Browse or search, then use + or drag the effect onto the timeline. Move and trim the added clip where you need it.
These are platform routes, not a promise that every sound appears in every account. If a particular item needs paid access, choose a permitted alternative or a separately licensed local file. The Free versus Pro feature guide covers broader access questions.
Choose a sound that fits the action
Search by what happens on screen. A whoosh can support a fast camera move or a title sweeping into position. A short click or pop suits a button, label or small reveal. An impact gives weight to a landing or dramatic cut; room tone, rain or another ambience can continue underneath a scene.
Listen beyond the opening. One search result may have a soft lead-in and a long tail, while another hits immediately. Choose the shape that fits the edit before trying to force it into place. For a quiet tutorial, I’d start with the shortest, least distracting cue that makes the action clearer.
The search words above are starting points, not guaranteed asset names. If the exact effect is unavailable, try the underlying action or use a file licensed for your destination. Avoid downloading a random “no copyright” reupload with no identifiable license.
Make a whoosh land on the cut
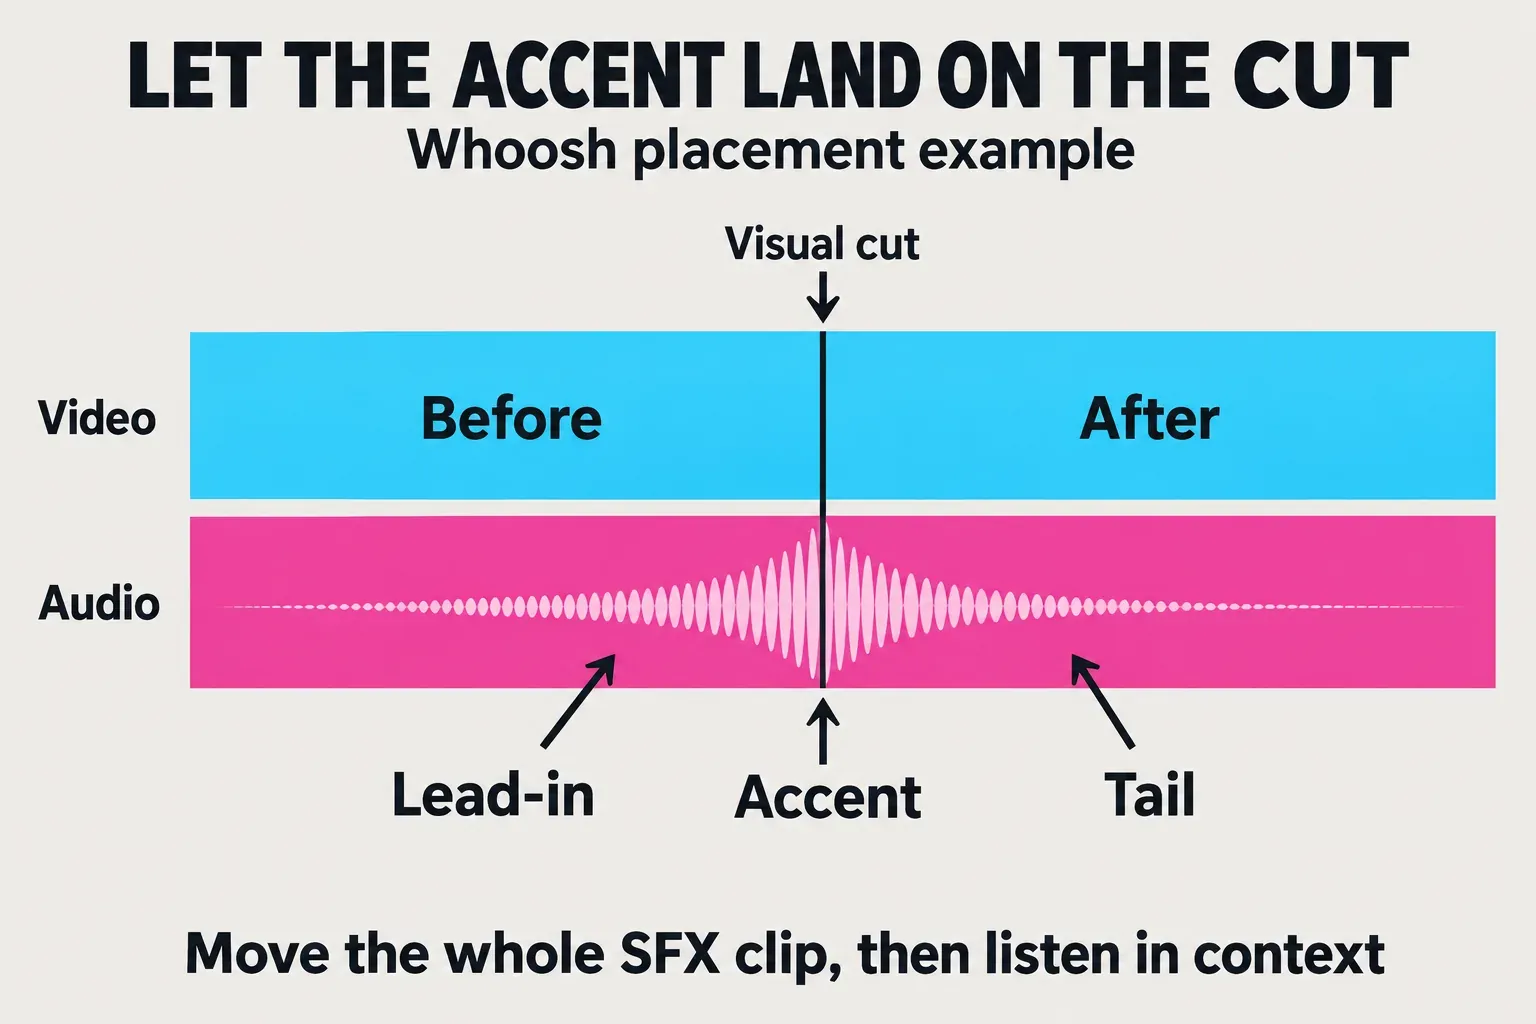
Do not automatically align the start of the sound file with the cut. A whoosh often builds toward an accent. If you start that build at the visual change, the accent can arrive too late.
- Find the exact cut, movement or title arrival you want to emphasize. Place the playhead there and zoom into that section of the timeline.
- Listen to the sound on its own. Find the accent you want to use; a visible waveform peak can help locate it, but your ears decide which part feels like the arrival.
- Move the whole SFX clip so that accent lands on the chosen picture moment. Keep any useful lead-in before it.
- Play from a little earlier than the cut. Check the approach, the accent and the tail together. Adjust the position if it feels early or late.
- Trim unwanted silence or an overlong tail. If you change the trim or speed afterward, check the alignment again.
For example, a title can begin moving while the whoosh builds, then settle as the sound reaches its accent. A button click has a different job: its audible onset should support the press or appearance. Matching every sound’s first frame to every cut misses that distinction.
This is deliberate cue placement. If recorded speech drifts out of sync with the picture over time, moving one whoosh will not fix that underlying problem.
Keep speech clear and edit the right layer
Play the effect with the full mix before deciding its level. A sound that feels modest alone can cover a consonant when dialogue, music and camera audio are all playing. Select the SFX audio clip, lower its Volume, and listen to the words around the cue again.
There is no useful universal volume percentage for every whoosh. The file’s starting level and the rest of the mix matter. I’d protect the sentence first: if the effect hides a word, reduce it, move it into a gap or choose a lighter sound. If that means leaving out a cue, leave it out.
Keep these layers distinct when checking the result:
- Video’s original audio: may already contain a click, footstep or camera noise. An added effect can double that sound.
- Voiceover or dialogue: carries the words the viewer needs to hear.
- Music: can compete with both speech and the SFX accent.
- Added SFX: the separate clip whose position and level you are editing.
For a sustained ambience, use the available fades when its entrance or ending is distracting. Keep a sharp click sharp if the action calls for it. The audio-mixing guide explains balancing the wider soundtrack; this step is about making one cue fit it.
Check rights and availability before publishing
CapCut sound effects are not automatically cleared for every platform or business use. The US materials agreement, dated January 22, 2026, includes sound effects within Platform Materials. It distinguishes non-commercial materials from materials marked for limited commercial use, with asset-specific territory and license-term conditions. Check the agreement served for your region and the exact item’s terms.
Do not treat SFX and library songs as one permission category. The same agreement has separate rules for Sounds and Commercial Sounds in its music section. Those music permissions do not establish the rights for every effect beside them in the editor. A paid-access badge also does not tell you whether your intended distribution is covered.
For a client video, save the asset name, license information and the permitted use with the project. Check the destination, commercial or advertising use, territory, term and any attribution requirement. If you cannot establish permission, replace the cue with your own recording or a sound whose license covers the job. Our commercial-use rights checklist covers the wider asset stack.
For a YouTube video, YouTube’s own Audio Library provides downloadable sound effects and explains its copyright-safe use on YouTube, including monetized videos. That assurance applies to its library, not every channel or website advertising “royalty-free” audio. Check the selected file’s terms before using it elsewhere.
If a sound vanishes from a saved project, check whether it is still available before rebuilding around it. CapCut’s materials agreement does not guarantee continued asset availability. Replace an unavailable asset with one you can use; keep your own source files available for local imports.
If the sound is silent, check the clip before resetting anything
Move the playhead inside the SFX clip and select that clip. Check that its volume is above zero and its track is not muted. Then check the device’s output volume and whether other project audio plays. CapCut’s audio-not-playing checklist identifies muted or low-volume tracks, unsupported or corrupted files, and device conditions as possible causes.
If a local file also fails in a normal audio player, obtain a valid copy before changing the whole project. If only CapCut playback is silent, follow the no-sound troubleshooting guide for the appropriate platform. Silence in the editor and a sound removed after social-platform publication are different symptoms.
Once the cue works, export and play the saved video. Check the accent, speech intelligibility and any unwanted tail around the cut. Keep the editable project and cleared audio files; the exported video is your delivery copy, not the working timeline. The tutorial hub has the neighboring editing lessons when you are ready to build the next part of the sequence.