

On CapCut Desktop, add the video and separate audio to the timeline, select both clips, right-click and choose Sync video and audio if the command is available. Check the alignment before muting the camera recording. On mobile, or when automatic sync is unavailable, move the audio clip until a clear sound matches its visible action.
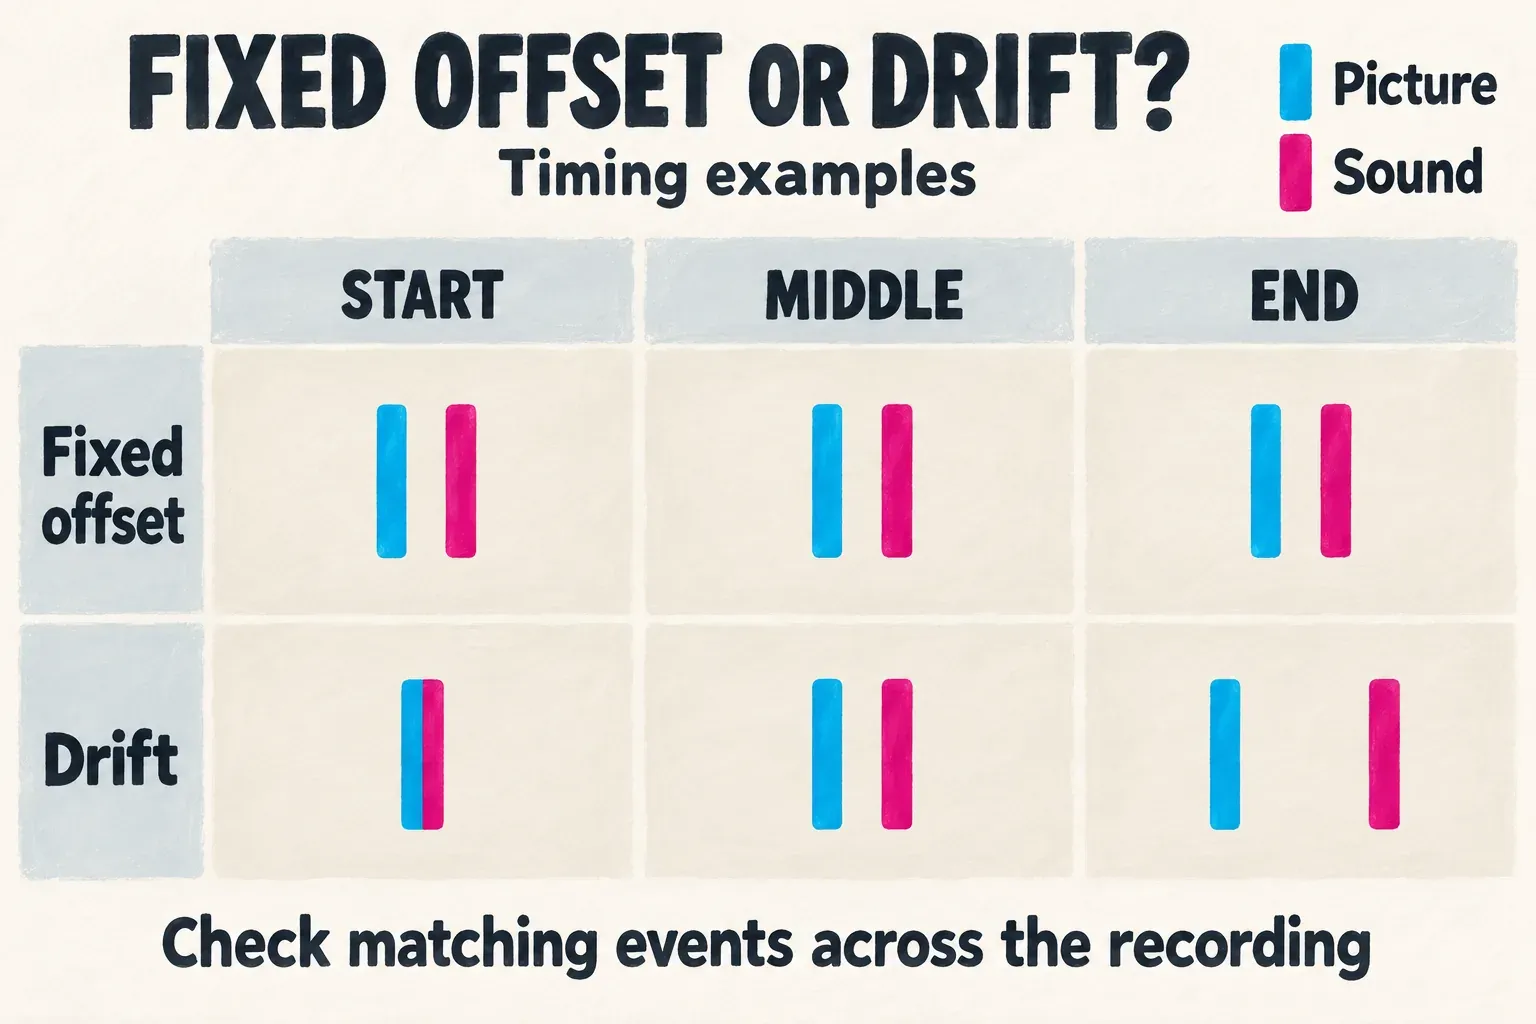
That fixes a timing offset. If the start looks right but the end slips, you need to check for drift or a change partway through the edit. Repeatedly dragging the whole recording will keep moving the good section along with the bad one.
I’d make that distinction before touching the timeline. It saves you from correcting a playback problem in the project or using beat markers for a recording that needs lip sync.
Find out which kind of sync you need
Use a clap, a door closing, a visible impact or a clear spoken syllable as a reference. Check a matching event near the beginning, middle and end of the recording.
| What you see and hear | First move |
|---|---|
| The audio is early or late by about the same amount throughout | Move the audio clip to correct the fixed offset. |
| The beginning matches, but the gap grows later | Diagnose drift; a single shift cannot align the whole recording. |
| Sync changes suddenly after a cut or speed edit | Inspect that edit and the audio segment beside it. |
| The saved video is right, but one playback device looks wrong | Investigate playback before moving the timeline audio. |
| You want cuts to follow a song’s rhythm | Use the separate beat-editing workflow. |
CapCut’s tutorial sync guidance distinguishes fixed offset, gradual drift and changes around individual edits. These patterns tell you where to investigate; they do not identify a universal cause for every file.
If you mean cutting a montage to music, the beat-sync templates guide covers that task. Beat markers do not establish that a separate microphone recording matches the camera’s dialogue.
Before splitting or changing timing, keep the original recordings and work on a duplicate project. A finished export does not preserve the editable relationship between your clips.
Use automatic sync on Desktop
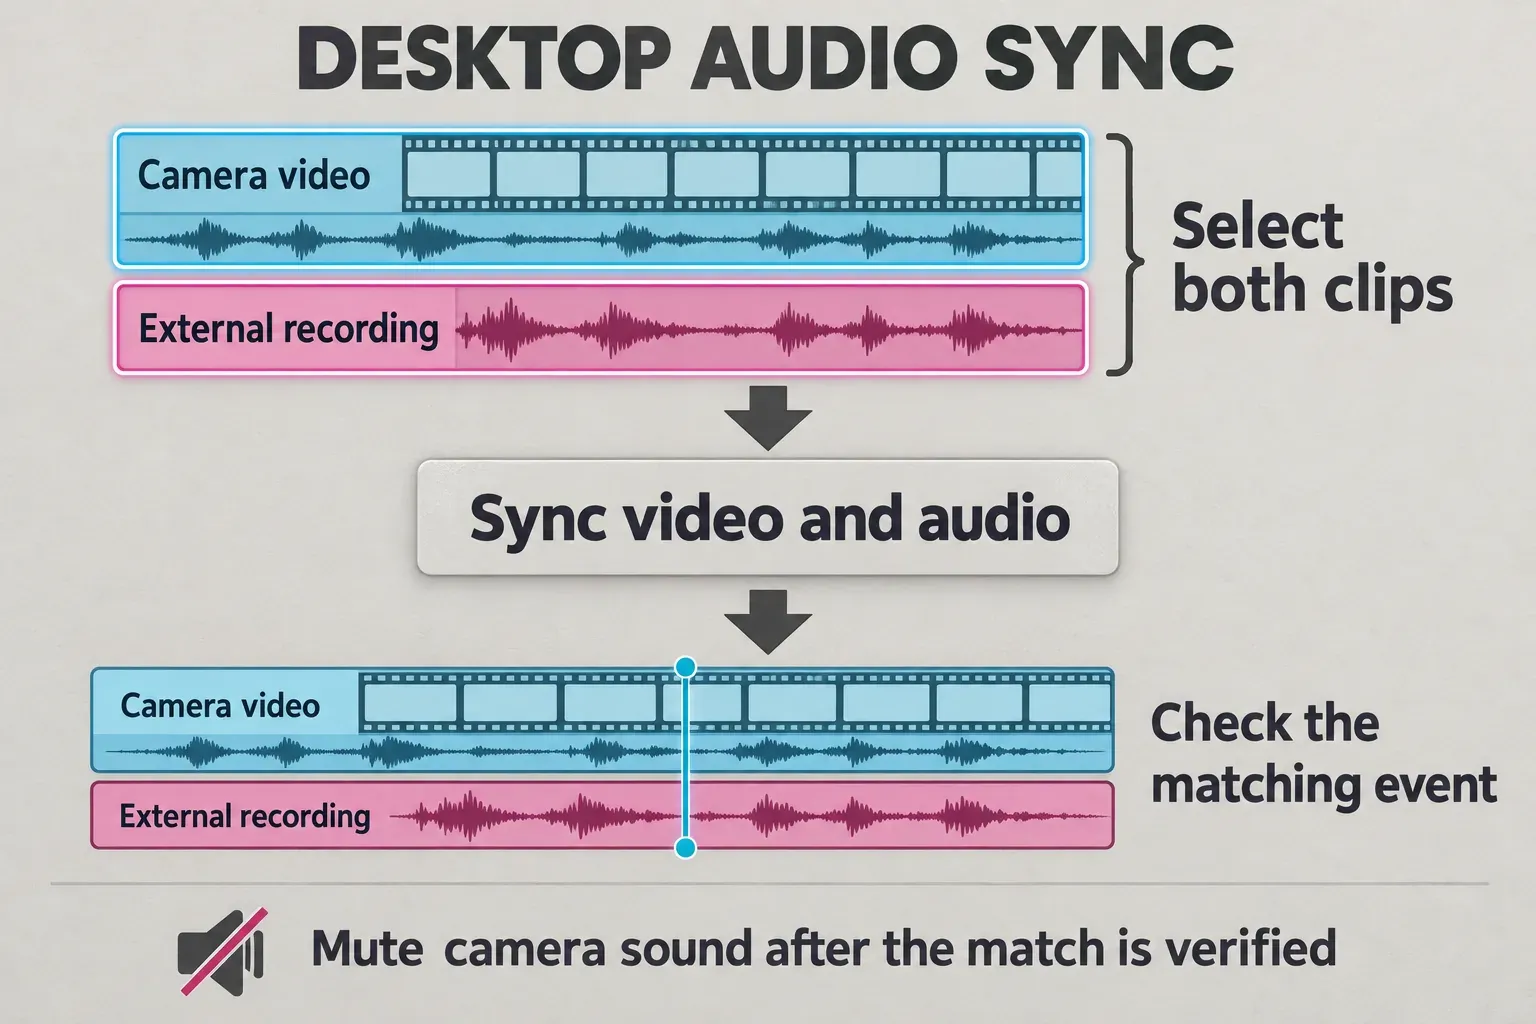
CapCut’s Desktop synchronization instructions document importing both files, selecting their timeline clips and choosing Sync video and audio from the context menu. The command is separate from editing to music beats.
- Import the camera video and the external recording. Put the video on the video track and the recording on a separate audio track beneath it.
- Keep the camera’s original sound available for now. It gives you a reference for checking the external track; do not delete it before finding the match.
- Select both relevant clips. The documented selection uses Ctrl on Windows or Cmd on Mac while clicking each clip.
- Right-click the selection and choose Sync video and audio if your build offers it. Let the alignment finish, then listen and watch the same reference event.
- Check another event later in the recording. Once the external track fits, select the camera video and lower its original audio volume to zero if you only want the external microphone in the mix.
This workflow makes most sense when the recordings cover the same event. A different take, an unrelated song or a video without a usable shared reference needs a deliberate manual match. Do not assume an automatic result is correct because the clips moved.
If the command is missing or greyed out, check that you selected a video clip and its separate audio clip, rather than one clip or a beat marker. Read any access notice the app shows. If it still is not available, use manual alignment; there is no need to reinstall the editor just to follow a menu path from another build.
Move the audio manually on mobile or Desktop
Manual alignment works by matching a point inside the audio file to a point inside the picture. Matching the two file starts is only useful if both recordings began at the same moment.
Add the video and recording to separate timeline layers. For importing a file from your phone, use the available device-audio route in our add-music and local-audio guide. CapCut’s phone audio-clip instructions describe moving added audio on the timeline; the timing principle also applies to an imported recording.
Zoom into the reference event. Find the video frame where the hands meet in a clap, for example, and the corresponding sharp sound in the recording. A waveform helps locate the event; listening confirms that you chose the right one.
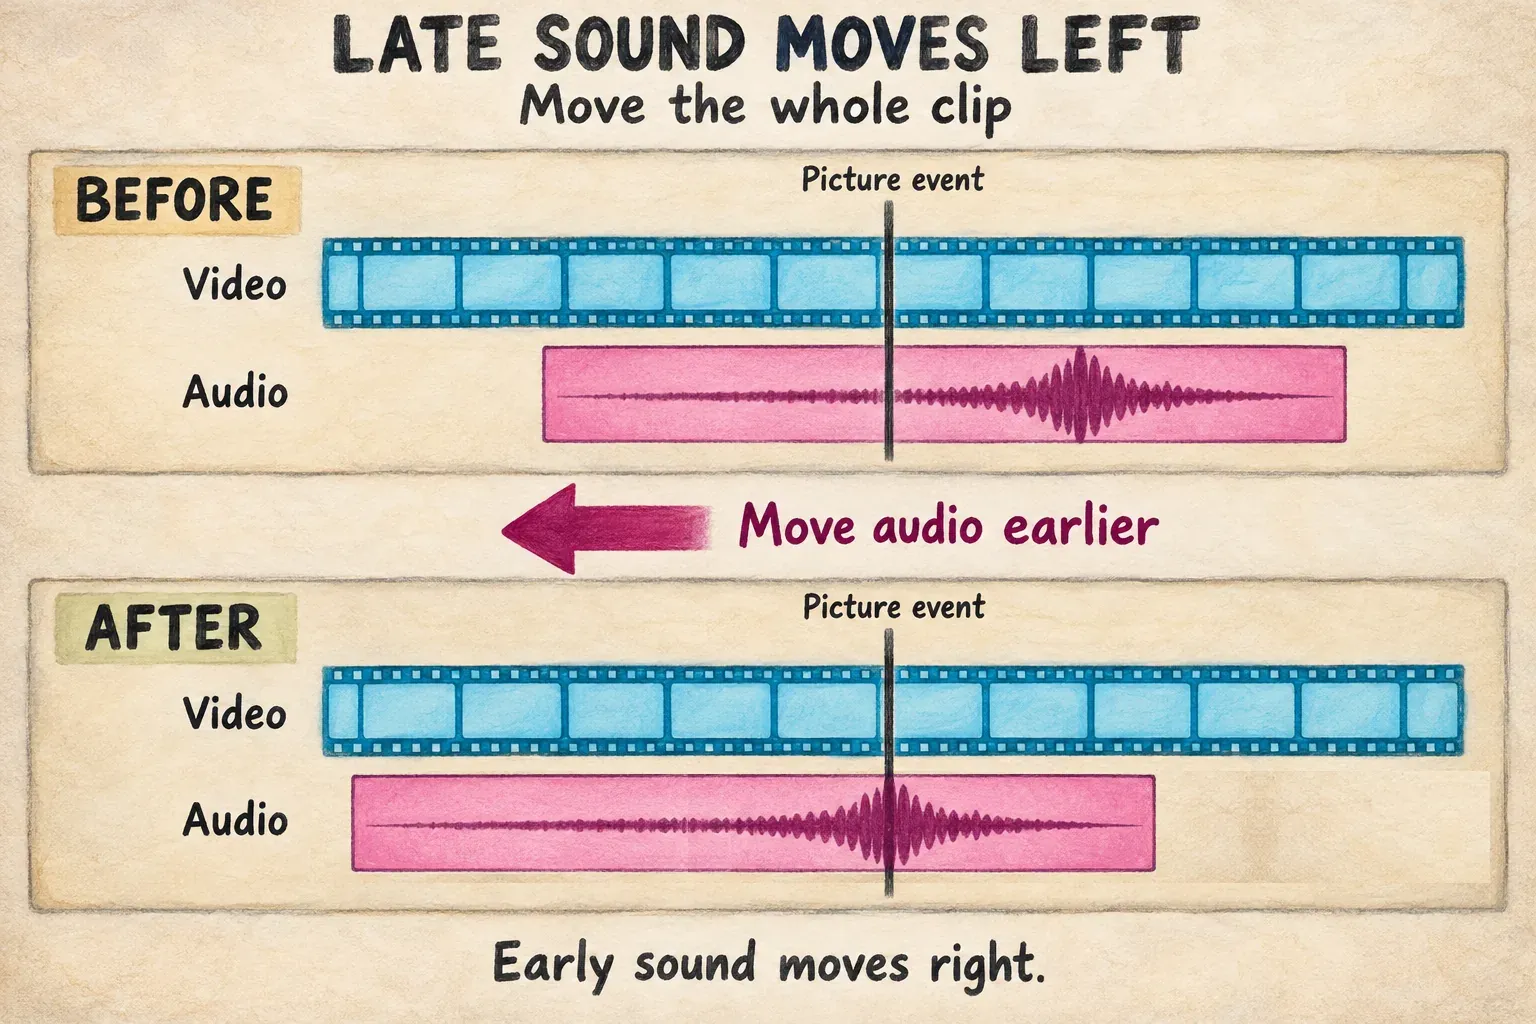
Select and move the body of the audio clip, rather than pulling its trim handle. On a phone, press and hold the clip to move it if your interface requires that gesture. On Desktop, drag the selected clip along its audio lane.
- Sound arrives after the visible action: move the audio earlier, to the left.
- Sound arrives before the visible action: move the audio later, to the right.
Move a little, play the passage from before the event and compare again. Then check a later matching event. Once both fit, mute the camera’s original sound if it would otherwise play alongside the external recording.
If the needed move would put the audio before the project’s beginning, keep a copy of the source and trim away the unwanted leading audio, or reposition the video and audio with enough space to align them. Preserve the words and action you need. Do not try to solve a timing problem by repeatedly shortening the useful end of the recording.
The distinction between moving and trimming is also visible in a CapCut community thread about moving audio: the original question concerns placing a cleaner recording against the phone video, including trouble at the timeline start. That is one user’s scenario, not proof of a current universal mobile limitation.
When the video’s own audio is out of sync
A separate microphone file is already independent. Audio still attached to the video needs to become editable separately if you want to shift only the sound.
CapCut’s Desktop separation instructions use right-click Separate audio. Other documented interfaces use Extract audio. Check the wording and access notice in your build; extraction access can differ, so do not assume the operation is free in every account.
On your working duplicate, separate the sound if the option is available, then align its audio clip against the picture using the manual steps above. Confirm which original audio remains audible: hearing two versions at once can produce an echo and make the match harder to judge. Keep the source video until the repair is accepted.
If your build does not permit separation, a licensed original audio file from the recording device is a useful alternative when you have it. The Free versus Pro feature guide covers access questions. A volume adjustment alone changes loudness, not timing.
Handle drift without hiding a broken join
If one shift fixes the opening but makes the ending worse, stop treating the file as a fixed-offset problem. Check whether the mismatch grows steadily or jumps at a particular cut. A wrong take, a changed clip speed or an independently moved segment deserves a different response from a gradual change across a long recording.
For a recording with useful pauses, you can align shorter sections on a duplicate. CapCut’s timeline editing instructions document Split for a selected audio or video clip. Place a split at an appropriate pause, select the affected audio section and align it to the matching picture event. Review both sides of the join: shifting the section can leave a gap or overlap, and cutting through a word can damage the sentence.
This is a local repair, not a promise that segmentation cures every long recording. If each section still drifts or the join cannot be made without missing speech, obtain a corrected source or use an audio editor suited to duration correction while preserving voice pitch. Return with the corrected file and check several reference events again. Do not apply an arbitrary speed percentage to the whole conversation.
After any timing change, review captions that were positioned against the old audio. The caption-timing guide covers early, late and overlapping caption blocks; it is separate from syncing the underlying recording.
Check the saved video before changing a good timeline
Export and watch the local file outside CapCut. Check a reference event near the start and another near the end, with only the intended audio version playing. If the timeline is right but the saved file is wrong, investigate the export stage with our lagging-export guide rather than compensating blindly in the edit.
If the mismatch appears only on one player or wireless listening setup, compare the same file through the device’s speaker or a wired output and another player. That comparison helps separate file timing from playback behavior; it does not establish the cause on its own.
Once the timing holds, use the audio-mixing guide to balance speech, music and effects. Keep the original recordings and the working project, then choose the next lesson from the CapCut tutorial hub.