

Documentation checked September 5, 2026. The steps below follow published CapCut instructions. Menus and AI availability can differ by version, account and region.
The short answer: import your creator clip into a normal CapCut project, cut it around one clear product demonstration, add matching B-roll and captions, then check the disclosure and exported file. An AI avatar is optional: use it as a scripted presenter, not an invented customer. A hybrid ad can pair either kind of presenter with real product footage.
Choose the UGC route before opening CapCut
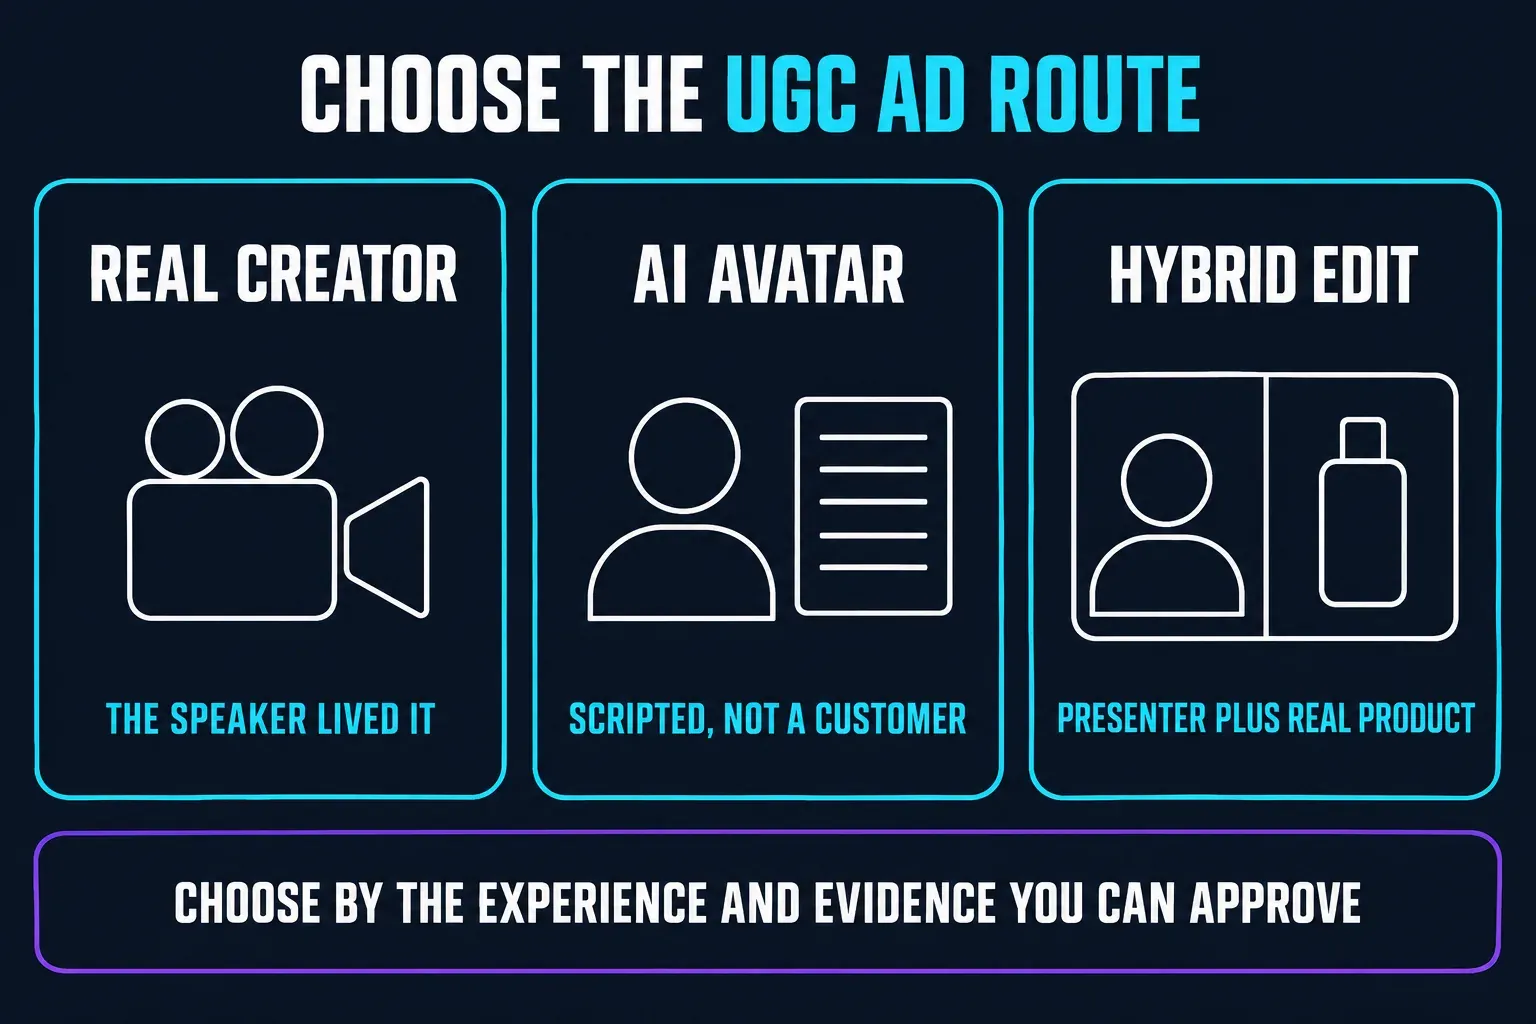
A customer describing a purchase, a paid creator demonstrating a product and an avatar reading a script are different starting points. Decide which one you have before editing. If you first need to choose between a solo editor, shared workspace and commerce production tools, our comparison of CapCut for Business options sets them side by side.
Use an actual experience
Use this only when the speaker had the experience described. Owning a product alone does not support a claim about testing it. Keep the source take and permission for the planned advertising use.
Use a scripted presenter
Use an avatar to explain a supported feature or offer. Pair physical product claims with real footage; generated gestures cannot prove how the item works.
Keep the product evidence real
Combine a real or AI presenter with genuine product cutaways, readable text and tighter pacing. Attribute personal experience only to someone who lived it.
For making the presenter, follow the CapCut AI Avatar guide. If you have only packshots, start with our product-video workflow from photos. Neither route needs a fictional customer story.
Real UGC and UGC-style advertising are not the same
Real UGC begins with a real person’s content or experience. UGC-style advertising copies familiar creator conventions: direct-to-camera framing, a fast hook, ordinary surroundings, product cutaways and plain speech. It may involve a customer, a paid creator, an actor or an AI avatar. The editing style can't tell the viewer which one they are seeing.
A line such as “I used this for a week” makes an experience claim. In the US, the FTC’s testimonials guidance does not ban all stock AI avatars. An avatar can convey a testimonial, but the underlying account must be genuine and the portrayal must not mislead. Identify a presenter’s role honestly; an AI label does not repair a fabricated review. Other jurisdictions have their own rules.
Build an approval pack before the timeline
A useful UGC brief is small enough to read during the edit. It should include the product identity, audience, one problem, approved benefit language, the demonstration you can show, offer details, prohibited claims, required disclosure, destination and owner for final approval.
Truth pack
- Approved product name and current offer
- Evidence for every measurable claim
- Real creator notes or a clearly scripted portrayal
Asset pack
- Consent and likeness permission
- Approved product footage or photos
- Music, logo and font rights
Delivery pack
- Destination and aspect ratio
- Disclosure and label checklist
- Named reviewer and final file location
Don't paste an unreviewed product page into a script generator and assume every extracted line is approved. Product pages mix specifications, positioning, reviews and legal qualifiers. Pull only the language the brand can support. The FTC’s small-business advertising FAQ is a practical reminder that objective claims need a reasonable basis before the ad runs.
Route 1: edit real creator footage
Preserve what the creator said
Keep the full source take before cutting it into hook-sized fragments. A short edit must not change the meaning by removing a condition, joining words from different answers or placing unrelated product footage over a claim. Mark any sentence the creator can't verify and send it back for clarification instead of “fixing” it in captions.
Cut around one complete proof moment
Choose one moment the viewer can understand without context: an unboxing, a feature demonstration, a workflow before and after, or a plainly stated preference. Put that proof immediately after the hook. Use product B-roll to show the exact feature being discussed, not a glamorous but unrelated shot.
Once the script and footage agree, make a small manual edit. CapCut's Desktop splitting instructions and overlay walkthrough document the core controls:
- Import the source footage. Create a project, choose Import and add the creator clip plus real product cutaways. Put the main speaking clip on the timeline. Keep an untouched copy of the original files.
- Choose the frame. Use the ratio control to set the shape for your first placement. For a vertical social example, choose 9:16 and reframe the speaker and product without hiding important details.
- Cut the speaking sequence. Select the clip, place the playhead at a cut point and choose Split. Repeat at the other end of the unwanted section, remove that section and close the gap. Listen again to make sure the cut has not changed the speaker's meaning.
- Add product B-roll. Place the relevant product clip on a track above the speaking clip, align it with the sentence and adjust its size in the preview. Mute unwanted cutaway audio so it does not compete with the speaker.
- Add text and captions. Use Text → Add text for the offer, next step and required disclosure. For speech, find Auto Captions under Captions or Text, depending on your version. Choose the spoken language, generate if available, then correct names, numbers and timing before export.
- Export a review copy. Open Export and inspect the available format, resolution and frame-rate settings. Save one file, watch it outside CapCut and check the whole ad before making more versions. Review the platform's publishing controls separately before posting.
On Mobile: start with New project and add the main clip. To place a cutaway over it, use Overlay → Add overlay, then adjust its position and duration. Our CapCut overlay tutorial explains the longer phone and Desktop workflow.
The ratio and export walkthrough shows the relevant Desktop controls. A 9:16, 1080p MP4 is a practical first review copy for a vertical campaign, not a universal ad specification. Keep the frame rate appropriate to your footage and confirm the destination's requirements. TikTok's creative guidance recommends vertical framing and keeping important content inside the interface safe area.
Route 2: make a UGC-style ad with an AI avatar
Current PC route
CapCut’s AI Ad Generator page documents AI video maker → Avatar video on PC. Choose an available avatar or permitted custom image, enter the reviewed script, select the voice and duration, then use Create. Review the generated scenes, captions and music before export. Check any displayed price or credit requirement before creating a draft; the page is not proof that your account has unlimited free access.
Current Web route
CapCut’s UGC ads instructions describe Web Avatar video and a separate Match media to script in 1 click workflow. The latter uses uploaded media and a script to assemble scenes. Review every match against the actual words. That same article also discusses Creatify and VEED; its URL-to-video example is not evidence of a CapCut control.
Write for a presenter, not a fictional customer
“Here is how the filter works” can introduce real demonstration footage. “I have used this filter for six months” needs a genuine underlying experience. An avatar can explain the feature; it cannot supply that experience. Do not dress up a generated scene as secretly recorded customer footage.
Route 3: combine a presenter with real product footage
Use a real voice or approved presenter take
You can keep a real creator’s voice and cover cuts with product close-ups, screen recordings or packshots. You can also use an AI presenter for an explanation while showing the real item in action. In either case, do not invent personal use or clone a creator’s voice or likeness beyond the permission you have.
Let CapCut build a draft, then replace weak matches
Media matching and scene generation can be useful starting points, but an automatic match is not evidence. Replace any shot that exaggerates the product, changes its colour or shape, shows a feature that is not present, or implies a before-and-after result you didn't document. For larger multi-scene drafts, our CapCut Video Studio guide covers the scene-generation and revision controls.
Write a five-beat script that can survive review
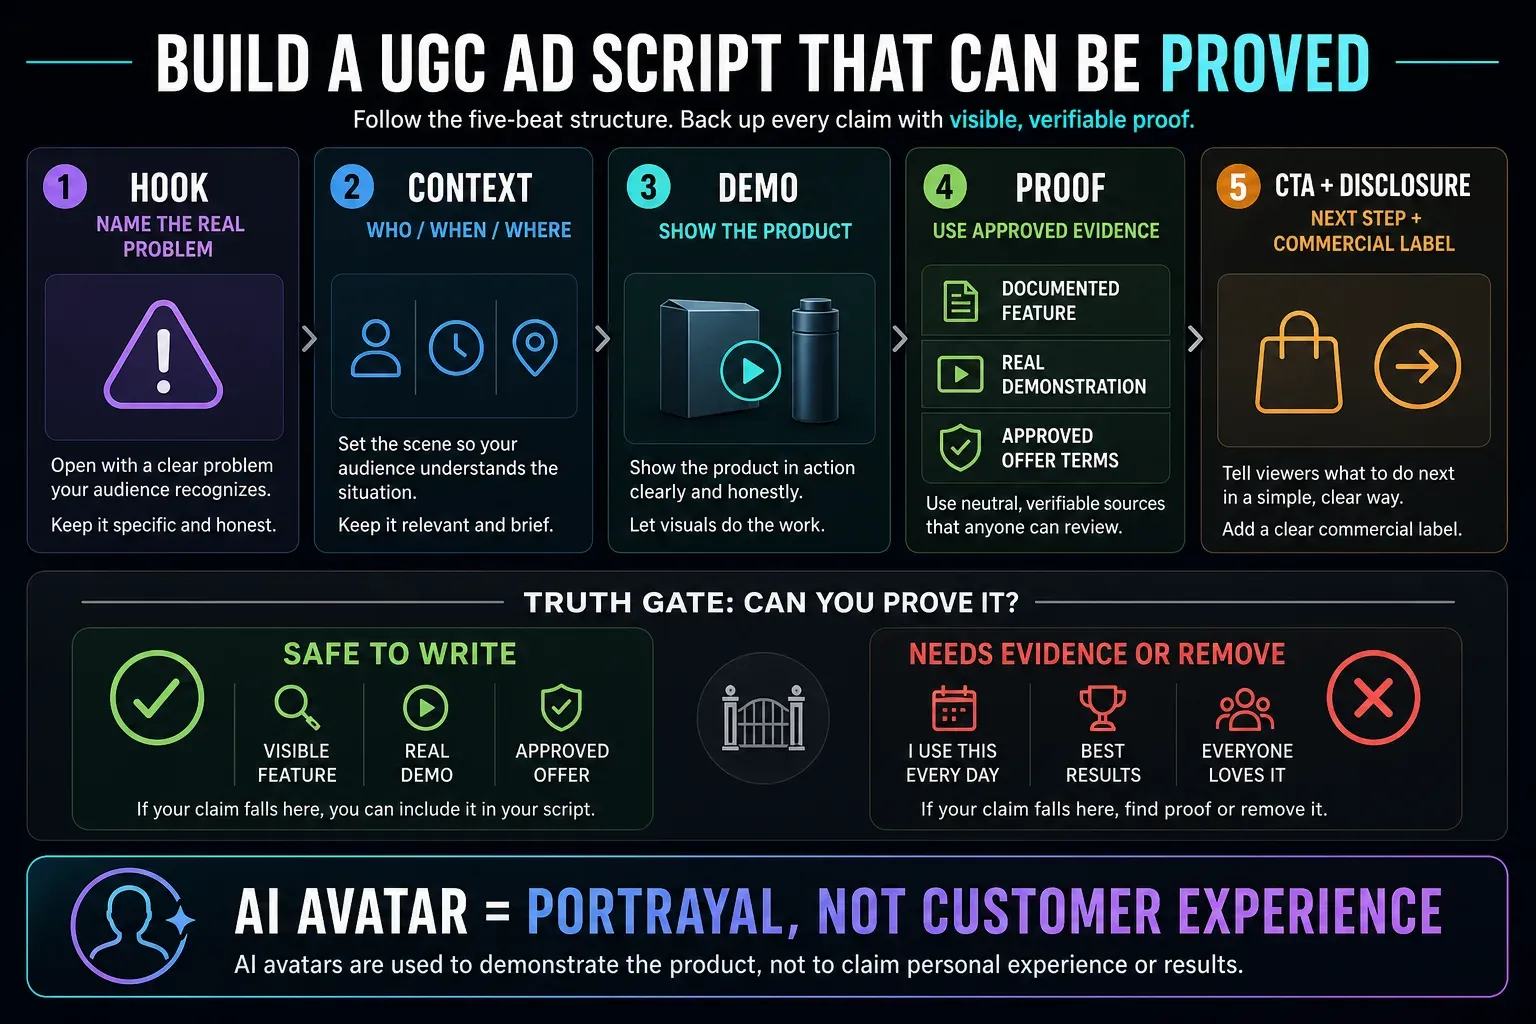
- Hook: name the situation, not an unsupported superlative. “Packing three cables for one trip?” is safer and more specific than “the only charger you’ll ever need.”
- Problem: describe a recognizable friction point without inventing the creator’s history.
- Demonstration: show the product doing the thing named in the voiceover.
- Approved proof: use a documented specification, offer term or real creator observation with its limits intact.
- CTA: give one next step that matches the actual offer and landing page.
Do not wait until the final beat to disclose a paid endorsement. The diagram groups disclosure with the CTA, but required disclosure belongs wherever viewers encounter the endorsement, and a mention at the end is not enough. The FTC’s endorsement FAQ explains that a visual endorsement needs visual disclosure, an audible one needs audible disclosure, and one using both needs both. A description hidden behind “more” is not a reliable substitute.
Generated hooks are starting options. Remove false urgency and pick the line that leads into your actual demonstration. Never let the opening promise a result the rest of the ad cannot support.
Check four parts of the edit
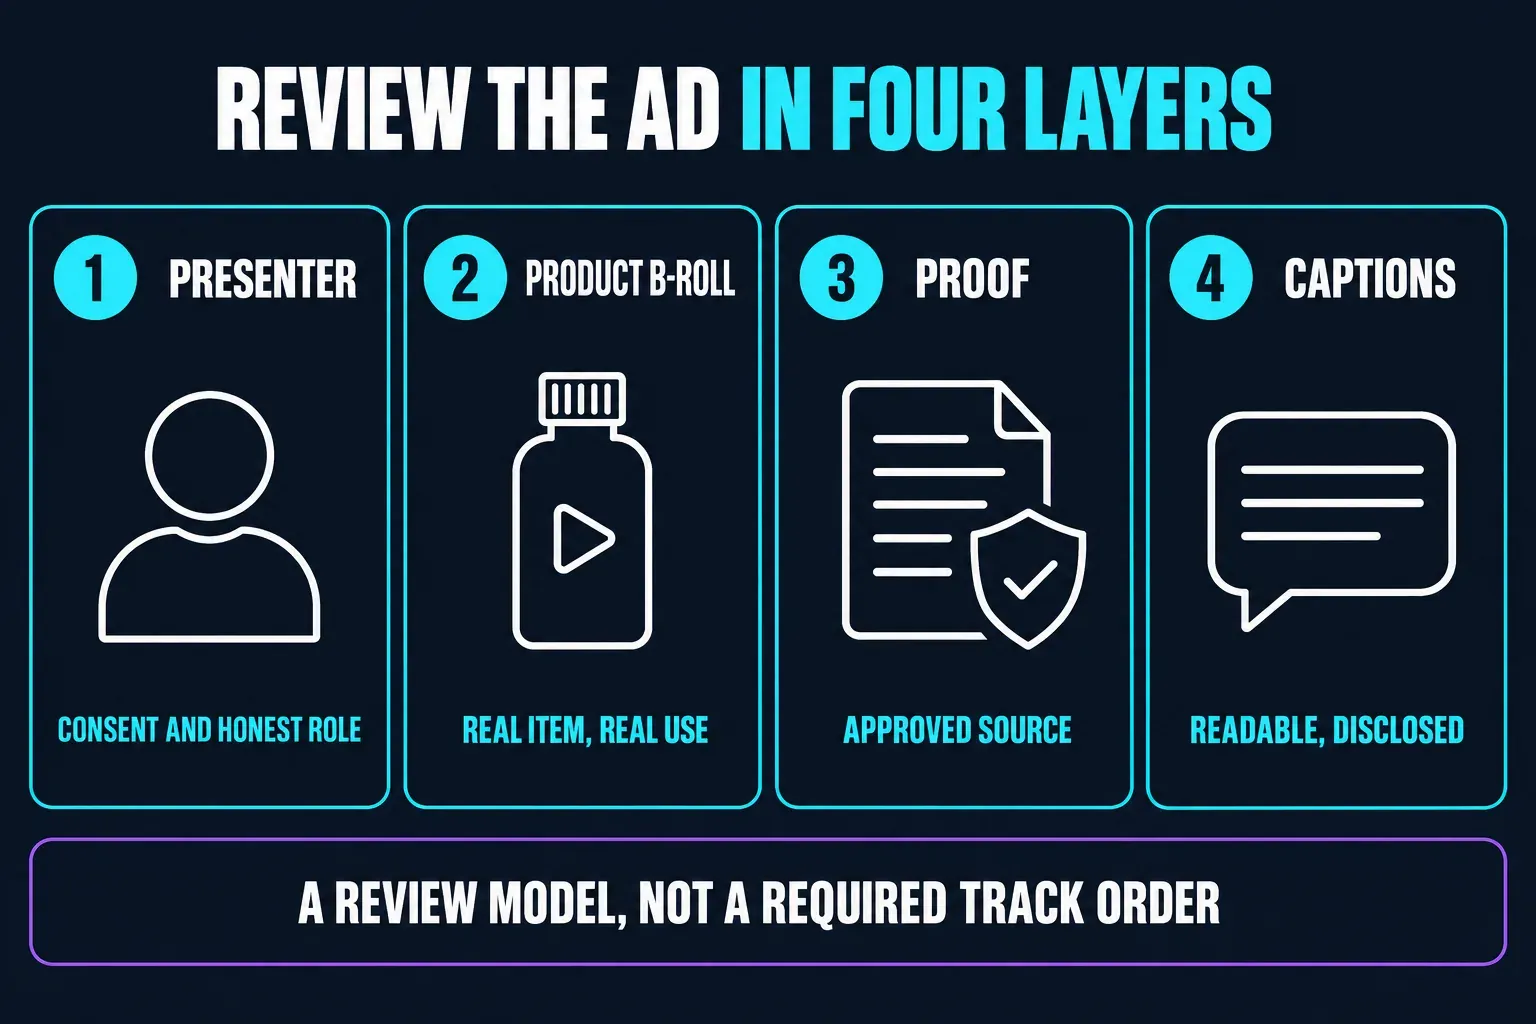
The four-layer diagram is a review model, not a required CapCut track count or stacking order. Product evidence is something you verify, not a special track type. Use as many actual video, audio and text layers as the edit needs.
Presenter or A-roll
Use the strongest complete sentence first. Tighten pauses without making speech feel cut into pieces. If it is an AI avatar, watch lip sync, hands, product contact and scene changes at full size; small generated errors often become obvious after export.
Product B-roll
Match each cutaway to the noun or action in the script. Keep the real product visible long enough to verify shape, controls and result. If your source is still photography, follow the safer motion and fidelity checks in our CapCut product-video guide.
Claims and supporting text
Add only the specification, price, offer or demonstration note that your source supports. Keep required qualifiers close to the claim and readable on a phone. A tiny footnote doesn't rescue a large false headline.
Captions and disclosure
CapCut’s caption help describes recognition mistakes. Correct names, numbers and negations in the editor while listening to the source, then check them again in the export. Our Auto Captions guide covers subtitle editing in more detail. Keep captions and disclosure clear of each other, stickers and platform controls.
Run every ad line through a claim gate
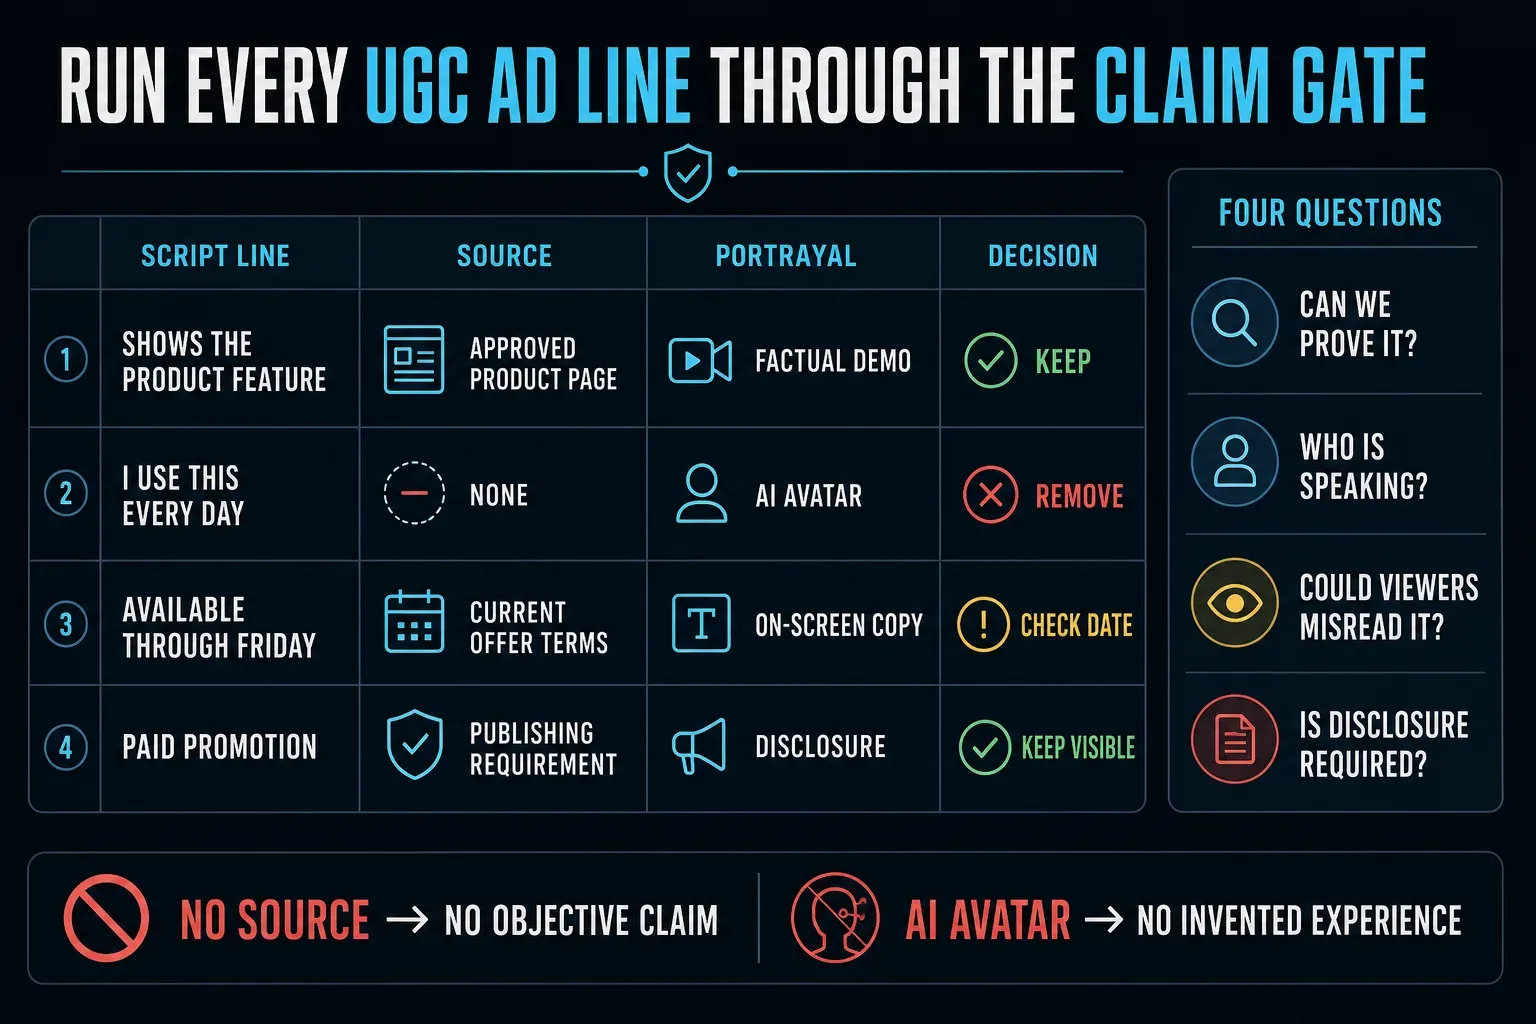
Source and portrayal agree
The line matches an approved source, the person or avatar is described honestly, and any necessary qualifier stays visible.
The idea is supportable, the wording is not
Replace “works instantly” with the measurable operation or documented condition you can demonstrate.
No source or false experience
Delete invented ownership, use, savings, health effects, comparisons, star ratings and customer quotes.
Keep four notes for each claim: the exact line, its evidence, who is presenting it and the approval decision. A brand approving its own product page is not independent proof of a performance claim. Keep the underlying evidence too; the diagram’s example offer is not an offer to copy into a real ad.
Check footage, likeness, music and CapCut materials separately
Check advertising rights for the footage, creator’s likeness, voice, client assets, logos, fonts and music separately. Permission to edit a clip may not cover paid distribution, voice cloning or every territory. Get the client’s approval before uploading confidential source files to a cloud tool.
Read CapCut’s Materials License Agreement for your region; it directs US users to separate US terms. In the linked non-US agreement, commercially marked materials still have scope, territory and time limits. Mixing in noncommercial material can make the finished video unsuitable for commercial use.
That agreement limits Commercial Sounds to CapCut, TikTok and TikTok for Business; other platforms require separate music rights. Do not assume the same track is cleared for an Instagram or YouTube ad. Review the applicable Terms of Service as well. These are checks to make, not legal clearance for your campaign.
AI safety is a separate question from commercial clearance. CapCut’s AI safety help page can explain platform safeguards, but it doesn't approve your product claims, consent record or destination disclosure.
Treat disclosure as a publishing step, not an overlay effect
Commercial disclosure and AI disclosure are different. TikTok’s commercial-post rules require the content disclosure setting for posts promoting your own business or a third-party brand for payment or another incentive. Its AI-content guidance separately requires disclosure of realistic AI-generated imagery, audio and video. One label does not replace the other.
For non-Spark ads, TikTok documents the AI-generated-content disclosure toggle in Ads Manager; Spark Ads follow the original post’s disclosure route. Recheck a new or duplicated campaign because the toggle can reset. Minor corrections are not the same as fully generated or significantly altered content; consult the current advertising policy for the creative you are submitting.
Meta’s June 1, 2026 transparency update describes a rollout of AI information in “About this ad,” including detection of third-party AI through industry-standard signals. It is not a promise that every account has one universal AI toggle. Check the current placement, ad and partnership controls for your campaign; automatic detection is not a substitute for truthful disclosure.
For destination-specific editing, safe areas and the upload handoff, use the CapCut for TikTok guide or our CapCut for Instagram Reels guide. They should not replace the campaign owner’s legal and platform review.
Check the UGC ad in four places
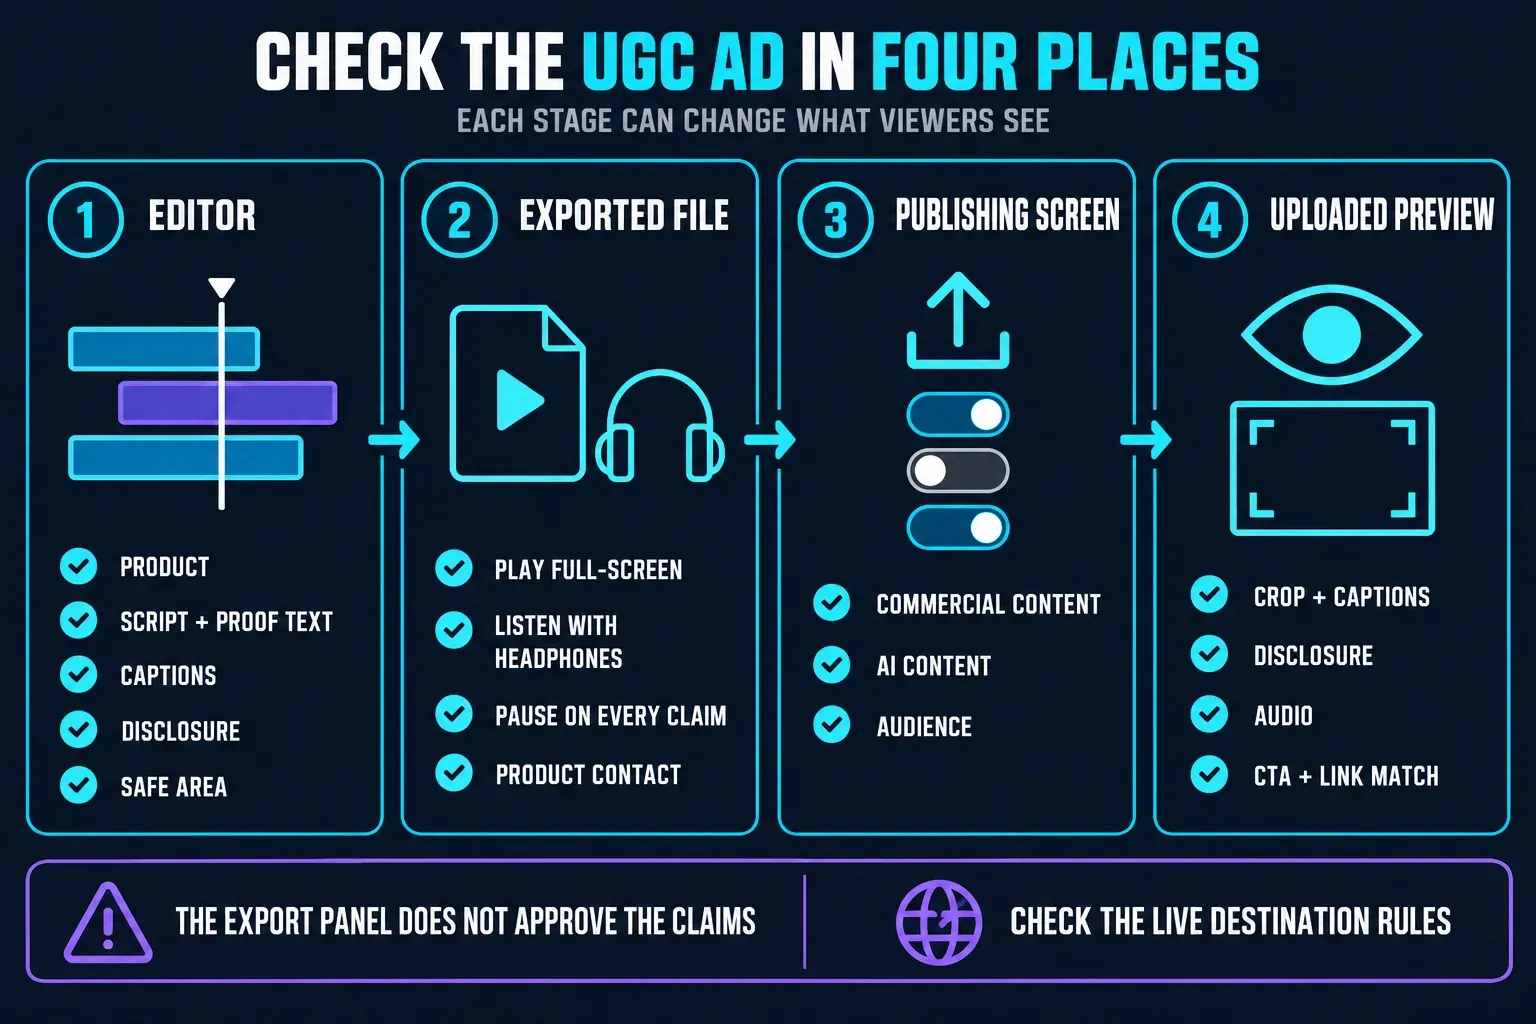
- Editor: verify the product, script, proof text, captions, disclosure and safe area.
- Exported file: play full-screen, listen with headphones, pause on every claim and inspect generated hands, edges and product contact.
- Publishing screen: confirm the current commercial-content, AI-content and audience controls that apply to the destination.
- Uploaded preview: check crop, caption placement, disclosure, audio, CTA and link or landing-page match.
Using an ordinary editing aid does not automatically trigger every AI-label rule. Read the controls and policy for the actual destination. Save the reviewed master with its approval notes so the wrong variant does not reach the campaign.
Fix the failure, not just the symptom
Reduce performance cues
Use plainer wording, fewer reaction shots and product footage that directly supports the sentence. Don't disguise an avatar as candid customer footage.
Replace generated evidence
Cut to an approved real product shot. A regenerated packshot that changes the item is not usable proof.
Correct by ear
Listen for numbers, negatives, product names and offer terms. One missing “not” can reverse the meaning.
Check the destination preview
Move essential text into the safe area and use the current publishing control. Don't rely on an editor preview alone.
CapCut UGC ads FAQ
Can CapCut make a UGC ad with an AI avatar?
Yes. CapCut currently documents Avatar Video workflows on PC and Web. Availability and labels can vary, so use the live interface. Review the script and describe the avatar as a scripted portrayal rather than a real customer.
Is an AI UGC ad a real testimonial?
Not by itself. An avatar has no personal product experience, but it can convey a genuine testimonial if the underlying account is real and the portrayal is not misleading. Never invent a customer’s use or results; an AI label does not make a fake review acceptable.
Should I use a real creator, an AI avatar or a hybrid edit?
Use a real creator for genuine experience, an AI avatar for a scripted explanation, or combine a real or AI presenter with actual product footage. Choose by the evidence you have, not a promise that one style always converts better.
Can I publish a CapCut-generated script without checking it?
No. Compare every measurable claim, testimonial-like line, offer and qualifier with an approved source. Rewrite or remove anything unsupported before generation and recheck it after scene matching.
Do CapCut assets automatically have commercial-use rights?
No. Check the applicable regional agreement and each asset’s licence, including its destination, territory and time limits. Music rights can differ from visual-material rights. Creator consent and support for product claims are separate checks.
Do I need to disclose a UGC-style ad?
Check both the commercial relationship and any realistic AI content. TikTok has separate commercial and AI disclosure rules; other destinations and jurisdictions differ. Put required endorsement disclosure where viewers encounter it; an end card or a hidden description is not enough.
Does UGC-style creative always perform better?
No universal result can be promised. Treat UGC style as a creative approach to test against your own audience, offer and placement, not as guaranteed conversion lift.