

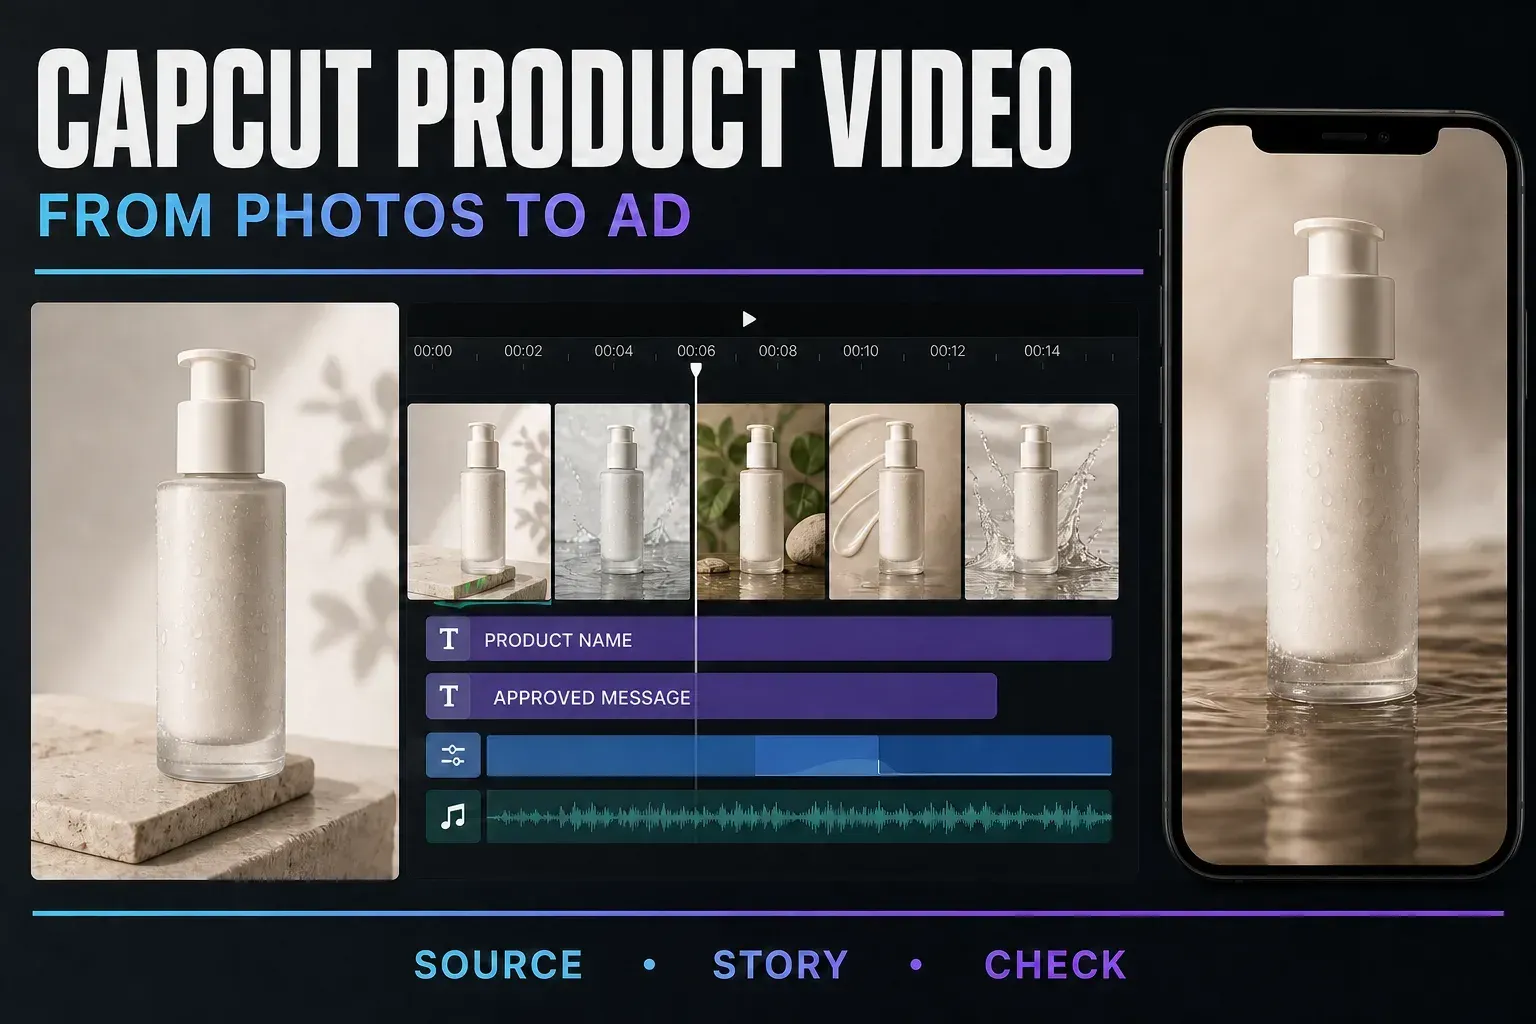
Documentation checked September 5, 2026. The workflows below follow published CapCut instructions.
Quick answer: create a normal CapCut project, add your product photos, arrange them in a short sequence, then add gentle keyframe motion, accurate text and a clear next step. Use Image to video only if you need generated movement and can check the whole clip for changes to the item. A template or script-led workflow is optional, not a requirement for turning photos into video.
A polished ad is no use if the bottle changes shape or the offer is wrong. Start with the real product and an approved message. CapCut can help assemble the video; your business still needs to check the claims, asset rights and finished file.
Choose the route before you open a project
For a label-heavy bottle, electronics package or food product, start with ordinary photo animation. It moves your existing image instead of asking AI to redraw the item. Still check the crop, color and proportions after editing. If you are deciding how a team should organize the work, our CapCut for Business breakdown covers solo, shared and commerce workflows.
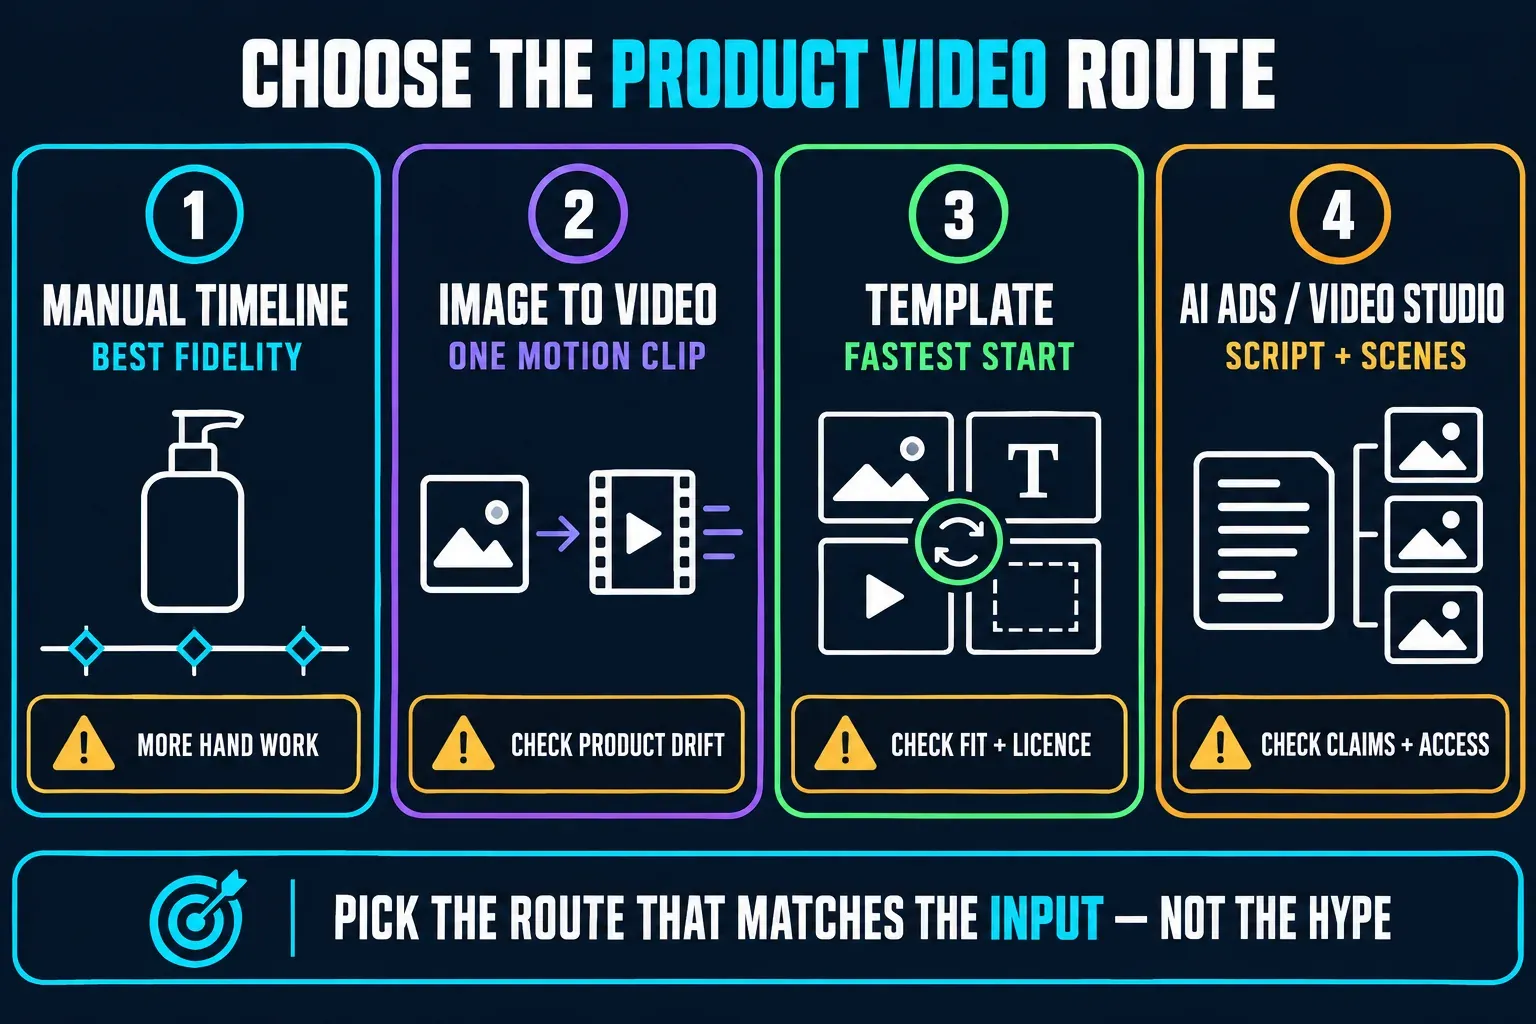
Manual timeline
Import the approved photos, set the destination canvas, then create restrained motion with position and scale. Choose this when packaging, labels and proportions can't drift.
Image to video
Animate one source image, watch the complete result and inspect the product frame by frame wherever details move. Keep only a clip that still represents the real item.
Template
Replace the template media and copy only when its crop, pacing and asset licence fit the campaign. A fast mismatch is still a mismatch.
Script-led video tools
Consider a scene-based workflow when you need narration or a presenter. Check which product and workspace you opened: an AI image-ad tool is not a video generator.
Build the source pack before CapCut
Don't make the editor guess what is true. Put the approved inputs in one small working pack before you touch a timeline: front, side and detail photos; the current product name; substantiated claims; offer dates and terms; approved logo, colours and fonts; intended placement; and the rights status of every photo, person and audio track.
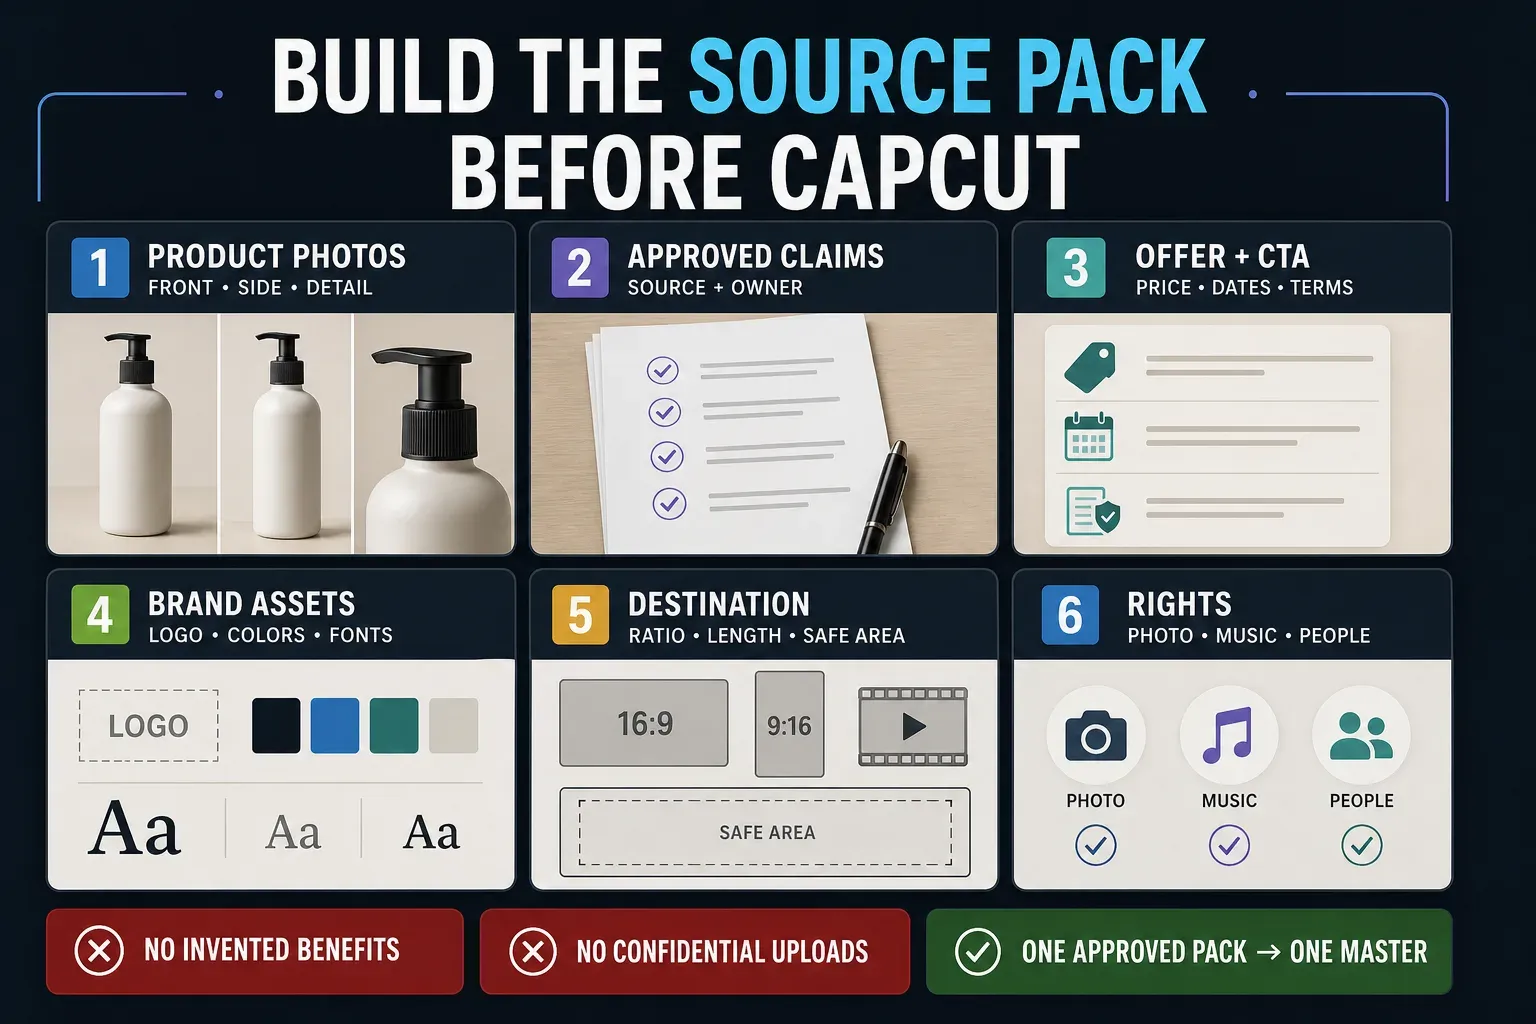
Product truth
- Current packshots and packaging
- Correct colour, size, quantity and variant
- Real demonstration footage if a use claim depends on it
Message truth
- Approved name, benefit and proof
- Current price, dates, exclusions and CTA
- Required disclosure or endorsement language
Production truth
- Destination, ratio and target length
- Cleared logo, font, image, music and people
- Owner for product, legal and final-file review
Keep recurring logos, colors and permitted fonts together with the CapCut Brand Kit workflow. If a packshot needs cropping or background cleanup, use the CapCut Photo Editor guide before assembling the video. Do not retouch away a real product feature.
For US advertising, the FTC's advertising FAQ for small businesses says claims must be truthful, not deceptive or unfair, and supported by evidence. A generated line that sounds persuasive is not evidence. Keep the source and approval owner beside every objective claim.
Build one short master story
A generated clip is raw material. A useful product video still needs a reason to stop, a clear look at the item, proof that supports the message and one next step. For a short social master, a 15-second structure is a practical planning frame, not a universal platform limit.
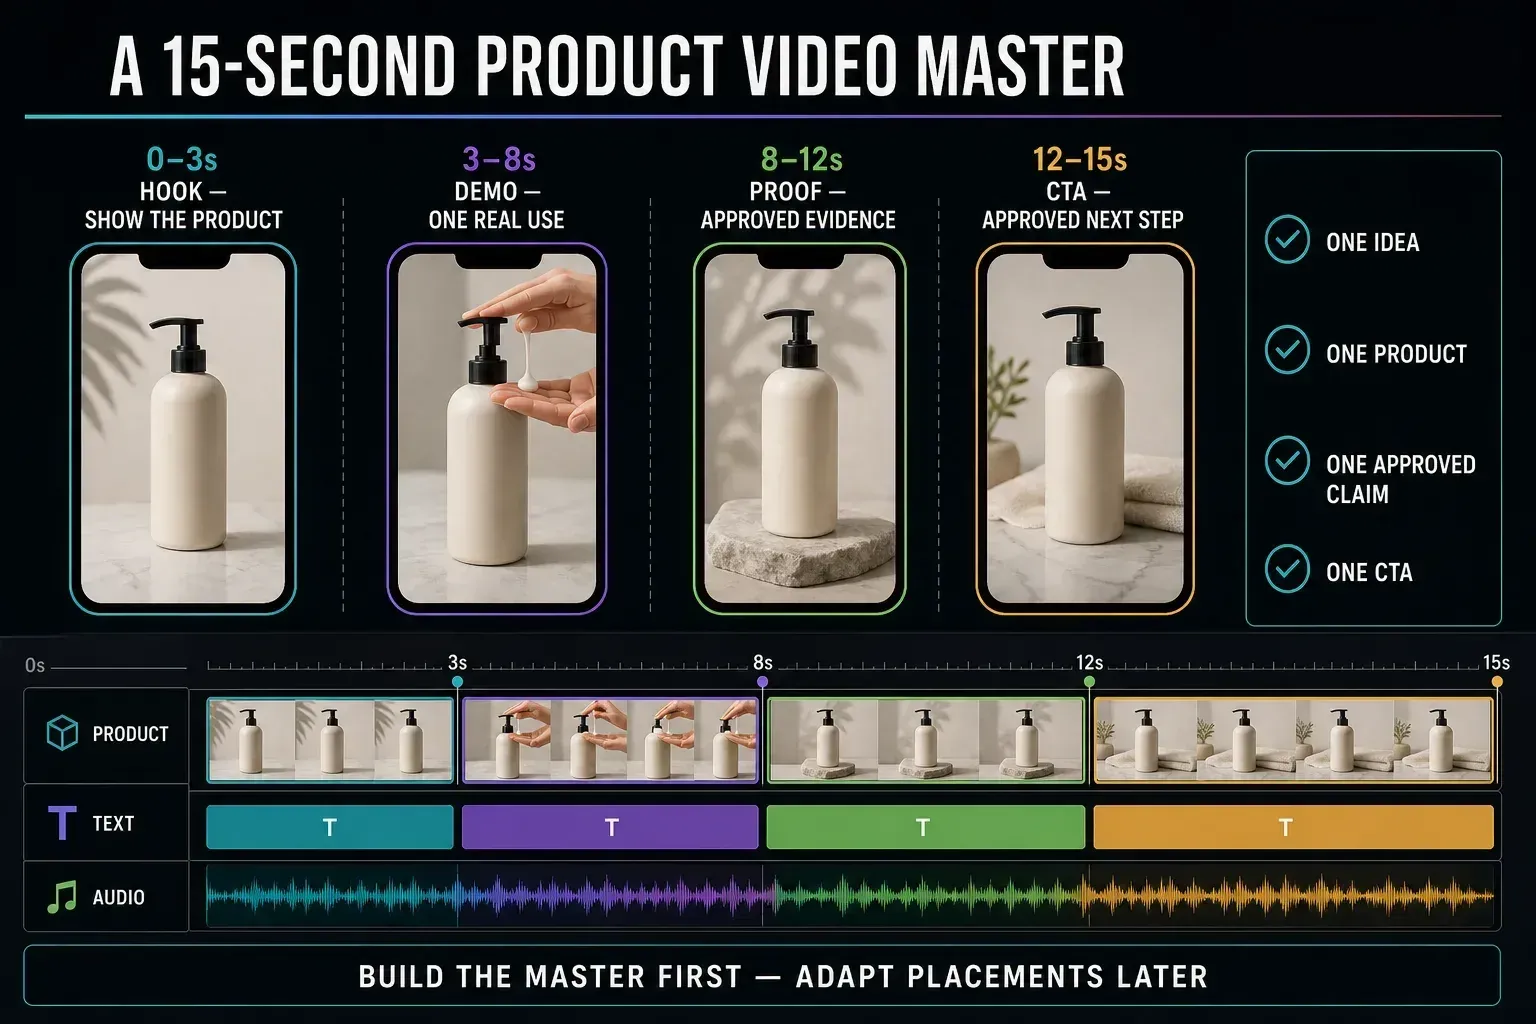
- 0–3 seconds: show the product. Use a clear first frame and a short hook tied to the real customer problem. Don't hide the item behind a long logo animation.
- 3–8 seconds: show one useful detail. Use a close-up or a real demonstration if you have one. A generated hand pressing a pump is not evidence of how the actual product works; if you only have photos, show a detail you can verify instead.
- 8–12 seconds: show approved proof. Use the evidence the campaign owner approved. A feature label, real demonstration or qualified statement is safer than invented praise.
- 12–15 seconds: give one next step. Match the CTA to the real landing page and offer. If dates, availability or eligibility matter, make them readable.
Build this master at the cleanest useful quality. Platform adaptations come later. If you make vertical, square and horizontal versions too early, you multiply text, crop and approval errors before the story is stable.
Manual motion: make a product video without AI generation
On Desktop, start a project and import the original product photos. CapCut's keyframe instructions document the diamond controls beside properties such as Position and Scale. Here is a small first edit you can build without generating new product pixels:
- Add the photos. Drag the imported photos onto the main timeline in the order you want viewers to see them. Start with a clear view of the item, then a detail and a final product view.
- Set the framing and timing. Choose the aspect ratio required by your first placement. Adjust each photo clip's length so viewers can read its message. Keep the whole product visible where that matters.
- Set the first keyframe. Select a photo clip, move the playhead near its start and click the diamond beside Scale or Position in the right panel. Set the starting size or position.
- Add a small move. Move the playhead later in the same clip and change that property. Confirm a second marker appears; add it with the diamond if needed. Play between the markers and reduce the movement if the label becomes unreadable.
- Add the message. Put the product name, one supported benefit and the next step on separate editable text layers. Set their duration to match the images. Add only audio you have permission to use for this placement.
- Export and inspect. Open Export, review the available settings and save a test video. Watch the whole file outside CapCut, checking product details, text, audio and the final frame before preparing another placement.
On a phone: CapCut's Mobile slideshow instructions start with New project and selecting photos. Tap a photo clip and drag its edges to change its duration. Arrange and preview the sequence before adding motion. For the phone's keyframe controls and a longer Desktop example, follow our CapCut keyframe tutorial.
If you have several angles, cut to the next one when it gives the viewer new information. Avoid adding a transition to every cut. Check that your zoom does not crop the label or soften the details you want people to see.
Use manual motion when
- Small label text matters
- The packaging must remain exact
- You already have several usable photos
- The brief needs simple, repeatable motion
Don't force it when
- The story needs a presenter
- You need several generated environments
- The source photo has no usable crop room
- A real demonstration is needed: film it rather than simulating proof
Image to video: generate one clip, then inspect it
CapCut's AI Video page documents AI media → Image to video inside the Desktop editing workspace. Its Web instructions instead start in the AI video workspace, with image upload and a prompt. Check the model, duration, ratio and credit quote offered in your account before generating. For more detail on these controls, see our guide to the CapCut AI video generator.
Try a restrained instruction, such as: “Slow camera push-in. Keep the bottle still and preserve its label, pump, color and proportions. No new objects or text.” This is a test prompt, not a guarantee. Review the full result before buying another attempt; use manual motion if the product keeps changing.
Templates: replace structure, not judgement
CapCut's product-video page documents a template/import route with animated text, music and export. Templates are useful when the placeholder rhythm already matches the job. Preview the complete template before replacing anything: count its media slots, identify the crops, read every text layer and check whether the ending CTA can carry the real offer.
After replacement, check every product shot for an awkward crop, leftover placeholder text or an unwanted ending. Remove unused layers. CapCut's legal centre distinguishes material marked for commercial use, but the label alone does not clear every asset, product category or publishing destination.
AI ads, avatars and Video Studio are different routes
The AI Ad Generator page describes two different outputs: AI design makes a static image ad; a separate PC AI video maker → Avatar video workflow makes a presenter-led video. Uploading a product photo to the image-ad tool does not, by itself, create a product video.
Some CapCut marketing tutorials turn out to describe Pippit's Video generator. If that is where a link takes you, you are using a different product. Our Pippit versus CapCut comparison explains the distinction; do not assume the same menus, plan or credits.
Before asking for scenes or narration, write down the audience, product, supported benefit, offer, CTA and any required disclosure. Read the generated script before generating more media. If you want to build and revise a multi-scene draft, follow the separate CapCut Video Studio walkthrough.
An avatar can present a script without pretending to be a customer. The FTC's guidance on AI avatars and testimonials does not ban all avatar marketing, but fake or false testimonials and deceptive presentations can violate US rules. Do not give a generated speaker an invented personal experience with the product.
Reject the clip when the product changes
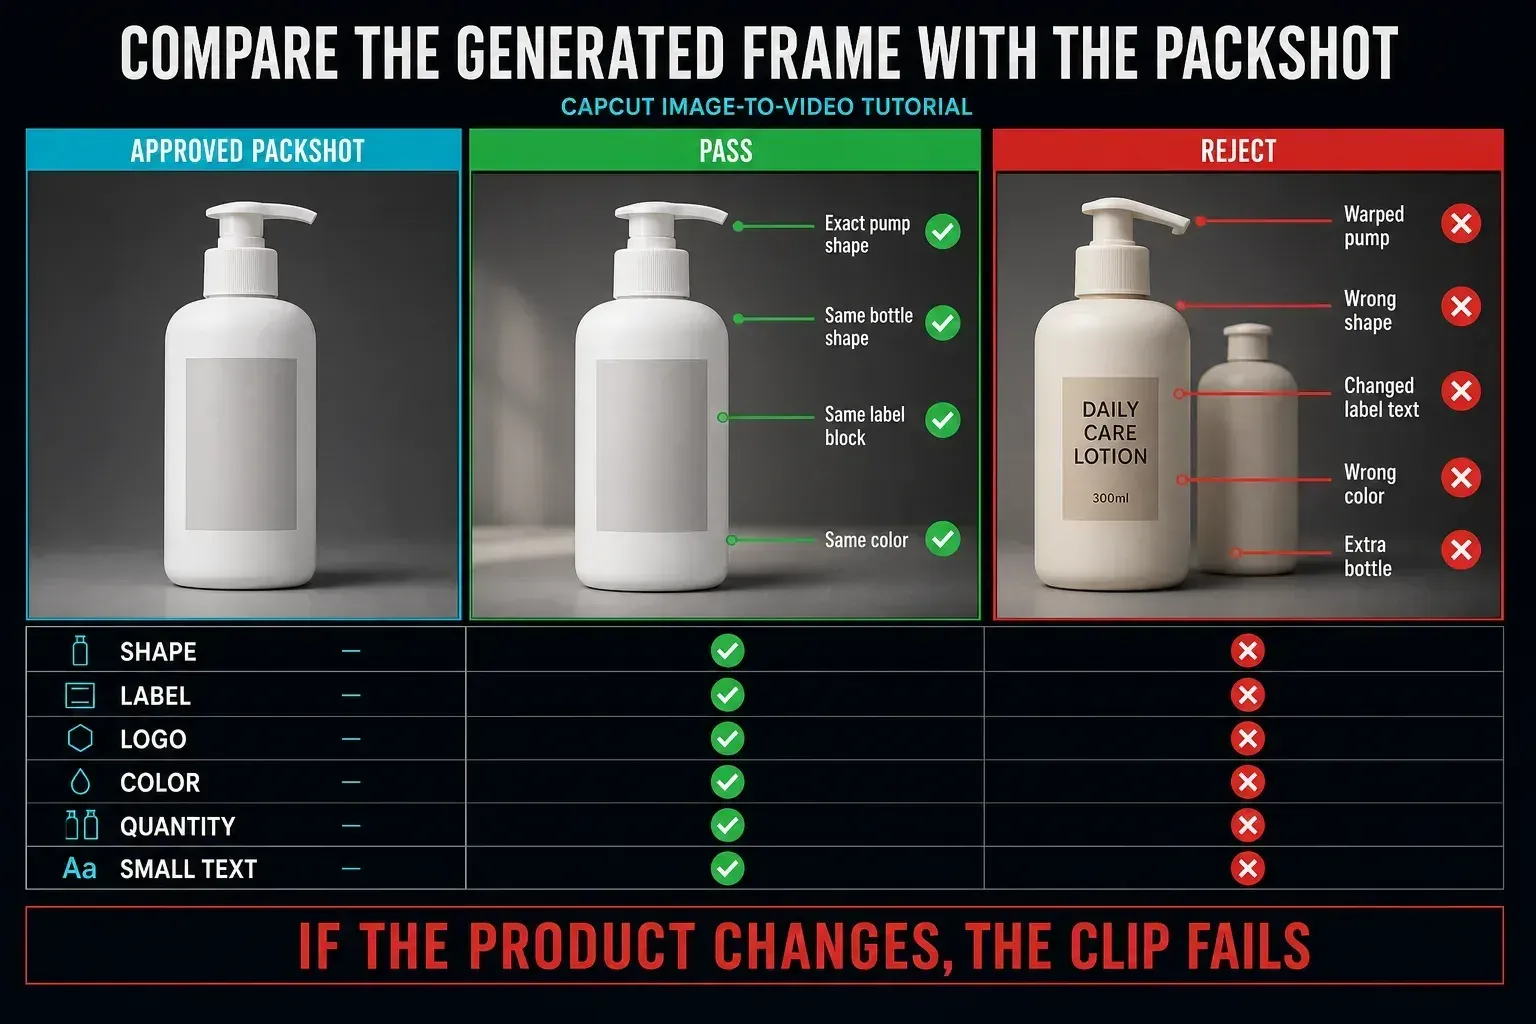
Watch the complete clip, then inspect the moving product frame by frame wherever its edges, label, accessories or reflections change. Compare it with the original photo. Sampling only the beginning, middle and end can miss a brief distortion. Check shape, cap or pump, label, logo, color, quantity and small text; an attractive scene is not enough.
The comparison diagram shows what to examine. Its blank label block cannot demonstrate readable logo or small-text accuracy; check those details on your own full-size product image and exported frames.
The product is correct
Keep the accepted visual and adjust editable text, timing, crop, audio or CTA in the timeline.
The scene is usable, the item is not
If another attempt is worth the displayed cost, reduce the requested motion and compare the new result. Otherwise, return to the original photos; you do not need to keep buying rerolls.
The model keeps changing the item
Return to the real packshot and create movement with keyframes, cutouts or several approved angles.
In a discussion about animating a single product photo, sellers describe unwanted changes from AI and suggest ordinary pans or zooms as a starting point. That is an anecdotal workflow tip, not a test of sales performance, watermark rules or music rights.
Proofread claims, captions and asset rights
Read every visible and spoken word against the source pack. Product name, price, dates, unit, ingredients, compatibility, performance, health or safety language and scarcity need special attention. If a claim doesn't have an approved source and owner, remove it.
If you add speech, proofread its captions too. CapCut's caption correction help explains that recognition can mishear words. Check names, prices and timing while listening. In a silent photo edit, write your message as text; auto captions are not a substitute for writing the ad.
Read the Materials License Agreement and asset-specific terms for your region. CapCut serves regional versions of these terms. US users should read the US Materials License Agreement, not assume another region's version applies. A commercial label is not unlimited permission: check the destination, territory, licence period and restricted product categories. Mixing in a noncommercial asset can prevent commercial use of the finished video.
Both the US and non-US versions checked for this guide limit Commercial Sounds to CapCut, TikTok and TikTok for Business; other destinations require separate rights. Do not carry that music into an Instagram, Facebook or YouTube ad assuming it is cleared. Use audio whose licence explicitly covers the planned use, or leave the music out.
The Terms of Service also apply. A clean export does not create missing permissions. Before uploading unreleased packaging or confidential client files, check the client's approval and CapCut's AI safety guidance. These checks are a starting point, not legal clearance for a campaign.
Check the file, then check the upload
Photos do not have a capture frame rate to match. For a photo-only video, choose a delivery frame rate; 30 fps is a reasonable starting example for a simple social edit, not a requirement. For mixed photo and video projects, consider the footage and the destination's specification. CapCut's frame-rate guide explains the tradeoffs. The export diagram's “match source” note applies to video footage, not still photographs.
On Desktop, open Export and check the offered resolution, frame rate and quality settings. CapCut's export instructions show Mobile quality controls beside the Export button; options vary with the device and project. Save one master and watch the entire file outside CapCut, first for the product and then with sound for copy, captions and audio. Check for any unwanted watermark or ending before uploading.
If the result is blurry, compare the saved file with the original photo before raising every setting. Use the original image rather than a compressed preview and reduce an excessive crop. CapCut's import-quality help distinguishes editor-preview blur from exported quality. A larger export cannot recreate detail missing from the source.
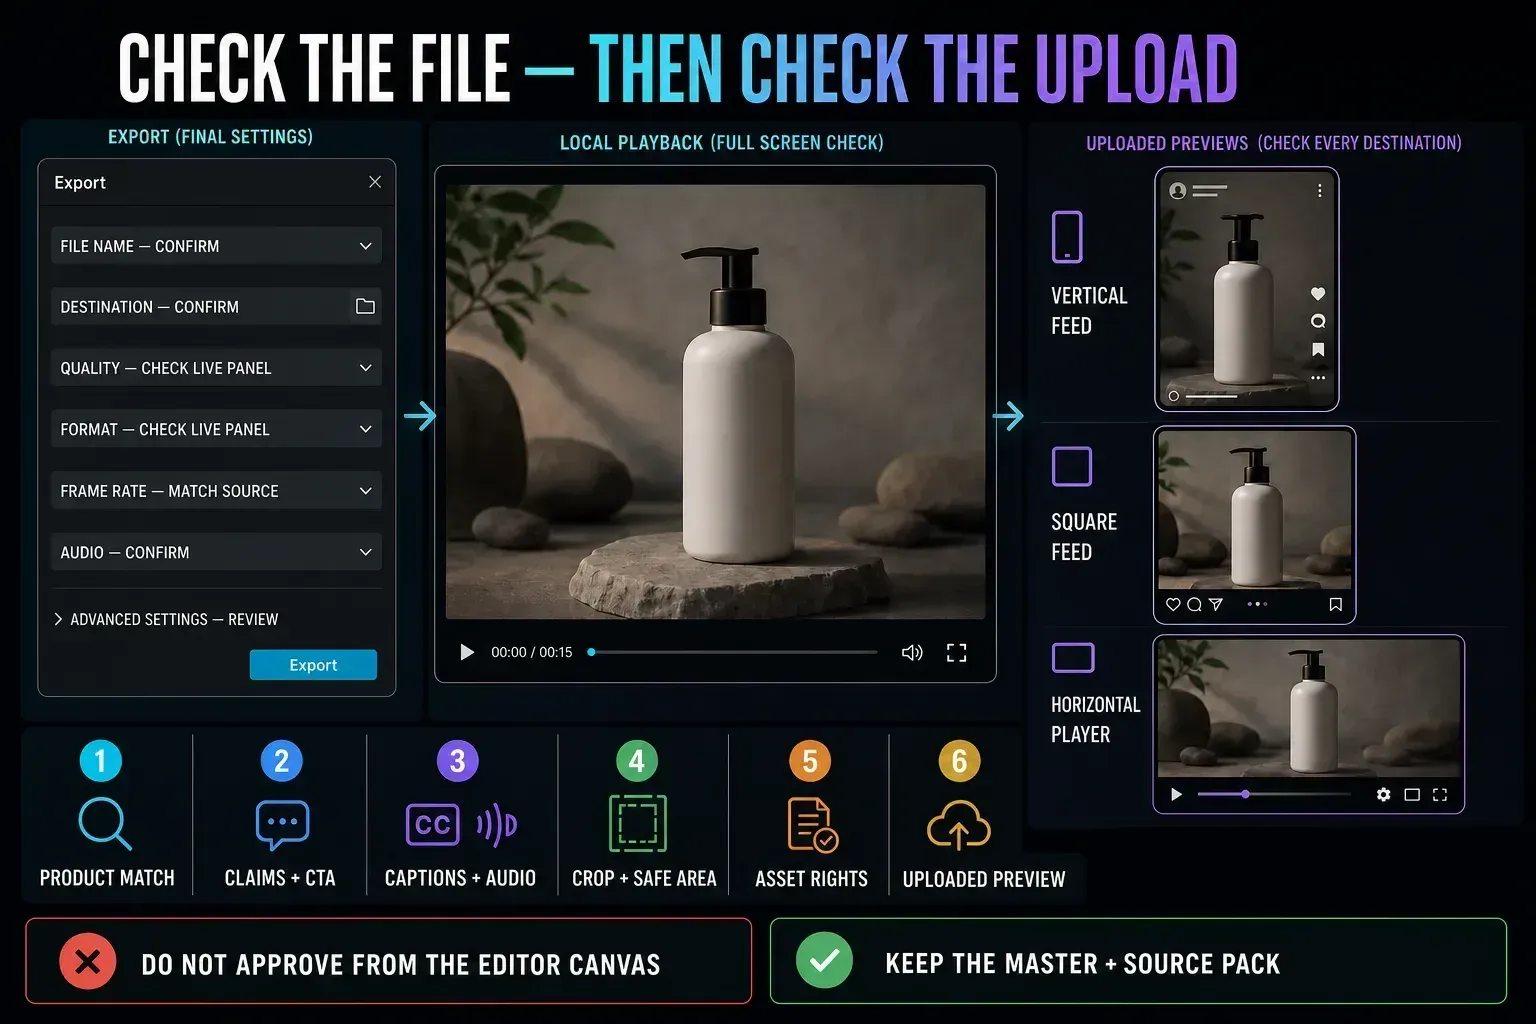
- The product still matches the approved packshot.
- Every claim, offer and CTA matches its approved source.
- Captions, voice and music are accurate, balanced and cleared.
- Text and product remain visible after the destination crop and interface overlays.
- The uploaded version matches the local master on another device.
- The source pack, project and approved master are retained for later changes.
For a vertical social version, use the TikTok workflow or Instagram Reels guide to check framing and publishing. Inspect the uploaded preview too: the local master is not the only version your customer will see.
When the product-video workflow goes wrong
The bottle, label or quantity changes
Reduce the requested motion, use a cleaner source image and rerun one controlled test. If the item still changes, use manual keyframes.
The offer is unreadable
Keep one message per beat, shorten the hook and give the CTA its own final frame. Don't solve density by shrinking important terms.
The product is cut off after upload
Recheck the destination ratio and safe area, then reposition in a dedicated version. Don't stretch the master to fill every shape.
The documented AI route is missing or gated
Confirm the platform, app version, account and region. Read the live quote before generating; switch to the manual or template route instead of assuming a universal entitlement.
CapCut product video FAQ
Can CapCut turn product photos into a video?
Yes. Add photos to a normal timeline, arrange their duration, and add text and motion. Templates and available AI tools are optional. A static AI image-ad workflow is different from creating a video.
Which route keeps the product most accurate?
Start with manual position and scale changes when the real product must stay recognizable. This avoids generative redrawing, but you still need to check crop, color and proportions. Inspect generated clips throughout rather than at a few sampled frames.
Is one image-to-video clip a complete ad?
No. It still needs a clear hook, approved product message or proof, CTA, captions or audio where relevant, asset-rights review and a final placement check.
Can I use any CapCut template or music in a commercial product video?
No. Check the terms for your region, each asset and the intended publishing platform. Commercial labels and music permissions have limits; do not assume a TikTok-cleared track is licensed for an Instagram or YouTube ad.
How long should a CapCut product video be?
There's no universal length. The 15-second master in this guide is a planning example for one focused social message. The product, destination and campaign objective should decide the final duration.
Should I upload the same product video everywhere?
Build one approved master, then create only the placement versions you need. Recheck ratio, crop, safe area, duration, captions and the uploaded preview for each destination.
What should I do if AI changes the product?
Reject it. If another test is worthwhile, reduce the motion and check the new clip against the original. If the shape, label, logo, color, quantity or text still changes, use the approved photos with manual motion instead.