

Documentation checked September 5, 2026. This guide follows CapCut's published instructions, not a signed-in test of every account. Brand names, colors and file names in the images are samples; an “approved” mark stands for your team’s own sign-off, not a CapCut approval feature.
On CapCut Desktop, go back to Home, open your Space and look for Brand Kit or Brand Assets. Add the logos, colors and fonts you want to reuse, then apply them in a short test project. For a shared kit, check the team membership and editing permissions first: individual Pro access does not guarantee the same tools as a Teams workspace.
Clean the source pack
Approve the logo variants, palette and font licences before anything reaches CapCut.
Open the right Space
Use the account and Space that will own the assets, then find Brand Kit or Brand Assets.
Run one real export
Apply the pack to a representative project and inspect the saved file outside the editor.
What CapCut Brand Kit does
Brand Kit keeps recurring assets together so you do not have to find the same logo and font for every video. CapCut's Desktop brand-asset instructions describe this library, while its Teams and Pro comparison lists a shared kit for logos, colors and fonts as a Teams benefit. Those pages do not establish universal free access to every kit screen.
If you are choosing between a solo setup, shared editing and a commerce workflow, start with our overview of CapCut for Business. The steps here are for organizing assets you already have.
Good fit
- Reusable logo files and watermarks
- Approved color references
- Heading and body fonts
- Shared campaign media
- One controlled starting point for editors
Not a substitute for
- A vector master and brand guidelines
- Trademark or copyright clearance
- Your required sign-off and licence records
- Color-managed print production
- An offline backup or full digital asset manager
Still need a logo? Use the guide to make and check a logo in CapCut first. Once the design is approved, bring its finished variants into the kit.
Prepare the brand pack before opening CapCut
The fastest setup begins outside the editor. Put the files in one local folder, give them names another editor can understand, and keep the originals. A folder full of files called logo-final-2-new.png is not a system; it is a future mistake.
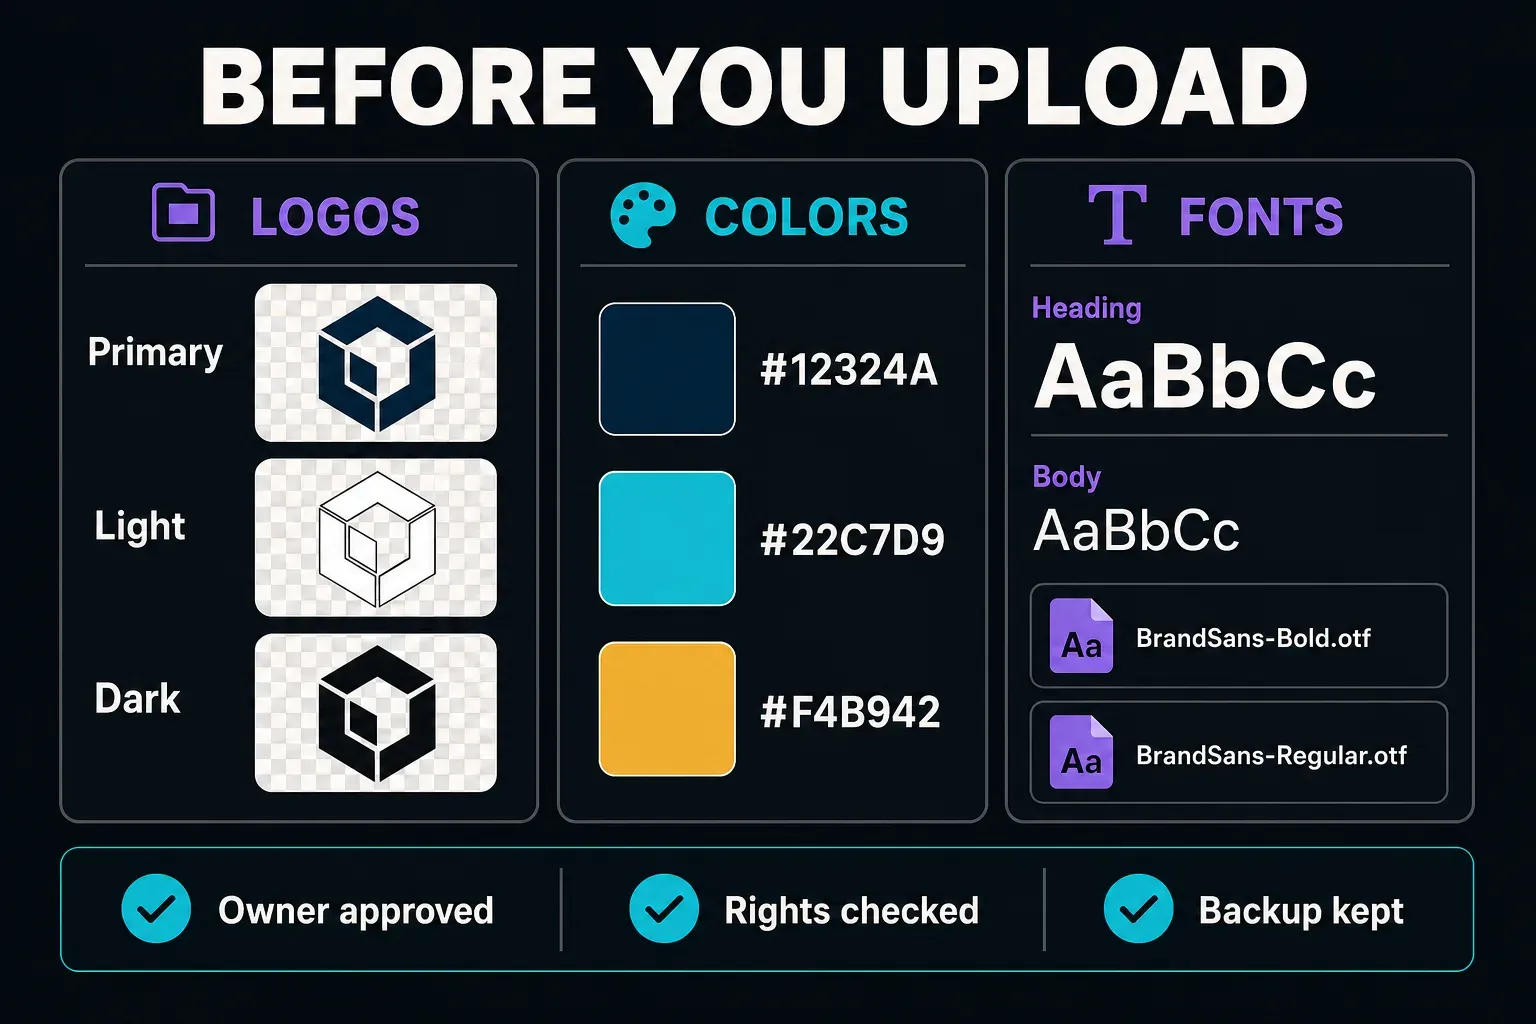
Keep usable variants
Keep a primary mark and the light or dark versions your brand uses day to day. Include an icon-only file if you have one. For a logo over footage, use a PNG with real transparent pixels, not a picture of a checkerboard. Keep the original vector file separately.
Record exact values
Write down the approved HEX values instead of sampling the logo by eye. If video grading is part of the brand look, document that separately; a title color and a whole-scene grade are not the same control.
Include the right weights
Keep the exact heading and body files plus proof of the licence. Don't assume a family name covers every weight, client, contractor or commercial destination.
CapCut documents custom uploads that are usually .ttf or .otf in its current font workflow. Treat those as the practical starting formats, not a promise that every variable font or account will behave identically. Test the actual weight you plan to publish.
Find Brand Kit or Brand Assets on Desktop
CapCut's documented Desktop route starts on Home, outside the project editor. Open Spaces, choose your Space, then look for Brand Kit or Brand Assets. Use the category and upload controls available there; their labels can vary between versions.
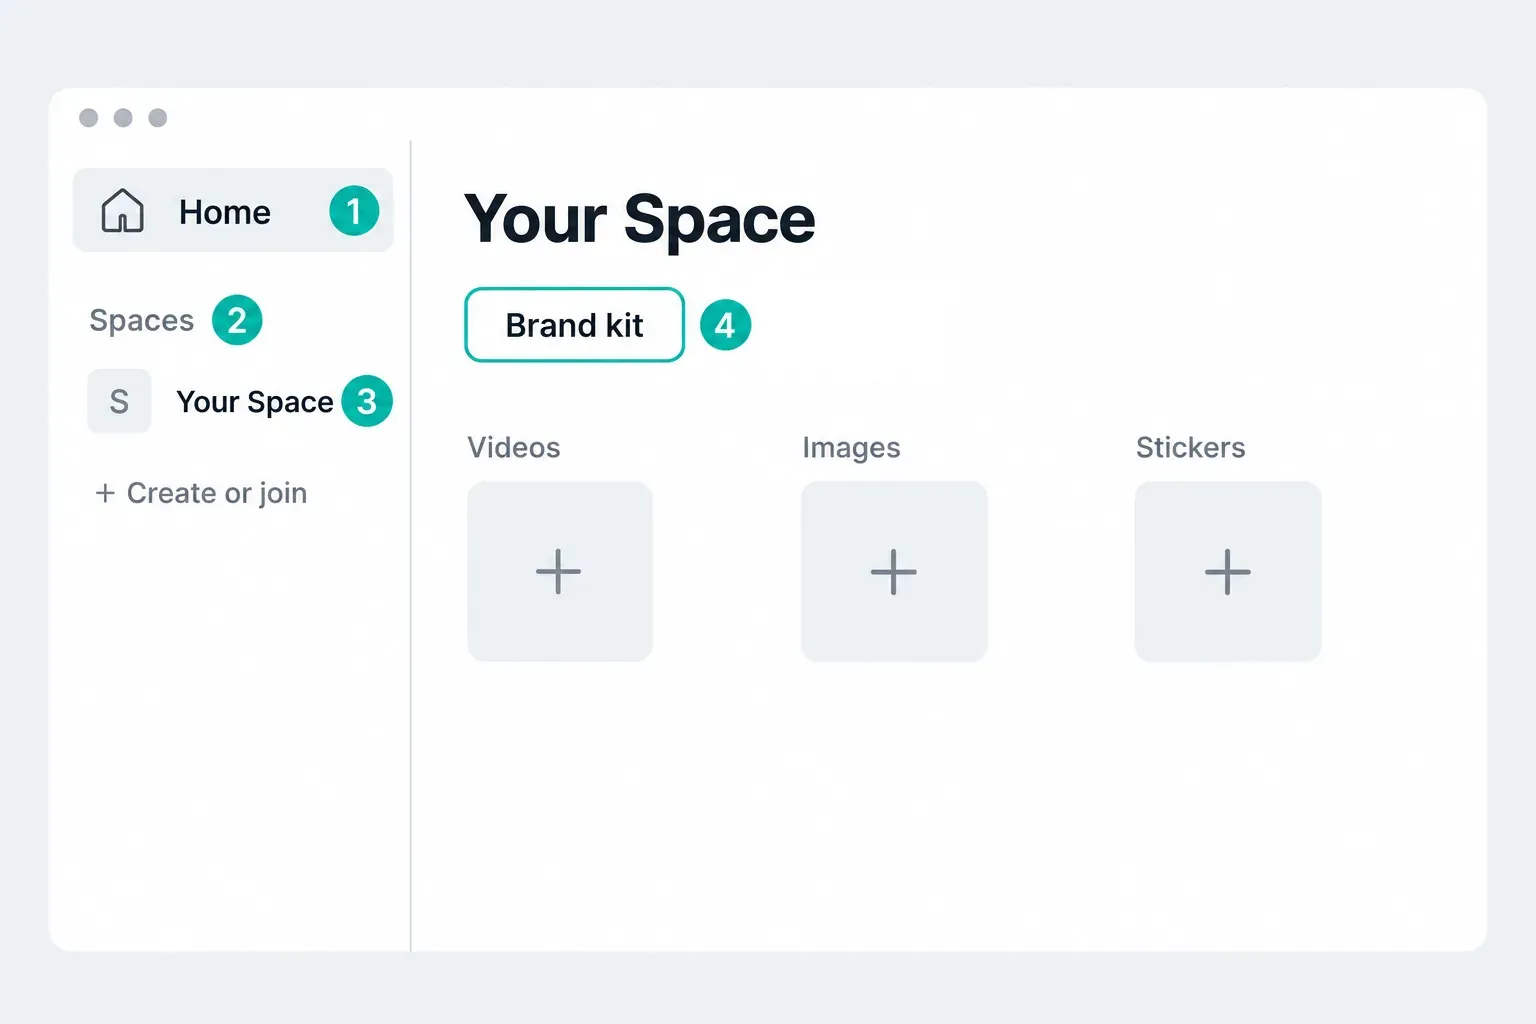
- Confirm the account. Check the account that owns or has joined the intended Space. If you use email, Google or TikTok sign-in, make sure you have reached the right account before recreating an empty-looking library.
- Open the right Space from Home. Choose the personal or team workspace that should hold the files, then open Brand Kit or Brand Assets if available. For a team, accept the invitation and confirm that you can edit the kit.
- Add one approved logo. In the relevant image or logo group, use the available upload or add control to select the file. Wait for it to appear before adding the rest of the pack.
- Add the palette and fonts. Use numeric color values wherever the picker supports them. In an available Fonts group, upload the extracted font file rather than a ZIP archive. Reopen each item to check that it saved.
- Apply the assets in a project. Select the logo from Spaces or Brand assets in the media panel if offered, place it above the footage, and add text with the intended font and color.
- Export a short sample. Check the logo, type and colors in the saved video. If someone else will edit, have them repeat the asset-selection test in the same team Space.
If Spaces itself does not load, CapCut's Cloud Space help recommends checking the account, updating Desktop and reopening Spaces. Check the connection too. Protect local projects before reinstalling; a missing cloud panel is not a reason to delete working files.
Shared kit: check membership and permissions
A Teams subscription belongs to a specific team, not every workspace its owner uses. CapCut says invited users must accept the invitation before receiving that team's benefits. Seeing a shared asset does not necessarily give you permission to replace it.
The collaboration help page describes admin-only changes to the centralized kit. Ask the owner or admin to check your role if you can use a logo but cannot upload or delete one. Web and Desktop support team workflows; Mobile has more limited access. Do not assume the phone offers the same kit-management controls.
Add logos and recurring media without creating a mess
Upload each logo variant as a separate, clearly named asset in the appropriate group. For example, Northfield_Primary_Dark.png tells the next editor more than logo-final-2.png. These are sample names; use your own brand name and a version or date when needed.
- Use a transparent logo only when the destination really needs transparency.
- Keep light and dark marks separate; don't rely on an editor to recolor a single file consistently.
- Include the minimum safe-area rule in the asset name or the separate brand sheet.
- Don't upload obsolete campaign marks “just in case.” Archive them outside the active kit.
- For client work, record who approved the file and when.
Keep recurring images and short bumpers in the relevant media groups where available. When replacing a logo, retain the old master and test a copy of an existing project first. Do not assume that replacing or deleting a library item will safely update every older edit.
Add brand colors without guessing
Start with the approved HEX values. CapCut Online's color-picker instructions describe numeric entry, but that does not prove every Brand Kit or Mobile screen has the same field. Where it is available, select the color, enter its code, confirm the change and reopen the saved swatch to check the value.
If your phone will not accept a code, try the same account and Space on Desktop or an available Web picker. Do not settle for an approximate color when the brand requires an exact one. If no suitable numeric control is available, use an approved graphic prepared with the required color instead.
Separate brand identity colors from corrective color grading. A stored cyan for titles doesn't mean every clip should be pushed toward cyan. Use brand colors for text, shapes, backgrounds and controlled graphic elements; use grading tools to make footage internally consistent.
Upload brand fonts carefully
In the kit's Fonts group, if your workspace offers it, use the upload/add control and choose the extracted font file. Wait for the upload to finish, then open a project, add a text layer and search the font list for that family. Test the intended weight with a few real words, numbers and accented characters from your content.
If the file is rejected, check that you selected the font rather than its ZIP archive, try a fresh copy from the licensed supplier and check the connection. CapCut's general font instructions mention TTF and OTF, but do not guarantee that every file in either format will work in Brand Kit. Installing a font on one computer is also not the same as adding it to a shared kit.
Check the licence separately: permission to use a font yourself may not allow you to upload its file for every contractor. A successful upload is not a licence check. Do not send a client's font to an unknown conversion website to work around an error.
For built-in fonts, CapCut's text-material help lists filters, region and connectivity among the reasons an item may not appear. Check the font name and active filters. Turning off a Commercial Use filter may reveal a font, but does not give you permission to use it commercially.
A font is not a complete text preset
A font file does not contain your caption size, stroke, position or animation. If your editor offers Add to Brand Kit or a save-preset control after styling text, save a clearly named preset and try it on a new text layer. Then check it on the device your next editor will use. If that control is absent, keep a duplicate reference project with the approved text treatment; do not overwrite the only master.
Use the kit in one real project before trusting it
Open a short project, select the logo from Spaces or Brand assets in the media panel if available, and place it on a track above the main clip. CapCut's overlay instructions document those asset sources. Set the logo's size, position and duration; uploading it to a kit does not add it to every video automatically.
Add one heading and one body line with the intended font and palette, then export. Inspect the saved video outside the editor. This checks the setup's output, not its legal clearance or guaranteed appearance on every display.
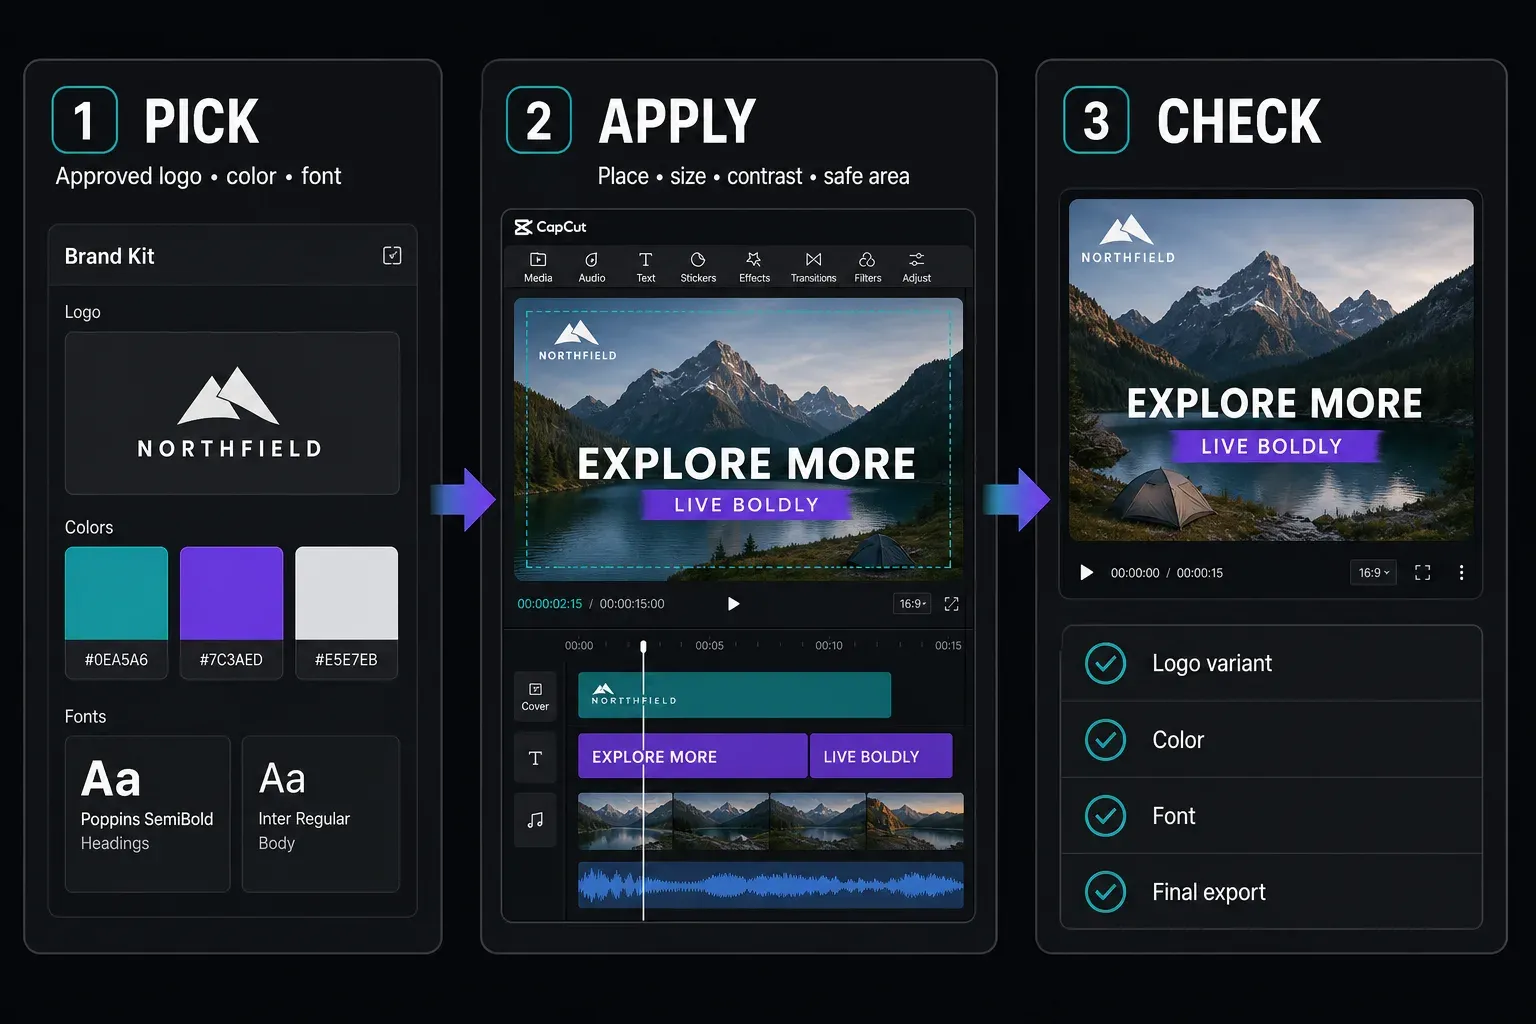
Check the mark
Use the correct light or dark variant, keep it inside the destination's safe area, and view it at phone size. A logo that is technically present can still be unreadable.
Check the type
Look for font fallback, missing weights, clipped descenders and text that becomes too small after platform compression.
Check the color
Confirm the entered color code, then look for unexpected shifts in the export. A second screen can reveal a problem, but it cannot certify an exact HEX match: display settings and the video color pipeline affect the result.
Check the handoff
Have the next editor open the same Space and repeat the test before moving a live client job into the workflow.
For detailed styling and placement, follow the CapCut text guide. For logo layer order, opacity and duration, use the overlay tutorial.
What to do when Brand Kit is missing
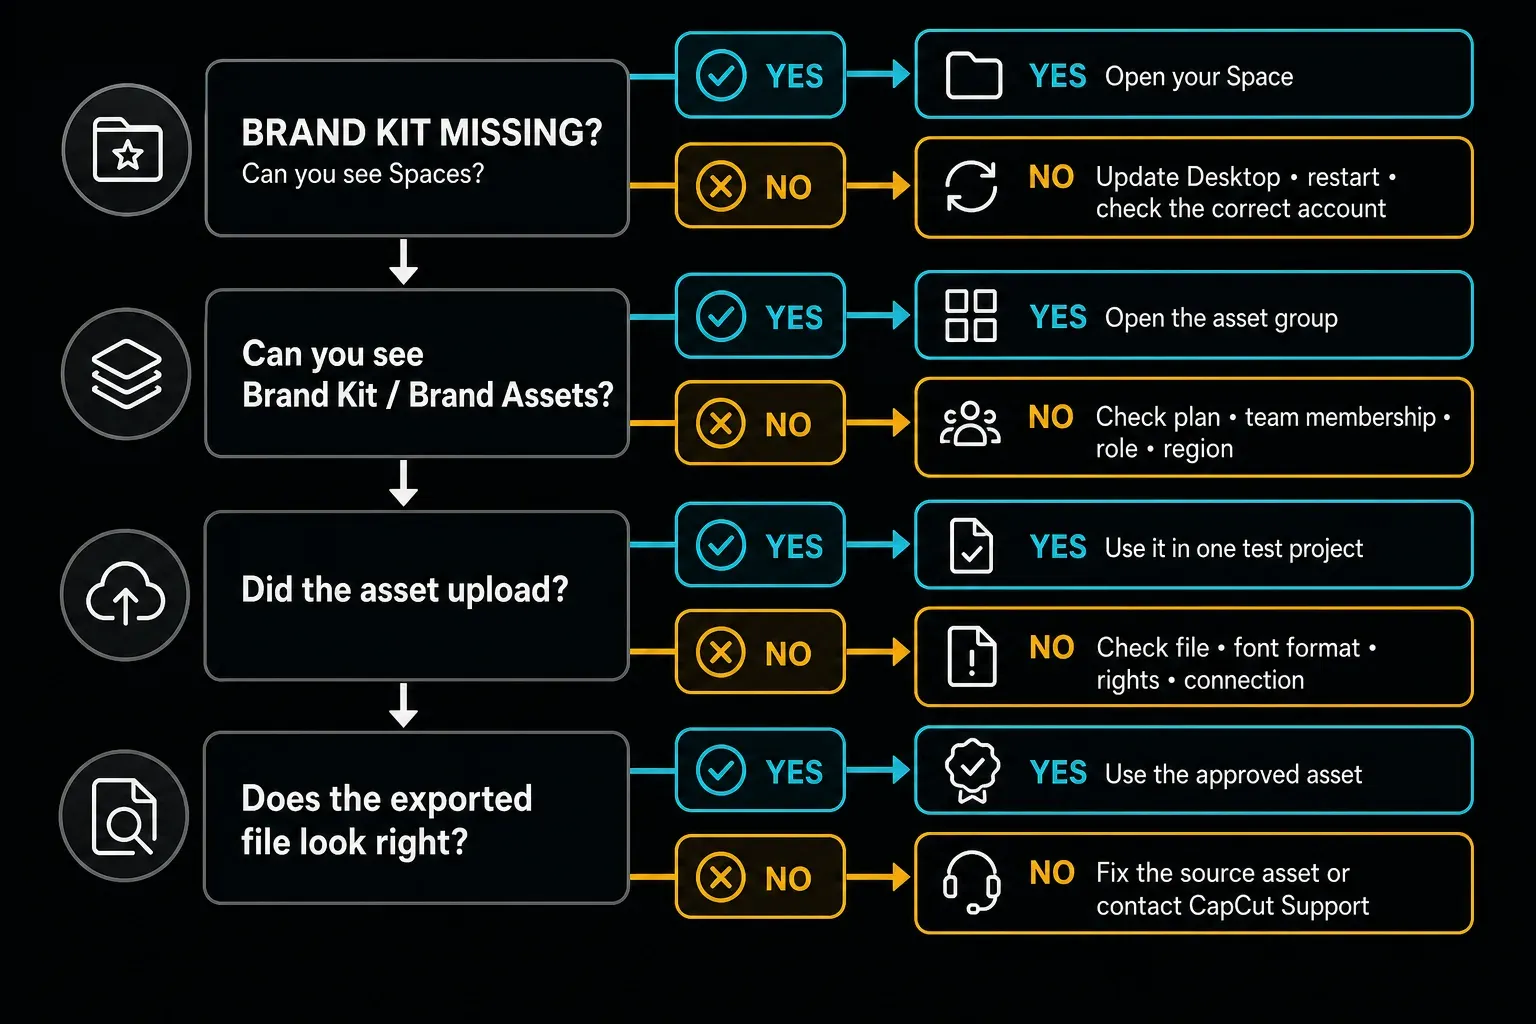
Update and verify the account
Install the current Desktop update, restart the app, reopen Spaces and confirm the sign-in method. Don't create a duplicate Space until you know the original is not simply under another account.
Check live access
Check whether you selected the right team, accepted its invitation and have permission to change the kit. Shared Teams access is not the same as an individual Pro subscription. Ask the owner to check the plan before paying again.
Test the source file
Try one extracted font or supported image file, keep the original unchanged and check the connection. Treat licence permission as a separate check; an upload error does not tell you whether you have legal permission.
Protect the master pack
Check the account, selected Space and team access before re-uploading anything. If you need the asset urgently, use the approved local copy in a duplicate project while the owner investigates the shared library.
Before buying Teams: compare the owner's live plan screen with our CapCut pricing guide. CapCut's Teams price page contradicts itself about Web versus Desktop purchasing, and its team-management pages disagree too. Use the purchase route shown for your team or ask CapCut support; do not buy a second personal Pro plan expecting it to unlock shared kit editing.
If you cannot use Brand Kit: keep the approved logos, palette sheet and permitted font files in a local folder, then import the needed logo into each project through Device or Import. This works as an asset pack, not a replacement for cloud syncing or team permissions. Share client files only through a channel the client has approved.
Treat rights, privacy and backup as separate checks
Upload assets your business owns or has permission to use. CapCut's Materials License Agreement prohibits using supplied Platform Materials as a logo or part of one. A sticker or stock graphic inside the app is not automatically available for your company mark.
For commercial videos, check the label attached to each CapCut material at the time of use. The CapCut Trust Center says materials expressly marked for commercial use can support commercial content, but the full agreement controls the scope, territory and other restrictions. Your own approved logo and licensed font remain the cleaner foundation.
Keep an offline master pack and a separate record of permissions. CapCut's Terms of Service tell users to back up cloud content. Its Privacy Policy describes collection of imported or uploaded content, including pre-upload processing in some workflows. Do not assume an unpublished client file is outside those terms. Get the client's approval before putting confidential assets into the service, and decide who controls the team when a contractor leaves.
For the project files themselves, follow the CapCut backup and transfer guide. A reusable logo shelf and a recoverable edit are different safeguards; you need both.
When CapCut is enough—and when it is not
CapCut is a sensible working library for a solo creator or a small team producing repeatable social videos. It is less suitable as the only system of record when hundreds of assets need approval histories, expiry dates, regional rights, version control, vector masters or print color management.
Small, active production pack
You have a few approved logos, a short palette, two or three font styles and a team that can test one shared Space.
Complex ownership or distribution
You manage many clients, markets, contractors or print outputs. Check whether your workflow records the approvals, licence dates and asset versions you need; keep those records in a separate system when it does not.
For the next design task, the CapCut design guides cover photo edits, thumbnails and logos. Keep this kit focused on the finished assets your editors reuse most.
CapCut Brand Kit FAQ
Where is Brand Kit in CapCut?
On Desktop, return to Home, open Spaces, choose the intended Space and look for Brand Kit or Brand Assets. For a shared kit, check the account, accepted team invitation and role. Labels and available controls can differ between versions.
Is CapCut Brand Kit free?
Don't assume universal free access. Current CapCut Help explicitly includes the shared Brand Kit with Teams, while other official material documents a broader Desktop Brand Asset route. Check the live account and plan shown to you.
Can I add my own fonts to CapCut Brand Kit?
Yes, where your kit offers font upload. Select the extracted file in its Fonts group, then test it on a text layer. CapCut lists TTF and OTF as usual custom-font formats, not a guarantee for every file. Check that your licence permits the intended team use.
Can I save brand colors by HEX code?
CapCut documents HEX entry in its Online color picker, but not identical controls on every kit screen. Enter and confirm the value wherever supported, then reopen the swatch to check it. Do not substitute an approximate color for an exact brand requirement.
Why is Brand Kit missing from my CapCut account?
Check the account, Desktop version, selected Space, accepted team invitation, role and plan. If Spaces itself does not load, check the connection, update and restart. Back up local projects before considering a reinstall.
Can I use a CapCut sticker or stock graphic as my business logo?
No. CapCut's Materials License Agreement says Platform Materials must not be used as a trademark, brand, trade name, service mark or logo. Use an owned or separately licensed source mark.
Does Brand Kit replace a backup?
No. Keep an offline master pack with approved logos, color values, font files, licences and reference exports. CapCut's Terms tell users to back up content stored through Cloud Space services.