


Start with Pippit when you want a product link, photos or a brief turned into a proposed video. Start with CapCut when you have footage and want to build the edit yourself, particularly in its desktop or mobile workspace. Those are starting points, not hard limits: both products have AI tools, and Pippit also has a timeline editor.
You may not need both. If Pippit produces a useful draft and its editor handles the remaining changes, finish there. Move the video to CapCut only when you need a particular tool or prefer its editing workspace. That extra handoff costs time and does not preserve the original layers.
This is a workflow comparison built from each product’s current documentation, store listings and terms. It doesn’t crown a faster or better-looking tool; the useful question is which starting point fits the material you already have.
Pippit vs CapCut at a glance
| Decision | Pippit | CapCut |
|---|---|---|
| Best starting input | Product link, product images, prompt, script or marketing brief | Recorded footage, photos, audio and an existing edit plan |
| Core job | Generate marketing drafts, then edit them in Pippit if its controls fit | Build and refine a timeline; AI generation is also available |
| Main working surface | Web platform, plus Android and iPhone apps; tools can vary by app and region | Mobile, desktop and web editors |
| Who makes the first creative decisions? | Pippit proposes more of the script, scene order, presenter, pacing or layout | In a manual project, you place the media, text, audio and timing |
| Best fit | Ecommerce, product promos, avatar drafts and repeatable campaign assets | Creator videos, exact cuts, captions, music, keyframes and final social edits |
| Main cost risk | Credits can be spent on attempts that still need repair or fail to return a usable file | Editing time, paid assets or features, and credits for some AI actions |
| Sensible combined workflow | Finish in Pippit where possible; export only if another editor adds value | Edit the rendered clip or rebuild sections from original assets; no separate layers arrive in the MP4 |
For example, a shop with product photos but no script could try Pippit’s generation tools. An editor with a filmed demonstration and an approved shot list could start directly in CapCut. If the only problem is a cut at 00:07, first check the editor you already have open, since Pippit also supports trimming and arranging clips.
They are related, but they are not the same product
Pippit is the successor to CapCut Commerce Pro. CapCut's official rebrand announcement described it at launch as an independent, web-based platform powered by CapCut. That still explains the product relationship, but it no longer describes every access route: current Bytedance listings now offer Pippit through Google Play and Apple's App Store.
The regular CapCut product remains the familiar editing family. Its current product site presents mobile, desktop and online versions alongside direct editing and AI-generation tools. Pippit has its own interface, pricing, credits and product routes. A CapCut subscription should not be treated as proof that a Pippit feature or allowance is included, or vice versa; verify the two signed-in checkout screens separately.
The naming history explains why old search results are confusing. Pages and videos may still say CapCut Commerce Pro, while the live destination now says Pippit. Treat Commerce Pro material as historical unless the same function is visible in the current Pippit account.
The workflow difference is visible before you generate anything
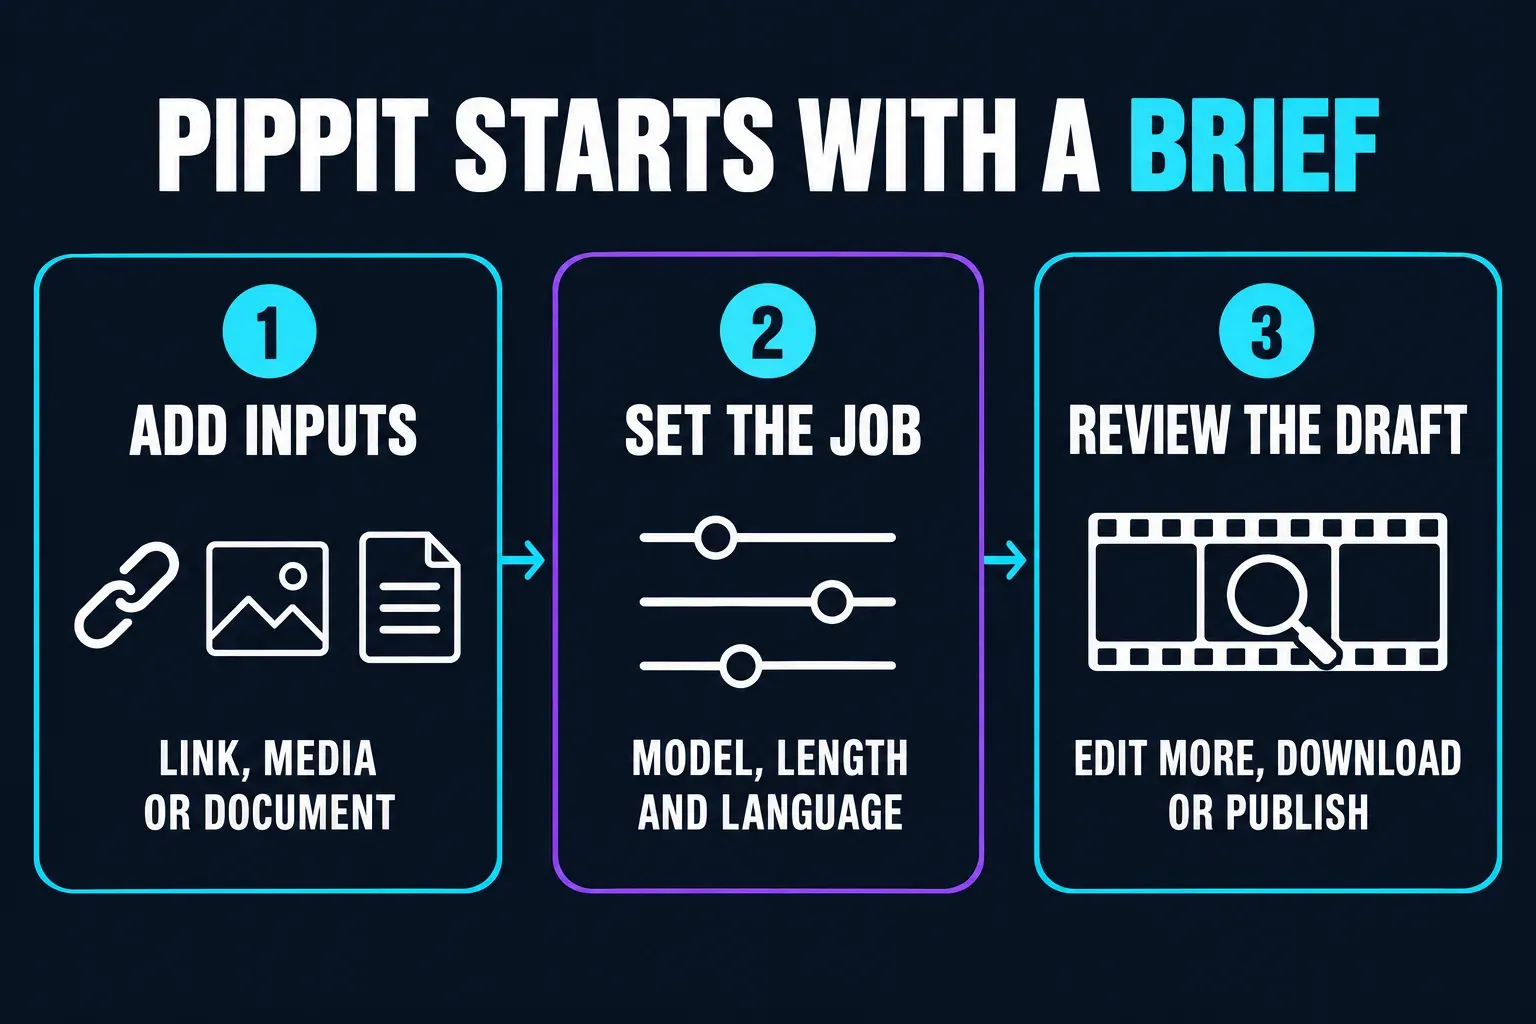
Pippit’s video agent guide starts with a prompt box rather than a timeline. You describe the video, add a product link, uploaded media or a document, choose a model such as Lite mode or Agent mode, and set the length and language. When the draft is ready, you review it and choose Edit more, Download or Publish. Menu names can change between app versions, so treat them as signposts rather than fixed labels.
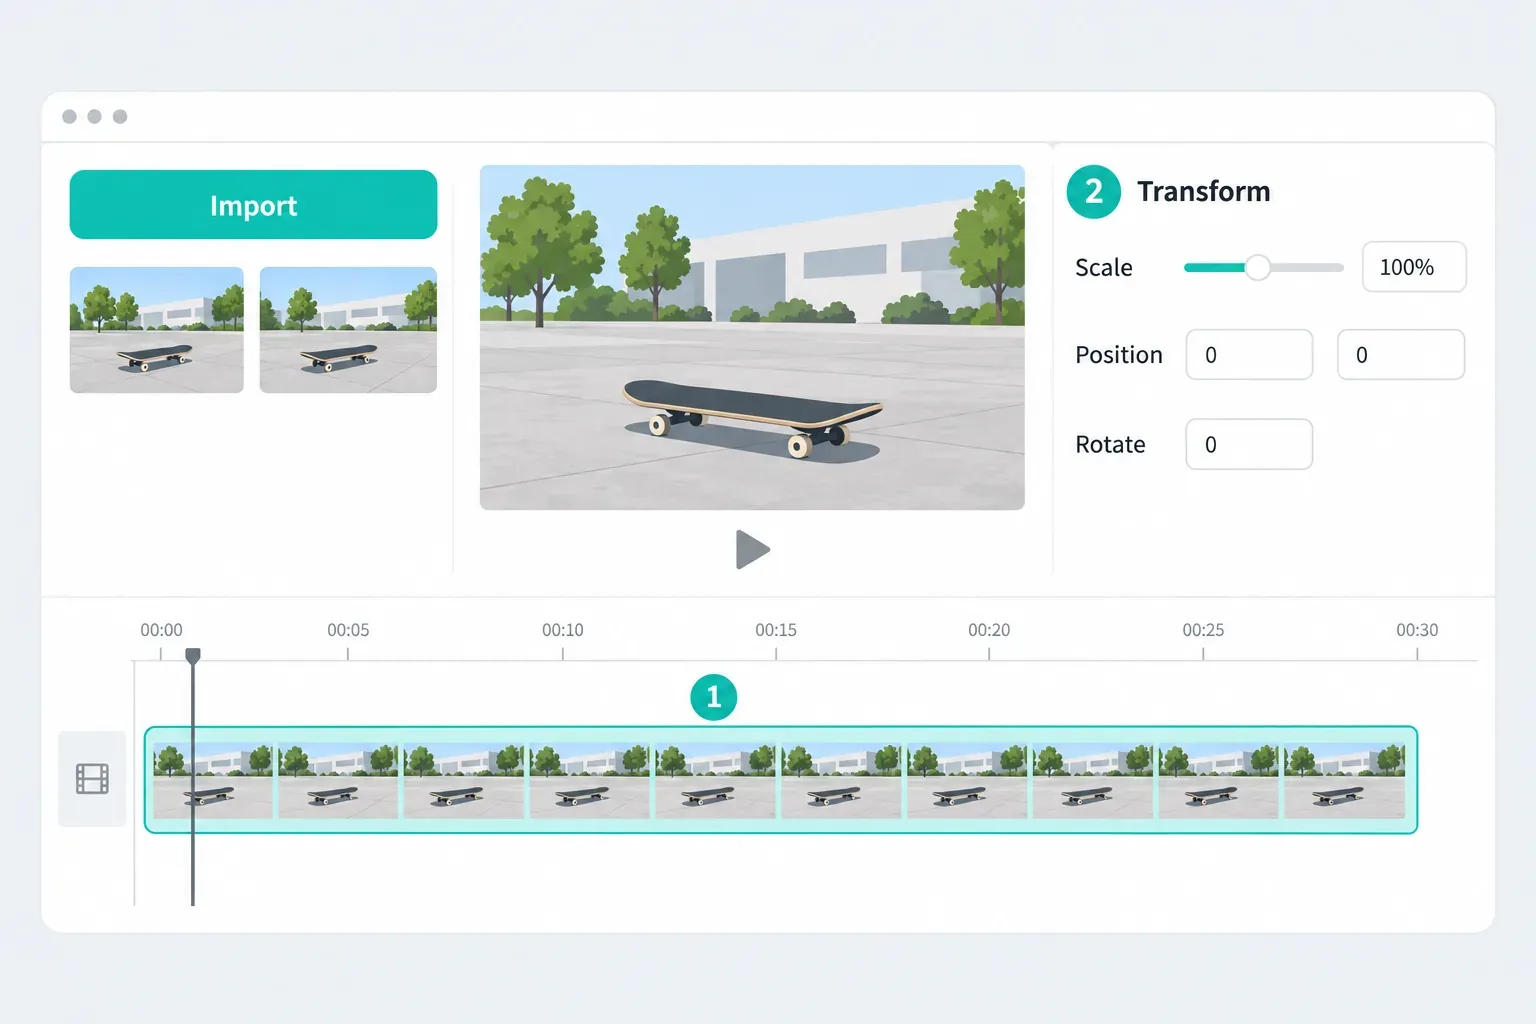
A manual CapCut Desktop project starts somewhere else: source footage on the timeline, a playhead and transform controls.
Pippit’s own timeline editor documentation describes separate video, audio and text layers, trimming, splitting and captions. You do not have to regenerate the whole video to make every correction. Check whether the generated route opens in that editor and which elements remain editable before deciding to switch tools.
What Pippit decides for you
Depending on the route, Pippit can propose a script, presenter, voice, scene order, stock or generated visuals, captions and an overall pace. Its official CapCut versus Pippit comparison calls this a link-, brief- or script-led marketing workflow rather than clip-first editing.
That automation is worth trying when coming up with a draft is the bottleneck. A shop can reuse a brief’s structure across products, but each item needs its own accurate facts and images. An agency can ask for alternative hooks, then compare the time spent reviewing them with the time needed to write them directly. Neither saving is guaranteed.
The trade-off is review work. Every decision Pippit makes can also be a decision it gets wrong. Product details, price, packaging text, pronunciation, crop, safe area, avatar behaviour and music still need a human check. A polished preview is not approval.
Pippit doesn’t publish a per-video rate card. Its subscription FAQ says not every creation tool consumes credits and sends you to the in-app information, so read the quote on each action before you confirm. Credits spent on failed or unusable results are a recurring complaint on Pippit’s Trustpilot page, which is why the cost section below counts approved outputs rather than attempts. Our Pippit AI review covers plans, credit expiry and refunds in more detail.
What CapCut lets you control directly
CapCut is a reasonable choice when you already know the edit and are comfortable working directly with clips. Its desktop product page documents keyframes, animation graphs, captions, colour tools and aspect-ratio changes. Check the specific controls and any paid requirements on the version you will use.
That control is especially valuable when:
- the product claim must match approved copy word for word;
- a spoken line needs a precise cutaway;
- captions must avoid a face, logo or platform control;
- music must duck under speech at a specific moment;
- the same project needs 9:16, 1:1 and 16:9 versions with deliberate crops;
- a client has commented on one frame rather than the whole concept.
These are reasons to use an editable timeline, not proof that only CapCut can do the work. Pippit has timeline controls too. Choose CapCut when its particular tools, layout or existing project setup suit the job better; stay in Pippit when you can make the same required changes there. Neither editor can turn a flattened video back into its original separate tracks.
Which is better for a product video?
Try Pippit first when you have product photos you can use, verified facts and no settled script. Its brief-led tools can propose a structure to accept, reject or rewrite. Test one representative product before relying on the process for a catalogue; a good-looking sample does not establish consistency across different items.
Start directly in CapCut when you have real footage, a founder speaking to camera, screen recordings or an approved shot list and want to use its timeline. If that material already makes sense as an edit, adding a generation step may not help. Use customer footage only with the necessary permissions.
Do not let either tool invent a product claim. Prepare approved copy, use it in the brief or text layers, then compare the final file with the underlying product specifications. Check the words and visuals: a generated shot can imply a size, accessory or result that the product does not offer.
If you're building the video from still images rather than an agent-generated draft, our CapCut product-video-from-photos guide covers the direct timeline route.
Which is better for creators and social editors?
For a creator who already records and edits in CapCut, staying there can avoid unnecessary transfers. Select the useful takes, tighten the opening, check captions and balance the audio. This is a workflow recommendation, not a claim that CapCut always takes fewer steps or that Pippit cannot edit phone footage.
Pippit is worth considering when the job starts with product angles, presenters or campaign drafts rather than recorded takes. It advertises publishing and analytics, but its promotional and help pages do not give a consistent current platform list. Check the live connection screen and requested permissions for the account you intend to use; do not buy it on the assumption that every social network is supported.
For a long interview or a project with complicated sound, test the actual editing requirements: track handling, captions, audio adjustments, backup and export. Commerce automation alone does not answer those questions. If neither product handles the project comfortably, compare dedicated desktop editors rather than forcing a two-tool workflow.
Platforms and project handoff
Pippit runs on the web, and Bytedance also lists Pippit: AI Video & Image Maker for Android in Google Play and for iPhone in Apple's App Store. Apple says the iPhone app can run on compatible Apple-silicon Macs, but labels it as not verified for macOS; that is not the same as a native desktop editor. A store listing doesn’t confirm that an app has every web tool, so check the features you need in the app you’ll actually use.
CapCut is available on iOS, Android, Windows, macOS and the web, but its surfaces are not identical either. Templates, paid benefits and individual tools can differ by device, region and account. Check the live store or web product you'll use rather than treating one listing as universal.
CapCut’s subscription help says Pro benefits cover mobile, desktop and web, while Standard benefits are mobile-only and the plan is available in some regions. That does not make every tool identical. Its project help specifically requires uploading projects to Spaces for cross-platform cloud use. Do not assume a local draft has been backed up just because you signed in; verify the uploaded project opens on the other device.
The handoff described here is a rendered video file, not a shared editable project. Pippit’s AI talking photo page says creations download as MP4 or MOV. CapCut’s third-party project guidance recommends importing a rendered file or rebuilding from original media. We found no Pippit or CapCut documentation for a transfer that keeps scenes or layers editable. Test the actual downloaded file: an MP4 extension alone does not guarantee every codec will import correctly.
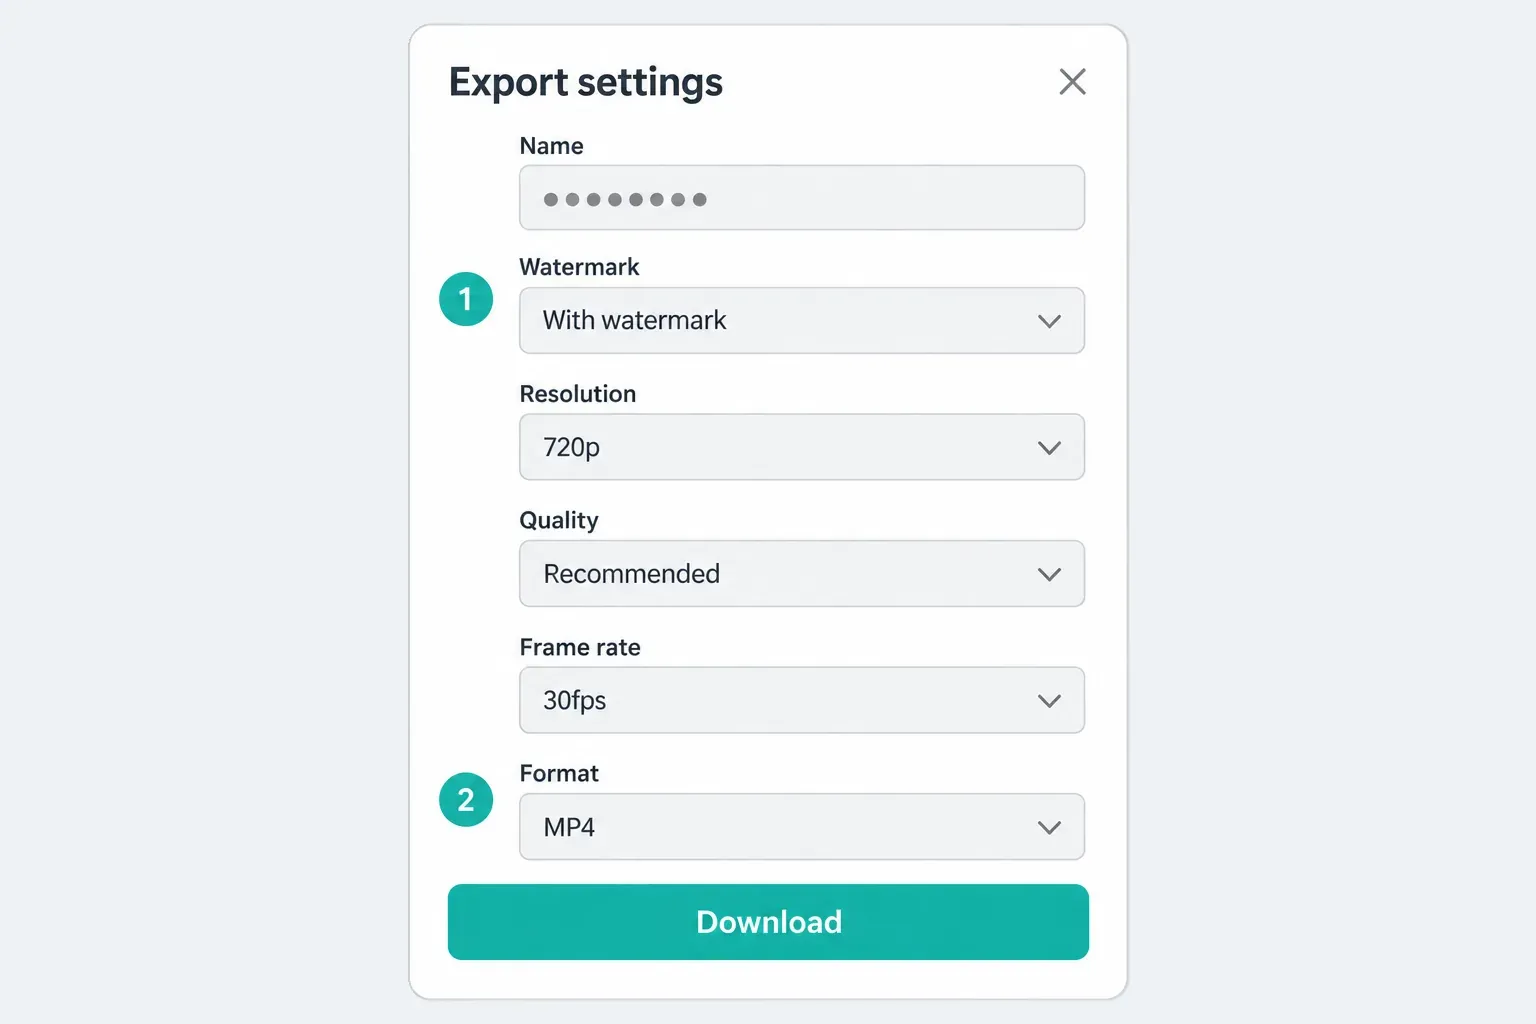
Keep the original images, footage, script and separate audio outside the exported video. CapCut’s export-and-import guidance explains that separate tracks and effects are lost in a rendered file. Burned-in captions become pixels; mixed music and voice are not independent audio tracks. Correct those in the original editable project and export again, or rebuild the affected section from source assets. Adding another caption layer on top does not fix the original words.
Pippit vs CapCut pricing: compare the cost of approval
Compare the offers on the accounts you plan to use. Pippit has its own Free, Starter, Plus and Pro plans. CapCut also has free and paid features, and its credit documentation confirms that some AI work uses credits. Do not assume a CapCut Pro subscription makes every generation unlimited or pays for Pippit.
The more useful calculation is:
(allocated subscription expense + actual extra purchases + labour cost) ÷ approved outputs
Count only the subscriptions you need for the work, and convert editing hours to money before adding them to the bill. A failed attempt can consume credits already included in a subscription; do not add that nominal value again. Add extra credit purchases only when they create an additional expense. With no approved outputs, cost per approved output is undefined, not zero. Compare annual cash paid upfront separately from a monthly allocation.
Our Pippit pricing guide compares plan prices by region and explains credit expiry, cancellation and refunds. Keep detailed plan shopping there; the decision here is whether generation, direct editing or a combination earns its place in your workflow.
Commercial use and client privacy
A business-oriented tool is not blanket permission to use any image, song or person’s likeness. The terms linked by Pippit permit commercial use of its Company Content subject to the materials licence. Third-party assets and music have their own conditions. Check the licence for the specific material and intended destination; do not present a generated avatar as a real customer’s endorsement.
The terms linked by CapCut also cover Pippit and treat uploaded User Content as non-confidential. Our recommendation is to keep confidential client files and private personal media out of these services unless an appropriate agreement and permissions cover the use. A paid plan or a commercial-use label on an asset does not by itself solve that issue.
The practical two-tool workflow
This is our recommended handoff checklist. Use it only if the extra editor solves a specific problem; otherwise finish in Pippit:
- Write a fact sheet with approved claims, spelling and call-to-action wording.
- Use product links or media you have permission to submit; give Pippit a narrow brief without confidential information.
- Review the proposed script and scenes. Remove anything the fact sheet does not support.
- Read the credit quote before generating. Afterward, record the actual debit and inspect the output.
- Make corrections in Pippit where its editor allows them, then download the version you want to take further.
- Import the downloaded file and original assets into a new CapCut project. Confirm playback and audio before building the edit.
- Replace inaccurate scenes using source assets. Return to the original project for changes that are baked into the video.
- Check captions, sound, crop and pacing. Rebuild burned-in text or mixed audio from originals where necessary; they are not separate layers in the MP4.
- Export a representative version and review the full file on another device before preparing more variants.
- Check every finished size and variant before delivery, including facts, captions, crop, audio and required AI labels.
Stop if the transfer creates more work than it saves. A draft needing a total rewrite is a reason to return to the brief, not to keep spending credits. For a repeatable production job, compare one complete batch, including review and finishing, with making it directly in the editor you already use.
Choose Pippit, CapCut or both
Choose Pippit first if
- your input is a product URL, product-photo set or marketing brief;
- you need several rough concepts before choosing one;
- avatar, product-showcase or campaign-asset generation is the main job;
- repeated catalogue content makes manual setup the bottleneck;
- someone is available to verify claims and approve every output.
Choose CapCut first if
- you already have the footage and know the story;
- exact cuts, captions, audio, masks, overlays or keyframes matter;
- you prefer CapCut’s mobile workspace or need its Windows or macOS desktop editor;
- a client is reviewing specific frames and wording;
- you would rather build the draft directly than audit an agent's proposal.
Use both if
- Pippit creates a useful draft, but a specific remaining edit is better handled in your CapCut setup;
- you have accounted for the time and quality cost of exporting and importing;
- you retain the original assets needed to rebuild any flattened elements;
- a trial of the complete process produces an acceptable file without unnecessary regeneration.
If you're still at the overview stage, our Pippit AI guide routes you to the review, pricing or this comparison. For a wider business decision that also includes Teams, brand libraries and approvals, see our overview of CapCut for Business.
Pippit vs CapCut FAQ
Is Pippit the same as CapCut?
No. Pippit succeeded CapCut Commerce Pro and is powered by CapCut, but it has its own web and mobile products, plans and credits. Regular CapCut remains a separate editing family. A shared brand relationship does not establish shared paid entitlements.
Can Pippit replace CapCut?
Yes, for a job its generation tools and editor can complete. Pippit has a timeline, so needing trims, text or audio adjustments does not automatically require CapCut. Switch only when a specific tool, platform or preferred workflow justifies it.
Is Pippit or CapCut better for product videos?
Try Pippit for a proposed video from product photos, links or a brief. Start directly in CapCut when you have footage and want its editing workspace. This is a starting-point recommendation, not a claim that one is faster or produces better ads.
Can I edit a Pippit video in CapCut?
Yes, if you can download a video that your CapCut version imports. It arrives as a rendered clip, not the original separate scenes, captions and audio tracks. Keep source assets and the original project for corrections; burned-in text cannot be edited as a caption layer.
Is Pippit free if I already pay for CapCut Pro?
Don't assume so. Pippit and CapCut show separate products, plan surfaces and credit systems. Check both signed-in accounts and checkout screens for the exact entitlement available in your region.
Does Pippit have a mobile or desktop app?
Yes. Current Bytedance listings show Pippit for Android in Google Play and for iPhone in Apple's App Store, while the web app remains available. Apple also lists the iPhone app as compatible with Apple-silicon Macs but not verified for macOS, so don't present it as a native Pippit desktop editor. Tools and availability can still differ by region, device and account.
Should a marketing team use Pippit and CapCut together?
Use both only when Pippit supplies a useful draft and CapCut solves a remaining editing need worth the extra handoff. If Pippit’s own editor can finish the job, a second tool is unnecessary. Keep source assets, verify rights and review every final output either way.