

Checked September 22, 2026. CapCut support varies by Desktop, Mobile, Web, operating system and app version, so a filename extension is only the first clue.
If CapCut will not import an MP4 or MOV file, do not rename it. Preserve the original, make sure the file is stored locally, inspect the video and audio codecs, then convert a short copy to H.264 video + AAC audio in an MP4 container with a constant frame rate. If that short copy imports, the original container, codec, timing or device-decoding path is the likely problem. This is a diagnostic baseline, not a promise that every H.264 file will work on every CapCut version.
CapCut itself warns that a file can carry a familiar .mp4 or .jpg extension while its actual format or encoding remains unsupported. That distinction explains why two files with the same extension can behave differently.
Use this order before converting the whole file
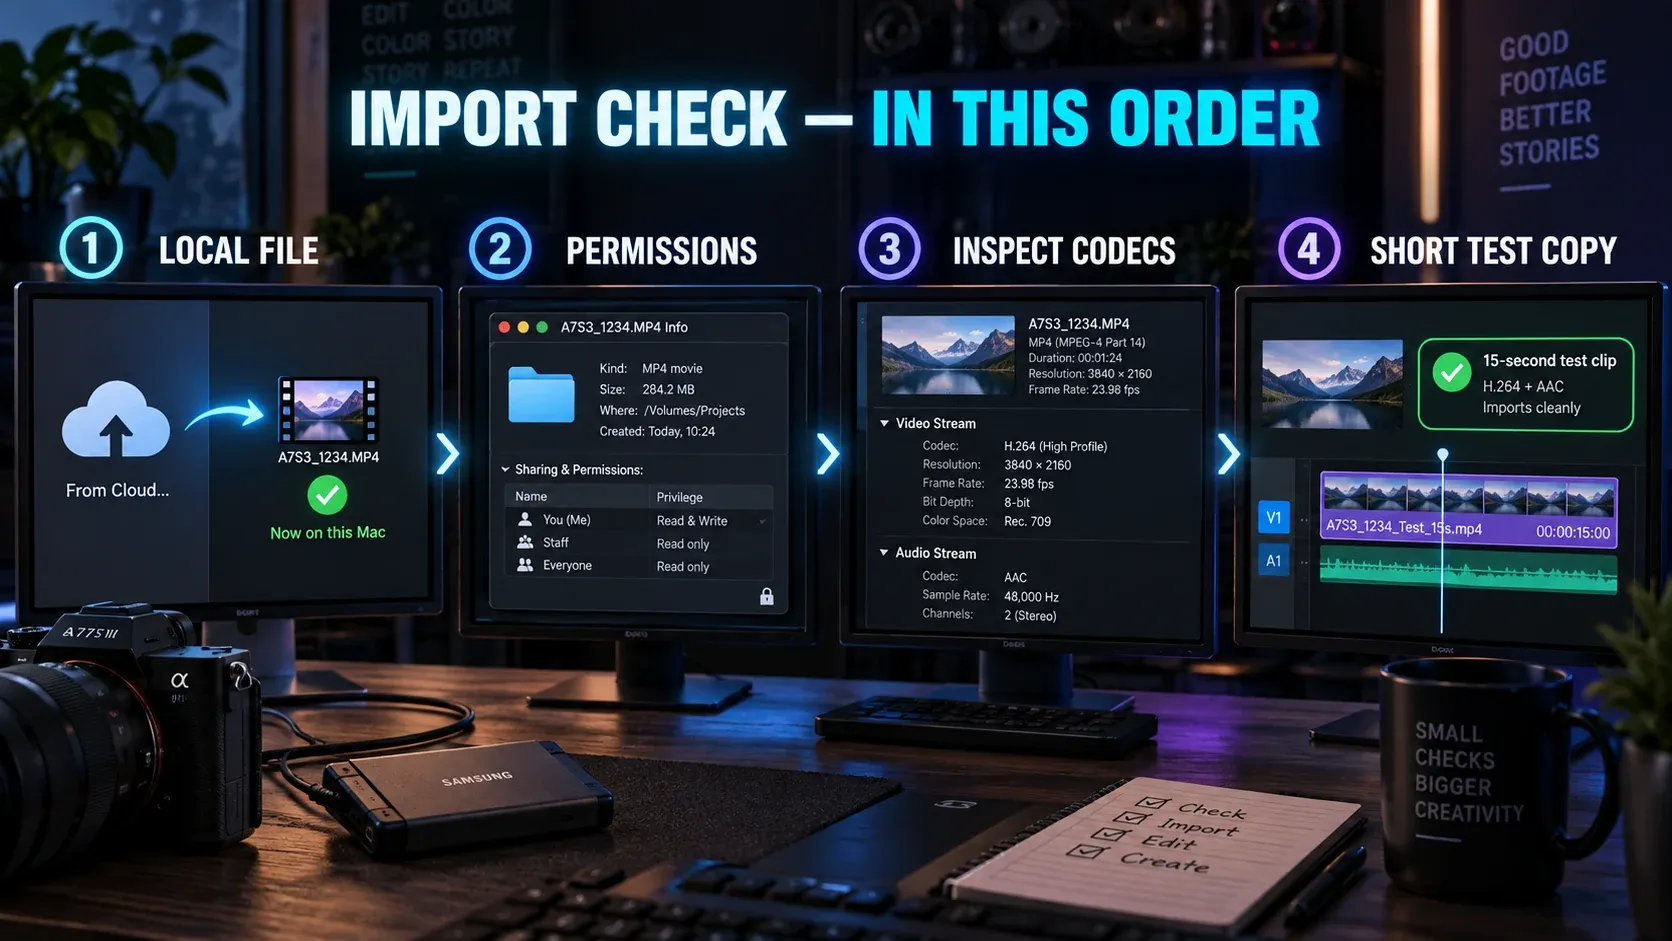
- Keep the original untouched. Work on a duplicate. A conversion can remove metadata, alter frame timing or reduce quality, so the source remains your rollback point.
- Confirm that the complete file is local. A thumbnail in iCloud, Google Drive, OneDrive or another cloud folder may be a placeholder. Download the original to the device and wait until the transfer finishes.
- Open the source outside CapCut. If another current player cannot seek through it or loses audio, the file may be incomplete or damaged. Re-copy or re-download it before changing codecs.
- Check storage access. On phones and tablets, verify that CapCut can access the selected photos or files. On desktop, copy the media to a normal user folder with a short filename and avoid removable drives for the first test.
- Inspect the container and streams. Record the video codec, audio codec, frame-rate mode, resolution, frame rate and bit depth. The section below shows two ways to do this.
- Test a short copy. Convert 10–20 seconds that includes picture and sound. Use MP4, H.264, AAC and CFR. Import that small file before committing time and disk space to the complete source.
If the test works, convert the full duplicate with the same settings. If it still fails, try the same test on another CapCut platform or current version. A failure on Web but not Desktop points toward browser or upload constraints; a failure on one phone but not another can point toward device decoding or memory pressure.
Container and codec are different layers
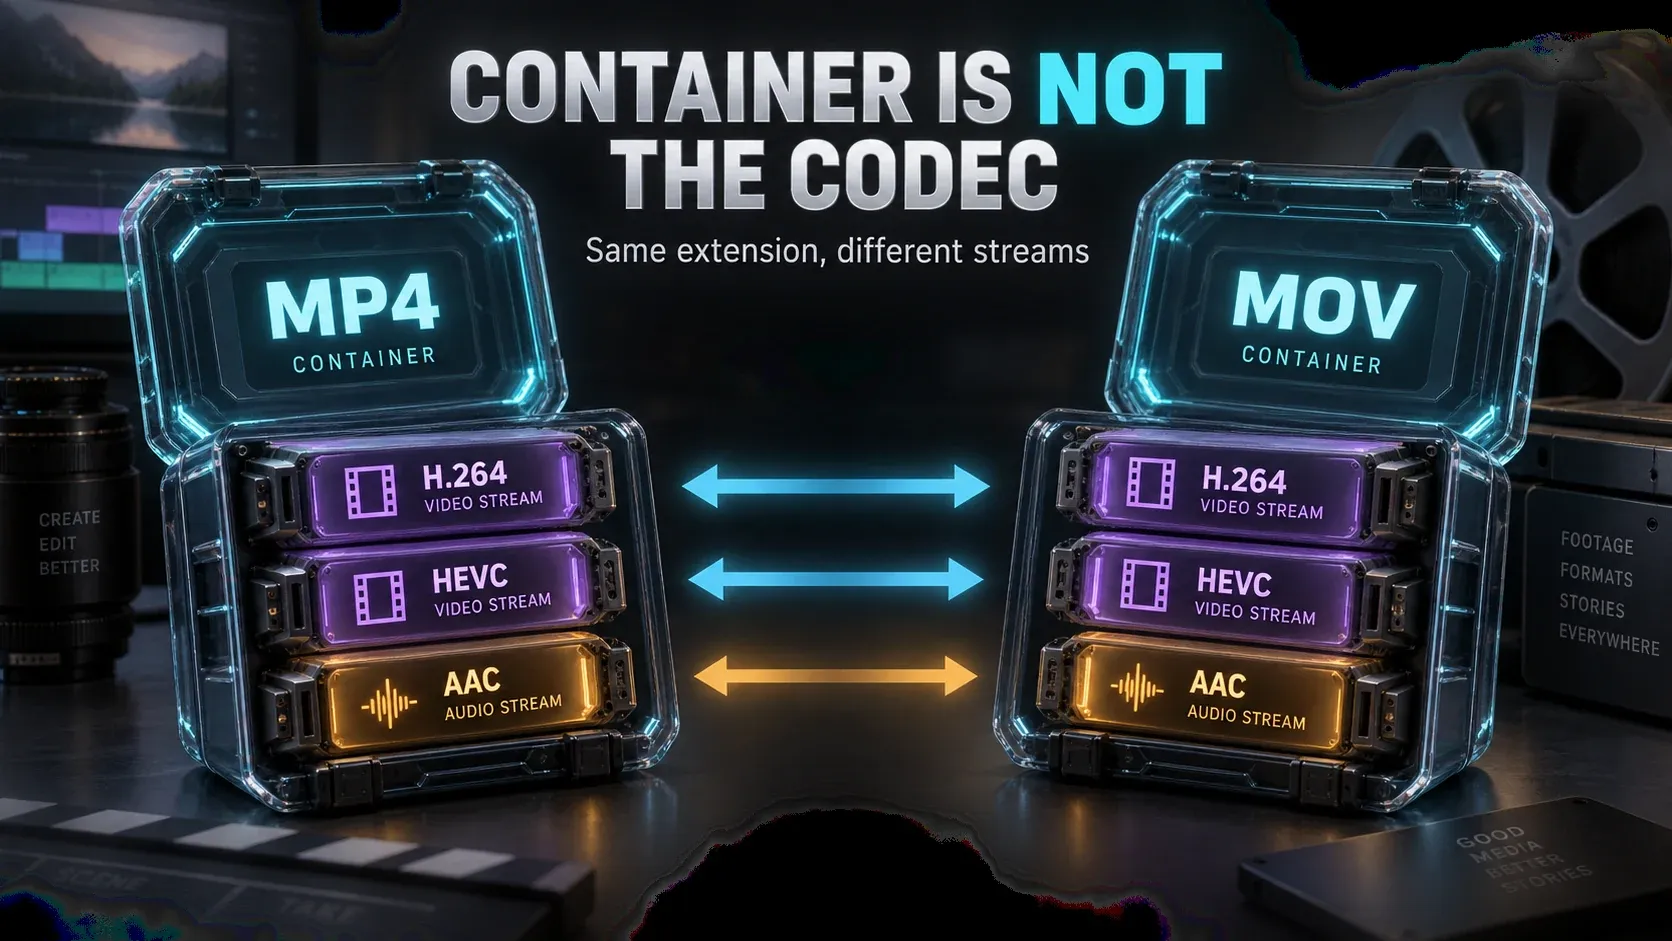
Think of MP4 and MOV as boxes. The video and audio streams inside are the contents. An .mp4 file might contain H.264 video and AAC audio, but another .mp4 could contain HEVC video, an unusual audio stream or timing that an editor handles differently. MOV has the same issue: the extension alone does not identify the codec.
CapCut's current desktop format article names MP4, MOV, M4V, AVI, MKV and WebM as popular inputs. Treat that as a useful starting list for Desktop, not a universal matrix covering every codec combination on Mobile and Web. The article also does not mean that a corrupted MP4, a cloud placeholder or a 10-bit HEVC file must import successfully.
This is why the common “change .mov to .mp4” shortcut fails. CapCut's help page states that changing the extension does not change the actual file format. A real conversion decodes the streams and writes new ones; a rename only changes the label.
MP4 imports on one device but fails on another
Start with the codec and the device, then look at resolution and frame rate. H.264 is usually the safer diagnostic video codec because it has broad hardware and software support. HEVC is more efficient, but support depends more heavily on the operating system, hardware decoder, bit depth and profile.
A file can also be too demanding even when its codec is recognized. 4K at 60 fps needs substantially more decoding bandwidth and memory than 1080p at 30 fps. On older Apple hardware, Apple says HEVC media at 1080p or lower and 60 fps or lower is more broadly compatible than heavier combinations. That is an Apple-device condition, not an official CapCut ceiling, but it is a useful clue when a high-resolution phone clip fails on one device.
Try these branches:
- Imports on desktop, fails on mobile: make a lower-resolution H.264/AAC copy for the mobile project, free local storage, and confirm the file is fully downloaded.
- Imports on mobile, fails in a browser: try CapCut Desktop. Web editing adds browser upload, codec and memory constraints that a native app may avoid.
- Imports but playback is choppy: create a short 1080p H.264 copy before assuming the project is broken. If that works, the original may be too costly for real-time decoding.
- Only one file fails: inspect that file against a working file from the same camera. Compare codec, bit depth, frame-rate mode and audio stream rather than comparing extensions.
H.264 versus HEVC or H.265
HEVC and H.265 are two names for the same video-coding family. It can store similar visual quality at a lower bitrate than H.264, but the smaller file is not automatically easier to edit. Older hardware and some browser paths may decode H.264 more reliably.
Apple's media guidance identifies HEVC as H.265 and describes H.264 as the more compatible sharing choice. If an iPhone HEVC clip will not import, make a duplicate in H.264 rather than changing the original. Keep the frame rate and resolution sensible for the device that will edit it.
Pay attention to 10-bit HEVC, HDR recordings and high-frame-rate 4K. Each adds conditions beyond the word HEVC. If the file imports but color looks pale or too bright, use the separate CapCut HDR and SDR diagnosis instead of treating a color-management problem as a failed format.
Variable frame rate versus constant frame rate
Phone screen recordings, meeting captures and some camera apps can produce variable-frame-rate video. VFR is valid, but it can expose timing problems in editing workflows: audio drift, uneven seeking or a clip that behaves differently after import.
HandBrake's documentation explains that VFR follows changing source timing while CFR writes one frame rate throughout. It also names import into a nonlinear editor as one of the special cases where CFR may be useful. That does not mean every VFR clip must be converted. Use CFR as a targeted test when timing or sync is the symptom.
Choose a frame rate that matches the useful source cadence. Do not convert 30 fps footage to 60 fps expecting more real motion detail. If you are unsure, make a short “same as source, CFR” diagnostic copy and compare audio sync before converting the full recording.
When video imports but audio is missing
A working picture with silent audio usually points to the audio stream, not the MP4 container as a whole. Inspect the audio codec, sample rate and channel layout. If the source contains multiple audio tracks, test the primary track by itself.
For diagnosis, extract or convert a short section to WAV or MP3 and import it as a separate audio file. WAV avoids another lossy encoding step; MP3 is convenient for a small compatibility test. Neither is a universal promise for every CapCut platform, so keep the original and verify sync against the picture.
If the project only needs sound, use the dedicated audio-only export guide after the media is accepted. If audio disappears only after export, investigate export settings rather than repeatedly converting the source.
How to inspect a problem file
You do not need to guess from the filename. MediaInfo reports the container, codec ID, frame rate, bit depth and audio format in a readable view. Look for:
- Container: MPEG-4, QuickTime, Matroska or another wrapper;
- Video: AVC/H.264 or HEVC/H.265, resolution, frame rate, frame-rate mode and bit depth;
- Audio: AAC, PCM, MP3 or another codec, plus sample rate and channel count;
- Duration and overall bitrate: useful for spotting a truncated or implausibly small file.
For a command-line check, ffprobe can report the container and every contained stream. A compact inspection command is:
ffprobe -v error -show_entries format=format_name,duration -show_entries stream=index,codec_type,codec_name,profile,pix_fmt,width,height,r_frame_rate,avg_frame_rate,sample_rate,channels -of json input.mp4
Read the output; do not paste an unknown filename into a command without quoting or selecting it safely. The important result is the combination of video, audio and timing fields.
A practical conversion baseline
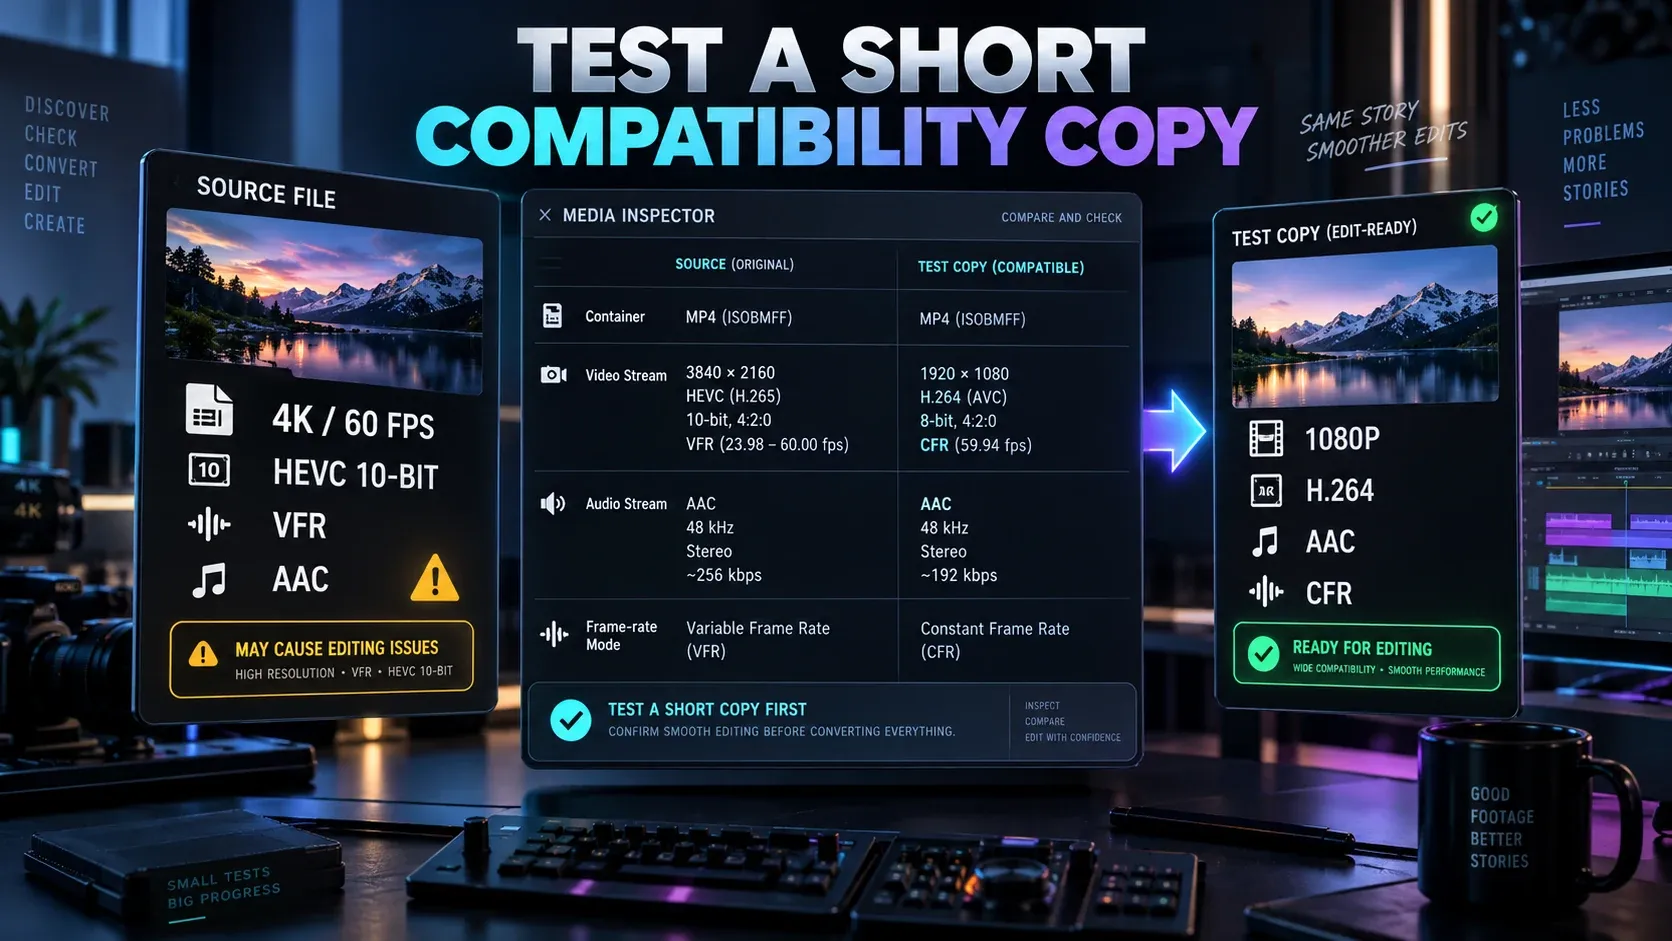
When the source properties offer no obvious answer, I use this as a diagnostic copy:
| Setting | Diagnostic choice | Reason |
|---|---|---|
| Container | MP4 | Broad interoperability and easy inspection. |
| Video | H.264/AVC | Safer compatibility baseline than HEVC on older or browser-limited systems. |
| Audio | AAC, stereo | Common pairing with MP4; simplifies unusual multichannel sources. |
| Frame-rate mode | CFR | Useful when VFR timing or sync is suspected. |
| Resolution | 1080p for the first test | Reduces decoder and memory load while preserving enough detail to judge the workflow. |
| Test duration | 10–20 seconds | Confirms the path before a full conversion. |
Keep the original frame rate unless timing evidence gives you a reason to change it. Do not upscale. If the short test imports, decide whether the project can use that proxy or whether you need a higher-quality full conversion for final editing.
A successful compatibility copy does not prove the source was “unsupported” in every environment. It proves that this simpler combination works in your current environment and narrows the cause.
Desktop, Mobile and Web are separate environments
Do not expect one support table to predict all three.
- CapCut Desktop has direct access to local media and usually has the broadest practical path for large source files. It is the first alternative I would try for 4K/60, HEVC, long recordings or multi-track media.
- CapCut Mobile depends on the phone or tablet's decoder, available storage, photo/file permissions and whether the source is fully local. A file visible in Photos can still be downloading from cloud storage.
- CapCut Web adds browser decoding, upload limits, network stability and tab memory. Try a short local H.264/AAC MP4 before uploading a multi-gigabyte original.
CapCut controls and capabilities change. Diagnose the file properties and environment you actually have rather than relying on a static extension list.
If conversion does not fix the import
Return to file integrity and access:
- copy the original from the camera or phone again;
- compare its file size and duration with the source device;
- move it to local internal storage;
- shorten the filename and remove unusual path characters;
- verify CapCut's storage or photo permissions;
- update the app or try another current platform;
- import the short test into a new blank project;
- check available storage and close memory-heavy projects or browser tabs.
If the file imports but looks soft, that is a different branch. Use the blurry-after-import guide to separate preview quality from source resolution. Once the media is stable on the timeline, the CapCut export quality guide and export settings guide cover delivery choices.
The fastest reliable answer is not “CapCut supports MP4.” It is: which video stream, audio stream, timing mode and device are inside this particular MP4 workflow? Preserve the source, inspect those fields, and prove the fix on a short copy first.