

A blurry CapCut preview does not necessarily mean your video lost quality. Open the original outside CapCut, then compare it with a short local export. If the export is sharp, check preview quality or Proxy. If the export is soft too, check the source, crop and export settings before adding Sharpen.
Keep the original media and your working project. The steps below use a separate test project so you can find the cause without dismantling the edit.
Checked against current CapCut and Apple help on September 13, 2026. Menu labels can differ by device and app version.
Run a short source-to-export test
Choose a section with fine detail: hair, fabric, leaves or small lettering. Around ten seconds is a convenient sample, not a required duration. Include the moment where you noticed the blur; leave the working project and original media untouched.
- Open the original file in your phone's gallery or a desktop player. Make sure it has downloaded fully, then pause on a detailed frame.
- Put that same file in a new, empty CapCut project and trim it to the short section you want to compare. Add no filters, enhancement, crop or speed changes. Keep your working project unchanged.
- Export the sample locally at the source resolution and frame rate where those options are available. Choose a high-quality bitrate preset if offered. Note the actual settings used; an export at a lower resolution is not a like-for-like detail test.
- Open the exported file outside CapCut. Compare the same frame with the original at the same display size, then play the moving section too.
Compare at the same display size: a small player window can hide softness that becomes obvious full-screen. Keep the same frame and playback section for both files.
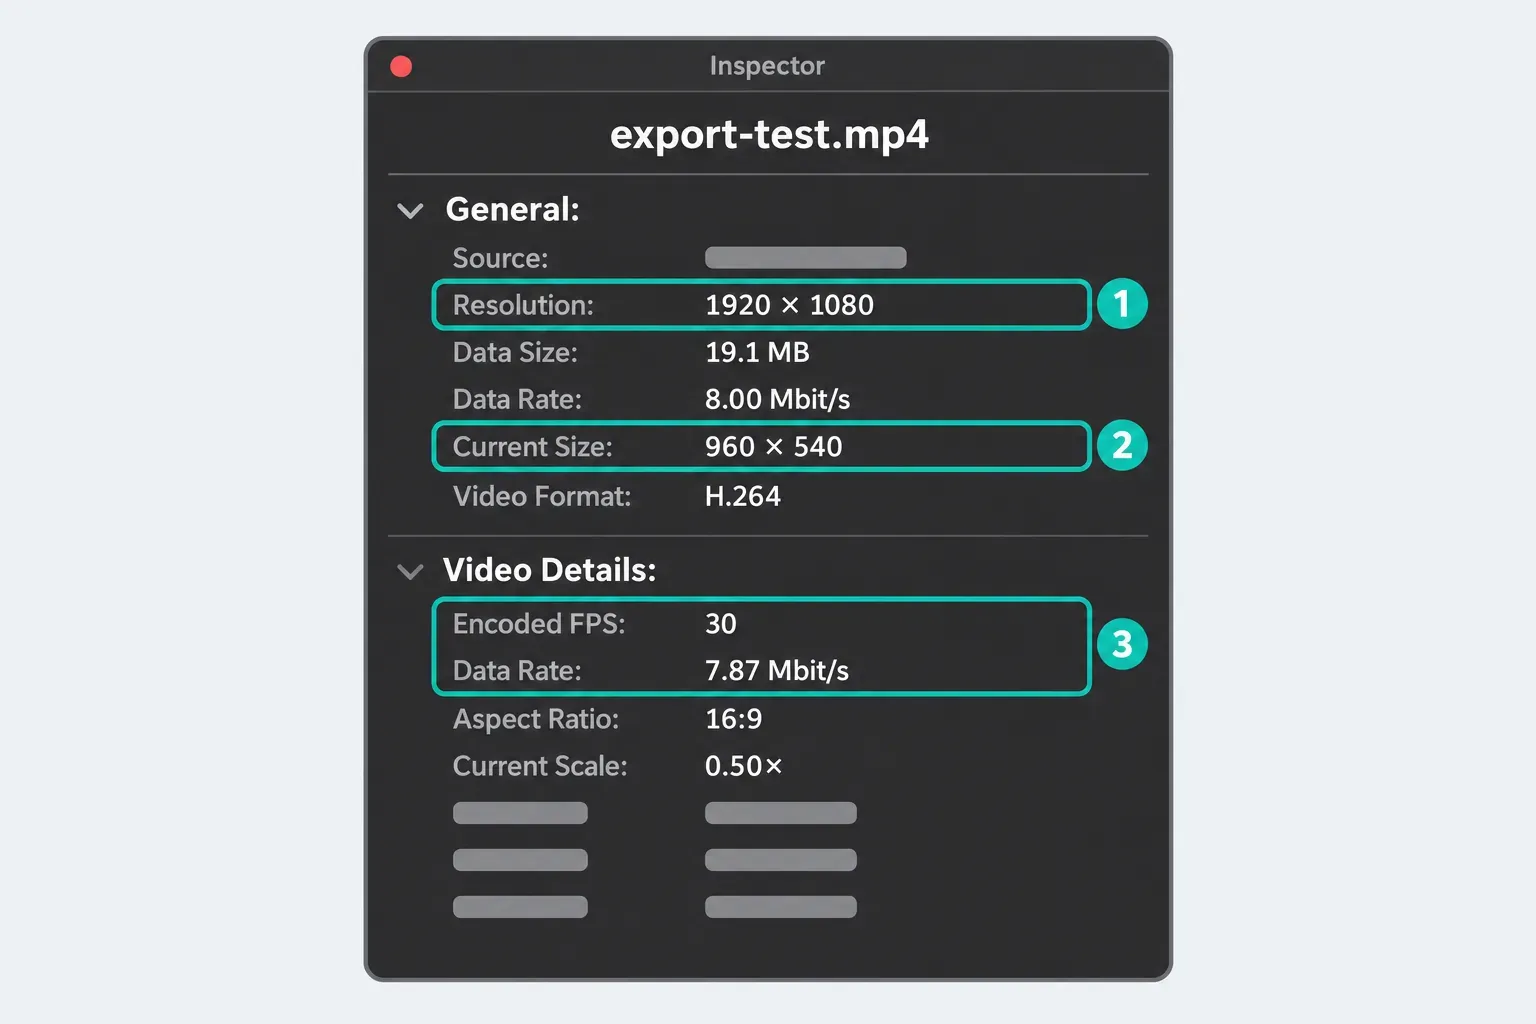
On a Mac, open each file in QuickTime Player and choose Window → Show Movie Inspector (Command-I), as described in Apple’s file-information guide. Read Resolution for the saved pixel dimensions, not Current Size, which is the player’s displayed size. Record the frame rate too. These details help you spot a lower-resolution export; they do not prove that the image is sharp.
| What is soft? | What to investigate | Start here |
|---|---|---|
| CapCut preview only | Reduced preview quality or proxy playback | Try higher preview quality; keep the source unchanged |
| Source file outside CapCut | Possible source-quality loss; rule out a low-quality player view too | Compare in another local player, then look for a better original if needed |
| Local export, while the source is sharp | Scaling, effects, export settings or a render problem, even if the preview is sharp | Check resolution, crop, bitrate and a clean test project |
| Only the social upload | Upload processing, playback quality or platform compression | Follow the platform branch of our CapCut export settings breakdown |
| Only moving or effect-heavy frames | Blur already in the recording, an effect, or compression during export | Compare the same moving section in the original; then test the suspect effect in a duplicate |
If only the CapCut preview is blurry
If the short export is sharp but the editor is soft, leave the source alone. Open the quality menu beneath the Desktop Player and try Full or High, if offered. CapCut’s import-quality help calls the higher-quality options Full Quality and High Quality. The image below shows the preview choices; the labels and location may vary by build, and Mobile or Web may use different controls.
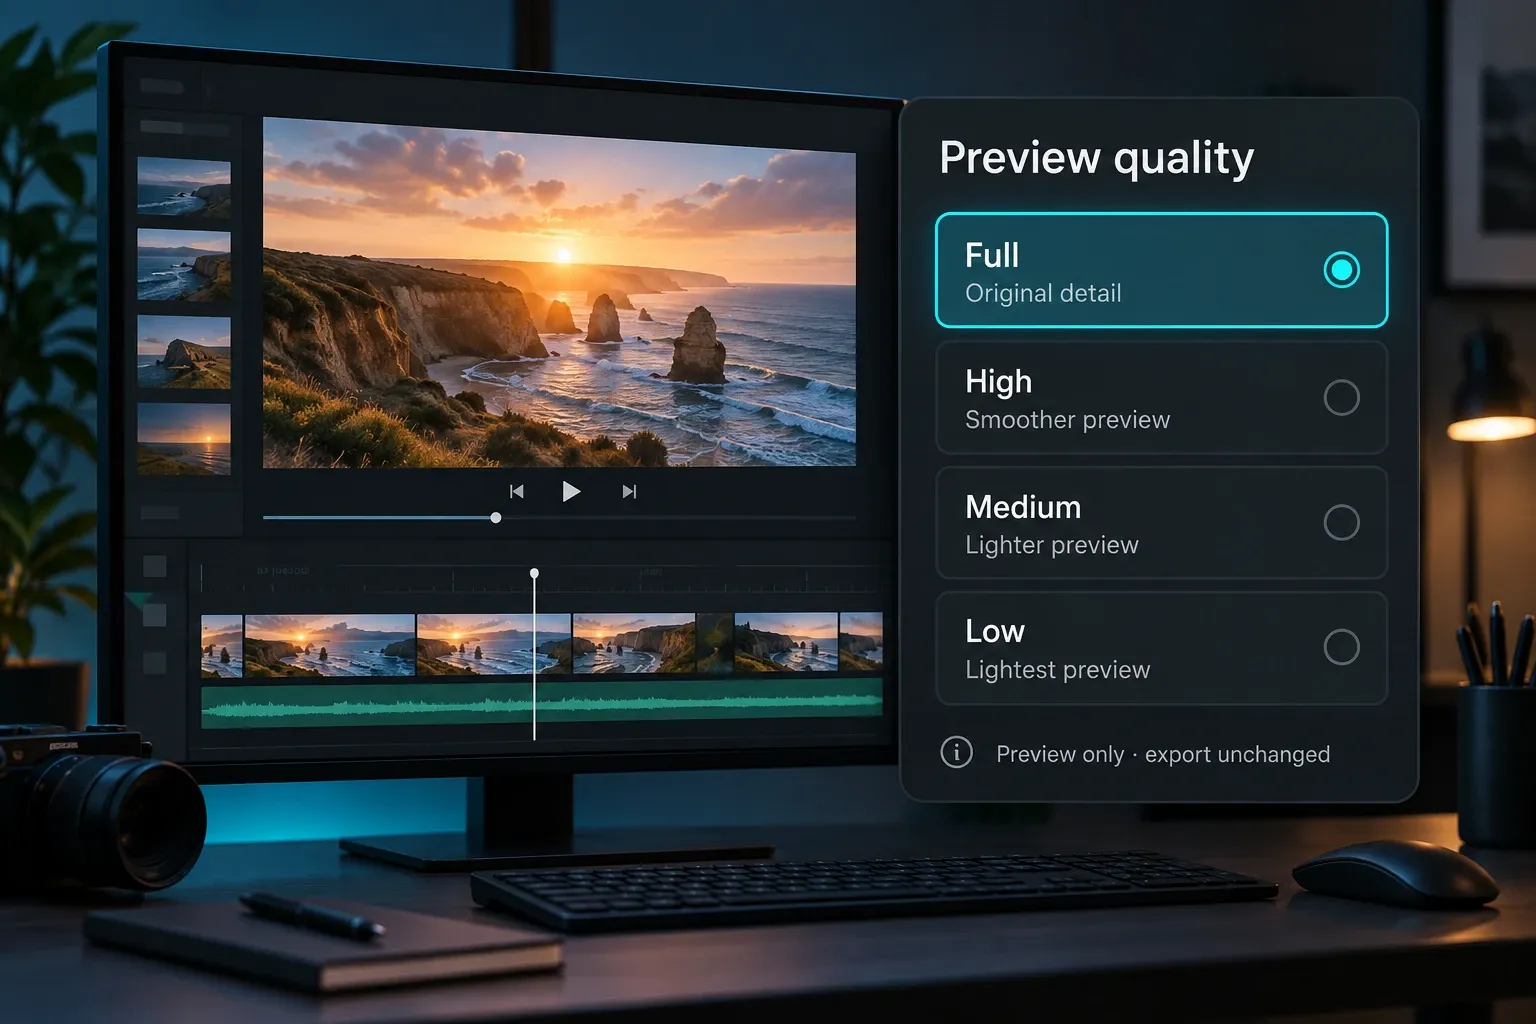
Higher preview quality can make a heavy timeline stutter. That is a performance trade-off, not proof that your footage was damaged. If playback becomes unusable, return to the lighter preview while you edit and judge sharpness from the short exported file.
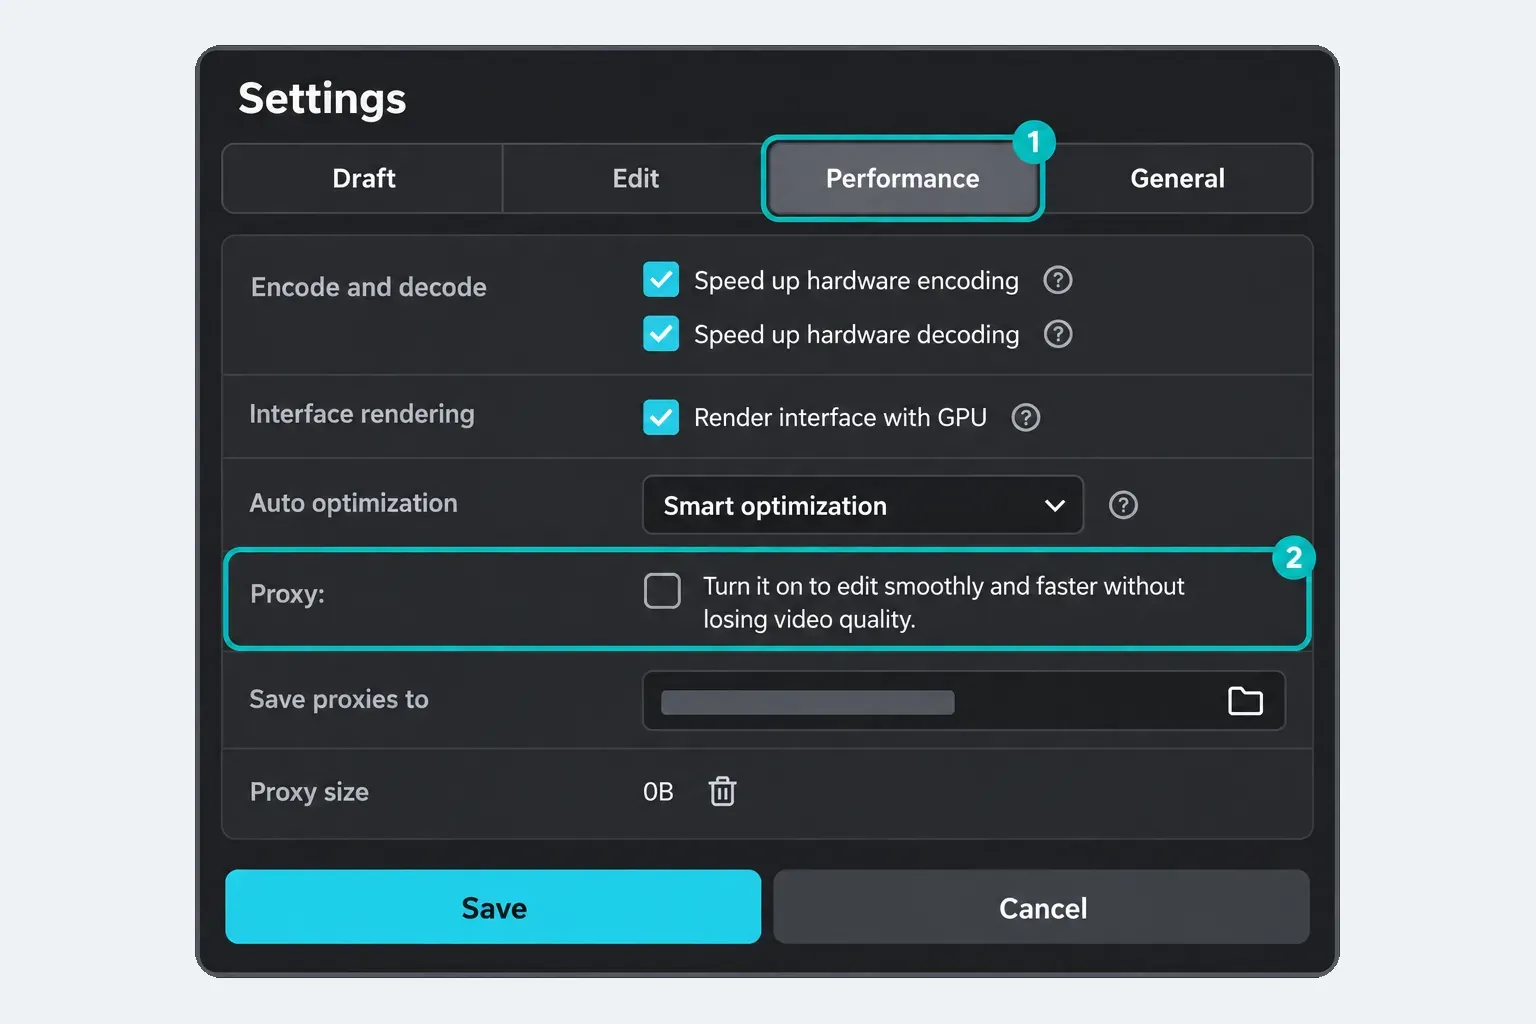
On Desktop, CapCut's Proxy and export-quality instructions place Proxy under Menu → Settings → Performance. If that route exists in your version, note its current state, switch Proxy off for one comparison, and replay the same section. It is a performance feature that can lower preview quality, not evidence that the original was damaged. Restore it if the export is sharp and editing runs better with it on.
If the source is already soft
Open the actual file you imported, not a streaming preview or a screen recording of it. If it looks soft outside CapCut, try another local player at the same display size before blaming the recording. When the original really lacks detail, changing CapCut’s preview quality will not repair it.
Look for an avoidable quality loss before import:
- a messaging app compressed the video;
- you saved a small cloud preview rather than downloading the original;
- the clip was exported once, then imported and compressed again;
- a still image has too few pixels for the area it fills;
- another app converted the recording at a lower resolution or with heavy compression.
With iCloud Photos, Apple distinguishes full-resolution originals from space-saving device copies. Make sure the original is available locally before the test. Having Optimize Storage enabled does not, by itself, prove CapCut imported a reduced copy.
If a better source exists, use it before doing more work. Ordinary sharpening increases edge contrast; it can make outlines harsher but does not recover missing texture. CapCut's PC blur guidance also warns against over-sharpening and repeated export-and-reimport cycles.
When photos, PNGs or logos look blurry after import
Check the image’s pixel dimensions in your photo viewer, then compare the image outside CapCut with a short export containing it. A PNG filename does not tell you whether the image has enough pixels for a full-screen background or a close crop. A small logo can look fine in a corner and soft when stretched across the frame.
In a separate test project, add the original image with no animation, enhancement or extra zoom. Compare the exported frame at the size viewers will watch it. If the file is sharp outside CapCut but still soft in that clean export, keep both samples for support. Do not replace the original with a screenshot or repeatedly convert PNG to JPEG just because a forum workaround suggests it.
A community discussion of blurry imported photos includes different outcomes: one person reports a soft preview with a sharp export, while another reports poor output too. That is a reason to run the comparison, not evidence of one confirmed bug or a universal fix.
Check scaling before blaming export quality
A 1080p clip can still look soft in a 1080p project if it has been enlarged to fill a different-shaped canvas. For example, filling a vertical 9:16 frame with a horizontal clip throws away the sides and enlarges the remaining image.
Select the clip and check its scale, crop and canvas shape. If the subject can stay smaller, fit the whole clip inside the frame and use a background for the remaining space. Our CapCut aspect-ratio guide explains the canvas choice; the crop guide helps you choose what stays in the frame. A tight crop enlarged to fill the output can reveal limited source detail.
Don't treat “100% scale” as a universal safe number. The useful limit depends on source dimensions, rotation, stabilization, canvas size and how CapCut defines the starting fit for that clip. Check the pixel dimensions and the exported frame rather than relying on the slider alone.
Mobile: test one original clip in a separate project
On iPhone or Android, compare the original in your gallery with one short export before changing the full edit. In CapCut’s Mobile export instructions, the resolution label beside Export opens the quality controls. Use the controls your version offers; resolution availability varies by device, app version and project.
Use this comparison:
- Create a temporary new project with just the original clip that looks blurry.
- Add no template, intro or effect.
- Export a short section at the matching source resolution if available, noting the frame rate and quality setting too.
- Compare it with the same section from the problem project.
If the temporary project is sharp, don't rebuild the whole edit immediately. Compare its crop, enhancement, stabilization and export settings with the original project's. Change one item in a duplicate and repeat the sample. A clean result narrows the cause; it does not identify the faulty setting by itself.
Desktop: separate preview controls from render controls
On CapCut Desktop, the quality you see while scrubbing and the quality selected in Export are separate decisions. Setting the export to 4K doesn't necessarily make the editor preview look sharper. A soft preview can still produce a clean file.
Before exporting the final job:
- match Resolution to the real source and delivery need;
- match frame rate to the source unless you have a specific conversion reason;
- use a bitrate that is appropriate for the resolution and motion;
- check that repeated exports have not become your new source;
- only test a change to hardware encoding if a repeatable local render fault remains; record the old setting so you can restore it.
CapCut lists a hardware-encoding toggle under Settings → Performance as a rare troubleshooting option in its import-quality help. It is not the same setting as Proxy. Don't change either automatically because a preview looks soft.
For bitrate, codec, HDR and platform-specific choices, see the full CapCut export settings walkthrough. Increasing every number is not a diagnosis. A 4K export cannot recreate detail missing from the source.
Web: check the project and the browser
Wait for media to finish loading, then download a short test. Do not use a blurry browser preview as your only evidence. If the download is sharp but the browser view remains unreliable, try a current supported browser with the same sample; CapCut’s export help lists Chrome, Edge and Safari.
Only upload footage you are allowed to process in an online editor. For private or client media that must stay local, use the local Desktop or Mobile workflow instead of sending it to Web just for a quality test.
If you began with a preset or template, check its canvas shape and the resolution offered at export. Download the sample and inspect that file. A template name is not enough to establish the saved resolution.
If the short local export is also blurry
If the source is sharp but the local file is soft, the problem is not preview-only. Follow the CapCut blurry-after-export diagnostic for the rendered-file checks. Keep the original, test project and export settings available so you can make a fair comparison.
If the local file is sharp and only the uploaded version is soft, check processing and playback quality before changing CapCut. For example, YouTube initially processes uploads in lower quality, with higher-quality versions becoming available later.
What not to do
- Don't delete or replace the original media before the test.
- Don't reinstall CapCut before protecting the project and source files.
- Don't add Sharpen to compensate for a preview-only problem.
- Don't assume 4K or 60 fps means better quality.
- Don't change five settings at once; you won't know which one mattered.
- Don't judge a TikTok or Instagram upload before checking the local export.
A clean final check
Before committing a long render, export the same detailed section once more using your intended delivery settings. Watch it outside CapCut on the intended viewing device. Check fine texture, moving edges, text and any frame that was cropped or stabilized.
A sharp test export means that section can render cleanly; it does not certify every clip in a long project. You can use a lighter preview while editing, then check the completed file. If the source is sharp but even the clean test remains soft, keep the samples and settings for support instead of replacing good footage or reinstalling blindly.
If the test exposes a different failure, such as a crash, a frozen export or missing sound, switch to that symptom in the CapCut fixes hub instead of applying blur fixes to the wrong problem.
CapCut blurry import FAQ
Why does a 4K video look blurry after I import it into CapCut?
CapCut may be showing a reduced-resolution preview. Compare the original with a short local export at matching settings where available. If the export is sharp but the editor is soft, investigate preview quality. If the export is also soft, check the source, scaling and export settings before blaming import.
Does CapCut reduce video quality when importing?
A soft editor preview doesn't by itself mean the source was reduced. CapCut's current help describes lower-quality preview playback as a performance measure. Compare the untouched source with a short local export before deciding that detail was lost.
Should I turn off Proxy in CapCut?
Try it as a reversible Desktop preview test, not a universal quality fix. CapCut documents Proxy under Menu → Settings → Performance; the route can vary by version. If a short export is sharp and Proxy makes editing smoother, you can keep it on.
Will exporting in 4K fix a blurry CapCut video?
Not if the source lacks the detail you need. A 4K export may preserve more existing detail than a lower-resolution export, but merely increasing the output dimensions cannot recover detail lost in a compressed source or a heavily enlarged crop.
Why are my PNGs or photos blurry in CapCut?
The preview may be reduced, or the image may be enlarged beyond the detail it contains. Check the original’s pixel dimensions and export a short sample with no extra zoom or enhancement. If the original is sharp but that export is not, keep both files for support rather than assuming the PNG format is the problem.
What if I cannot find the preview-quality menu?
Do not assume a Desktop control exists in your Mobile or Web version. Compare a short downloaded export with the original first. If that file is sharp, you can continue editing with the lighter preview and check the completed export before sharing it.
Can sharpening fix a blurry imported video?
Sharpening can increase edge contrast, but it does not restore missing resolution. First compare the source and local export. If you then choose to sharpen a soft source, apply it gently and check for harsh outlines or noise.