

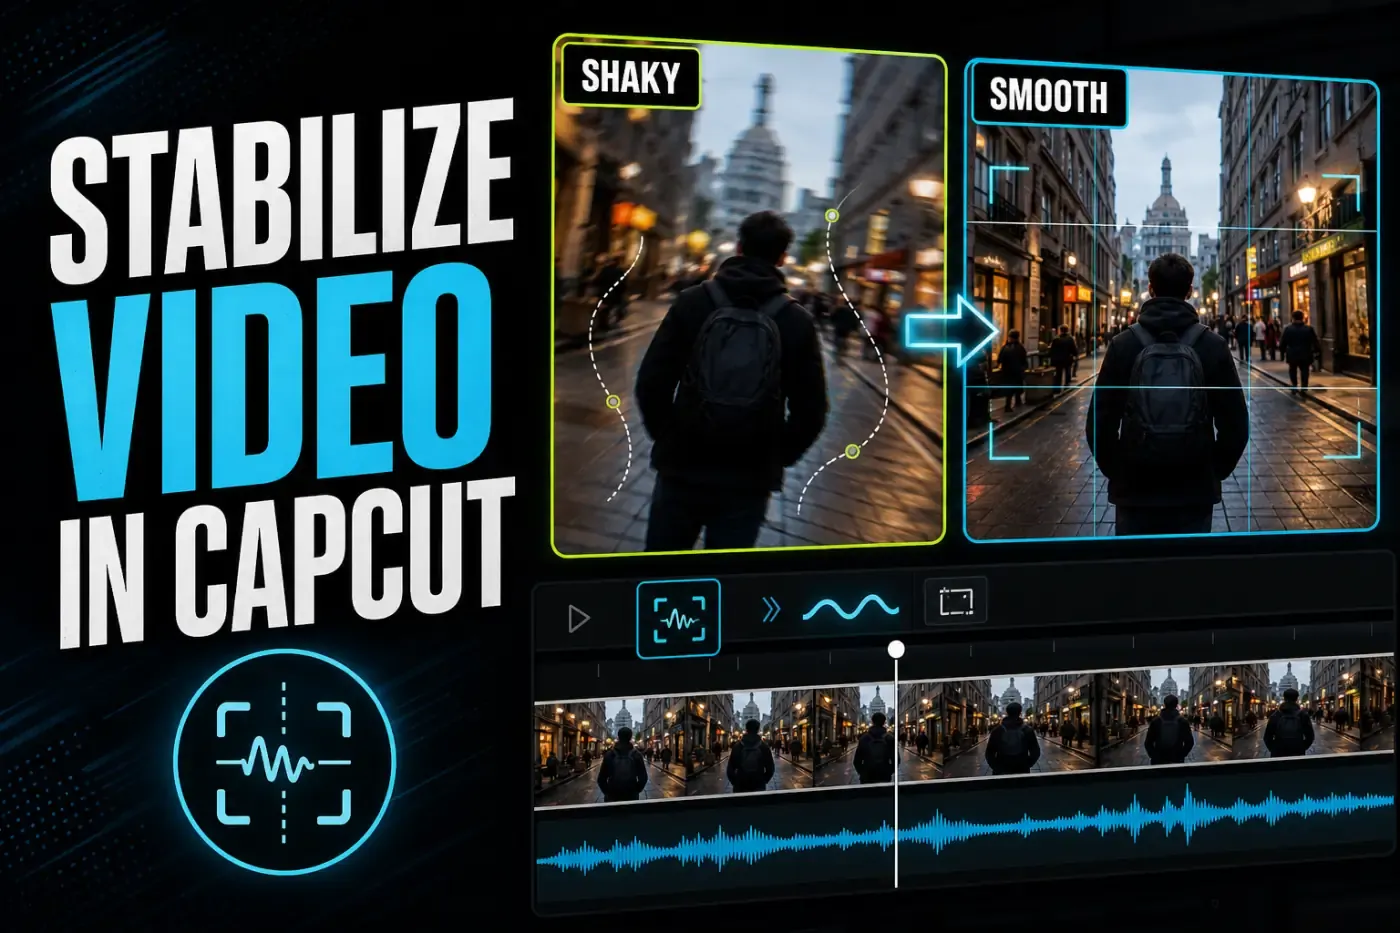
To stabilize video in CapCut, select the clip and open Video → Basic → Stabilize on desktop or web. On mobile, select the clip and use Edit → Stabilize. Start with Recommended, let the analysis finish, and preview the whole clip before deciding whether Minimum Cut or Most Stable gives a better balance.
The strongest setting is not automatically the best result. Stabilization needs room to move, rotate, and scale frames while hiding the borders, so stronger correction can tighten the composition or create visible warping around buildings, faces, or foreground objects. I judge the result on three things together: remaining shake, lost framing, and distortion.
I rechecked CapCut's current PC, mobile, online stabilizer, and export-processing documentation on August 5, 2026. Tool placement, access, and labels can still vary by version, platform, plan, account, and region, which is why this guide avoids fixed processing-time and permanent Free/Pro promises.
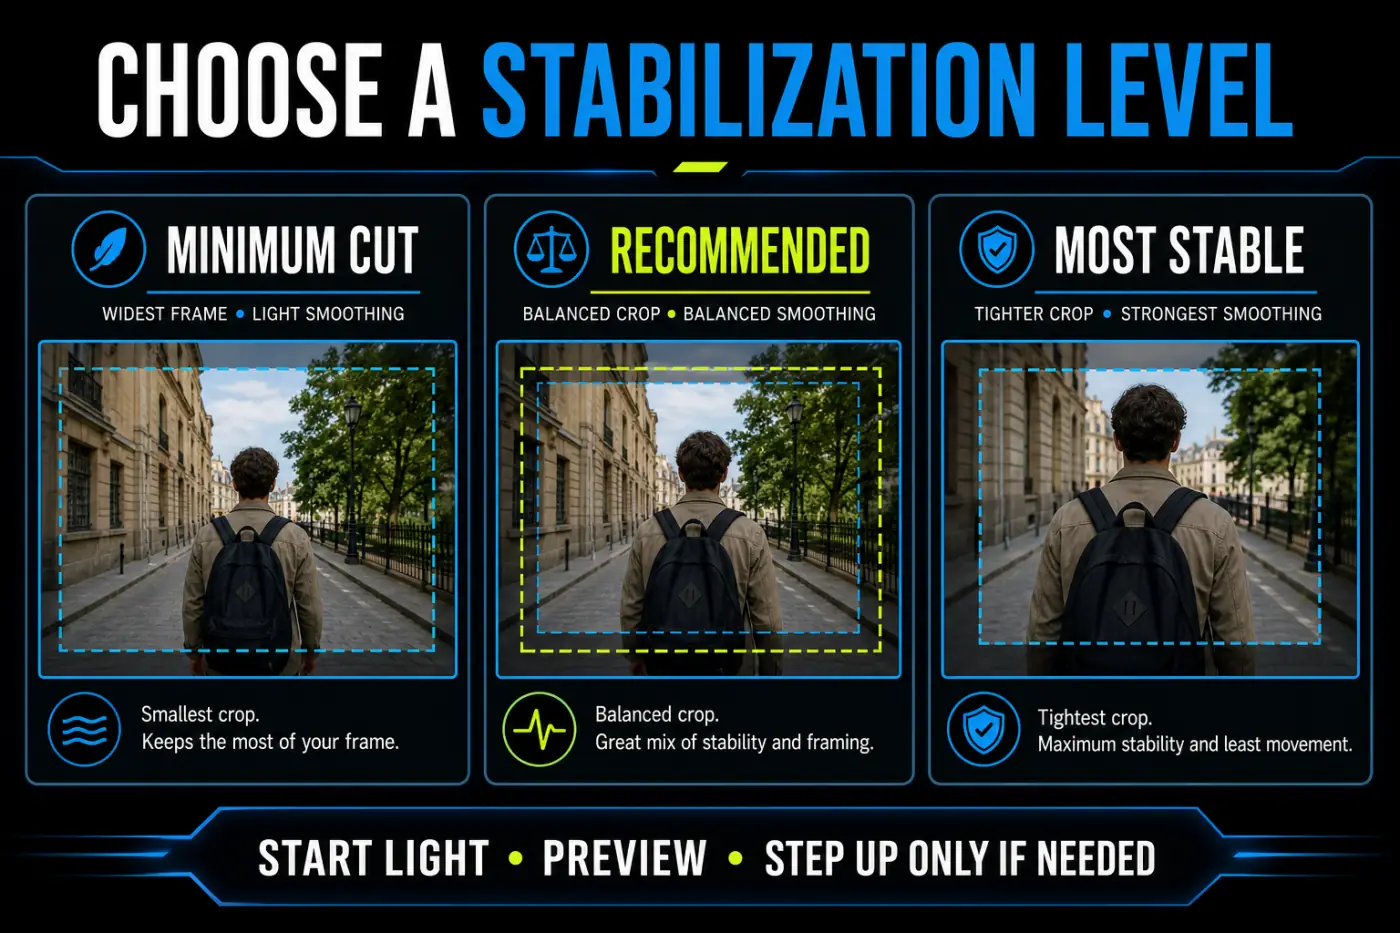
Choose a CapCut Stabilization Level
| Level | What it prioritizes | Best reason to try it | What to inspect |
|---|---|---|---|
| Minimum Cut | Keeping more of the original frame | Mostly steady clips, wide compositions, subjects near an edge | Whether enough shake remains to distract |
| Recommended | A middle balance between smoothing and crop | The first pass for ordinary handheld footage | Both edge loss and local warping |
| Most Stable | Stronger correction with a potentially tighter frame | Persistent shake when the composition has room to crop | Faces, straight lines, horizon, and foreground wobble |
CapCut's official stabilizer guide names Recommended, Minimum Cut, and Most Stable on PC, mobile, and web. Those names describe the intended tradeoff, not a promise that every source will react identically. A walking clip with foreground objects behaves differently from a wide landscape or a slow pan.
My default is Recommended because it creates a useful comparison point. I move down to Minimum Cut when important content is disappearing at the edges. I move up to Most Stable only when the remaining shake is worse than the tighter crop or distortion it introduces.
Why Stabilization Crops the Frame
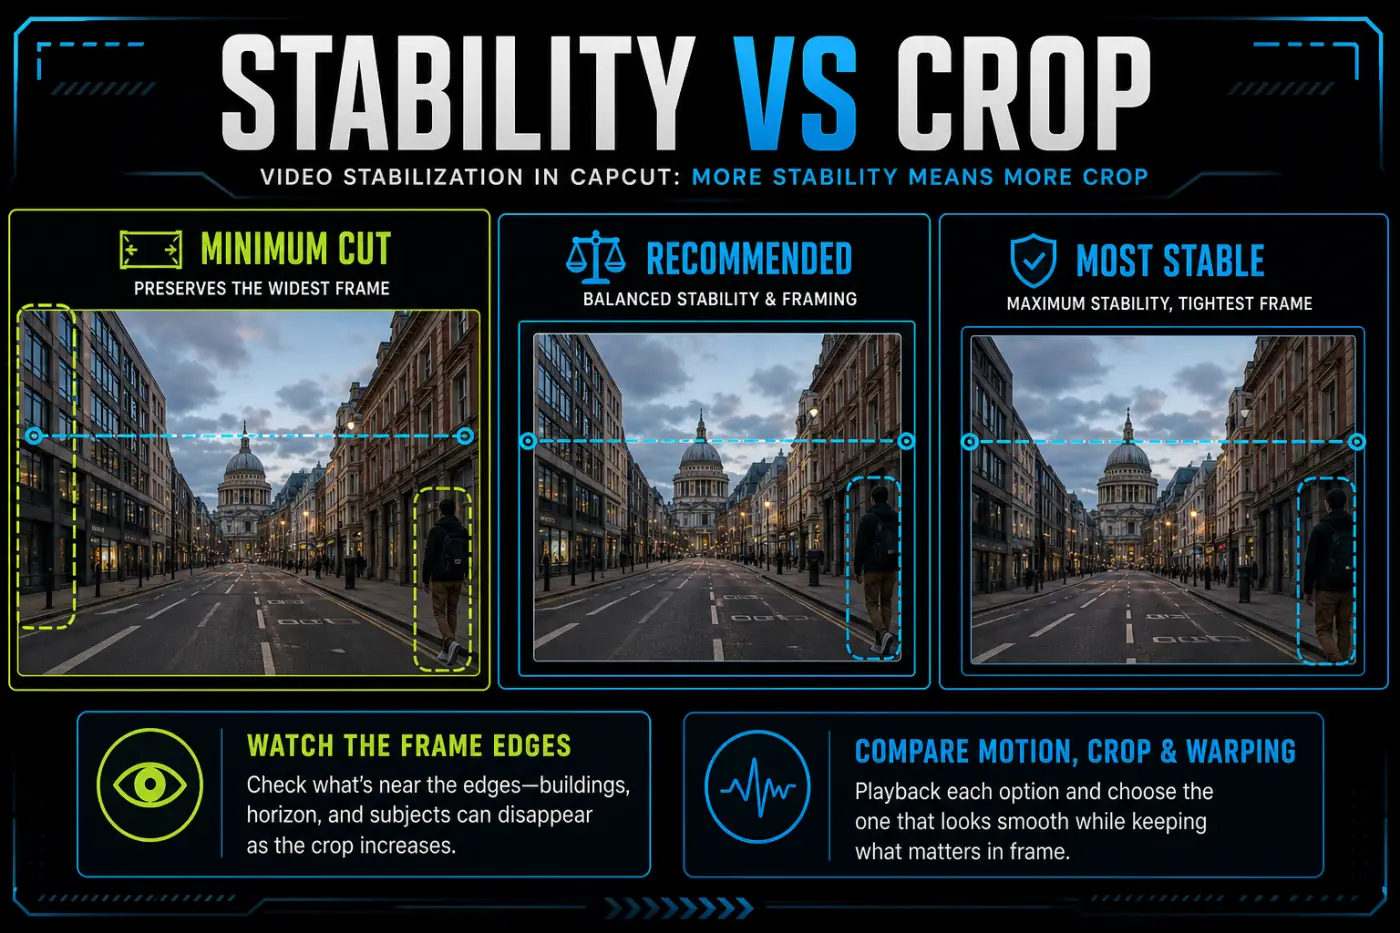
A stabilizer estimates camera movement between frames, then shifts the image in the opposite direction. That correction can expose empty borders. To keep those borders out of the visible picture, the editor scales or crops the frame. More erratic movement usually requires more room, but the precise amount cannot be predicted from the level name alone.
CapCut does not show a universal crop percentage because there is no single percentage for every clip. Check the preview at the beginning, middle, and end, then look closely at anything near an edge: a face, subtitle safe area, horizon, door frame, or product. A stable center is not useful if the main subject is cut off.
If the clip is meant for a vertical platform, set the final canvas before making the last stabilization decision. A crop that looks acceptable on a wide source can become too tight after conversion to 9:16. The CapCut Reels workflow and CapCut TikTok workflow cover their export canvases separately.
Prepare the Clip Before Stabilizing
- Trim or split first. Isolate the section that needs correction. CapCut's current help page about a long “Stabilizing” export recommends applying stabilization only to the shakier segments rather than every clip.
- Keep intentional camera moves separate. A deliberate pan, tilt, or reveal can look unnatural if the stabilizer tries to hold it still.
- Use the original source when possible. Repeatedly compressed footage contains fewer clean details for motion analysis and can show blocky or smeared edges after reframing.
- Do not add artificial shake or motion blur first. Stabilize the source movement before creative camera-shake effects. Motion blur recorded in-camera cannot be removed by repositioning frames.
- Make a short test. Ten or fifteen representative seconds can reveal crop, warping, plan access, and processing trouble before a long analysis.
If the edit also uses a speed ramp, finish the structural cut and keep the source timing easy to inspect before adding the final ramp. The CapCut velocity-edit guide covers speed curves without mixing them into the stabilization decision.
What CapCut Stabilization Can and Cannot Fix
CapCut stabilization is most useful when the unwanted movement belongs to the camera: small handheld jitter, a gently drifting horizon, or the repeated bounce of a walking shot. The software can estimate that frame-to-frame movement and compensate by repositioning the image. It does not need to track one face or object in the way a motion-tracking effect would.
That distinction matters when the subject moves independently. A runner crossing the frame, a car passing close to the lens, or leaves moving in the foreground can give the analysis several competing motions. The background may become steadier while the foreground bends or pulses. A lighter level or a shorter isolated section is often more natural than forcing the strongest correction across the whole shot.
Stabilization also cannot rebuild information that the camera failed to record cleanly. If each frame contains strong motion blur, the editor can align those blurred frames but cannot recreate sharp detail. If a fast pan produces rolling-shutter skew, ordinary stabilization may reduce the camera path while leaving the image looking wobbly. Focus hunting, exposure flicker, digital zoom jumps, and compression damage are separate problems.
Use the result as a repair, not as a reason to ignore capture technique. A steadier grip, elbows close to the body, a wider lens, deliberate footsteps, optical stabilization, a tripod, or a gimbal can preserve more of the frame and reduce the correction needed later. Once the footage exists, the practical goal is not to imitate a perfect tripod shot at any cost. It is to make the unwanted shake less distracting without damaging the composition.
How to Stabilize Video in CapCut Desktop
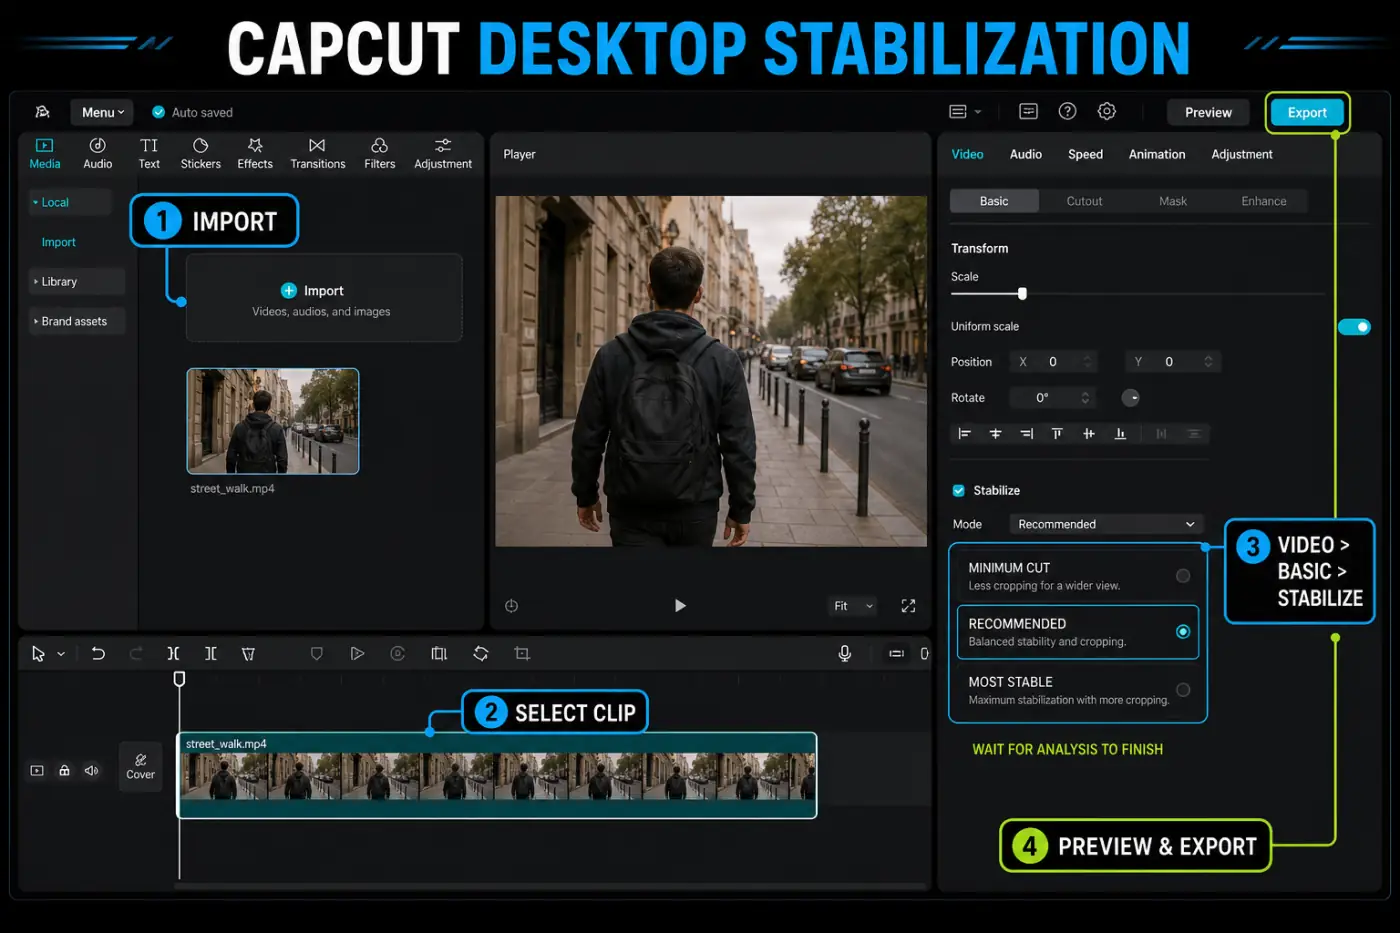
- Open CapCut Desktop, create or open a project, and import the source video.
- Drag the clip to the timeline and split out the section that needs stabilization.
- Select that timeline clip. The right inspector should show the clip's video controls.
- Open Video → Basic, find Stabilize, and enable it.
- Choose Recommended, Minimum Cut, or Most Stable. Start with Recommended unless framing already tells you that preserving edges is the priority.
- Wait for analysis to complete. Do not judge the result from an unfinished pass.
- Play the full segment and compare frame edges, straight lines, faces, and foreground objects. Switch levels if the remaining shake, crop, or warping is unacceptable.
- Export a short sample at the intended resolution and frame rate before committing to a long delivery.
The current official PC route is documented as Video → Basic → Stabilize. If the control is missing, first make sure the media clip—not the canvas, audio, effect, or text layer—is selected. Then update and restart the app before treating the project as damaged.
For a new installation, use the scoped CapCut for PC guide or CapCut for Mac guide. Do not reinstall as the first troubleshooting step when a short test clip can identify whether the problem is the file, project, or tool access.
How to Stabilize Video in CapCut Mobile
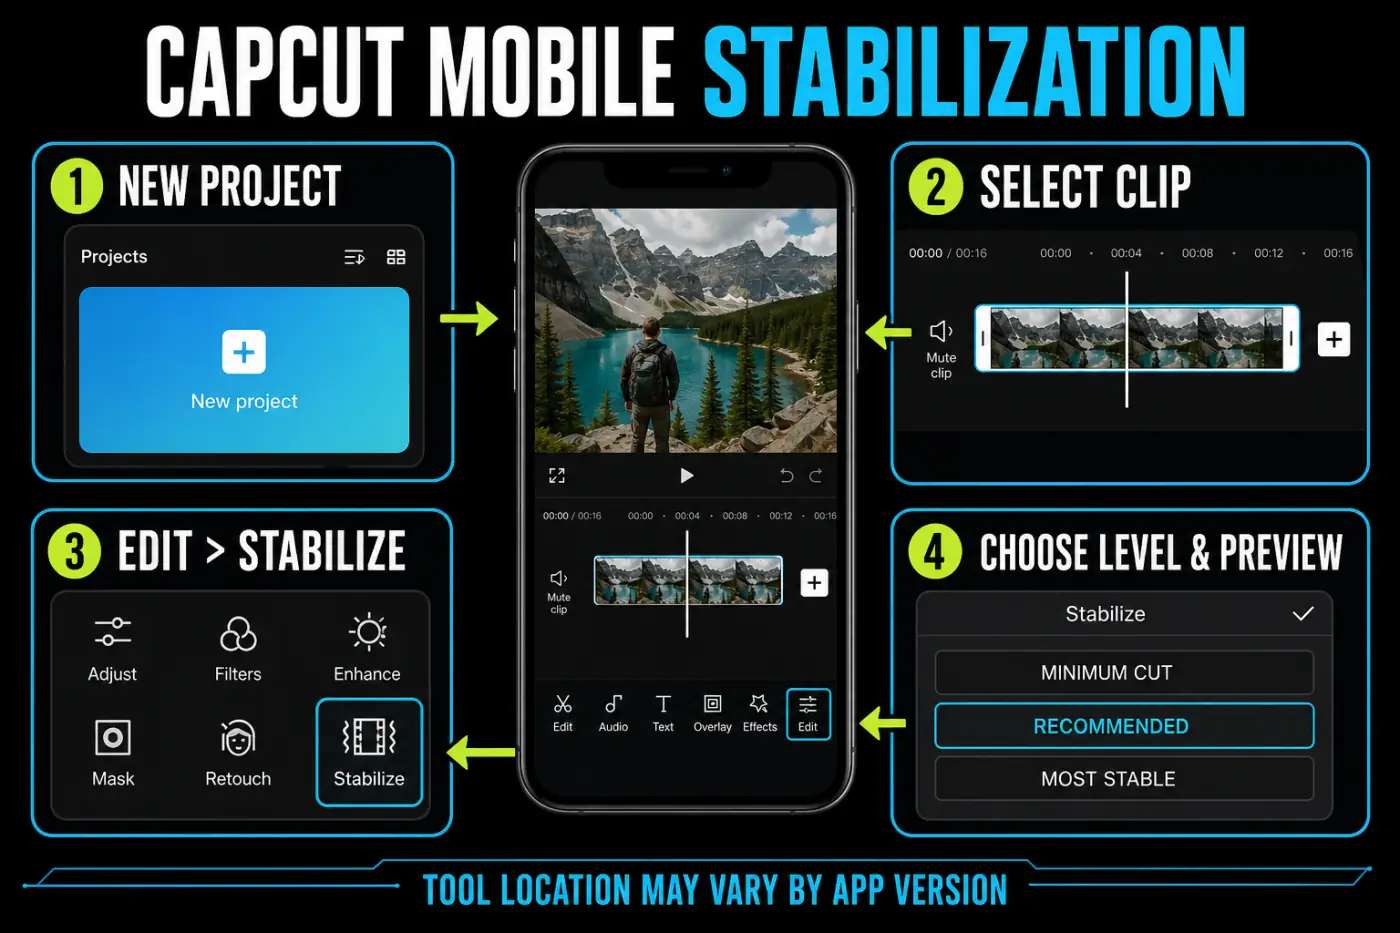
- Tap New project, choose the video, and add it to the timeline.
- Tap the clip so its editing controls appear.
- Open Edit → Stabilize. On some versions, Stabilize may appear elsewhere in the scrollable clip toolbar.
- Choose Recommended for the first pass, accept the analysis, and keep CapCut in the foreground while it processes if the device is under load.
- Preview the beginning and end as well as the shakiest moment. Check whether a person or object near the edge has been cropped.
- Try Minimum Cut when the result is too tight, or Most Stable when distracting movement remains and the frame has room.
- Export a short test and view it in the device gallery, not only inside the editing preview.
Do not attach a universal processing time to mobile stabilization. Resolution, duration, codec, frame rate, device memory, temperature, free storage, background activity, and the current app build all matter. A fixed minutes-per-clip claim is not reliable enough to plan a deadline.
How to Stabilize Video in CapCut Web
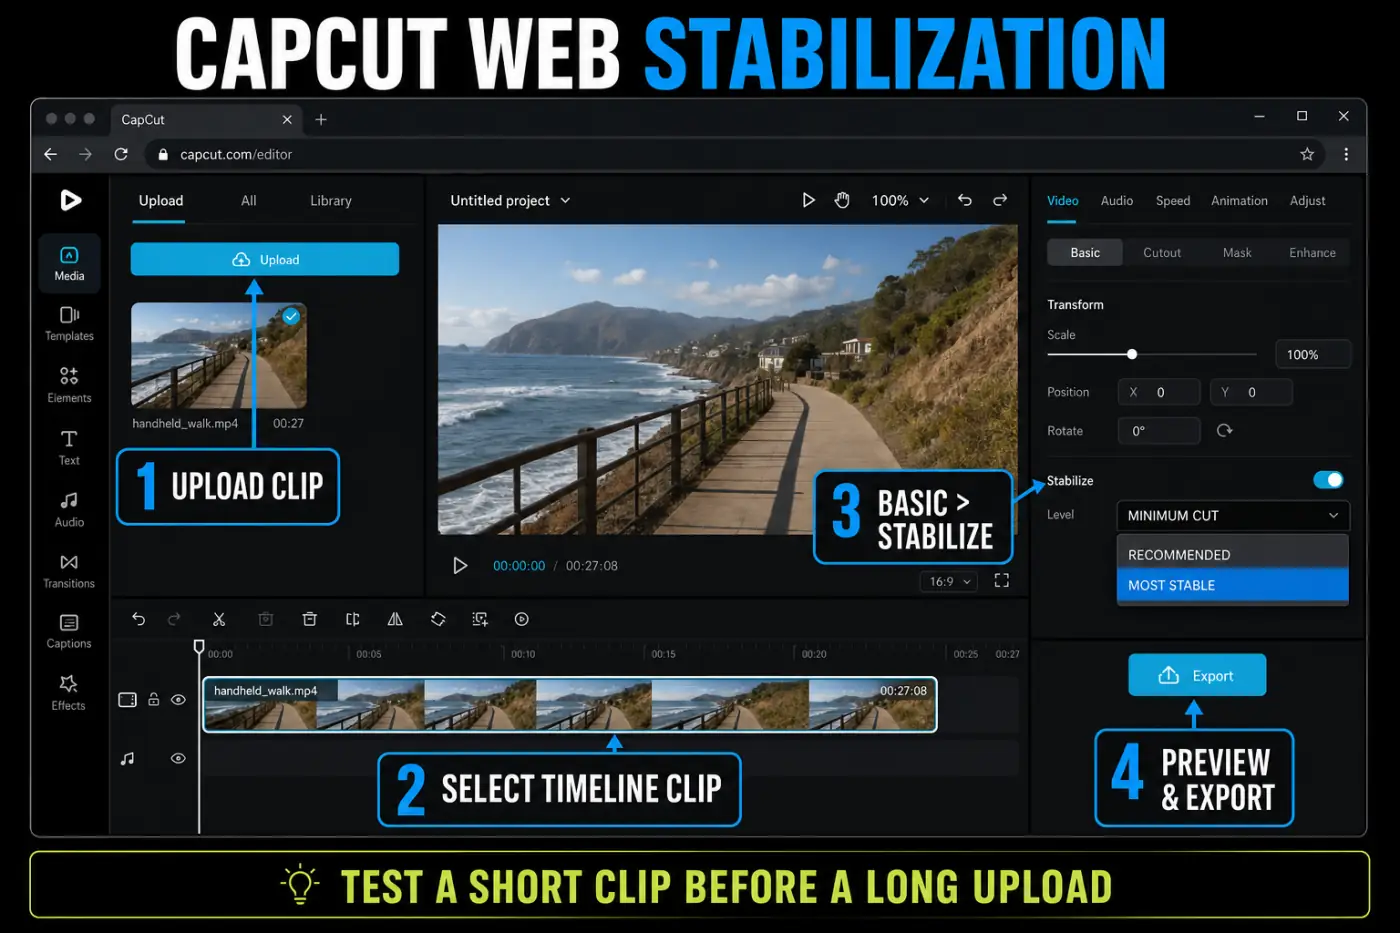
- Open CapCut's online editor or the standalone stabilizer page.
- Upload the video and add it to the timeline.
- Select the timeline clip and open the right-side Basic controls.
- Enable Stabilize, choose a level, and wait for processing to finish.
- Compare the result over the full problem section and export a short sample.
Web is convenient for a short non-sensitive file when installation is not practical. It is less predictable for a long upload because connection quality, browser resources, account limits, and server-side conditions enter the workflow. Keep a local source copy; do not make an uploaded project the only copy of important footage.
CapCut's official online stabilization page and current cross-platform instructions both show the Basic/Stabilize route. If the web editor stalls, first test a short local file in a current browser before compressing or replacing the original.
Stabilize Only the Shaky Part
One long clip can contain several different camera behaviors: a steady hold, a walking section, a quick pan, and another steady hold. Treating all four with one setting makes CapCut solve competing motions. Split before and after the shaky section and apply stabilization only there.
- Place the playhead just before the unwanted shake and split.
- Place it just after the shake and split again.
- Select the isolated middle segment and apply Recommended.
- Check the cut points for a sudden scale or framing jump.
- If the jump is visible, try Minimum Cut or adjust the surrounding edit so the change lands on a natural cut.
This approach is also easier to retry when analysis gets stuck. It preserves intentional pans and avoids spending processing time on footage that was already stable. Apple's current Final Cut Pro stabilization guidance makes the same general editing point: isolate the problem section before applying correction. That source explains stabilization mechanics, not CapCut's interface.
Fix Crop, Warping, Wobble, and Softness
| Result | Likely reason | Best next test |
|---|---|---|
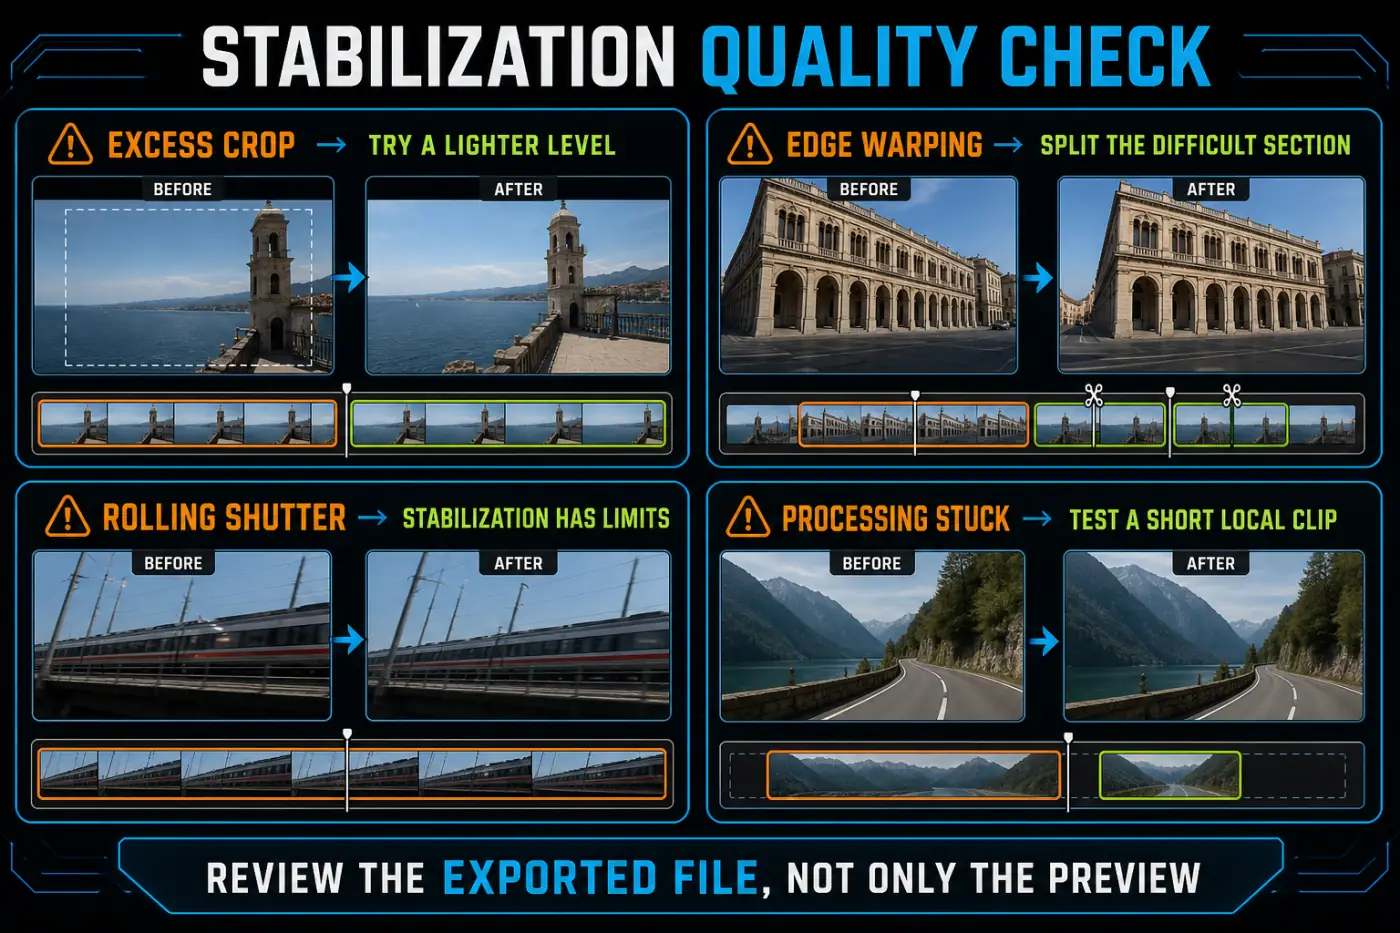
| Main subject is cropped | The correction needs more border room than the composition allows | Try Minimum Cut, shorten the section, or use a different crop/canvas |
| Buildings or faces bend | Strong correction, parallax, moving foreground, or difficult motion | Use a lighter level and split around the worst movement |
| Image pulses or looks gelatinous | Rolling-shutter distortion or unstable motion analysis | Compare the unstabilized source; CapCut may not provide a dedicated rolling-shutter repair control |
| Video remains blurry | Motion blur was recorded into each frame | Use a cleaner source or accept the blur; stabilization moves frames but cannot recreate missing detail |
| Intentional pan fights the frame | The stabilizer treats the camera move as shake | Exclude the pan or isolate only the unwanted jitter |
| Preview is choppy but export is smooth | Real-time playback cannot keep up with processing | Judge a short local export before reducing quality |
Rolling shutter is a separate capture distortion: fast movement can make vertical lines appear skewed or the image look wobbly. Apple's iMovie support guide documents it as a distinct correction from ordinary stabilization. CapCut's current public stabilizer workflow does not document a comparable dedicated rolling-shutter switch, so a severe case may need a tool that exposes that repair separately.
CapCut Stabilization Stuck or Not Working
| Symptom | Check first | Then try |
|---|---|---|
| Stabilize is missing | Confirm the video clip is selected | Update/restart, inspect the current toolbar, and test desktop, mobile, or web access |
| Analysis never advances | Test a short local clip from the same source | Split the difficult section, free storage, restart CapCut, and retry |
| Export stays on “Stabilizing” | Check which clips have stabilization enabled | Remove it from steady clips and isolate only the sections that need it |
| Only one source file fails | Play that file outside CapCut and test a short section | Create a clean intermediate copy while preserving the original |
| Web tool stalls | Connection, browser, and upload completion | Use a short local file or move the edit to desktop |
| App closes during analysis | Device resources and free storage | Close other work, restart, shorten the segment, and follow the CapCut crash guide |
CapCut's current help page on an export stuck on “Stabilizing” recommends limiting stabilization to the clips that need it. Community reports about desktop stabilization not retriggering and processing remaining stuck show real failure modes, but they do not prove that every current build has the same bug.
If the stabilization completes but export fails elsewhere, use the narrower CapCut export-stuck checks rather than repeatedly changing the stabilizer setting.
Free vs Pro: Verify the Current Build
CapCut has changed which tools carry Pro labels across platforms and accounts. Community posts document users seeing stabilization become gated, but a user report is not a stable pricing table. Do not promise lasting free access on desktop, mobile, or web.
Process a short sample and open Export before committing to the project. That shows whether the current account can apply the chosen level and deliver the intended resolution without an upgrade prompt. The CapCut Free vs Pro guide explains the broader verification approach.
Export and Compare the Final Result
I do not approve a stabilization pass from the editor preview alone. Export a short sample using the intended resolution and frame rate, then view it at normal speed and once frame by frame around the worst movement.
- Compare the same section with Stabilize off, Recommended, and the one alternative you are considering.
- Watch the frame edges, horizon, faces, straight architecture, and objects passing close to the camera.
- Check that the crop does not jump at split points.
- Listen for any unrelated edit or sync problem introduced around the split.
- View the local export outside CapCut to separate preview lag from rendered motion.
Match the export to the source rather than upscaling by habit. The CapCut export-settings guide covers resolution, frame rate, bitrate, format, and codec without mixing them into the stabilization level decision.
CapCut Video Stabilization FAQ
How do I stabilize a video in CapCut?
Select the clip, open Video, Basic, Stabilize on desktop or web, or Edit, Stabilize on mobile. Start with Recommended, wait for analysis, preview the whole clip, and compare it with Minimum Cut or Most Stable if framing or remaining shake needs a different tradeoff.
Which CapCut stabilization level should I use?
Start with Recommended. Use Minimum Cut when preserving the widest frame matters more than maximum smoothing. Try Most Stable when shake remains and a tighter crop is acceptable. The best choice depends on the clip, so compare motion, crop, and edge warping rather than choosing by name alone.
Does CapCut stabilization crop the video?
Stabilization normally needs room to reposition, rotate, or scale frames while hiding exposed borders, so some crop can occur. Minimum Cut is intended to preserve more of the frame, while Most Stable can use a tighter frame. The exact result depends on the movement and source footage.
Can I stabilize only part of a clip in CapCut?
Yes. Split the clip before and after the shaky section, then apply Stabilize only to that segment. This keeps intentional pans and already-steady sections from being processed unnecessarily and makes a difficult passage easier to compare and retry.
Why is CapCut stabilization stuck?
Long or demanding footage, limited device resources, a problematic source file, web connectivity, or an app issue can interrupt analysis. Test a short local clip, restart and update CapCut, confirm free storage, split the problem section, and try another platform before changing the whole project.
Why does stabilized video look warped or wobbly?
Strong parallax, fast pans, motion blur, rolling-shutter distortion, moving foreground objects, or excessive correction can make edges bend or pulse. Try a lighter level, split the difficult movement, and compare the export. CapCut stabilization cannot reconstruct detail that was blurred during capture.
Is CapCut video stabilization free?
Access can vary by platform, plan, account, version, and region. A control that is available without a badge in one build may be gated in another. Test a short clip and open the current export screen before assuming the full workflow is free for that account.
How long does CapCut take to stabilize a video?
There is no reliable universal time. Duration, resolution, frame rate, codec, stabilization level, device performance, storage, and web upload or server conditions can all change processing time. A short test from the same source is a better estimate than a fixed minutes-per-clip promise.