

A CapCut black screen is not one failure. The editor preview can be black while the timeline is intact. An export can contain audio but no visible video. Or a valid export can fail in one player and work in another. Identify which output is black before changing the project.
If you want a black screen on purpose, use CapCut's black-screen templates or an intentional background in the editor. The tests below are for video that turns black unexpectedly. For a different symptom, start from the CapCut fixes hub.
Quick test: duplicate the project and export 5–10 seconds across the first black frame. CapCut recommends a short test on its preview mismatch page. If the export is visible, investigate the preview and graphics path. If the export is black too, inspect the timeline element, source media and encoder. If it is black in only one player, test playback compatibility before editing anything.
Protect the draft first: duplicate it before disabling timeline elements. Before clearing data or reinstalling, verify a restorable copy of the editable project and its source media. Use the project backup and transfer checks. Space is one option if available and you have permission to upload the footage; it is not a compulsory subscription or a safe default for confidential client media. Confirm the copy opens with the expected timeline and media before proceeding. If you cannot verify a restorable copy, stop before clearing app data, deleting browser site data or reinstalling. A local duplicate is still local; CapCut warns on its template troubleshooting page that uninstalling can remove local drafts and unfinished projects.
| What you see | Likely area | First thing to try |
|---|---|---|
| Preview black, timeline thumbnails look normal | Playhead, layer visibility, source or preview rendering | Check the playhead, opacity and covering layers before cache or GPU settings |
| Whole app window or interface is black | Application or display layer, not the project | See CapCut not working for app-level failures |
| Preview black on mobile right after importing | Thumbnail generation, permissions or file size | Wait for thumbnails, import fewer files, then check photo permissions |
| Export plays audio over black | Timeline, source decoding, encoding or playback | Isolate with short section exports from a duplicated project |
| Black only at the end of the export | Trailing clip or a track running past the video | Inspect the trailing element; trim only unintended overhangs, not planned credits |
| Only one source file turns black | File encoding or an unsupported format | Convert a copy to a format CapCut lists for your platform, then import that copy |
| Project or template turns black after moving devices | Missing or unlinked media | Relink the media, and finish template edits on the platform they were built for |
| Black bars down the sides | Canvas framing, embedded borders or an effect | Check the original and target ratio; filling the frame crops content |
| Exported file black in one player only | Playback compatibility on that device | Test in VLC and a second player before blaming the export |
Fact-checked September 14, 2026 against current CapCut Help, Microsoft, Apple, Google and Android guidance. Labels and available controls can differ by platform, region and build, so record what your version shows before changing a setting.
Hardware Acceleration: Test Preview and Export Separately
CapCut's help pages recommend different hardware settings for different failure stages. That doesn't create one universal on/off rule.
For a missing PC preview, CapCut's current video-not-showing page says to update graphics drivers and enable hardware acceleration. Its export-stuck-at-the-beginning page asks users to disable hardware encoding. The first page addresses preview playback; the second addresses export.
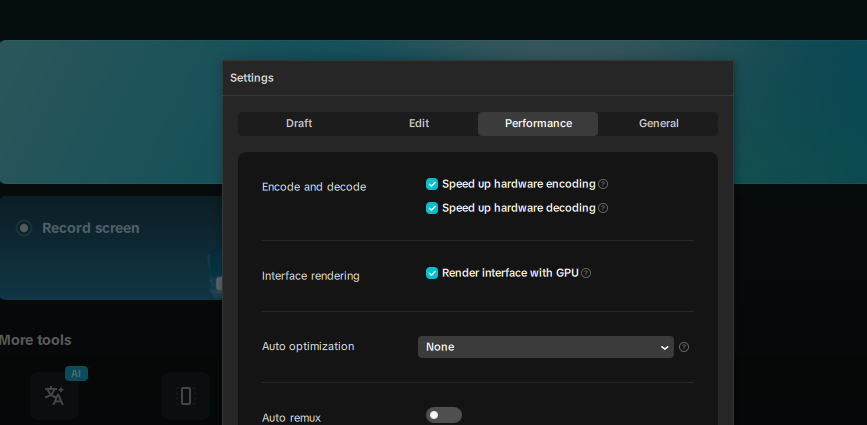
Some builds separate hardware decoding, hardware encoding and interface rendering. Record the original state and change one control per test. A changed result narrows the investigation without proving that the GPU itself is damaged.
For a black preview, update the app and graphics path, then test the decoding or interface-rendering control your build exposes. For a black or stalled export, compare one short range with hardware encoding disabled. Restore the original state between tests; neither setting is universally correct.
If the Desktop Preview Goes Black
Save the project before restarting CapCut or updating anything. Work through the reversible checks below on Windows or macOS. Restart when the changed setting or updater asks you to; moving a playhead or checking a layer does not require a relaunch.
- Check the playhead and layers first. Move the playhead inside the affected clip. Check its opacity and visibility, then temporarily hide any upper layer that covers it in the duplicate. Audio can continue when the picture is hidden. A normal thumbnail alone does not prove a cache or GPU fault.
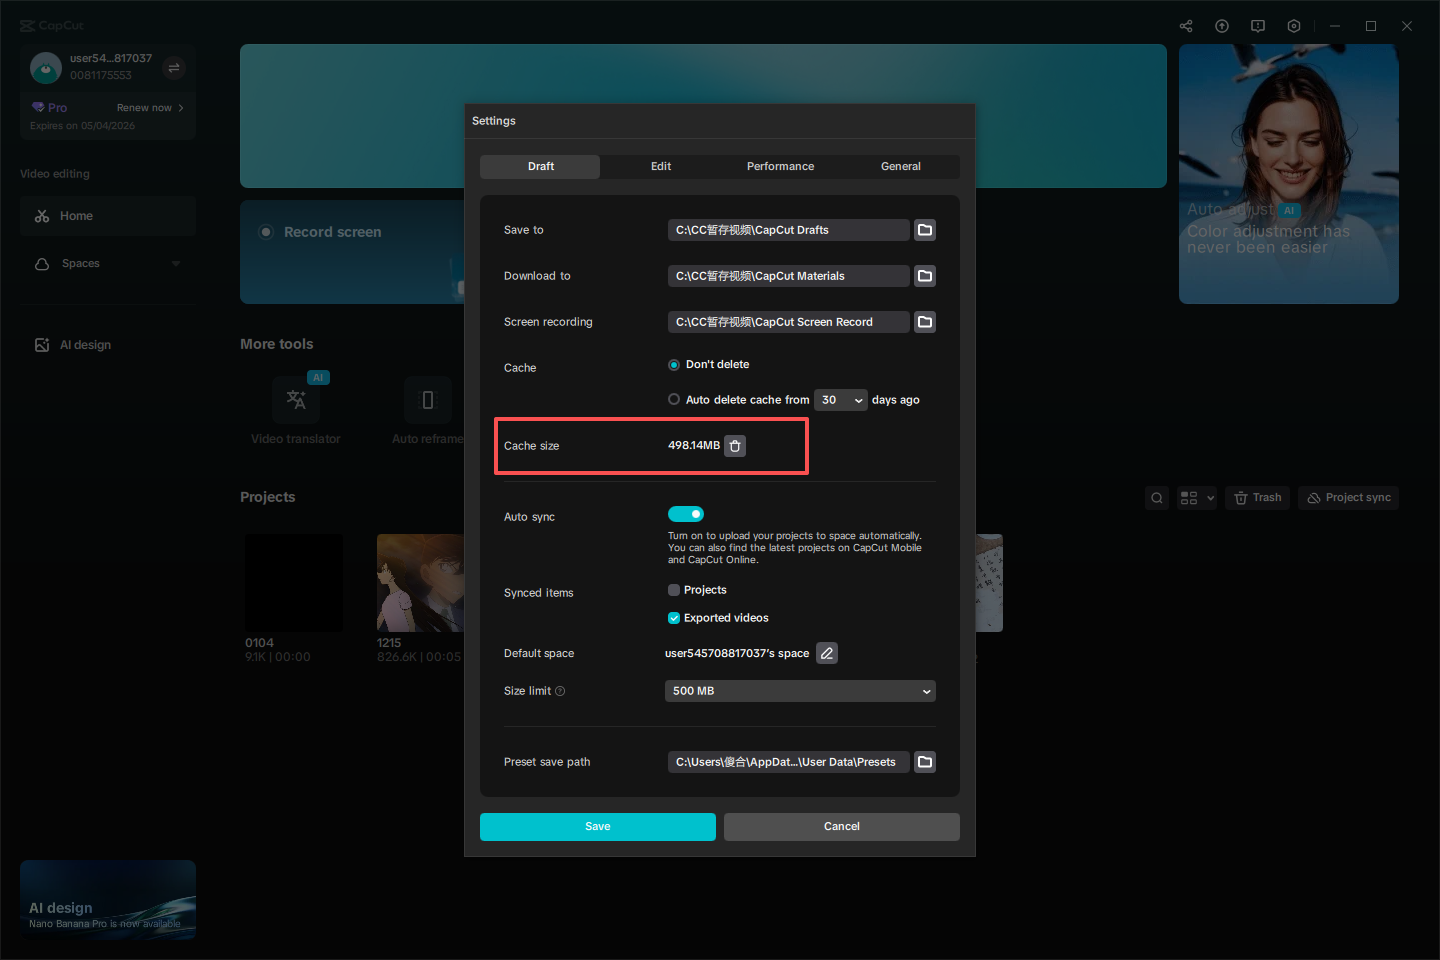
- Use only a clearly labelled in-app cache control. CapCut’s preview-mismatch help illustrates Settings → Draft → Clear Cache beside Cache Size. If your build has no equivalent, skip this step. Do not delete the entire CapCut data folder, User Data or project directories.
- Turn proxy editing off. Proxy mode swaps in low-resolution copies for smoother playback, and CapCut notes it can misrepresent scaling and blur. In CapCut's current desktop instructions, Proxy is under Menu → Settings → Performance. Its location can differ between builds. Record the original Proxy state, test the same range with it off, and restore it if the comparison does not help.
- Update the graphics path. On Windows, Microsoft recommends Windows Update for routine driver updates and the hardware maker's official site if Windows has no newer compatible driver. On macOS, back up your Mac before installing a compatible update through System Settings → General → Software Update. Avoid third-party driver sites.
- Test the acceleration options. Open the Performance settings available in your build. If decoding, encoding or interface-rendering controls are separate, change one, save, restart CapCut and repeat the same action. Restore it before testing the next control.
To separate a graphics problem from a project problem, create a blank project and add one small file that already previews and exports correctly in the same CapCut build. If that control file is black too, investigate the application, settings and graphics path; the control test is not a hardware diagnosis. If it plays, compare the original project and its media. Install-side checks are covered in the CapCut for PC guide.
If Mobile Thumbnails or Preview Go Black
If every item in the album picker is black, start with the import path rather than the editor. CapCut's local-assets guidance says large files or a large album can delay thumbnail generation. Wait for the view to finish loading, restart the app, then import a smaller batch.
Check permissions. Open your phone settings, find CapCut, and confirm photo and media access is granted. With selected-media access on iOS or supported Android versions, confirm the particular clip is included. You do not need to grant access to the whole library just to test one file. The official album-access instructions also recommend checking whether the picker is filtered to Videos or Photos. Android menu labels vary by manufacturer.
Test a separate project. Save the current draft first, then use New video if that is the creation label in your build and import one original file. This is a control test, not a repair of references in the existing edit.
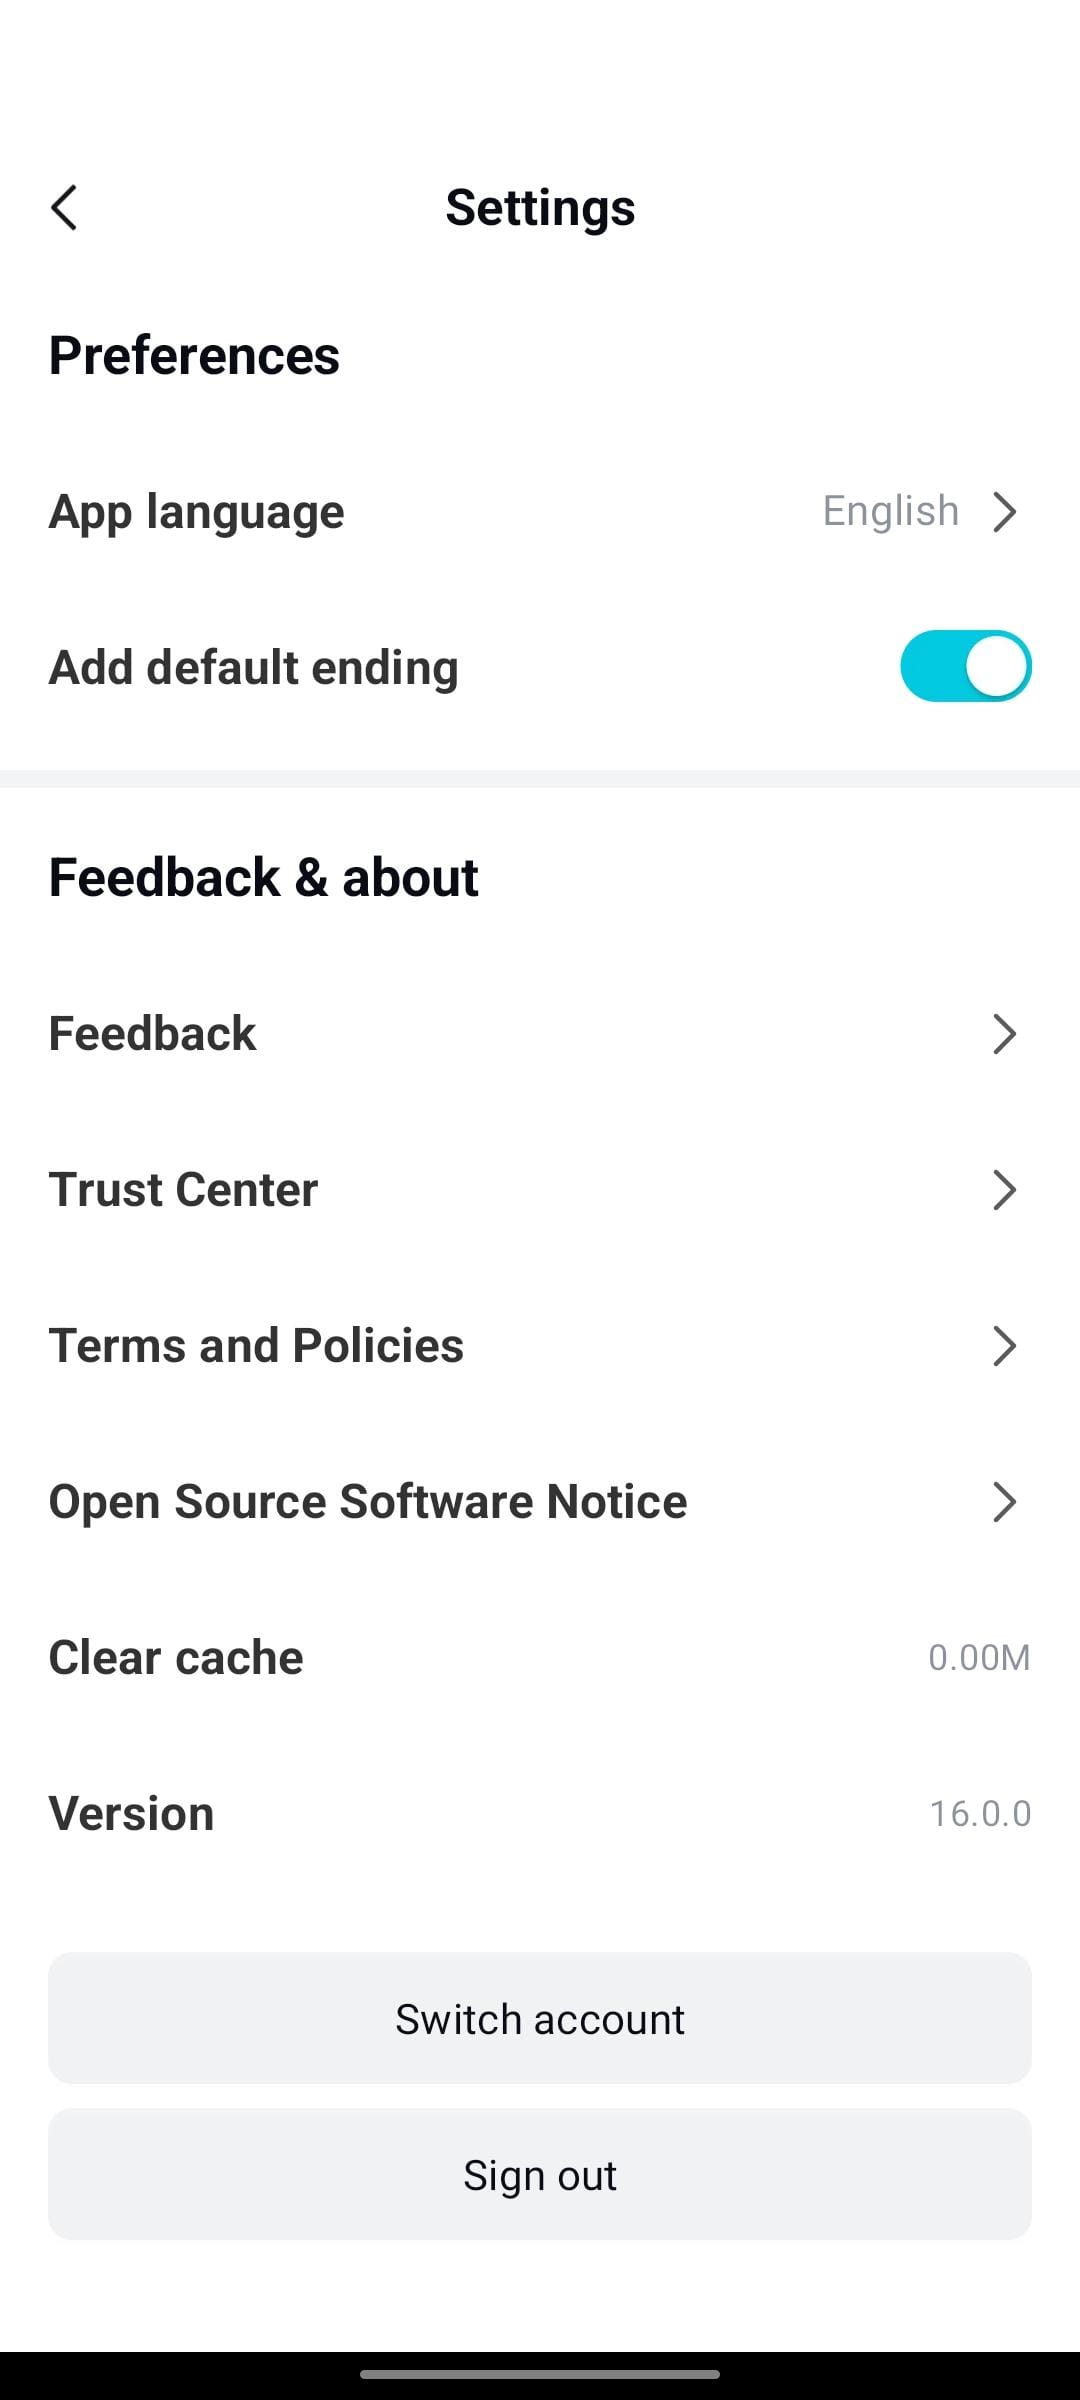
Clear cache, not project data. On Android, use CapCut's in-app cache control or Settings → Apps → CapCut → Storage → Clear cache where available; the exact storage submenu varies by phone. Google says Clear storage permanently deletes app data. On iOS, Offload App keeps documents and data, while Delete App removes the app and related data. Neither operation is proof of a usable project backup. Do not offload or delete the app as an early black-screen test; verify a restorable project and media copy first.
Check the playhead. If it sits past the last visible clip, the preview can show the canvas background or another visible layer instead of your footage. Move it back inside the clip.
Expect proxy differences. CapCut states that mobile previews use lower-resolution proxies, so image quality can differ from the export. Layout and timing should match. If they don't, export a short test: the cause may be a keyframe or timeline mistake, but rendering glitches, template problems and cache errors produce the same symptom.
If the problem appears only with high-resolution, high-frame-rate or effect-heavy footage, close background apps, confirm free storage and export a short lower-resolution test. A successful test points toward resource pressure, but it doesn't prove one specific memory, storage or thermal cause.
If the phone is already hot, disconnect it from power and let it cool before trying again. Google tells Pixel owners to unplug an overheating phone and stop using it until it cools. Apple documents charging slowing or stopping and frame rates dropping once an iPhone passes its normal operating range. Charging a hot phone while it renders works against you.
If the Web Editor Preview Goes Black
CapCut recommends reproducing editor problems in the latest Chrome, Edge or Safari on macOS. Before switching browsers, confirm the project save and media uploads have completed. If you cannot confirm that, preserve the original tab. A difference between browsers can involve compatibility, extensions, settings or session state; it does not prove that the project is damaged. CapCut's own pages are not consistent about which browsers support every web feature, so a black preview in Firefox is worth testing rather than assuming.
Check the playhead and layer order without reloading first. In a duplicate, temporarily hide a covering layer rather than permanently moving the video above deliberate titles. Before using Ctrl+R or Cmd+R, verify that the current edit is saved and required uploads have completed. If saving is uncertain, keep the original tab open and stop before refresh, sign-out or browser-data deletion. CapCut says a weak connection can leave streamed asset previews incomplete; repeat the test on a stable connection before treating the project as damaged.
CapCut describes web rendering as cloud-assisted and a best-effort approximation rather than pixel-perfect output, and names heavy filters, nested overlays and long text animations as the elements that render least reliably in a browser. What the web version does and doesn't handle is covered in the browser editor troubleshooting.
If the Export Has Audio but No Picture
Audio over black confirms the audio stream survived. On its own it doesn't tell you whether the failure happened in the timeline, in source decoding, in video encoding or in playback. Work through those in order, in a duplicated project.
Isolate the material in a copy. Export short sections until you find the first range that fails. CapCut's current error-code page uses that method for codes 4114 and 10004. It tells users to relink media for 10006 and rebuild compound clips for 22113. Before rebuilding, preserve the original project and record the compound clip’s timing, effects and component order. Compare those details in the duplicate after rebuilding; do not remove the only editable copy. With no code, inspect the clip, transition, effect or compound clip around the first black frame.
Test the encoder. In a duplicated project, record the original Performance settings and export the same short range with hardware encoding disabled. The test may be slower if the build uses more CPU work. A visible result makes the encoding path worth investigating, but it does not prove the GPU itself is faulty; restore the original setting before the next test.
If your export panel offers H.264/AVC in MP4, try the same short range with that option as a playback-compatibility comparison. Keep the original export and compare both files in two players. A successful comparison does not prove that another codec is generally broken.
Check processed effects one at a time. If only clips using enhancement, background removal or another cloud/AI effect turn black, disable that effect on one duplicated test clip and export the same range. Don't delete internal CapCut files to force a rerender.
Lower the resolution, frame rate or bitrate for one comparison. CapCut's template-export guidance gives 2–3 GB free on the Desktop export drive as a troubleshooting minimum; longer or higher-resolution projects can need more working space. Export settings are covered in the CapCut export settings guide, while stalled renders belong in CapCut Export Stuck.
If Only the Start or End Is Black
Check the timeline before changing performance settings for a dark tail.
CapCut says some template projects include a branded ending clip. Delete it only if it is visibly present on the timeline; the watermark guidance doesn't establish that every build adds one.
Check whether anything runs past your last video clip. Captions, text, stickers or overlays can continue after the footage ends. That interval can show the canvas background or another visible layer. Zoom out to see all tracks and trim only unintended overhangs in the duplicate. Preserve deliberate credits, endcards and pauses. If deleting one element also changes linked items, undo it and check selection and linkage before trying again.
Inspect the first frame and the joins between clips for unintended gaps. A gap exposes the canvas or another visible track, so it is not always black. Keep an intentional opening pause; close only a gap that should contain footage. Check the first and last frames of the short export afterward.
Black bars down the sides or across the top are a different problem. Compare the original file with the timeline: borders can be embedded in the source, created by an effect or added by player framing. If the canvas and clip ratios differ, retain the delivery ratio you need and choose between fitting with borders or filling with a crop. Filling removes edge content; it does not recover missing picture.
If One Source File Is the Trigger
Test the original clip in VLC and a second independent player. If the source is black or corrupted in both, the file itself becomes the likely cause.
A filename extension does not establish the encoding. MP4, MKV and MOV are containers. H.264/AVC, HEVC and AV1 are codecs that sit inside them. CapCut makes the point on its own import troubleshooting page: a file labeled MP4 may not be in a format CapCut recognizes, and renaming an extension changes nothing.
That page also states that supported formats vary by device, operating system and CapCut version, so check it against the version you're running rather than against a format list in someone's blog post.
Keep the original file. For a local conversion route, use the HandBrake compatibility-test instructions and compare a converted copy in a separate test project before replacing anything. Use a format CapCut lists for your platform. Avoid uploading private footage to an online converter without permission. If it works, the original file or its encoding becomes the lead suspect. The result doesn't identify one codec defect, and conversion can change HDR, color and image quality.
If media was moved, renamed or deleted after import, a saved reference can become unavailable. CapCut may show a missing-media warning or placeholder rather than black. Editing from an SD card, a USB drive or a synced cloud folder such as OneDrive or iCloud Drive can cause the same thing when the drive is disconnected or the cloud file is switched to online-only. Reconnect the original drive or download an offline copy before relinking. Copy rather than move the originals to a stable local folder, then use the missing-media prompt to locate each matching file if your build exposes it. Check the filename, duration and preview before accepting a replacement; inspect timing and effects afterward. The transfer and relinking checks cover the wider project handoff.
If the exported file plays in VLC but not elsewhere, that points at codec, HDR, color management or playback compatibility on the second device rather than a failed export.
If It Broke After Moving a Project or Template
A project opened on another device may lack media that was available on the first device.
If you transferred through Space, confirm its upload finished and use the same original login method. Do not unlink or delete the working source project just to force a new transfer. CapCut warns that Google, email, TikTok and other methods can open different accounts even when the email looks the same. If clips are marked missing or unavailable, relink those files and export a short test.
Templates behave differently again. CapCut states on its template preview page that a mobile-template project opened on Desktop may show one default frame, blank/grey placeholders or missing dynamic assets. Its recommended route is to fill and complete the template on mobile. Treat the claim that export remains unaffected as conditional: verify all media is linked and export a short test before trusting the full render.
CapCut Black Screen FAQ
Does a black screen mean I've lost my project?
A black preview alone does not establish that the project is lost. Confirm the timeline and original media still exist. If CapCut reports missing media, restore access to the matching originals and relink them in a duplicate. Do not overwrite or reset the only copy while diagnosing it.
Why does CapCut export black video with audio only?
Audio over black confirms the audio stream survived, but it doesn't identify whether the video failed in the timeline, source decoding, encoding or playback. Work in a duplicated project, disable or remove suspect clips, then export short sections until the problem material shows itself. CapCut's export error codes use the same section-by-section isolation method.
Why is only the start or end of my CapCut export black?
Inspect the timeline in a duplicate. Remove an unwanted ending only if it is present, and trim only unintended caption or overlay overhangs. Preserve deliberate credits and endcards. A gap can show the canvas background or another visible layer, not necessarily black.
Why is the CapCut preview black in Firefox but fine in Chrome?
CapCut recommends comparing the Web editor in current Chrome, Edge or Safari on macOS. Save the project and finish uploads before switching. A browser-only difference can involve compatibility, extensions, settings or session state; it does not prove project damage or a universal Firefox fault. If saving is uncertain, preserve the original tab.
Why did my CapCut project turn black after moving devices?
If you used Space, confirm the upload finished and use the same original login method. For any transfer route, confirm the second device can access the matching source media. Relink unavailable files in a duplicate where the app offers that control, then check a short export before touching the working original.
Should I reinstall CapCut?
Treat it as a last step. Verify a restorable editable project and its source media first. A local duplicate alone does not protect against uninstalling. Space is one option only when available and appropriate for the footage. If you cannot verify restoration, stop before reinstalling or clearing app data. CapCut warns that uninstalling can remove local drafts.
Does turning off hardware acceleration slow CapCut down?
It can. With hardware encoding disabled, a build may use more CPU work and export more slowly. Keep the controls separate: encoding primarily affects export, while decoding and interface rendering primarily affect preview. Record the original state, test the same short range, then restore it unless the change is clearly useful.
If the same controlled test still fails, send CapCut support the app version, operating system, GPU and driver version, source format, first black timestamp and any export error code. Include whether the short export works in a second player and whether one known-good control file works in a blank project. Read the version from About or settings if accessible; otherwise say it is unknown. Share a non-sensitive reproduction and redact account identifiers, client footage, file paths and unrelated notifications from screenshots. Do not send passwords or authentication codes.