

Choose CapCut for straightforward social edits, caption styling and template-led videos. Choose Premiere Pro when the job needs detailed revision control, managed color, an Adobe workflow or an editable Premiere project. I'd stay with CapCut until a specific delivery requirement makes the move worthwhile; a longer video or a paying client is not, by itself, a reason to switch.
This comparison focuses on CapCut Desktop and Adobe Premiere, still widely searched for as Premiere Pro. CapCut also has mobile and web editors, and Adobe offers a separate mobile editing route. Use the desktop comparison for a computer-based edit; a phone-only job needs the features of the mobile app.
CapCut vs Premiere Pro: choose by the deliverable
| Your next job | Where I'd start | What settles the choice |
|---|---|---|
| A solo Reel, Short or captioned talking-head edit | CapCut | Can you finish the required style and export it without unwanted paid assets? |
| A longer YouTube video | Either | Media organization, revisions, sound and delivery matter more than duration alone. |
| A multicamera interview | Compare both desktop workflows | Both document multicam. Check synchronization, angle changes, separate audio and later corrections. |
| A job requiring an editable .prproj file | Premiere Pro | A rendered CapCut video cannot supply the requested native Premiere timeline. |
| Mixed-camera color work and multiple delivery versions | Premiere Pro | Choose it when sequence color management and the required interchange/export workflow solve the brief. |
| A paid social ad delivered as a finished video | Either, after checking rights | The asset licenses, output specification and revision agreement decide whether the editor fits. |
Where CapCut makes the everyday edit easier
For a simple social video, the editing task is often the same: trim a take, remove an awkward pause, add captions, fit the frame and balance speech against music. CapCut keeps that kind of work approachable, especially when a familiar caption style or template is part of the brief. If that is the work you need to finish, learning a different editor can add effort without fixing a problem.
That does not mean every automatic tool is free, or that a template is the right choice for every channel. Build one representative video with your own footage and check its export before committing a series to that workflow. Our CapCut auto-caption guide covers the caption controls; the comparison here is about whether the whole editing job fits.
Transcript cuts, captions and translation: compare the whole job
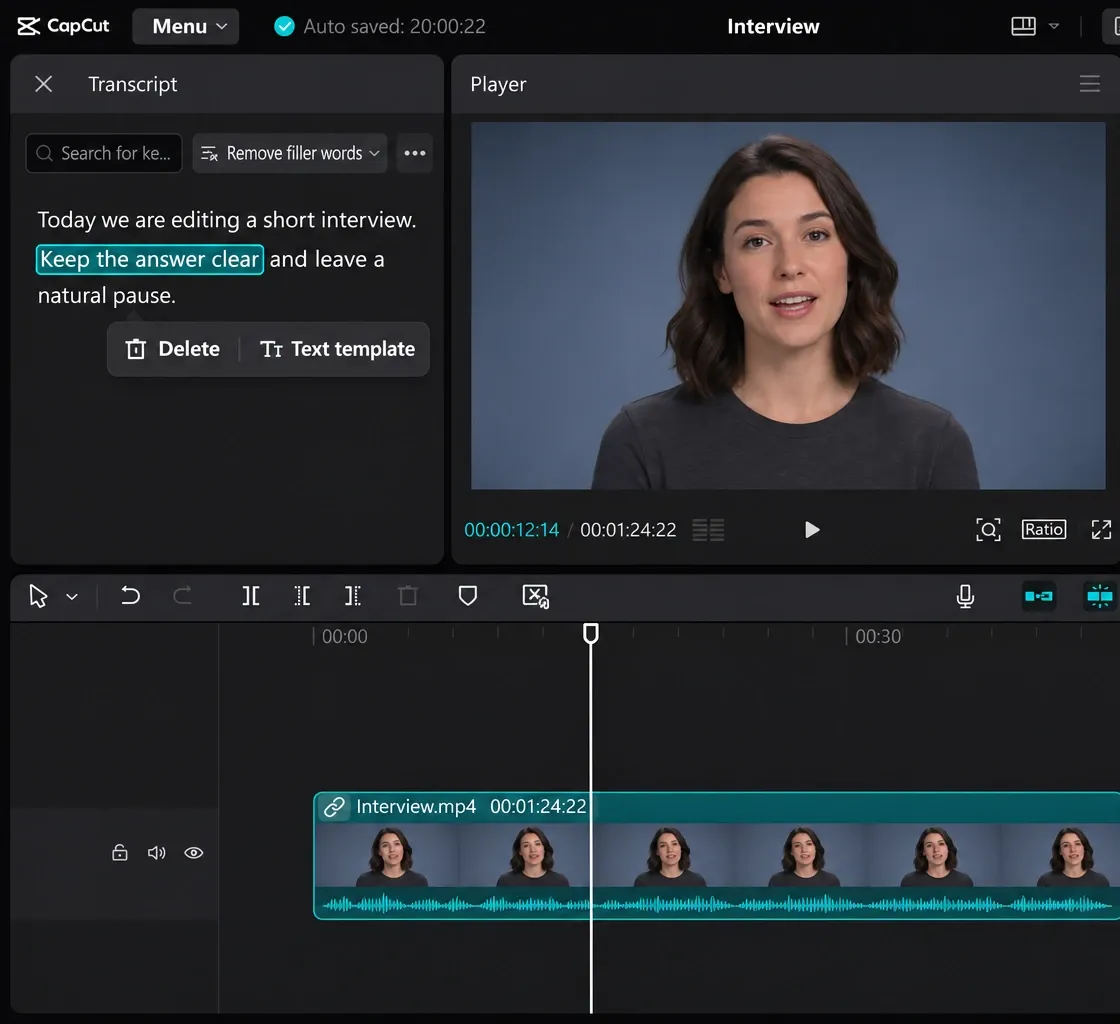
Both desktop editors can cut spoken footage through its transcript and remove filler words. In CapCut, the documented route is Menu → Layout → Transcript-based editing: deleting text removes the corresponding video segment. Its desktop transcript workflow also covers filler removal. Premiere's Text-Based Editing trims and rearranges clips through selected text and can bulk-delete fillers. Transcript editing alone is no reason to change editors.
Cutting speech and making final captions are separate decisions. Adobe tells you to generate captions from the final edited sequence after Text-Based Editing. Premiere also offers Single Word captions, so one word at a time is not exclusive to CapCut. I'd stay with CapCut when the required caption design is already available there; I'd compare the exact treatment in Premiere when captions need to remain in the master project.
For multilingual work, Premiere can translate captions into a new timeline track using cloud services. CapCut also advertises caption translation; check the required language and export access in the app you will use. Review names, specialist terms and line breaks before delivery. Translation does not recreate a speaker's voice.
Ask for the caption deliverable up front. Premiere supports burned-in captions and separate timed-text files, including SRT; embedded-caption support depends on the chosen format. A CapCut Desktop guide documents SRT export with video unchecked. A separate SRT preserves text and timing for revisions; it does not carry an animated template. Burned-in words stay in the picture. If the next editor needs a clean image, export that before adding the final text.
Multicam and color are not exclusive to Premiere
CapCut Desktop has a documented Create multi-camera clip workflow, including synchronization and switching angles. A second camera does not automatically mean you have outgrown it. Start with our CapCut multicam guide if you already edit there, and check whether the feature is available in your build.
Premiere's multicamera target sequence supports angle switching and subsequent cut corrections. For a recurring interview series, compare what happens after the first cut: changing the selected camera, moving an edit, correcting one angle and keeping the intended microphone track. That is a more useful comparison than a checkbox saying both apps support several cameras.
Color follows the same logic. CapCut's own desktop color instructions include HSL, curves and color wheels. Calling it a filters-only editor misses controls that can solve a real correction. For a targeted adjustment, our HSL walkthrough explains how to avoid changing the wrong colors.
I'd lean toward Premiere when the brief requires a controlled path from mixed raw or log footage to specified outputs. Adobe documents sequence color management and output color spaces. That is a concrete reason to consider the move. A richer-looking default filter is a much weaker reason.
What a published auto-edit test shows
In TimeBolt's 2025 automation comparison, the same 93-second, pause-heavy recording produced the following automatic edits:
| Editor in the test | Duration of edited output |
|---|---|
| CapCut 7.3.0 | 41 seconds |
| Premiere Pro 25.5.0, build 13 | 37 seconds |
Those numbers describe the length of the resulting videos, not the time taken to process or export them. The vendor-run test used default automation, with Premiere set to remove silences of at least 0.5 seconds. It is one recording on those versions, so it does not establish a current speed or accuracy winner.
The practical lesson is to budget for the review after automation. Listen through the joins, check that a removed pause has not changed the meaning, and correct caption names and line breaks. I would choose the workflow that leaves a clean, editable cut after that review, rather than the one that produces the shortest first pass.
When Premiere earns the extra setup
The case for Premiere gets stronger when a revision affects several parts of a project. Think of an interview where the producer changes an answer, a designer supplies revised animation and an audio editor needs separate material. The job is no longer just to make a good-looking export; it is to keep those changes manageable.
Adobe documents Dynamic Link with After Effects, while its plans describe Frame.io review and approval tools. Those serve different jobs: linking a composition keeps design revisions connected to the edit, while a review service collects feedback. Neither is the same as supplying the editable project. Check the actual plan: a Premiere subscription does not automatically include every other Adobe app you need.
Premiere also lists interchange exports such as AAF, OMF, EDL and XML. If a collaborator requests one of those, confirm exactly what they need before choosing the editor. Interchange is a defined handoff, and it does not guarantee that every effect or title survives in another app.
For a solo creator delivering a finished MP4, much of that infrastructure may be unnecessary. Keep the editor that handles the brief cleanly. For a team expecting an editable Premiere timeline, make that decision before editing starts.
Compare export settings before judging quality or speed
An editor's name does not determine whether the final video looks sharp. Different source footage, frame rates, compression and color handling can overwhelm the difference you were trying to compare. A smaller exported file is not proof of a better encoder, and a larger one is not proof of a better picture.
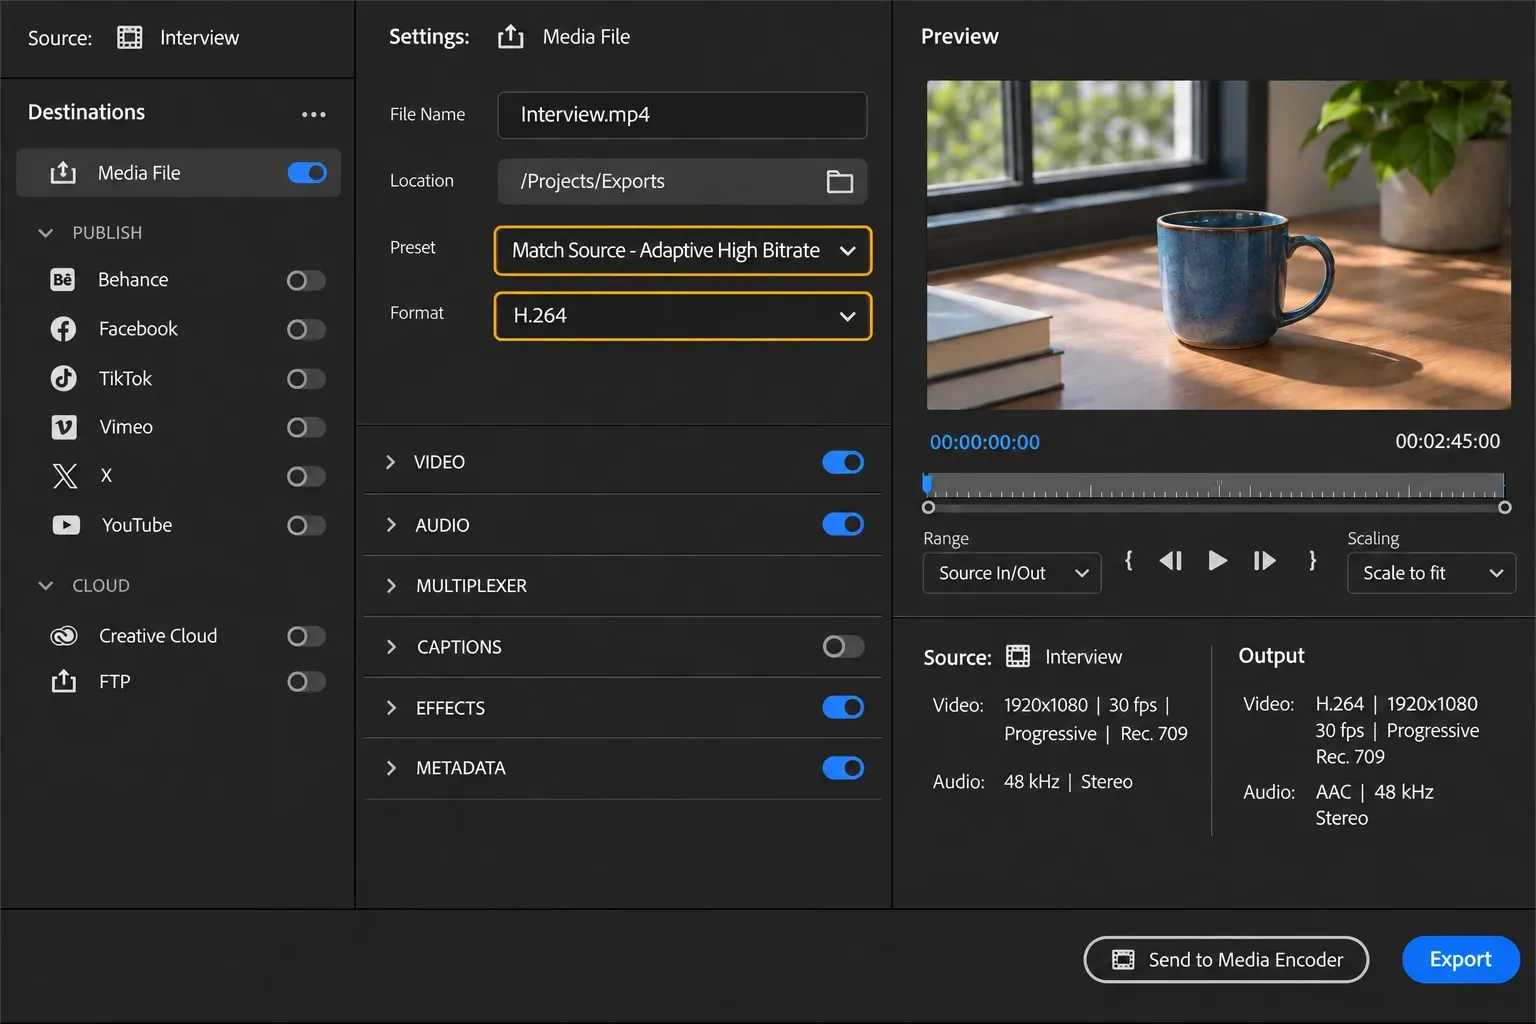
Use the same source and an equivalent timeline. Match resolution, frame rate, codec, bitrate and color output as closely as the available controls allow. Include the effects required by the brief. Then compare the exported files at the same viewing size, checking detailed movement, soft gradients, text edges and audio sync.
If you time an export, use the same computer and note hardware acceleration, effects and background work. A quick result from a simple CapCut timeline and a slow result from an effects-heavy Premiere sequence do not establish a useful speed ratio. If CapCut's output looks soft, work through the blurry-export checks before rebuilding the entire edit elsewhere.
Can your computer run the version you need?
Check compatibility before paying. Adobe's Premiere 27.0 requirements list Windows 11 v24H2 as the Windows minimum; x86 processors need AVX2, and Windows on Arm has its own processor requirements. The Mac table lists Apple silicon and macOS 15 Sequoia. An older Premiere article that recommends an Intel Mac or Windows 10 is not a compatibility guide for this release.
Separate installation minimums from an editing budget. Adobe recommends 16 GB RAM for HD and 32 GB or more for 4K on Windows. Its Mac minimum is 8 GB unified memory, with 16 GB in the recommended column. A fast SSD for the app/cache and high-speed media storage are part of the recommended setup too. Allow space for originals, cache, previews and collected handoff copies.
For demanding media, Premiere's proxy workflow uses lighter working copies, with the originals available for final export. Adobe documents separate restrictions for After Effects, Dynamic Link and Audition within that proxy workflow; do not assume the proxy links follow every integration. Compare playback, a real revision and a short export using your camera files. A successful final render alone does not tell you whether the timeline is comfortable to edit.
Cost includes the commitment and the assets
CapCut's free route can be enough for an edit, but a previewable tool or asset is not a promise of a free export. Its help page explains how premium elements can trigger an export upgrade prompt. Check the finished project's requirements, including effects, fonts, AI tools and the export choices your account offers. The current plan differences belong in our CapCut pricing guide.
Premiere on desktop requires a subscription. For a concrete budget reference, Adobe's US individual single-app card showed US$22.99/month, annual billed monthly, on November 14. Twelve installments at that rate total US$275.88 before any extra charges. Use the plan and price offered in your own checkout, including companion apps required for the job.
Annual billed monthly still means an annual commitment. Adobe's US terms for that payment route specify an early termination fee of 50% of the remaining contract balance after 14 days. A month-to-month offer, prepaid plan or store purchase can have different terms. Compare the cost of the project period you actually need, rather than treating every monthly figure as a cancel-anytime plan.
A paid subscription also does not settle every music, stock or template license. For client work, check the asset, the intended platform and the permitted commercial use before delivery. Our CapCut commercial-use checklist separates those questions. A finished social ad can be a sensible CapCut job when the rights and deliverables fit; receiving payment does not make Premiere compulsory.
Using both: protect the editable master
Using Premiere for a master edit and CapCut for a social cutdown can make sense, provided you decide where the editable master lives. CapCut's project export guidance says it does not directly import or export third-party native project files such as Premiere projects. You can move rendered media, or rebuild from the original files.
An exported video may be useful as a reference or as finished source material, but its overlaid titles and mixed audio do not become separate editable elements in the other app. Keep the native project, clean source media and separate voice/music files when the next editor needs to adjust the mix. Retain an SRT when captions still need revision.
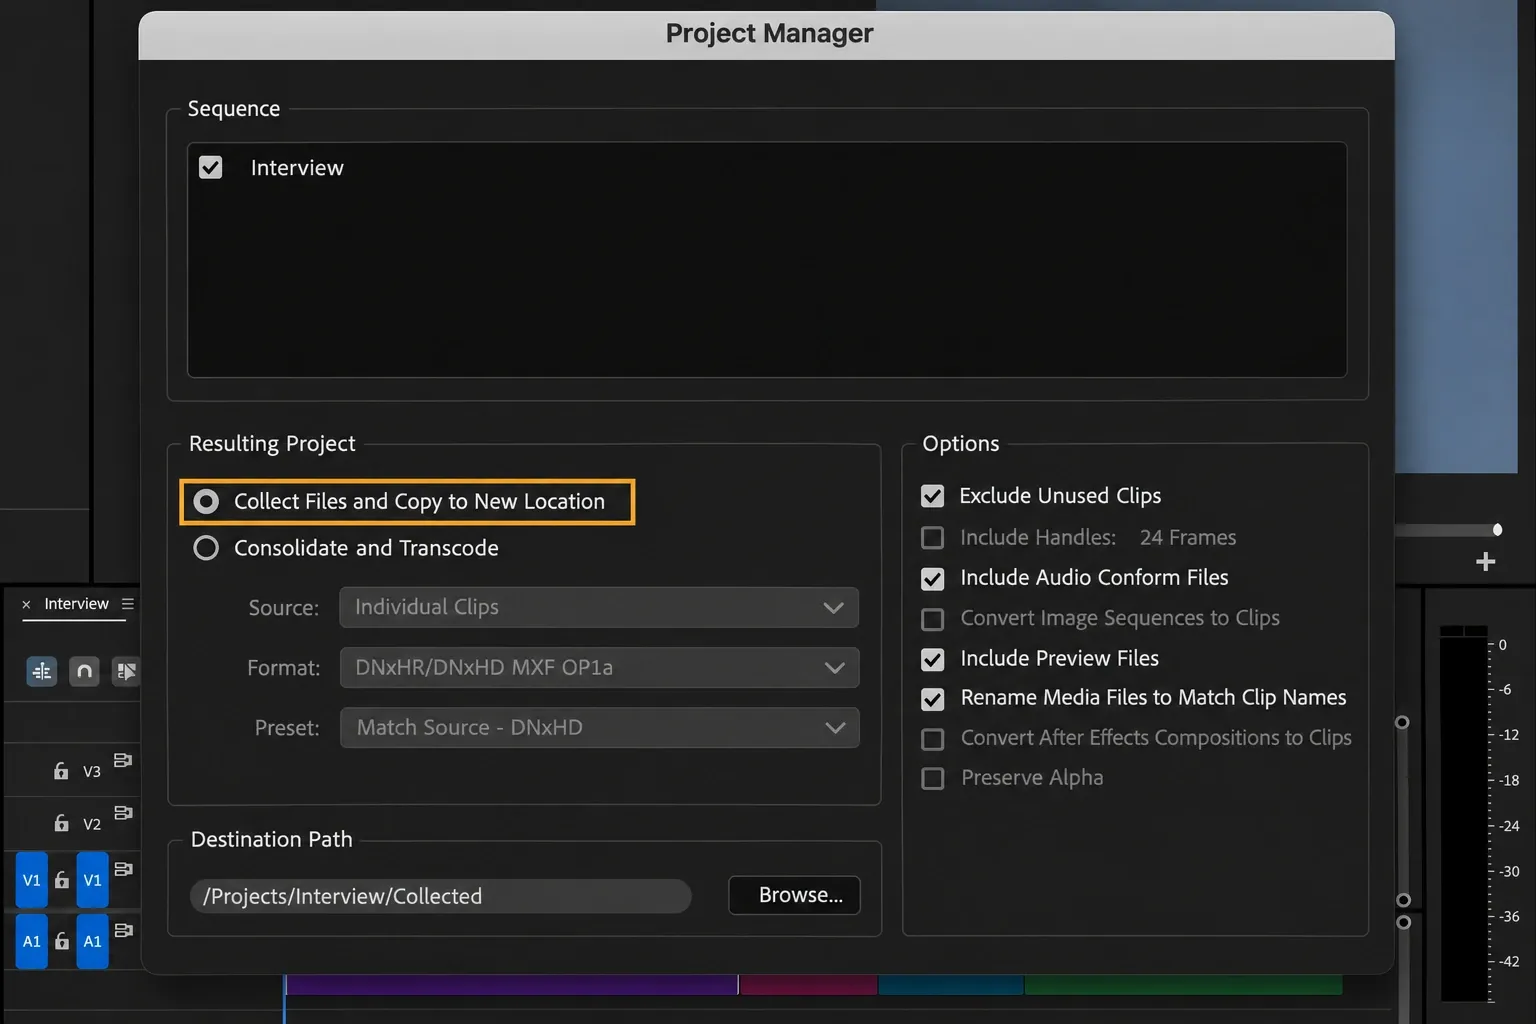
A requested .prproj is not a self-contained media package. In Premiere, File → Project Manager → Collect Files and Copy to New Location collects footage used in selected sequences and creates a project linked to that copied media. Confirm the required fonts, plug-ins and linked compositions separately; do not assume the collection includes every dependency. Reopen the handoff from its destination and check the intended sequence, picture and sound before archiving your working copy.
For the transfer steps and their limits, use our guide to what transfers between CapCut and Premiere Pro. Do not start a project in CapCut on the assumption that you can later turn it into a fully editable .prproj file.
Make the choice on one representative brief
- Write down the required delivery. Include aspect ratios, captions, audio files, color requirements and whether anyone needs the editable project.
- Build the difficult section first. Use the real camera files, caption style and effects. For multicam, include an angle change and the intended microphone track.
- Make a revision. Replace a shot, move a cut, change a caption and rebalance sound. Judge how clearly the project stays organized.
- Check the export and the purchase terms. Confirm that your account can produce the required files and that the assets are licensed for their destination.
My recommendation is CapCut when it already delivers the result and keeps revisions manageable. Move to Premiere when you can name the requirement it solves: an editable Premiere handoff, a controlled color workflow, interchange files or an Adobe production process. If neither fits your budget or platform, compare the other CapCut alternatives before paying for a new workflow.