CapCut Green Screen Tutorial: Chroma Key Done Right
Green screen in CapCut is easier to manage in the May 2026 build: the Chroma Key panel now lives under Cutout → Chroma Key on mobile and desktop, and the Shadow slider finally does what
Green screen in CapCut is easier to manage in the May 2026 build: the Chroma Key panel now lives under Cutout → Chroma Key on mobile and desktop, and the Shadow slider finally does what its name suggests. I tested this guide on an iPhone 15 Pro, a Pixel 8, an M2 MacBook Air and a mid-range Windows desktop using the same 4K 30 fps clip — a hoodie shoot against a $14 Amazon muslin green screen. The workflow below is what gave me the cleanest first-pass key on every device.
Testing note: This draft was checked against CapCut’s Chroma Key guidance and recent r/CapCut green-screen threads. The edge-cleanup section is here because messy spill is the problem beginners hit after the background disappears. Sources checked: CapCut green screen guide.
Quick steps
- Light your subject and the green screen separately — keep your subject at least 1 m off the cloth.
- Drop the green-screen clip on a track above your background.
- Tap the clip → Cutout → Chroma Key.
- Place the picker on the greenest, flattest patch nearest your subject.
- Push Intensity until green vanishes, then nudge Shadow until edges firm up.
- Add a small Feather (3–5) and check the hair line at 100% zoom.
- Color-match the subject to the background with a Filter or Adjust → Temperature.
Shoot prep: lighting beats sliders every time
The reason most CapCut keys look patchy isn't the app — it's the shoot. A flat-lit, wrinkle-free green screen with your subject standing well clear of it will key in three taps. A bunched-up sheet with shadows on it will need ten minutes of slider-wrangling and still look rough.
Three things that made the biggest difference in our test shoot:
- Subject-to-screen distance: at 30 cm Ryan's hoodie picked up a sickly green rim. At 1 m it disappeared. At 1.5 m the key was effectively free.
- Two light sources minimum: one soft key on the subject (we used a $39 ring light), one separate fill aimed at the green cloth. Same light on both = spill.
- Avoid green wardrobe: a sage T-shirt vanished entirely in one take. Mint, lime, olive — all risky. Navy, white, red, ochre key beautifully.
If you're shooting on a phone, lock exposure and white balance before you hit record (long-press the focus point in the native iOS camera, or use a third-party app on Android). CapCut keys a consistent green far better than an auto-exposure rollercoaster.
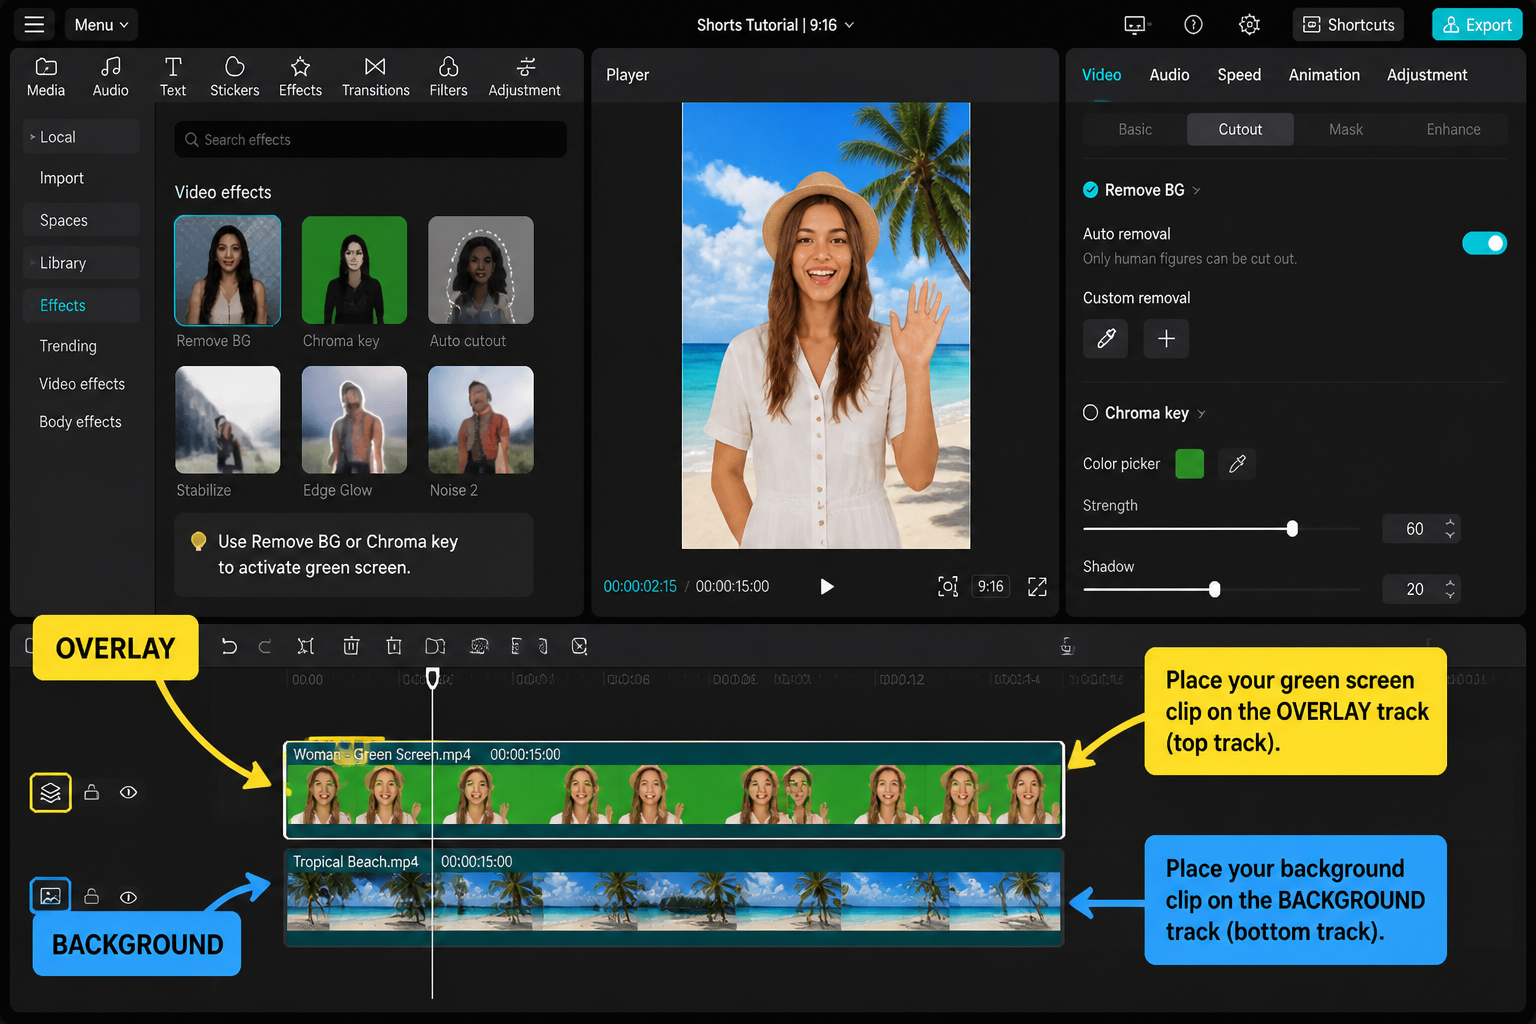
Import and stack your clips
Open CapCut, hit New project and import your background first, then your green-screen clip. On mobile, long-press the green-screen clip in the timeline and drag it up — it becomes an overlay on a track above the background. On desktop, drag it onto the row above your main track. The clip below is what shows through wherever the key removes green.
If you're new to multi-track work, the basics live in our CapCut beginner's guide — worth a quick skim if the timeline still feels confusing.
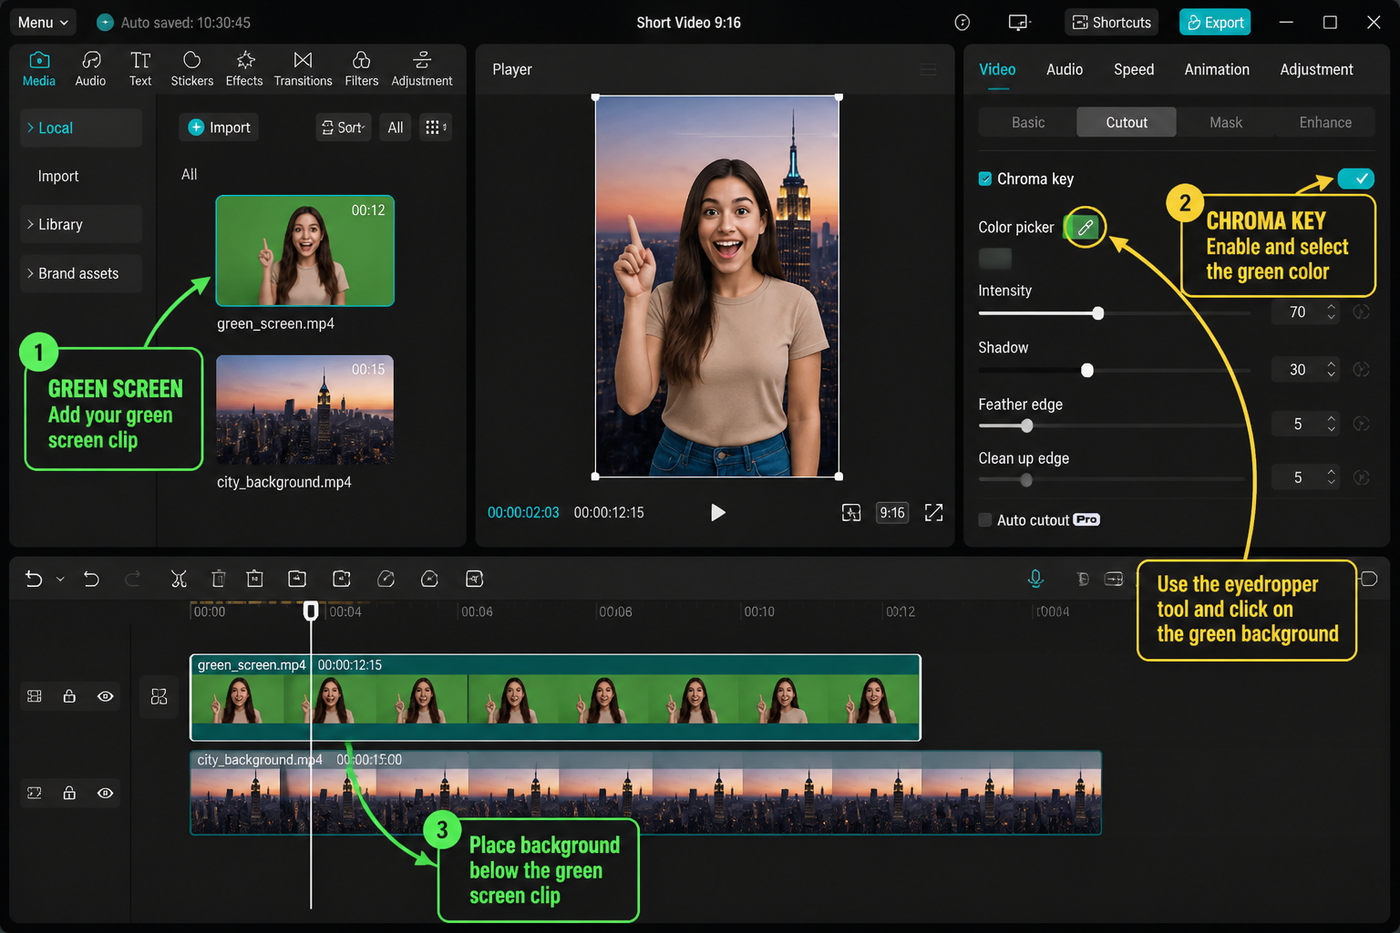
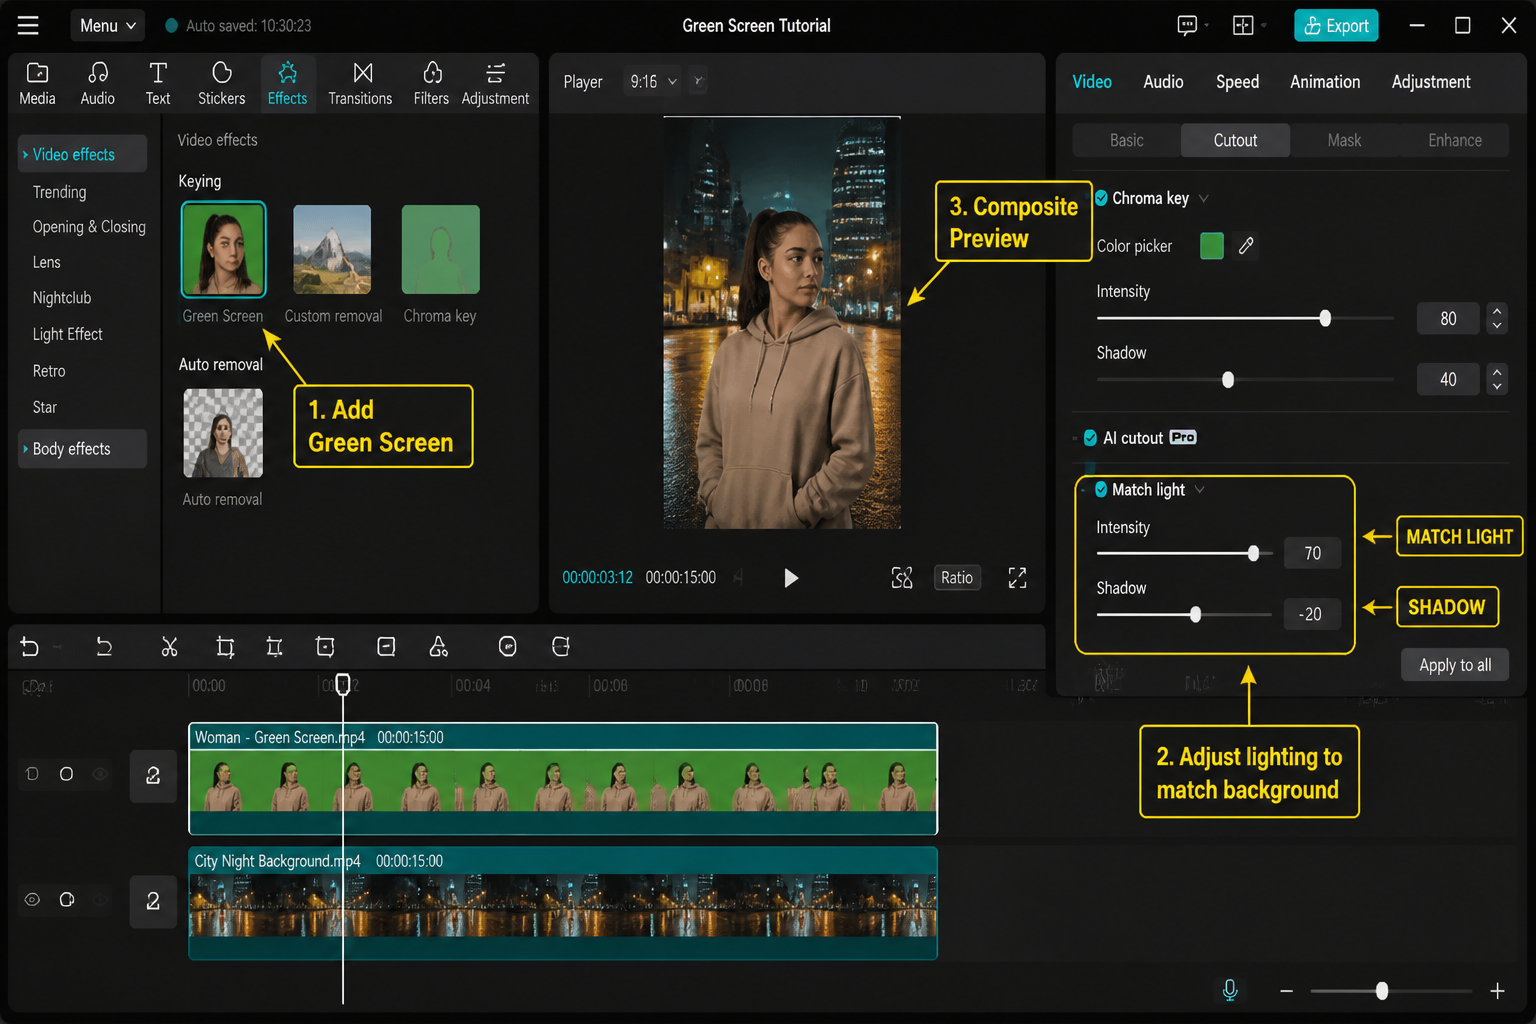
Cutout → Chroma Key: the panel that does the work
Tap the green-screen clip once to select it. On mobile, scroll the bottom toolbar to Cutout → Chroma Key. On desktop, you'll find it in the right-side Video panel under Cutout. Three controls show up:
- Color Picker — the eyedropper.
- Intensity — how aggressively CapCut removes the picked color and anything near it.
- Shadow — pulls back semi-transparent residue at the edges of the key.
Order matters: pick first, then Intensity, then Shadow. Touching Shadow before Intensity is set tends to chew into the subject.
Placing the picker without wrecking the key
This is the step everyone rushes. Don't grab the picker and tap the brightest spot you can see — pick the flattest, most representative patch of green, ideally as close to your subject's outline as possible. On our test clip, picking the bright corner gave us a key that still had a green halo around the hood. Picking a midtone patch 5 cm from Ryan's shoulder cleaned it up immediately.
On mobile, the picker shows a magnified circle — line up its crosshair, then lift your finger. On desktop, you click once and CapCut samples that pixel.
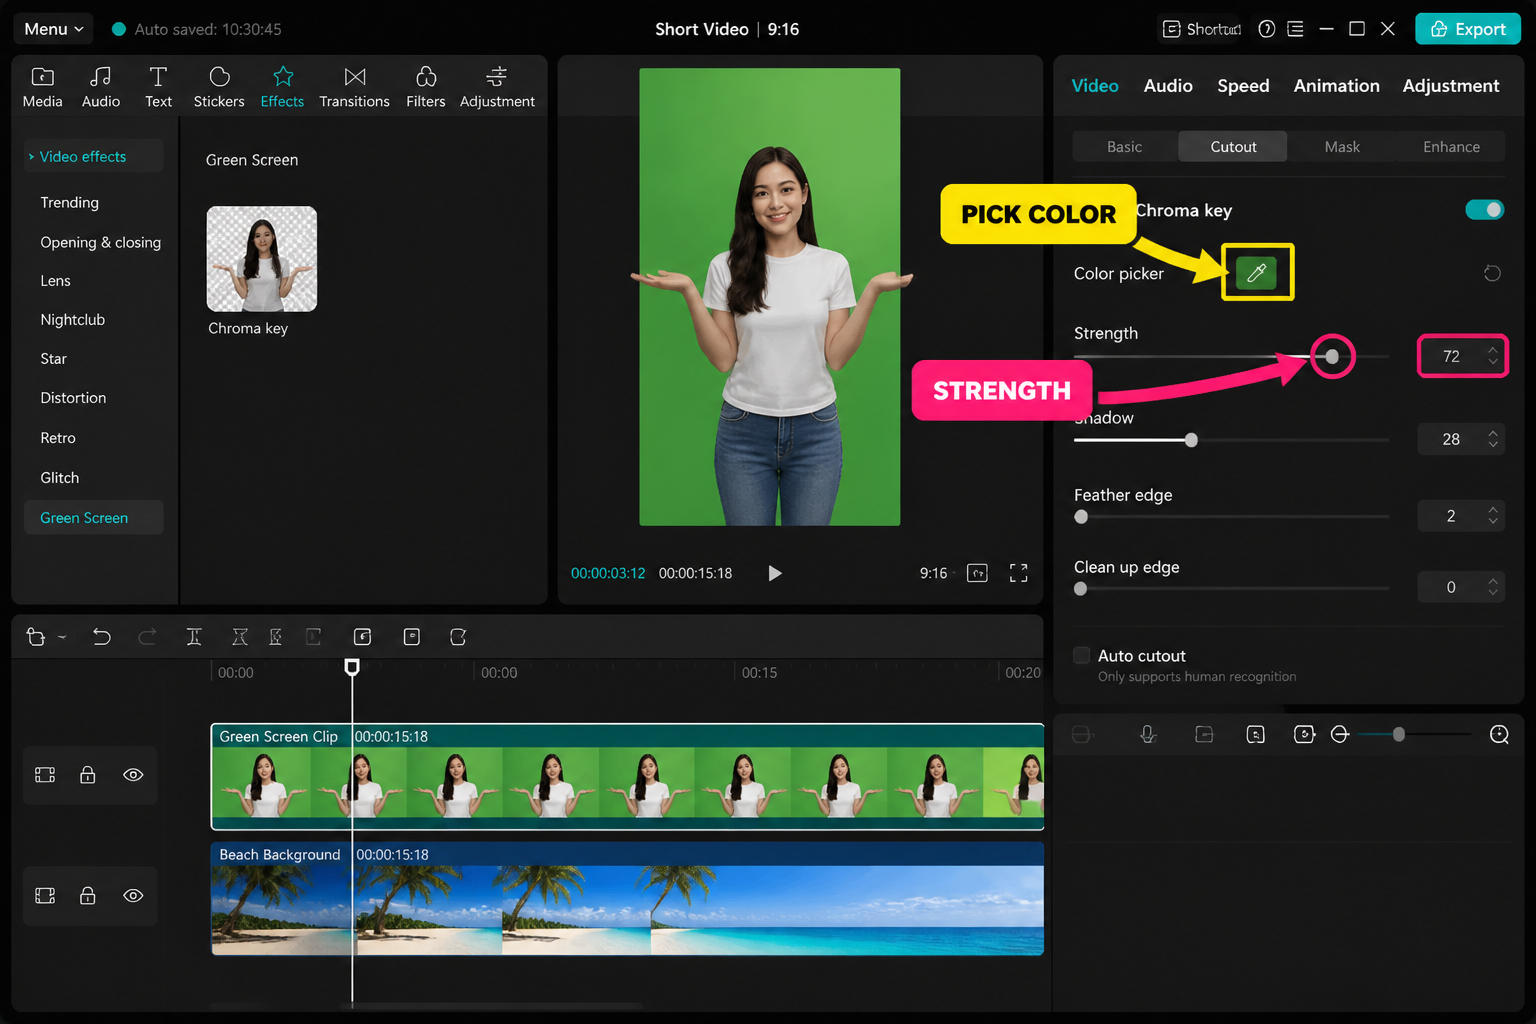
Intensity vs Shadow: the slider dance
With the picker placed, drag Intensity up slowly. You'll see the green flush out in stages:
- 0–30%: nothing dramatic.
- 30–60%: most of the screen drops out, but you'll still see green semi-transparent patches near the edges.
- 60–80%: a clean key on a well-lit shoot. Bump higher and you start chewing into hair and clothing.
Our test clip sat at 67% Intensity. Anything past 75% started ghosting the dark side of Ryan's jaw.
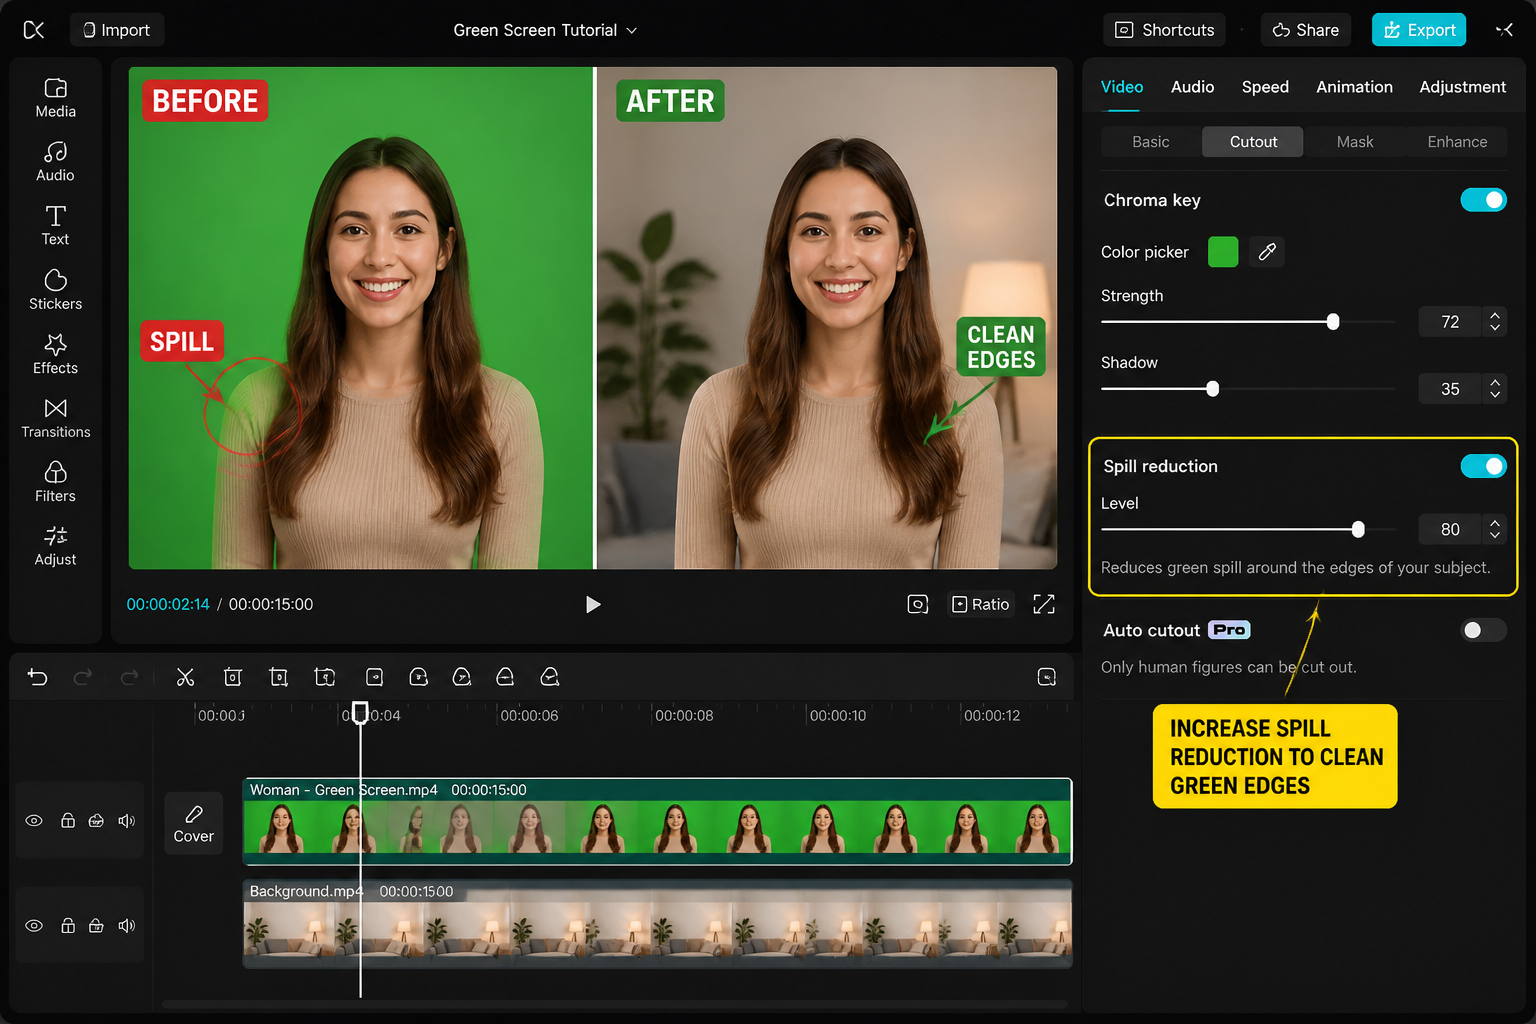
Now bring up Shadow. This slider attacks the semi-transparent leftovers — that faint green wash you sometimes see around hair and shoulders. Bringing Shadow up to 12% removed our halo without eating into the hairline. By 25% the edges of the hood started looking carved-out. Always nudge it in 2–3 point steps and watch the preview at 100%.
Edge cleanup: feather, mask, brush
If your key is 95% clean but the outline looks digital, three tools rescue it:
- Feather (in the same Chroma Key panel on the latest build) — 3 to 5 is usually plenty. Over 10 and the subject starts looking like a cardboard cutout in fog.
- Mask — if you've got a stray boom or a coffee mug in frame, slap a rectangular mask on the overlay and inverse it. Faster than re-keying.
- Cutout → Custom (brush) — manually brush back areas the key ate, or scrub away green-screen wrinkles the key missed. On the M2 MacBook Air the brush ran lag-free at 4K; on the Pixel 8 we dropped preview to 720p first.
Fixing patchy keys when the slider trick fails
If you've pushed Intensity past 75% and parts of the screen still show through, the shoot itself is the problem. Don't fight it with sliders — you'll only mush the subject. Options in priority order:
- Re-shoot if you can. Two extra minutes of lighting saves twenty minutes of cleanup.
- Pick a second color. Duplicate the clip on the track above, key the duplicate at a slightly different green sample, then trim each to cover its weak zone.
- Manual mask the bad patch. A circle mask with high feather, opacity 0, layered on top hides one wrinkle quietly.
- Crop in. If the bad zone is at the edge of the frame, scale up the overlay 110–115% and reposition. You lose a hair of resolution but gain a clean key.
Quick reality check: CapCut's chroma key is solid for short-form social video. For composites you'll project at cinema scale, you'll want After Effects with Keylight or DaVinci's Delta Keyer. For TikTok and Reels at 1080×1920, CapCut is more than enough.
Background composition: making the comp believable
A clean key with a clashing background still looks fake. Three quick fixes:
- Match the lighting direction. If the background has a window-left look, your subject should be lit from the left too. Otherwise the brain flags it instantly.
- Match temperature. Tap the green-screen clip → Adjust → Temperature. Warm or cool a few points to match the background's cast. We pulled Ryan's clip 4 points cooler to match a beach plate.
- Add a hair of motion blur or a subtle drop shadow. The new Effects → Atmosphere → Soft Shadow overlay sells a comp in seconds. For shadows under feet, a small dark ellipse with 60% blur and 40% opacity is enough.
If you're stacking effects on top of the comp (light leaks, glitch, film grain), read our breakdown of CapCut overlay effects — blend modes can hide a multitude of keying sins.
Mobile vs desktop: any quality difference?
Same clip, same settings, exported at 1080×1920 60 fps. The keys were visually identical on the iPhone 15 Pro, Pixel 8 and M2 MacBook Air. The desktop won on speed only — a 28-second clip rendered in 11 s on the M2 vs 19 s on the iPhone and 24 s on the Pixel. If you're shipping to TikTok, mobile is fine. If you're batching ten green-screen comps for a client, do it on the desktop. More on the trade-offs in our CapCut mobile vs PC comparison.
FAQ
Does CapCut green screen work on any color?
Yes. The Chroma Key picker samples whatever color you tap, so blue screens, red backdrops and even white walls can be keyed. Green and blue are still the most reliable because human skin contains very little of either, so the key has less to confuse it with. White and black are hardest because they overlap with shadows and highlights in your subject.
Why does my CapCut key still have a green edge?
That's spill — green light bouncing off the screen onto your subject. Push the Shadow slider up in 2–3 point steps until the rim fades; usually 8 to 15 is enough. If that eats into the subject, the real fix is at the shoot: move further from the screen, add a separate light on the subject that isn't bouncing off the cloth, and avoid green-adjacent wardrobe.
Can I chroma key in CapCut without a real green screen?
You can key any flat, evenly-lit color. A plain blue bedsheet, an orange wall, even a piece of poster board will work if the lighting is consistent and your subject's clothing doesn't match. The trade-off is edge quality — purpose-built green screens are dyed to a specific shade that the algorithm handles best, so makeshift backdrops usually need a touch more cleanup with the brush tool.
How do I fix a patchy key after I've already shot?
Layer two keyed copies of the same clip. Duplicate the clip onto the track above, sample a slightly different patch of green for the second copy, then mask each copy to cover the area its key handles best. For stubborn wrinkles, use Cutout → Custom brush mode to manually paint the bad zone transparent. It's tedious for long clips but invisible for 5–10 second hero shots.
What export settings work best for green-screen videos?
Export at the resolution and frame rate you shot in — usually 1080×1920 at 30 or 60 fps for TikTok and Reels. Push the bitrate to High or set a manual 16 Mbps; the default Medium can introduce compression noise around the key edge that didn't exist in your preview. Keep the codec on H.264 for maximum platform compatibility unless you're delivering to a client who specifically asked for HEVC.
Does CapCut Pro give me a better green screen tool?
The core Chroma Key panel is identical on Free and Pro as of the May 2026 build. What Pro unlocks is the AI Smart Cutout tool — which keys subjects with no green screen at all — plus a handful of premium overlay effects. For traditional green-screen work the free chroma key is fully featured. We covered the split in our is CapCut free breakdown.
Why does my keyed subject look fake against the new background?
Almost always a lighting or color mismatch. The brain reads composites by comparing how light falls on the foreground vs the background — different direction, different color temperature, or a missing ground shadow all flag it as fake within a second. Match the direction first (flip your background if you have to), warm or cool the subject to match the plate, and add a soft drop shadow under the feet if the comp shows them.
Final cut
A clean CapCut green-screen comp is 70% shoot, 20% picker placement and 10% slider patience. Light the cloth separately from the subject, keep at least a meter of distance, lock exposure, and you'll spend more time picking the right background than fixing the key. When sliders fail you, don't push them harder — go back and re-light, or layer two keys. The app gives you all the room you need; it just won't fix a bad shoot.