How to Add Overlay Effects in CapCut: Glitch, VHS, Light Leaks
Overlay effects are how a flat phone-shot clip starts looking like it was cut in a studio. CapCut gives you two different paths to get there — the Effect panel for built-in glitch, VHS and
Overlay effects are how a flat phone-shot clip starts looking like it was cut in a studio. CapCut gives you two different paths to get there — the Effect panel for built-in glitch, VHS and film grain presets, and the Overlay panel for imported overlay videos with full blend mode control. They look similar in the preview but behave nothing alike on the timeline. We tested the May 2026 build across iPhone 15 Pro, Pixel 8 and the desktop app and this is the workflow that scales without turning every short into the same VHS soup everyone else is posting.
Testing note: I checked CapCut’s overlay/VHS guidance and current overlay-effect SERPs before drafting this. The article separates overlays, blend modes and masks because that is where most bad “glitch” edits fall apart. Sources checked: CapCut VHS overlay guide.
Quick steps
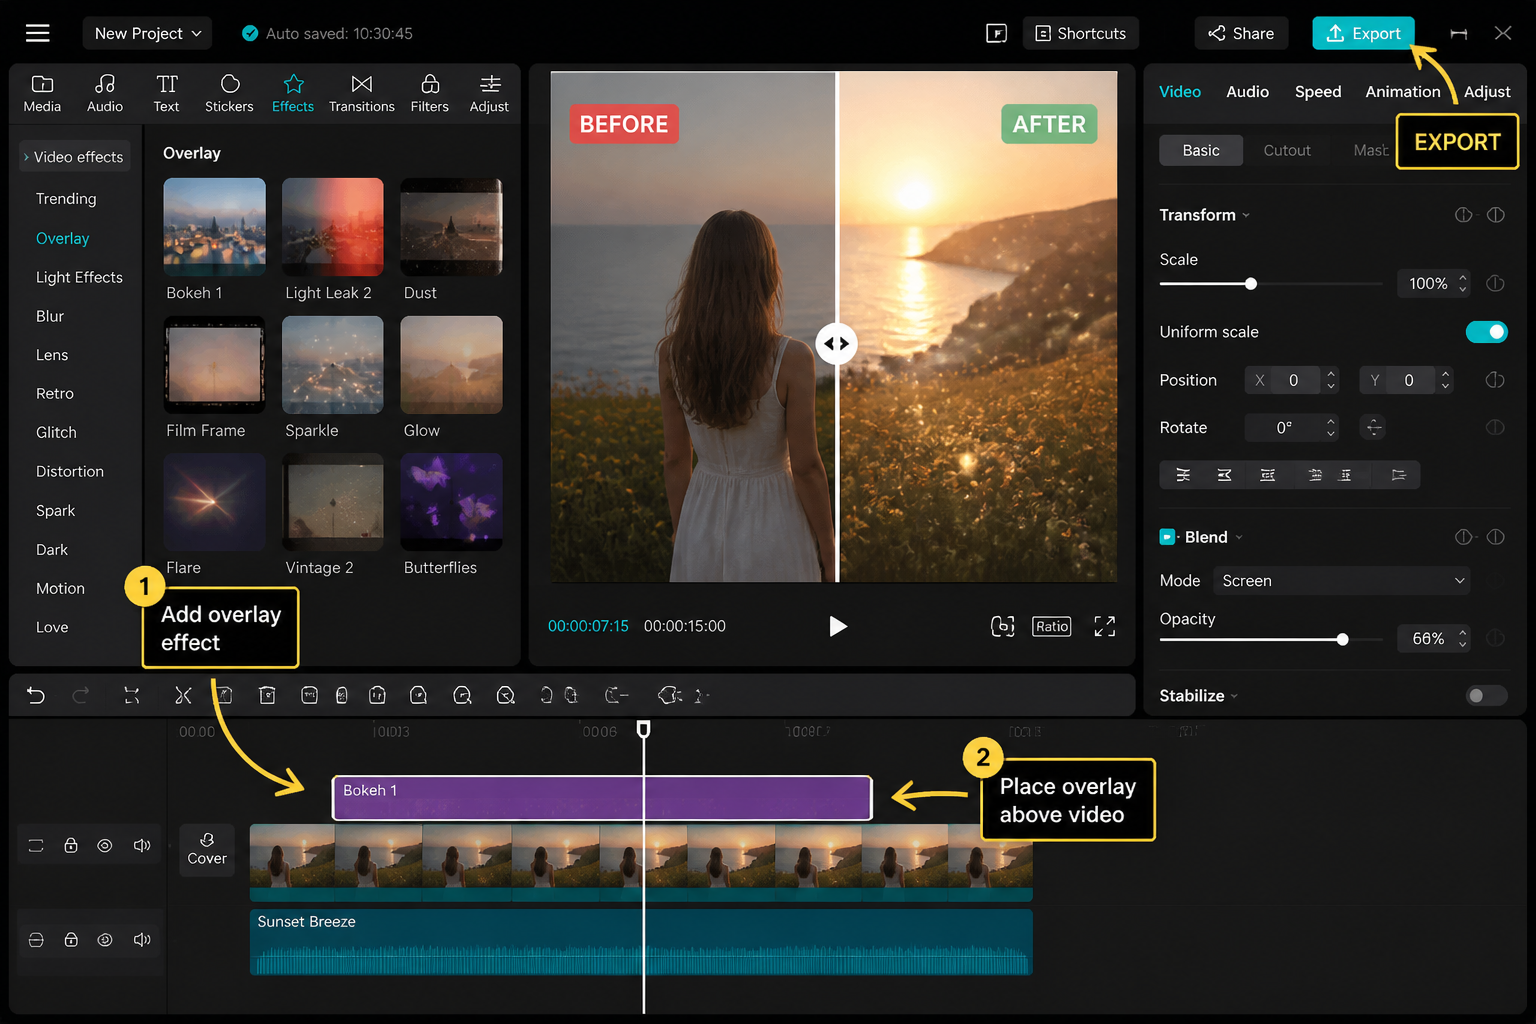
- Decide: built-in Effect preset or imported overlay clip.
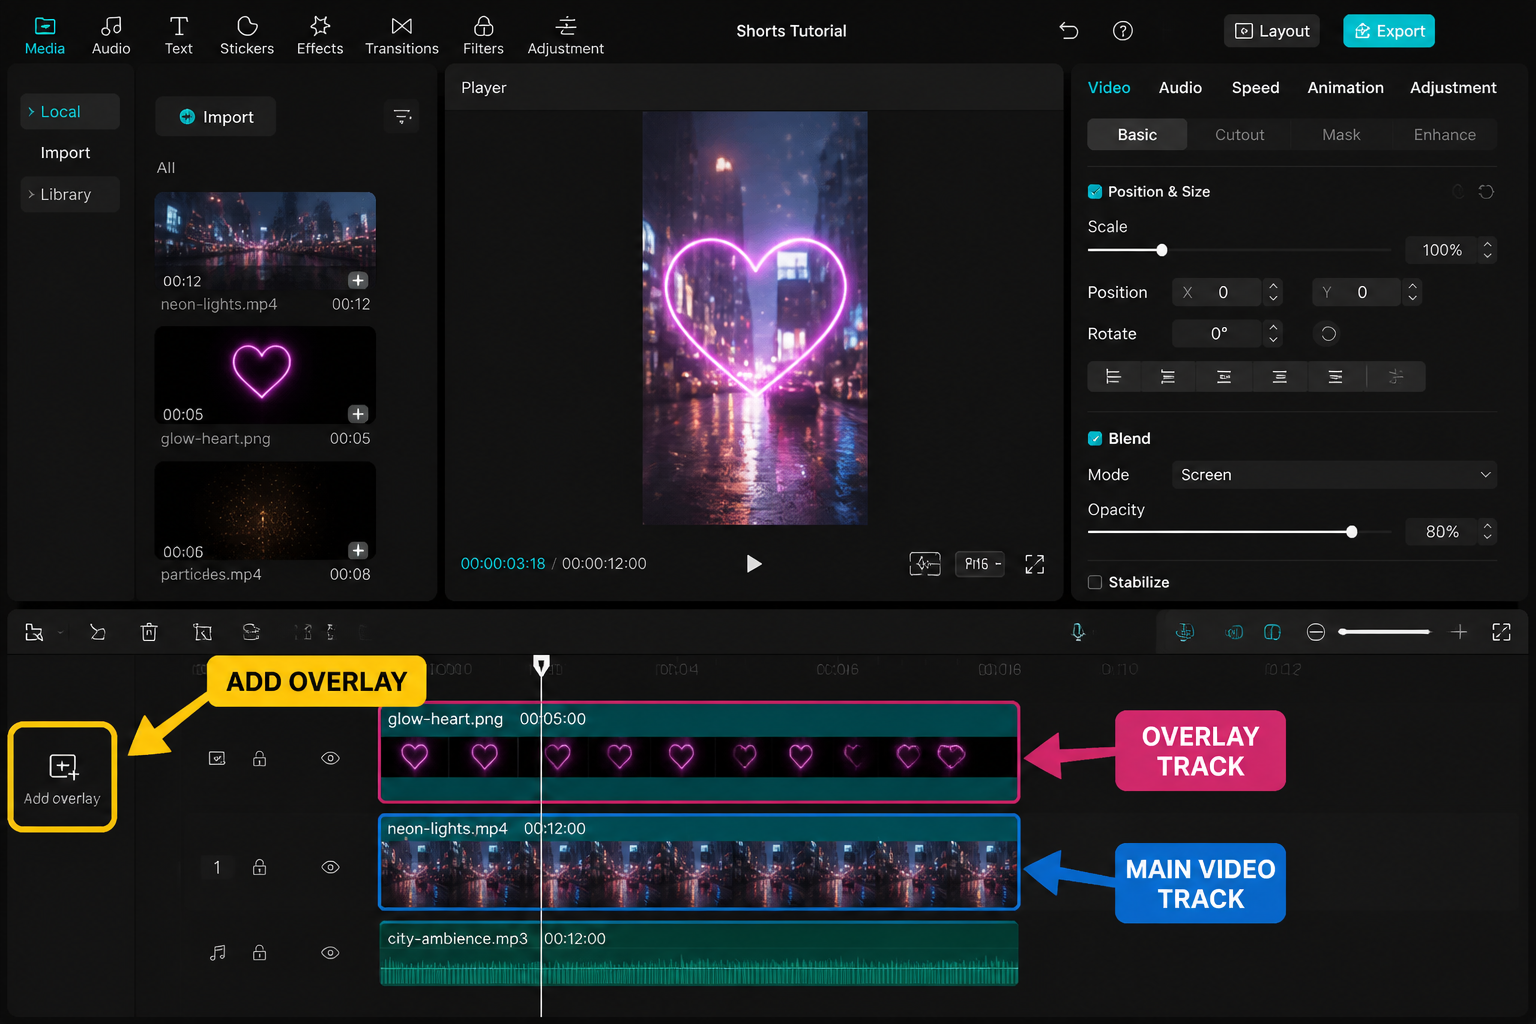
- For overlays you import, drop them on the Overlay track above your footage.
- Set the blend mode based on overlay color (Screen for bright, Multiply for dark).
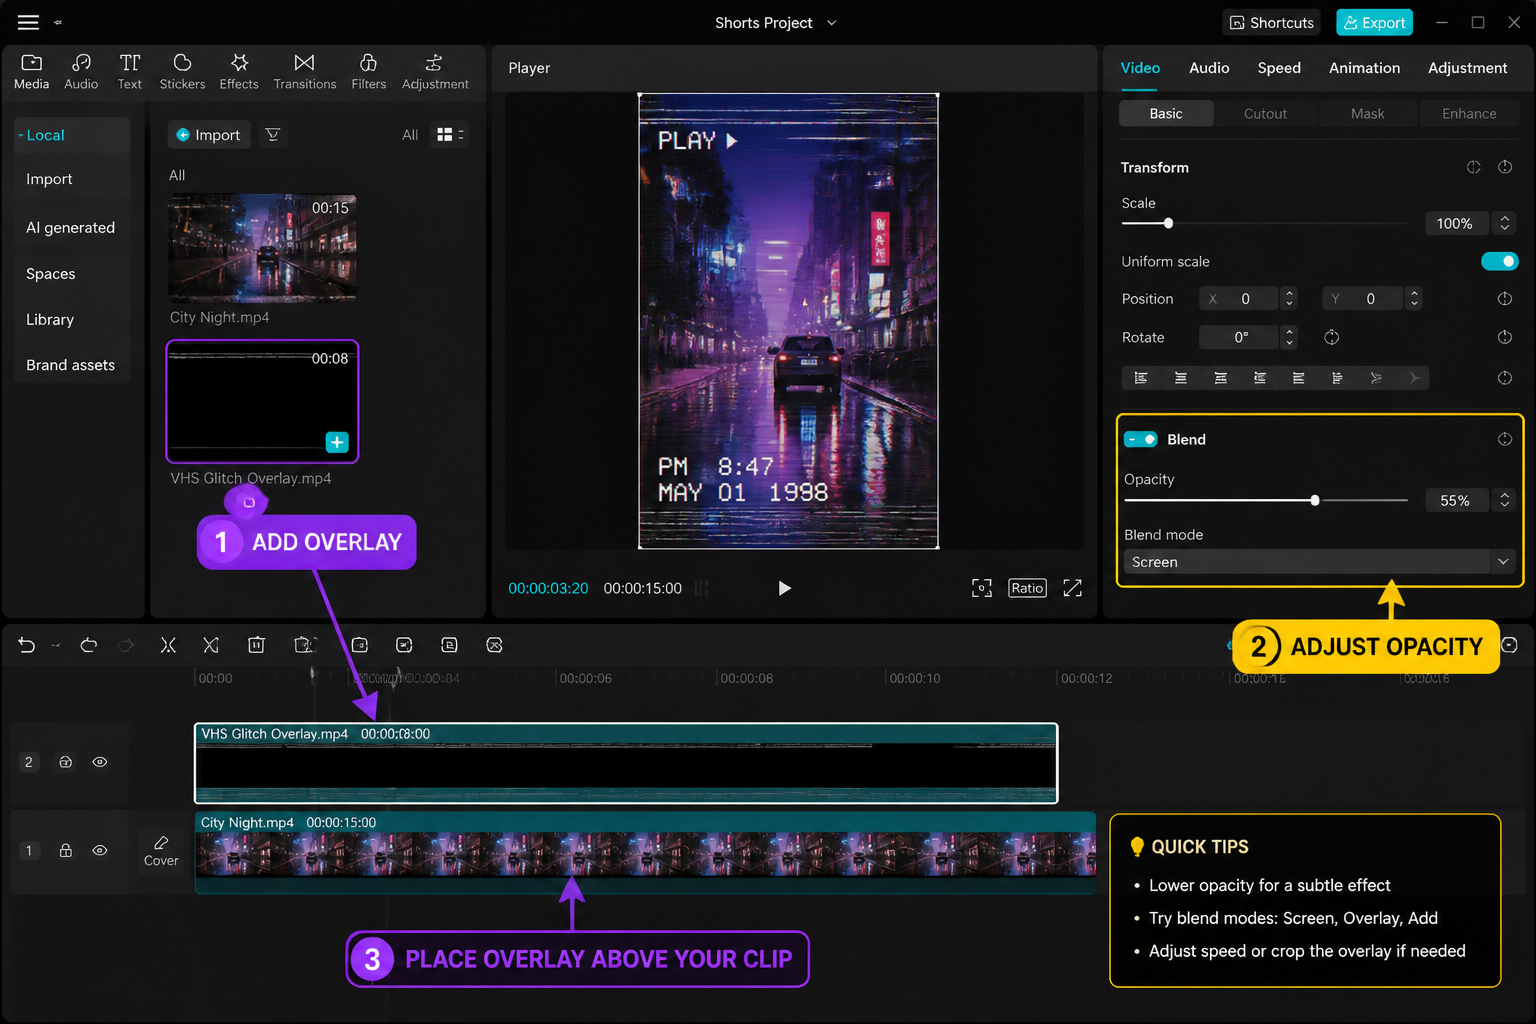
- Drop opacity to 40-70% so it sits inside the shot, not on top.
- Color-match by tweaking Hue and Temperature to your base footage.
- Stack a maximum of two overlays per moment.
- Loop short overlays by duplicating end-to-end on the track.
Built-in Effect overlays vs imported overlay clips
This is the distinction that decides how the whole edit goes. Built-in Effect overlays live under the Effects tool in the bottom bar — tap Effects, then Video Effects, and browse categories like Glitch, Retro, Lights, or Bling. These are CapCut-rendered effects that apply to the clip beneath the playhead automatically. They're fast, they always color-match because the engine handles it, and they have no blend mode controls because they don't need them.
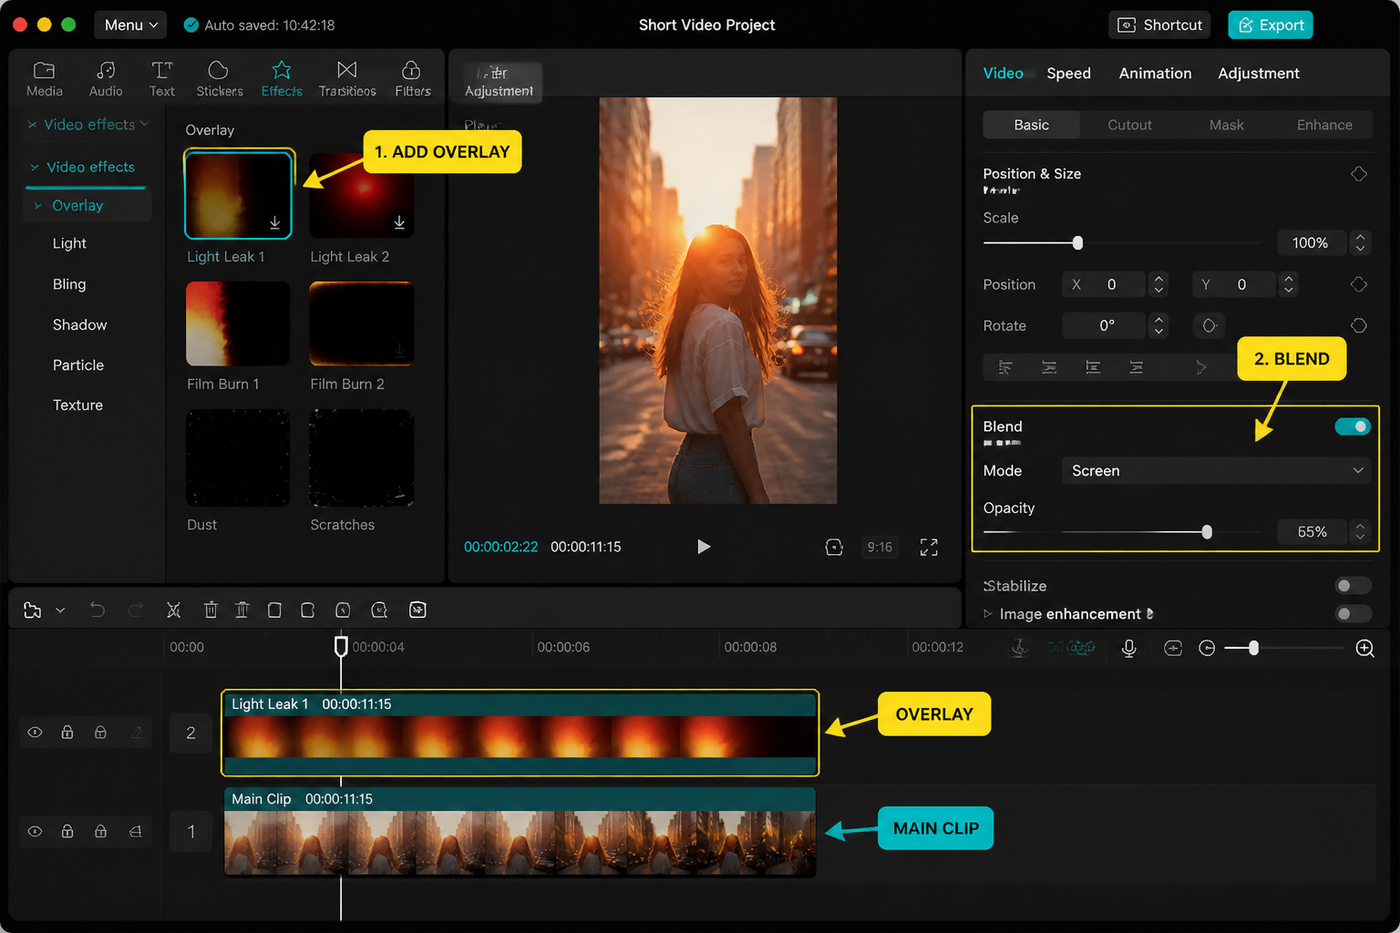
The trade-off is that built-in effects look identifiably CapCut. The "VHS" Effect preset is on roughly one in four short-form posts right now and viewers clock it instantly. Imported overlay clips are MP4 or MOV files you've downloaded from places like Mixkit, Videvo, or paid packs from Motion Array. You add them via the Overlay tool (bottom bar → Overlay → Add Overlay), which places the clip on its own track above your base footage. From there you get blend modes, opacity, scale, position, and chroma key — everything the built-in effects hide from you. For most paid creator work, imported overlays win because they look bespoke. For fast-turnaround TikToks, built-in is fine.
Blend modes that actually matter
Blend modes decide how the overlay's pixels combine with your base footage. CapCut's May 2026 build exposes around 14 modes, but four do 90% of the work for overlay effects. Here's the cheat table we keep open while editing:
| Overlay type | Blend mode | Why it works |
|---|---|---|
| Light leaks, lens flares, bokeh | Screen | Drops black pixels, keeps bright ones — leaks layer over the shot without darkening |
| RGB glitch, neon, energy bursts | Add | Brightens the base and pushes saturated channels — glitches read as light, not as a sticker |
| Soft VHS noise, dust, scratches | Lighten | Only pixels brighter than the base show through — preserves shadow detail |
| Dark grain, film burn, smoke, shadows | Multiply | Drops white pixels, keeps dark ones — grain settles into the shot like physical film |
The rule: Screen for bright overlays on any background, Multiply for dark overlays on any background. Add is more aggressive than Screen — use it when you want the overlay to actively brighten the base, not just sit on top. Lighten is the gentlest of the brighten modes; reach for it when Screen blows out the highlights too hard. To set a blend mode, select the overlay clip, scroll to Blend in the bottom toolbar, and tap through the options with the preview running so you see the change live.
Opacity ramps so overlays breathe
Flat 100% opacity on an overlay almost always looks pasted. Drop it to 40-70% and the overlay starts feeling like part of the shot. Better: keyframe the opacity so the overlay ramps in and out. Drop a keyframe at the start of the overlay clip at 0% opacity, another 8-12 frames in at 60%, hold, then ramp back to 0% over the last 8-12 frames. The diamond icon on the Opacity slider drops the keyframe at the playhead position. Our CapCut keyframes guide walks through the keyframe interface in more depth if you're new to it.
For beat-synced edits, ramp opacity to peak on the downbeat and back to 0 between beats. The overlay pulses with the track and the whole edit feels coherent rather than busy. The beat sync workflow pairs naturally with overlay opacity keyframes — generate beat markers first, then drop your keyframes on the markers.
Color match the overlay to your footage
The single most common giveaway of a stock overlay is color mismatch. A warm 35mm light leak slapped on a cool blue-hour shot looks wrong even with blend modes dialed. Select the overlay, open the Adjust tab, and start with three sliders: Temperature to push the overlay toward your base's color cast, Hue to nudge the dominant color of the overlay itself, and Saturation to dial intensity. We start with Temperature at ±15 toward the base, Hue at 0 and adjust by feel, Saturation knocked down 10-20 from default.
For dramatic mismatches — say a teal-and-orange light leak on a neutral indoor shot — Hue Shift up to ±30 will swing the leak into the right color family without killing the texture. If you're learning the broader color toolkit, our CapCut beginners guide covers the Adjust panel basics.
Stacking multiple overlays without going overboard
Two overlays per moment is the cap. Three starts looking like a 2014 YouTube intro. The cleanest stack we use repeatedly is one texture overlay (grain or VHS noise on Multiply at 30%) plus one motion overlay (light leak on Screen at 50%) — the texture gives the footage a physical feel, the motion gives it life. Drop them on separate Overlay tracks so you can keyframe each independently.
If you do stack three, make sure the third is doing something the first two aren't — usually a transition-specific overlay (RGB glitch on Add) that only appears for 6-10 frames at a cut. For cut-driven edits, pair overlay stacking with the cuts themselves; our best CapCut transitions rundown covers which cuts pair with which overlay families. And for fast-paced velocity edits, see the velocity edit guide.
Looping short overlays without seam pops
Most free overlay packs ship as 3-5 second clips. To loop them across a 15-second shot, place the first instance on the Overlay track, then long-press and Duplicate. Drag the duplicate end-to-end with the original. The seam where they meet will pop unless you do one thing: add a 4-frame opacity dip at the seam — drop opacity to 0% at the join, ramp back up over 4 frames on either side. Eye doesn't catch the dip but the seam pop disappears.
Better packs ship "smooth loops" that have been engineered to loop cleanly without the dip — Mixkit's free pack and most paid Motion Array overlay bundles flag these in the filename. If you're shopping packs, prioritize smooth-flagged content; it saves a tedious manual fix on every clip. Templates also bundle pre-looped overlay sequences — see viral CapCut templates for a teardown of how the popular ones layer overlays.
Common mistakes: overdone, wrong frame rate, wrong aspect
The three failures we see in 90% of submitted edits: overdone effects (every clip has an overlay, plus a filter, plus a color preset — the eye has nowhere to rest), frame rate mismatch (your footage is 30fps, overlay is 24fps, and the overlay strobes during motion), and aspect ratio mismatch (16:9 overlay scaled to fit 9:16 leaves visible bars or zooms past usable detail).
Fix overdone by picking one hero moment for the overlay and leaving the rest of the cut clean — overlay impact is relative; if everything's overlaid, nothing is. Fix frame rate by setting your project frame rate to match your base footage before importing overlays; CapCut conforms imported overlays to project frame rate, which works fine as long as project rate matches base footage. Fix aspect by sourcing vertical overlays for vertical edits — packs from Mixkit and Motion Array both filter by aspect ratio now. Comparing editors? Our CapCut vs InShot piece covers how each app handles overlay limits.
FAQ
What's the difference between an Effect and an Overlay in CapCut?
Effects live in the Effects panel and are CapCut-rendered presets that apply to the clip beneath the playhead — fast, automatic, no blend mode controls. Overlays live in the Overlay panel and are video files you import that sit on their own track above your base footage, with full control over blend mode, opacity, position, scale and chroma key. Use Effects for speed, Overlays for bespoke looks.
Which blend mode should I use for a light leak overlay?
Screen. Light leaks are bright pixels on a black background, and Screen drops the black entirely while keeping the leak intact. Drop opacity to 50-70% so the leak sits inside the shot rather than on top. If Screen feels too aggressive on already-bright footage, try Lighten instead — it's the gentler version of the same idea and preserves more highlight detail in your base clip.
Which blend mode works for film grain or dark VHS overlays?
Multiply. Grain, scratches, dust and film burn overlays are dark pixels on a near-white background, and Multiply drops the white while letting the dark texture settle into your shot like physical grain. Run Multiply overlays at 25-35% opacity — full strength looks like static rather than texture.
Why does my CapCut overlay look pasted on top instead of blended in?
Three causes, in order of likelihood. You're at 100% opacity — drop to 40-70%. You haven't set a blend mode — Normal leaves the overlay sitting on top with no interaction; pick Screen, Add, Lighten or Multiply based on the overlay's color. The overlay color doesn't match your footage — open the Adjust panel on the overlay clip and pull Temperature and Hue toward your base footage.
Where can I download free overlay clips for CapCut?
Mixkit and Pexels Videos both have free packs you can use commercially without attribution — search "light leaks", "film grain", "VHS overlay" or "glitch transition". Videvo has a larger free library with mixed licensing, so check each clip. For paid bespoke work, Motion Array and FilmCrux ship the cleanest packs with smooth loops and matched frame rates. Avoid generic YouTube downloads — most are watermarked or licensed for personal use only.
How many overlays is too many in one shot?
Two is the working cap — one texture overlay (grain or noise on Multiply at 30%) plus one motion overlay (leak or light on Screen at 50%) on separate tracks. Three works only if the third is doing something the first two aren't, usually a 6-10 frame transition-specific overlay at a cut point. Four or more and the shot reads as cluttered regardless of how each individual overlay is dialed.
Why does my overlay strobe during motion?
Frame rate mismatch. Your base footage is 30fps and the overlay was exported at 24fps (or vice versa), so CapCut conforms the overlay to the project frame rate and the conform process creates judder during motion. Set your project frame rate to match your base footage before importing overlays, and source overlays at that same frame rate when possible. 30fps to 30fps is the safe pairing for most short-form work.
Can I use CapCut overlay effects on commercial videos?
CapCut's built-in Effects are licensed for both personal and commercial use through CapCut's terms — the catch is the company's terms of service can change, so check the current version before shipping client work. Imported overlay clips depend on the source license: Mixkit and Pexels allow commercial use without attribution, Motion Array's commercial license comes with a paid subscription, and YouTube downloads almost never grant commercial rights. When in doubt, default to paid packs from a reputable stock site.
Final cut
Overlays earn their reputation when they're invisible — the viewer should feel the texture and depth without spotting the overlay itself. The path is the same every time: pick built-in or imported based on how bespoke the edit needs to feel, set the blend mode by overlay color, ramp opacity with keyframes, color-match to your base, cap at two stacked overlays per moment, and watch the frame rate. Get that loop locked in and the overlay panel stops being a gimmick generator and starts being the difference between a flat phone edit and something people actually save.